> ## Documentation Index
> Fetch the complete documentation index at: https://www.truefoundry.com/llms.txt
> Use this file to discover all available pages before exploring further.
# TorchServe
> Deploy a sample MNIST model using TorchServe on TrueFoundry with Docker-based configuration.
TorchServe is no longer actively maintained. We recommend using [AWS Multi-Model Server](/docs/model-deployment/deploy-model-mms) or [LitServe](/docs/model-deployment/deploy-litserve) instead.
[TorchServe](https://github.com/pytorch/serve) is a flexible and easy-to-use tool for serving and scaling PyTorch models in production with flexibility to write [custom handlers](https://github.com/pytorch/serve/blob/master/docs/custom_service.md) and [configure dynamic batching](https://github.com/pytorch/serve/blob/master/docs/batch_inference_with_ts.md).
In this example, we will deploy a simple MNIST model using MMS. You can find the code for this example [here](https://github.com/truefoundry/getting-started-examples/tree/main/deploy-model-with-torchserve).
**Live Demo**
You can view this example deployed [here](https://platform.live-demo.truefoundry.cloud/deployments/cmbltlrz6f87x01rj1z4k0o80?tab=pods).
The key files are:
* `mnist.py`: The pytorch model definition.
* `model/mnist_cnn.pt`: The trained pytorch model checkpoint.
* `mnist_handler.py`: Contains the main handler that runs the inference.
* `requirements.txt`: Contains the dependencies.
* `config.properties`: Contains the configuration for the model server.
### How to write the inference function in TorchServe
```python TorchServe Handler expandable lines theme={"dark"}
...
class MNISTDigitClassifier(ImageClassifier):
"""
MNISTDigitClassifier handler class. This handler extends class ImageClassifier from image_classifier.py, a
default handler. This handler takes an image and returns the number in that image.
Here method postprocess() has been overridden while others are reused from parent class.
"""
image_processing = transforms.Compose([transforms.ToTensor(), transforms.Normalize((0.1307,), (0.3081,))])
def __init__(self):
super(MNISTDigitClassifier, self).__init__()
self.profiler_args = {
"activities": [ProfilerActivity.CPU],
"record_shapes": True,
}
def postprocess(self, data):
"""The post process of MNIST converts the predicted output response to a label.
Args:
data (list): The predicted output from the Inference with probabilities is passed
to the post-process function
Returns:
list : A list of dictionaries with predictions and explanations is returned
"""
return data.argmax(1).tolist()
```
TorchServe requires a single function `handle` that takes in `data` and `context` as inputs and returns the inference output.
In this case we are inheriting from the [`ImageClassifier`](https://github.com/pytorch/serve/blob/62c4d6a1fdc1d071dbcf758ebd756029af20bd5e/ts/torch_handler/image_classifier.py#L14) class which is a default handler for image classification models. It already comes with the implementation for the entire pipeline. We just modify the `postprocess` method to return the predicted class.
Please see [TorchServe Custom Service docs](https://github.com/pytorch/serve/blob/master/docs/custom_service.md) for more details on how to write a custom handler.
### Exporting the model in MAR (model archive) format
TorchServe neatly packages the model definition, handler and checkpoint into a single file called `.mar` file
```shell lines theme={"dark"}
torch-model-archiver --model-name mnist --version 1.0 --model-file mnist.py --serialized-file model/mnist_cnn.pt --handler mnist_handler.py --export-path ./model_store/
```
This will give us a `mnist.mar` file.
```shell lines theme={"dark"}
model_store/
└── mnist.mar
```
### Running the server locally
1. Install the dependencies
```shell Shell lines theme={"dark"}
pip install -r requirements.txt
```
2. Package the model in MAR format
```shell Shell lines theme={"dark"}
torch-model-archiver --model-name mnist --version 1.0 --model-file mnist.py --serialized-file model/mnist_cnn.pt --handler mnist_handler.py --export-path ./model_store/
```
3. Run the server
```shell Shell lines theme={"dark"}
export MODEL_DIR="$(pwd)/model_store"
torchserve --foreground--model-store $MODEL_DIR --models all --ts-config config.properties --disable-token-auth --enable-model-api
```
3. Test the server
```shell Shell lines theme={"dark"}
curl -X POST -H "Content-Type: application/json" --data @./example.json http://0.0.0.0:8080/v2/models/mnist/infer
```
The output should look like this:
```json lines theme={"dark"}
{
"id": "d3b15cad-50a2-4eaf-80ce-8b0a428bd298",
"model_name": "mnist",
"model_version": "1.0",
"outputs": [
{
"name": "input-0",
"datatype": "INT64",
"data": [
1
],
"shape": [
1
]
}
]
}
```
### Deploying the model with TrueFoundry
To deploy the model, we need to package both the model file and the code. To do this, we can follow the steps below:
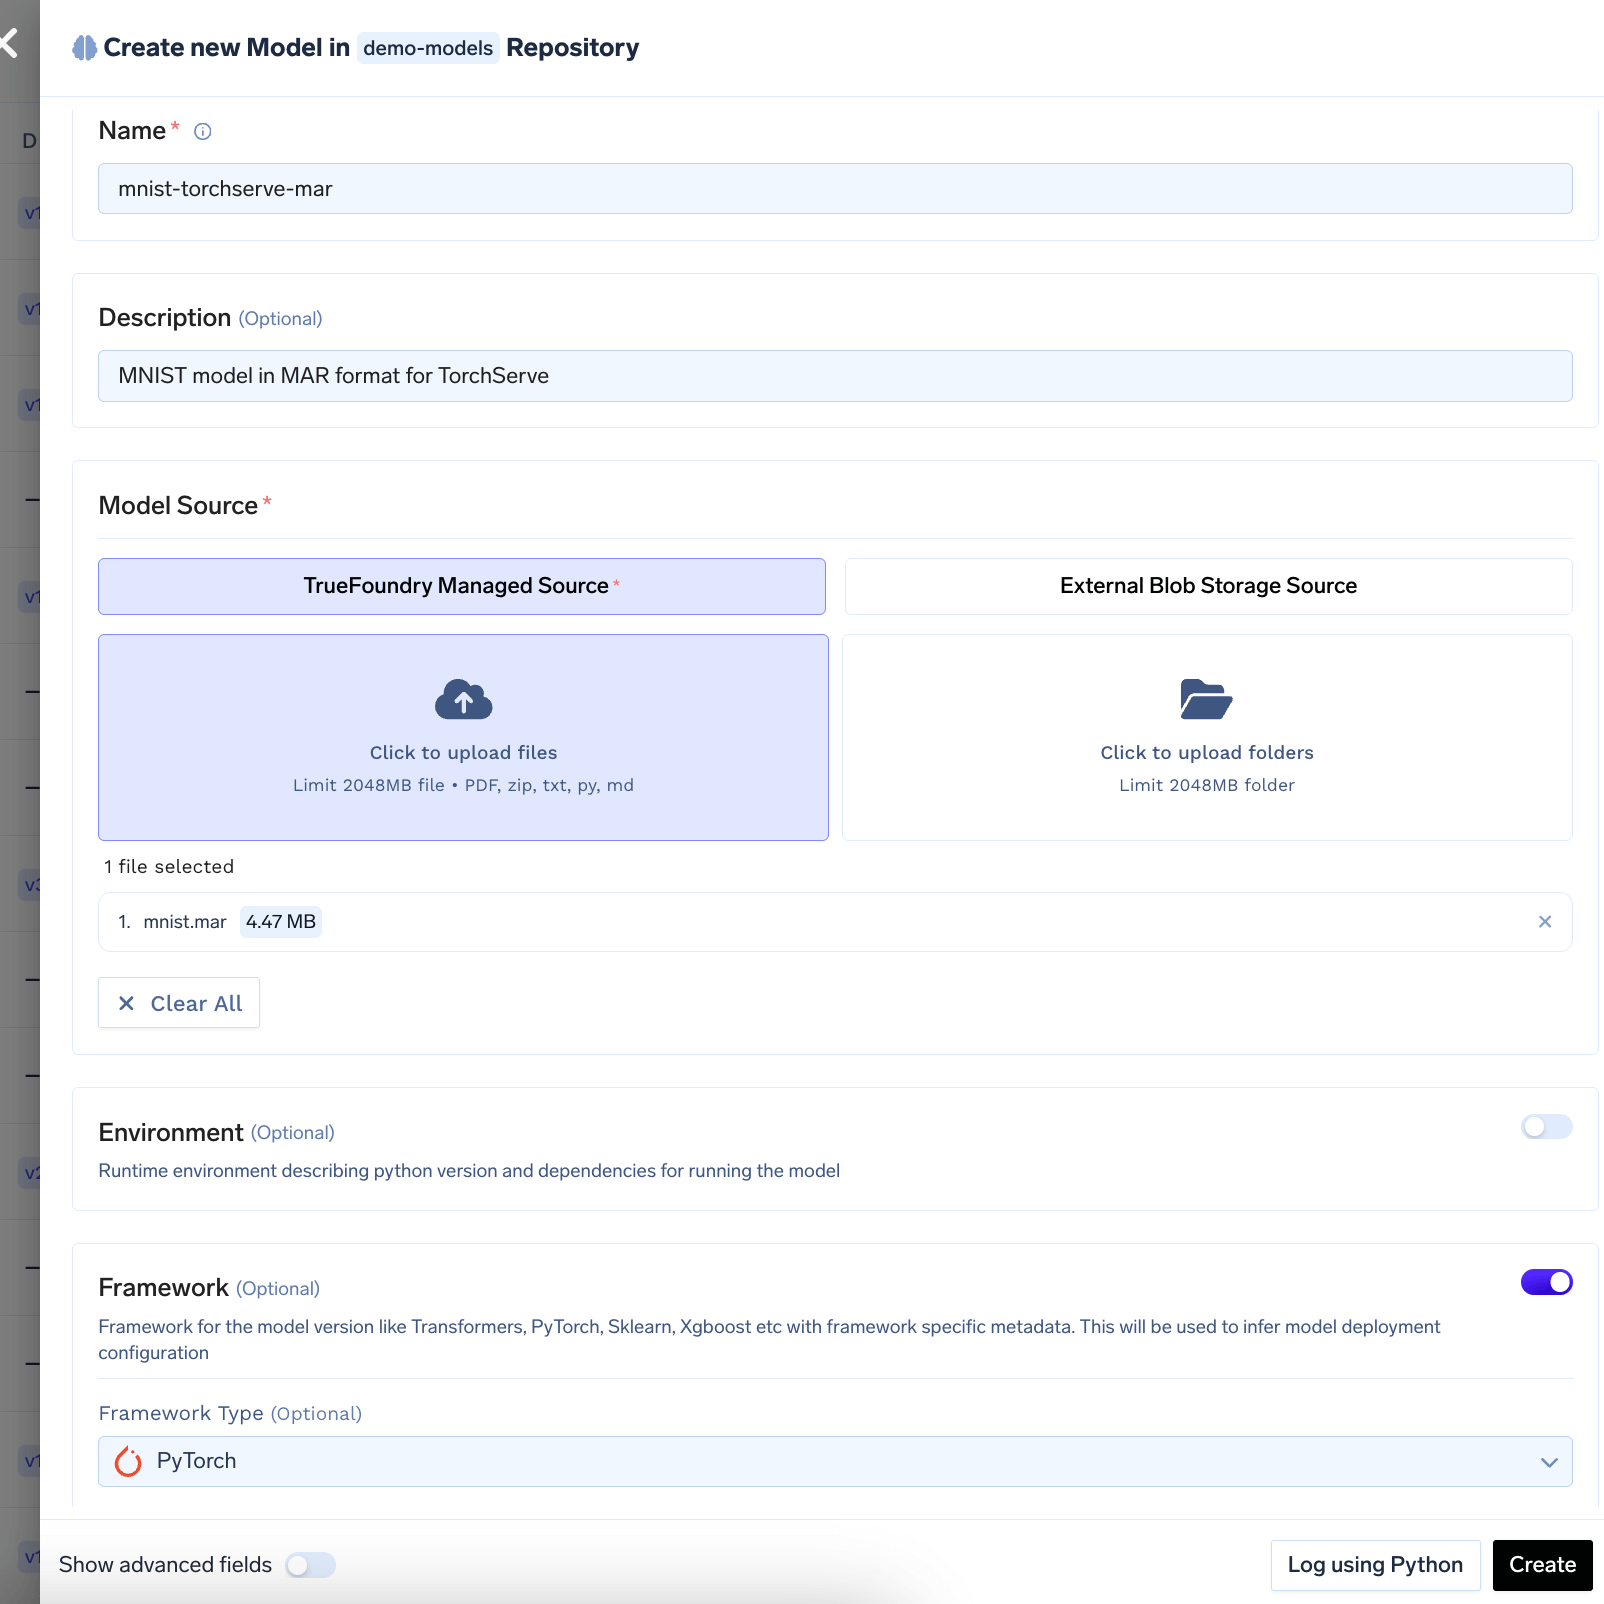
Log the `mnist.mar` file to the model registry. You can follow the guide [here](/docs/model-registry#upload-model-from-ui) to log the model to the registry.
Make sure to log only the `mnist.mar` file.
 Once you have tested your code locally, we highly recommend pushing the code a Git repository. This allows you to version control the code and also makes the deployment process much easier. However, if you don't have access to a Git repository, or the Git repositories are not integrated with Truefoundry, you can directly deploy from local laptop.
You can follow the guide [here](/docs/deploy-first-service) to deploy your code.
Configure the source code and build settings as follows:
Once you have tested your code locally, we highly recommend pushing the code a Git repository. This allows you to version control the code and also makes the deployment process much easier. However, if you don't have access to a Git repository, or the Git repositories are not integrated with Truefoundry, you can directly deploy from local laptop.
You can follow the guide [here](/docs/deploy-first-service) to deploy your code.
Configure the source code and build settings as follows:
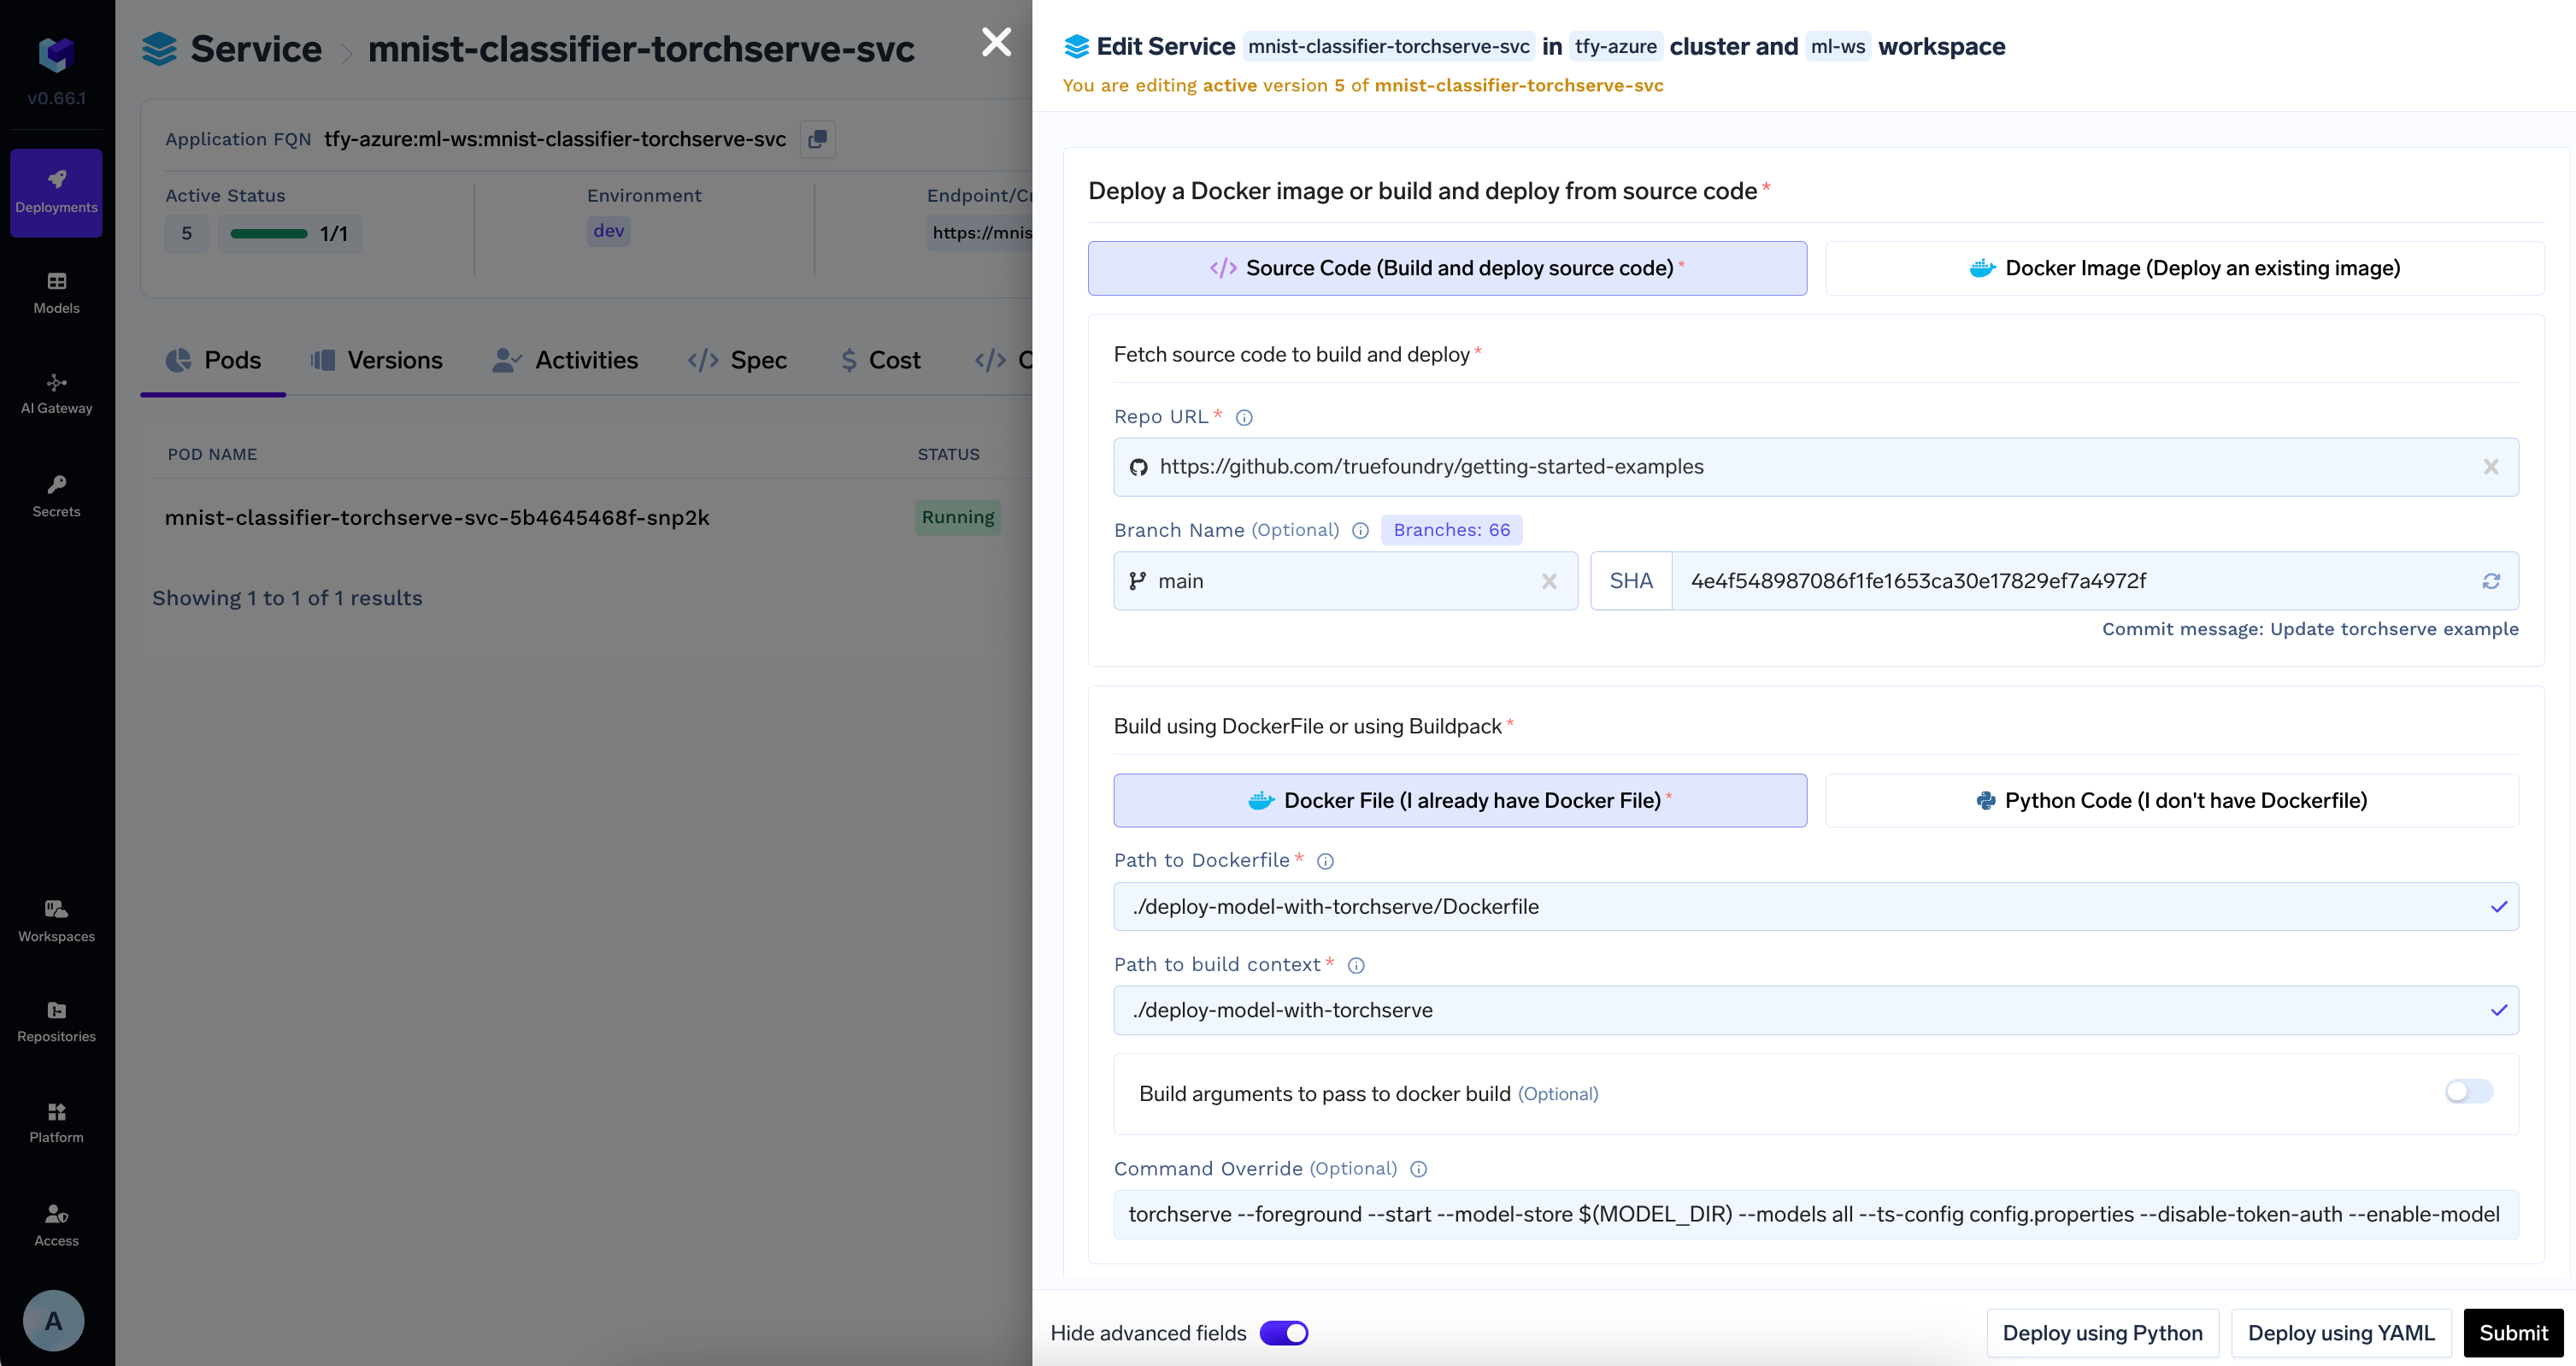 The command looks like this which references the `MODEL_DIR` environment variable where the model will be downloaded to.
```shell lines theme={"dark"}
torchserve --foreground --start --model-store $(MODEL_DIR) --models all --ts-config config.properties --disable-token-auth --enable-model-api
```
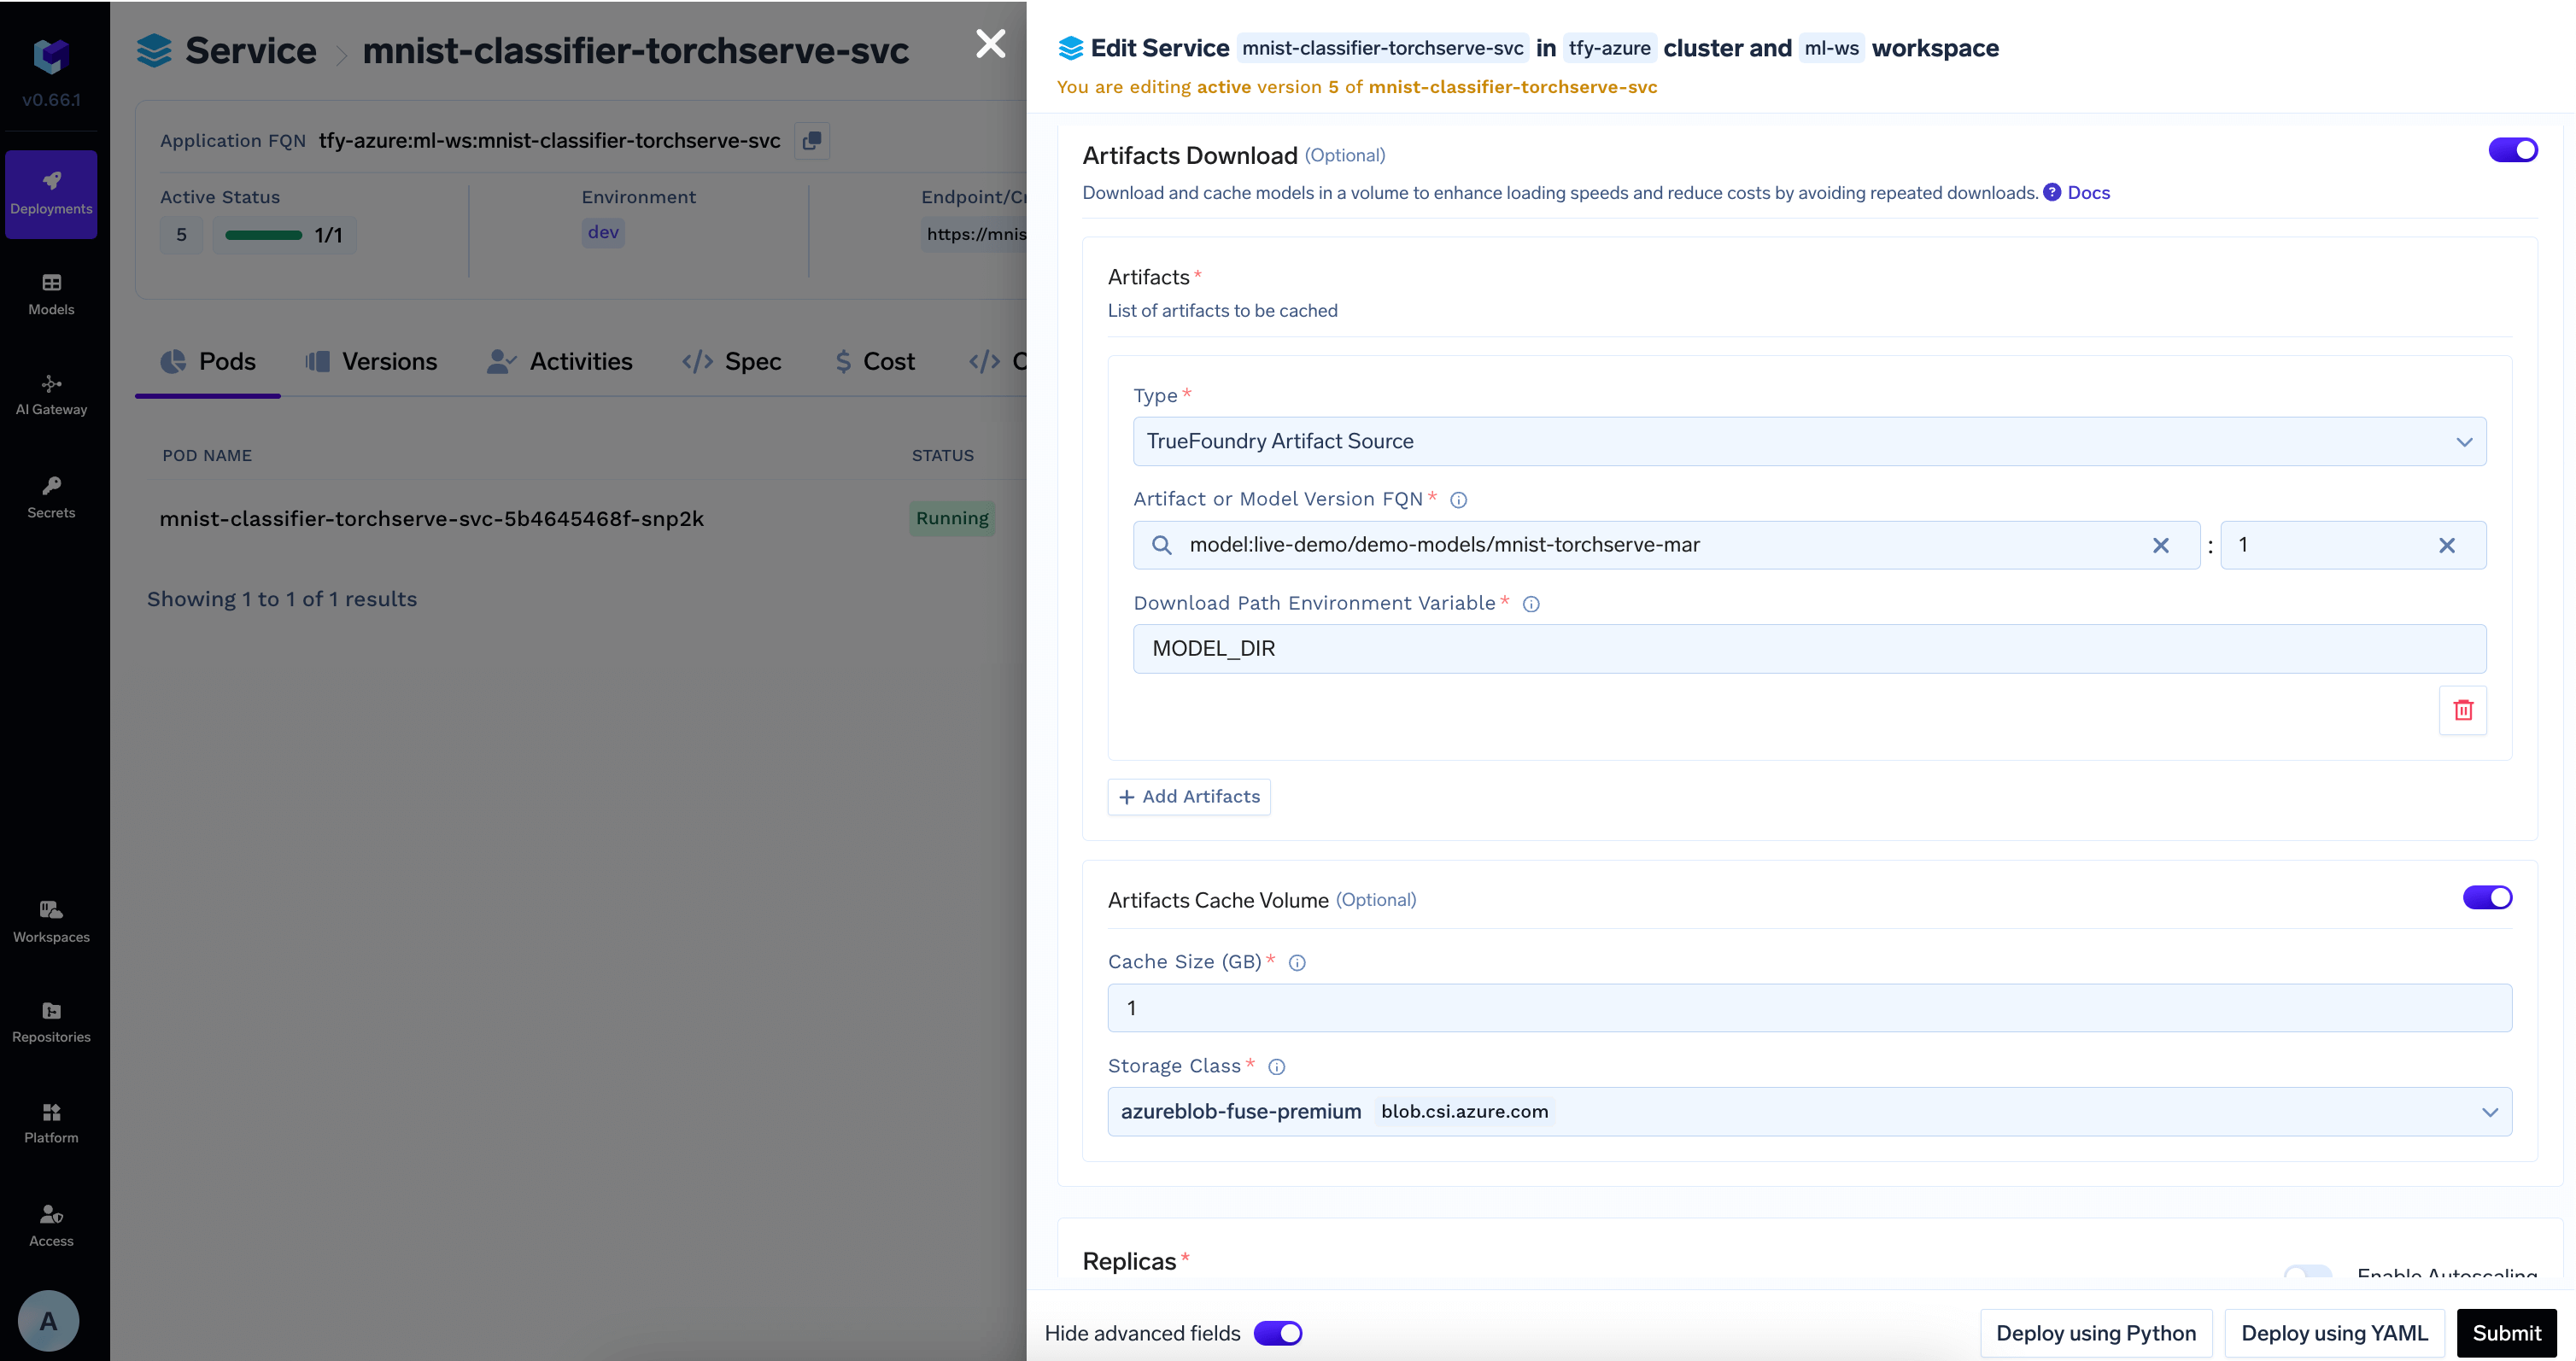
TrueFoundry can automatically download the model at the path specified in the `MODEL_DIR` environment variable to the deployed service.
Add the model id and revision from HuggingFace Hub in `Artifacts Download` section
The command looks like this which references the `MODEL_DIR` environment variable where the model will be downloaded to.
```shell lines theme={"dark"}
torchserve --foreground --start --model-store $(MODEL_DIR) --models all --ts-config config.properties --disable-token-auth --enable-model-api
```
TrueFoundry can automatically download the model at the path specified in the `MODEL_DIR` environment variable to the deployed service.
Add the model id and revision from HuggingFace Hub in `Artifacts Download` section
 Once the deployment goes through, you can view the deployment, the pods, logs, metrics and events to debug any issues.