> ## Documentation Index
> Fetch the complete documentation index at: https://www.truefoundry.com/llms.txt
> Use this file to discover all available pages before exploring further.
# AWS Multi-Model Server
> Deploying sample MNIST model with AWS Multi-Model Server
[Multi Model Server (MMS)](https://github.com/awslabs/multi-model-server) is a flexible and easy to use tool for serving deep learning models trained using any ML/DL framework with flexibility to write [custom handlers](https://github.com/awslabs/multi-model-server/blob/master/docs/custom_service.md) and [configure dynamic batching](https://github.com/awslabs/multi-model-server/blob/706aa9c755576e4d8122514358649a0edfbc8992/docs/batch_inference_with_mms.md#L4).
In this example, we will deploy a simple MNIST model using MMS. You can find the code for this example [here](https://github.com/truefoundry/getting-started-examples/tree/main/deploy-model-with-mms).
**Live Demo**
You can view this example deployed [here](https://platform.live-demo.truefoundry.cloud/deployments/cmbltjhe4f86601rjhn39b09e?tab=pods).
The key files are:
* `model/mnist.py`: The pytorch model definition.
* `model/mnist_cnn.pt`: The trained pytorch model checkpoint.
* `model/mnist_handler.py`: Contains the main handler that runs the inference.
* `requirements.txt`: Contains the dependencies.
* `config.properties`: Contains the configuration for the model server.
### How to write the inference function in MMS
```python MMS Handler expandable lines theme={"dark"}
...
class PyTorchImageClassifier:
"""
PyTorchImageClassifier service class. This service takes a flower
image and returns the name of that flower.
"""
def __init__(self):
self.checkpoint_file_path = None
self.model = None
self.mapping = None
self.device = "cpu"
self.initialized = False
def initialize(self, context):
"""
Load the model and mapping file to perform infernece.
"""
properties = context.system_properties
model_dir = properties.get("model_dir")
# Read checkpoint file
checkpoint_file_path = os.path.join(model_dir, "mnist_cnn.pt")
if not os.path.isfile(checkpoint_file_path):
raise RuntimeError("Missing model.pth file.")
model = Net()
state_dict = torch.load(checkpoint_file_path, map_location="cpu")
model.load_state_dict(state_dict)
for param in model.parameters():
param.requires_grad = False
self.model = model
# Read the mapping file, index to flower
mapping_file_path = os.path.join(model_dir, "index_to_name.json")
if not os.path.isfile(mapping_file_path):
raise RuntimeError("Missing the mapping file")
with open(mapping_file_path) as f:
self.mapping = json.load(f)
self.initialized = True
def preprocess(self, data):
"""
Scales, crops, and normalizes a PIL image for a PyTorch model,
returns an Numpy array
"""
image = data[0].get("data")
if image is None:
image = data[0].get("body")
my_preprocess = transforms.Compose([transforms.ToTensor(), transforms.Normalize((0.1307,), (0.3081,))])
image = Image.open(io.BytesIO(image))
image = my_preprocess(image)
return image
def inference(self, img, topk=10):
"""Predict the class (or classes) of an image using a trained deep learning model."""
# Convert 2D image to 1D vector
img = np.expand_dims(img, 0)
img = torch.from_numpy(img)
self.model.eval()
inputs = Variable(img).to(self.device)
logits = self.model.forward(inputs)
ps = F.softmax(logits, dim=1)
topk = ps.cpu().topk(topk)
probs, classes = (e.data.numpy().squeeze().tolist() for e in topk)
results = []
for i in range(len(probs)):
tmp = dict()
tmp[self.mapping[str(classes[i])]] = probs[i]
results.append(tmp)
return [results]
def postprocess(self, inference_output):
return inference_output
# Following code is not necessary if your service class contains `handle(self, data, context)` function
_service = PyTorchImageClassifier()
def handle(data, context):
if not _service.initialized:
_service.initialize(context)
if data is None:
return None
data = _service.preprocess(data)
data = _service.inference(data)
data = _service.postprocess(data)
return data
```
MMS requires a single function `handle` that takes in `data` and `context` as inputs and returns the inference output.
The function in our code orchestrates the other 4 functions:
* `initialize`: Loads the model and any other resources needed for inference.
* `preprocess`: Preprocesses the input data.
* `inference`: Runs the inference.
* `postprocess`: Postprocesses the output data.
Please see [MMS Custom Service docs](https://github.com/awslabs/multi-model-server/blob/master/docs/custom_service.md) for more details.
### Exporting the model in MAR (model archive) format
MMS neatly packages the model definition, handler and checkpoint into a single file called `.mar` file
```shell lines theme={"dark"}
model-archiver --model-name mnist --model-path model/ --handler mnist_handler.py:handle --export-path model_store/ --runtime python --force
```
This will give us a `mnist.mar` file.
```shell lines theme={"dark"}
model_store/
└── mnist.mar
```
### Running the server locally
1. Install the dependencies
```shell Shell lines theme={"dark"}
pip install -r requirements.txt
```
2. Package the model in MAR format
```shell Shell lines theme={"dark"}
model-archiver --model-name mnist --model-path model/ --handler mnist_handler.py:handle --export-path model_store/ --runtime python --force
```
3. Run the server
```shell Shell lines theme={"dark"}
export MODEL_DIR="$(pwd)/model_store"
multi-model-server --foreground --model-store $MODEL_DIR --start --mms-config config.properties
```
3. Test the server
```shell Shell lines theme={"dark"}
curl -X POST -H "Content-Type: application/json" http://0.0.0.0:8080/predictions/mnist -T 0.png
```
The output should look like this:
```json lines theme={"dark"}
[
{
"0": 1.0
},
{
"2": 1.2512639535611214e-10
},
{
"9": 2.1287303517136813e-11
},
{
"6": 6.419928824663579e-12
},
{
"7": 5.592026407902351e-12
},
{
"8": 9.722452877503063e-13
},
{
"1": 4.075868061028526e-13
},
{
"5": 1.0949020959631281e-13
},
{
"3": 7.591976635031028e-15
},
{
"4": 2.665370010069895e-15
}
]
```
### Deploying the model with TrueFoundry
To deploy the model, we need to package both the model file and the code. To do this, we can follow the steps below:
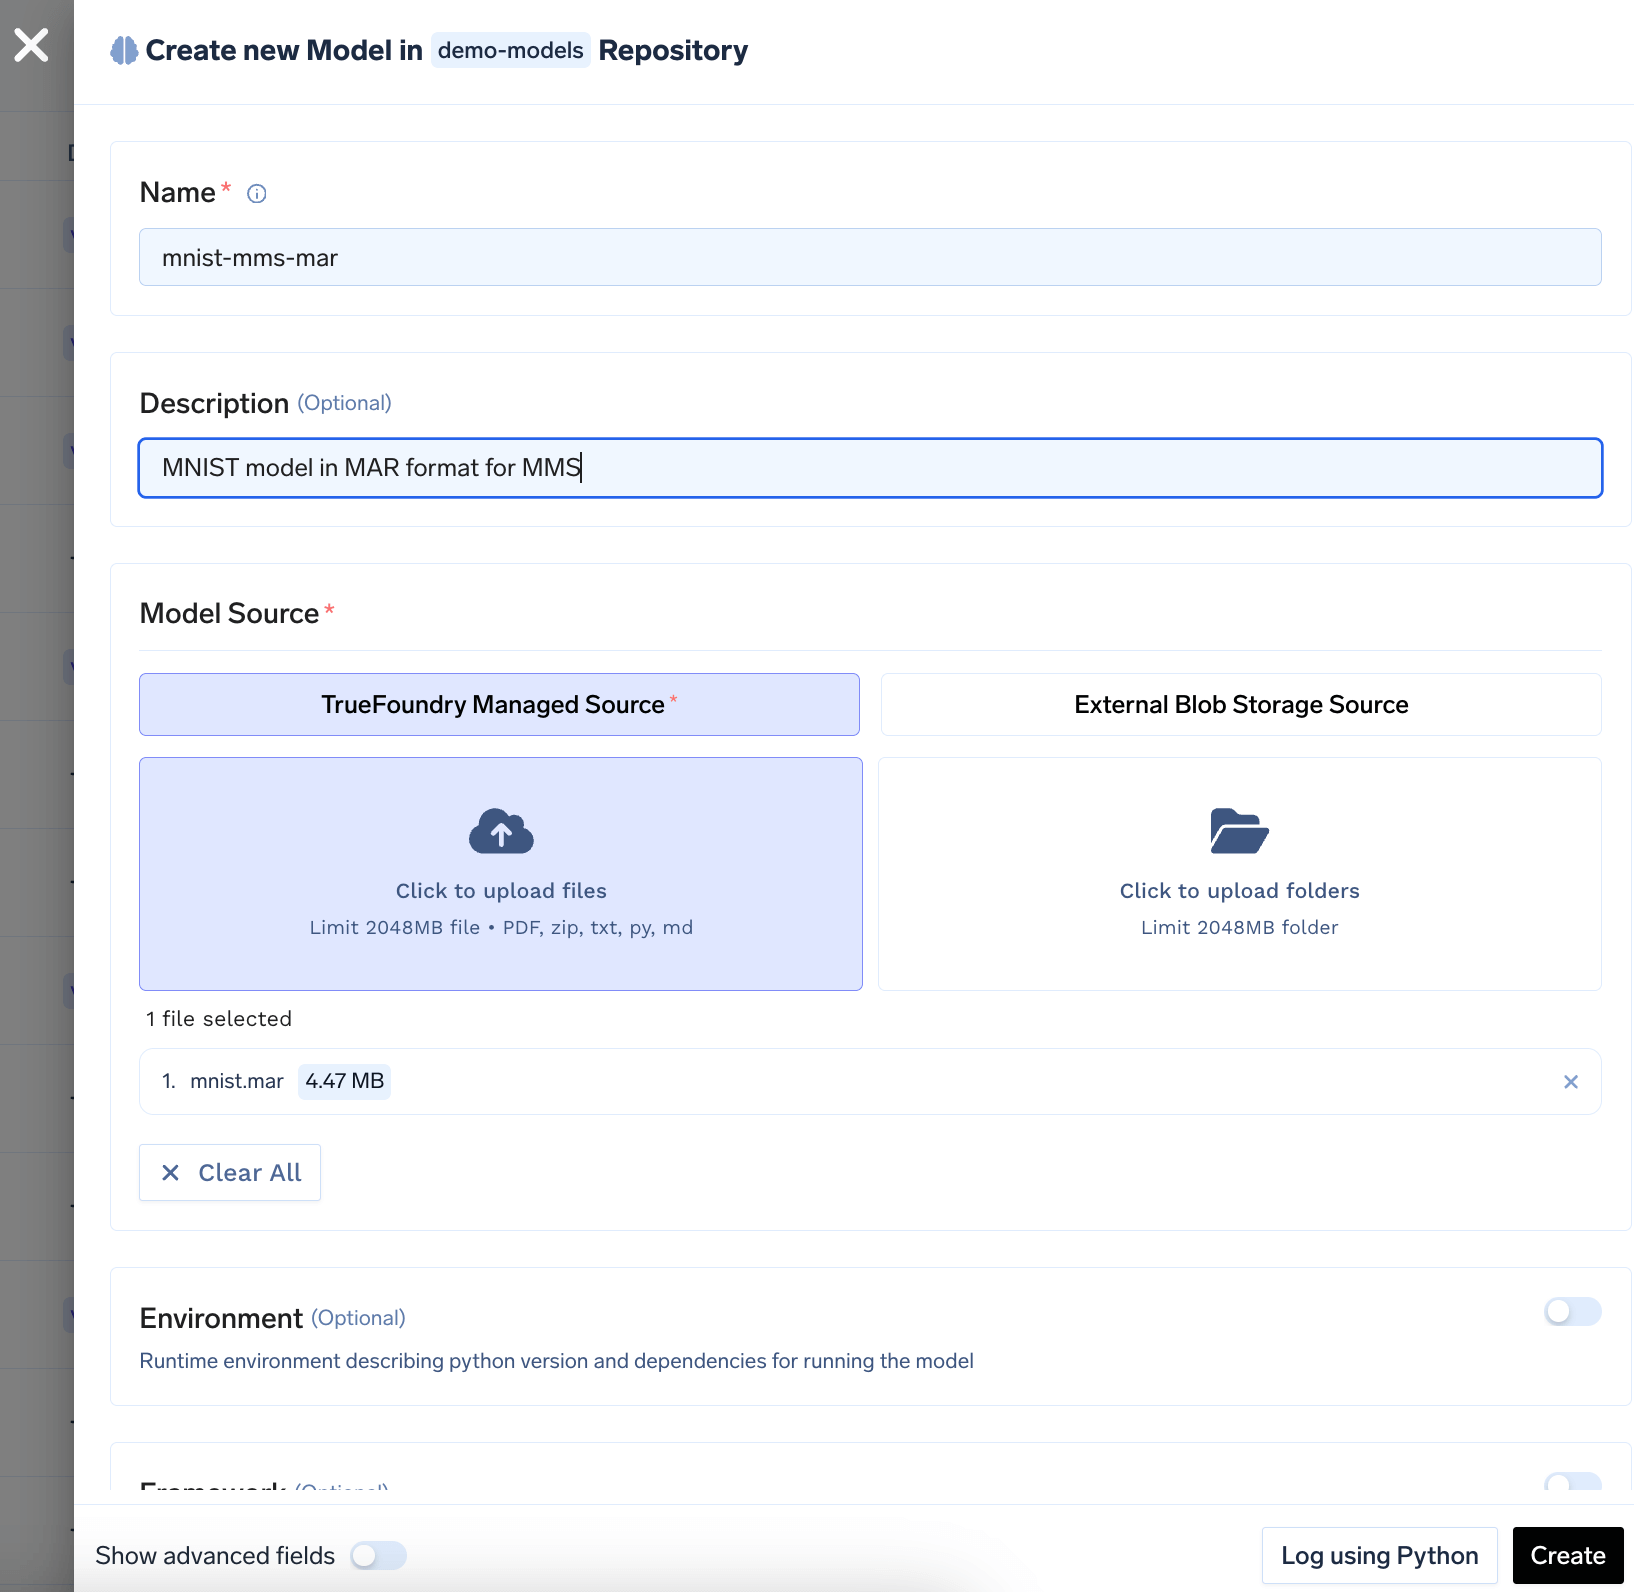
Log the `mnist.mar` file to the model registry. You can follow the guide [here](/docs/model-registry#upload-model-from-ui) to log the model to the registry.
Make sure to log only the `mnist.mar` file.
 Once you have tested your code locally, we highly recommend pushing the code a Git repository. This allows you to version control the code and also makes the deployment process much easier. However, if you don't have access to a Git repository, or the Git repositories are not integrated with Truefoundry, you can directly deploy from local laptop.
You can follow the guide [here](/docs/deploy-first-service) to deploy your code.
Configure the source code and build settings as follows:
Once you have tested your code locally, we highly recommend pushing the code a Git repository. This allows you to version control the code and also makes the deployment process much easier. However, if you don't have access to a Git repository, or the Git repositories are not integrated with Truefoundry, you can directly deploy from local laptop.
You can follow the guide [here](/docs/deploy-first-service) to deploy your code.
Configure the source code and build settings as follows:
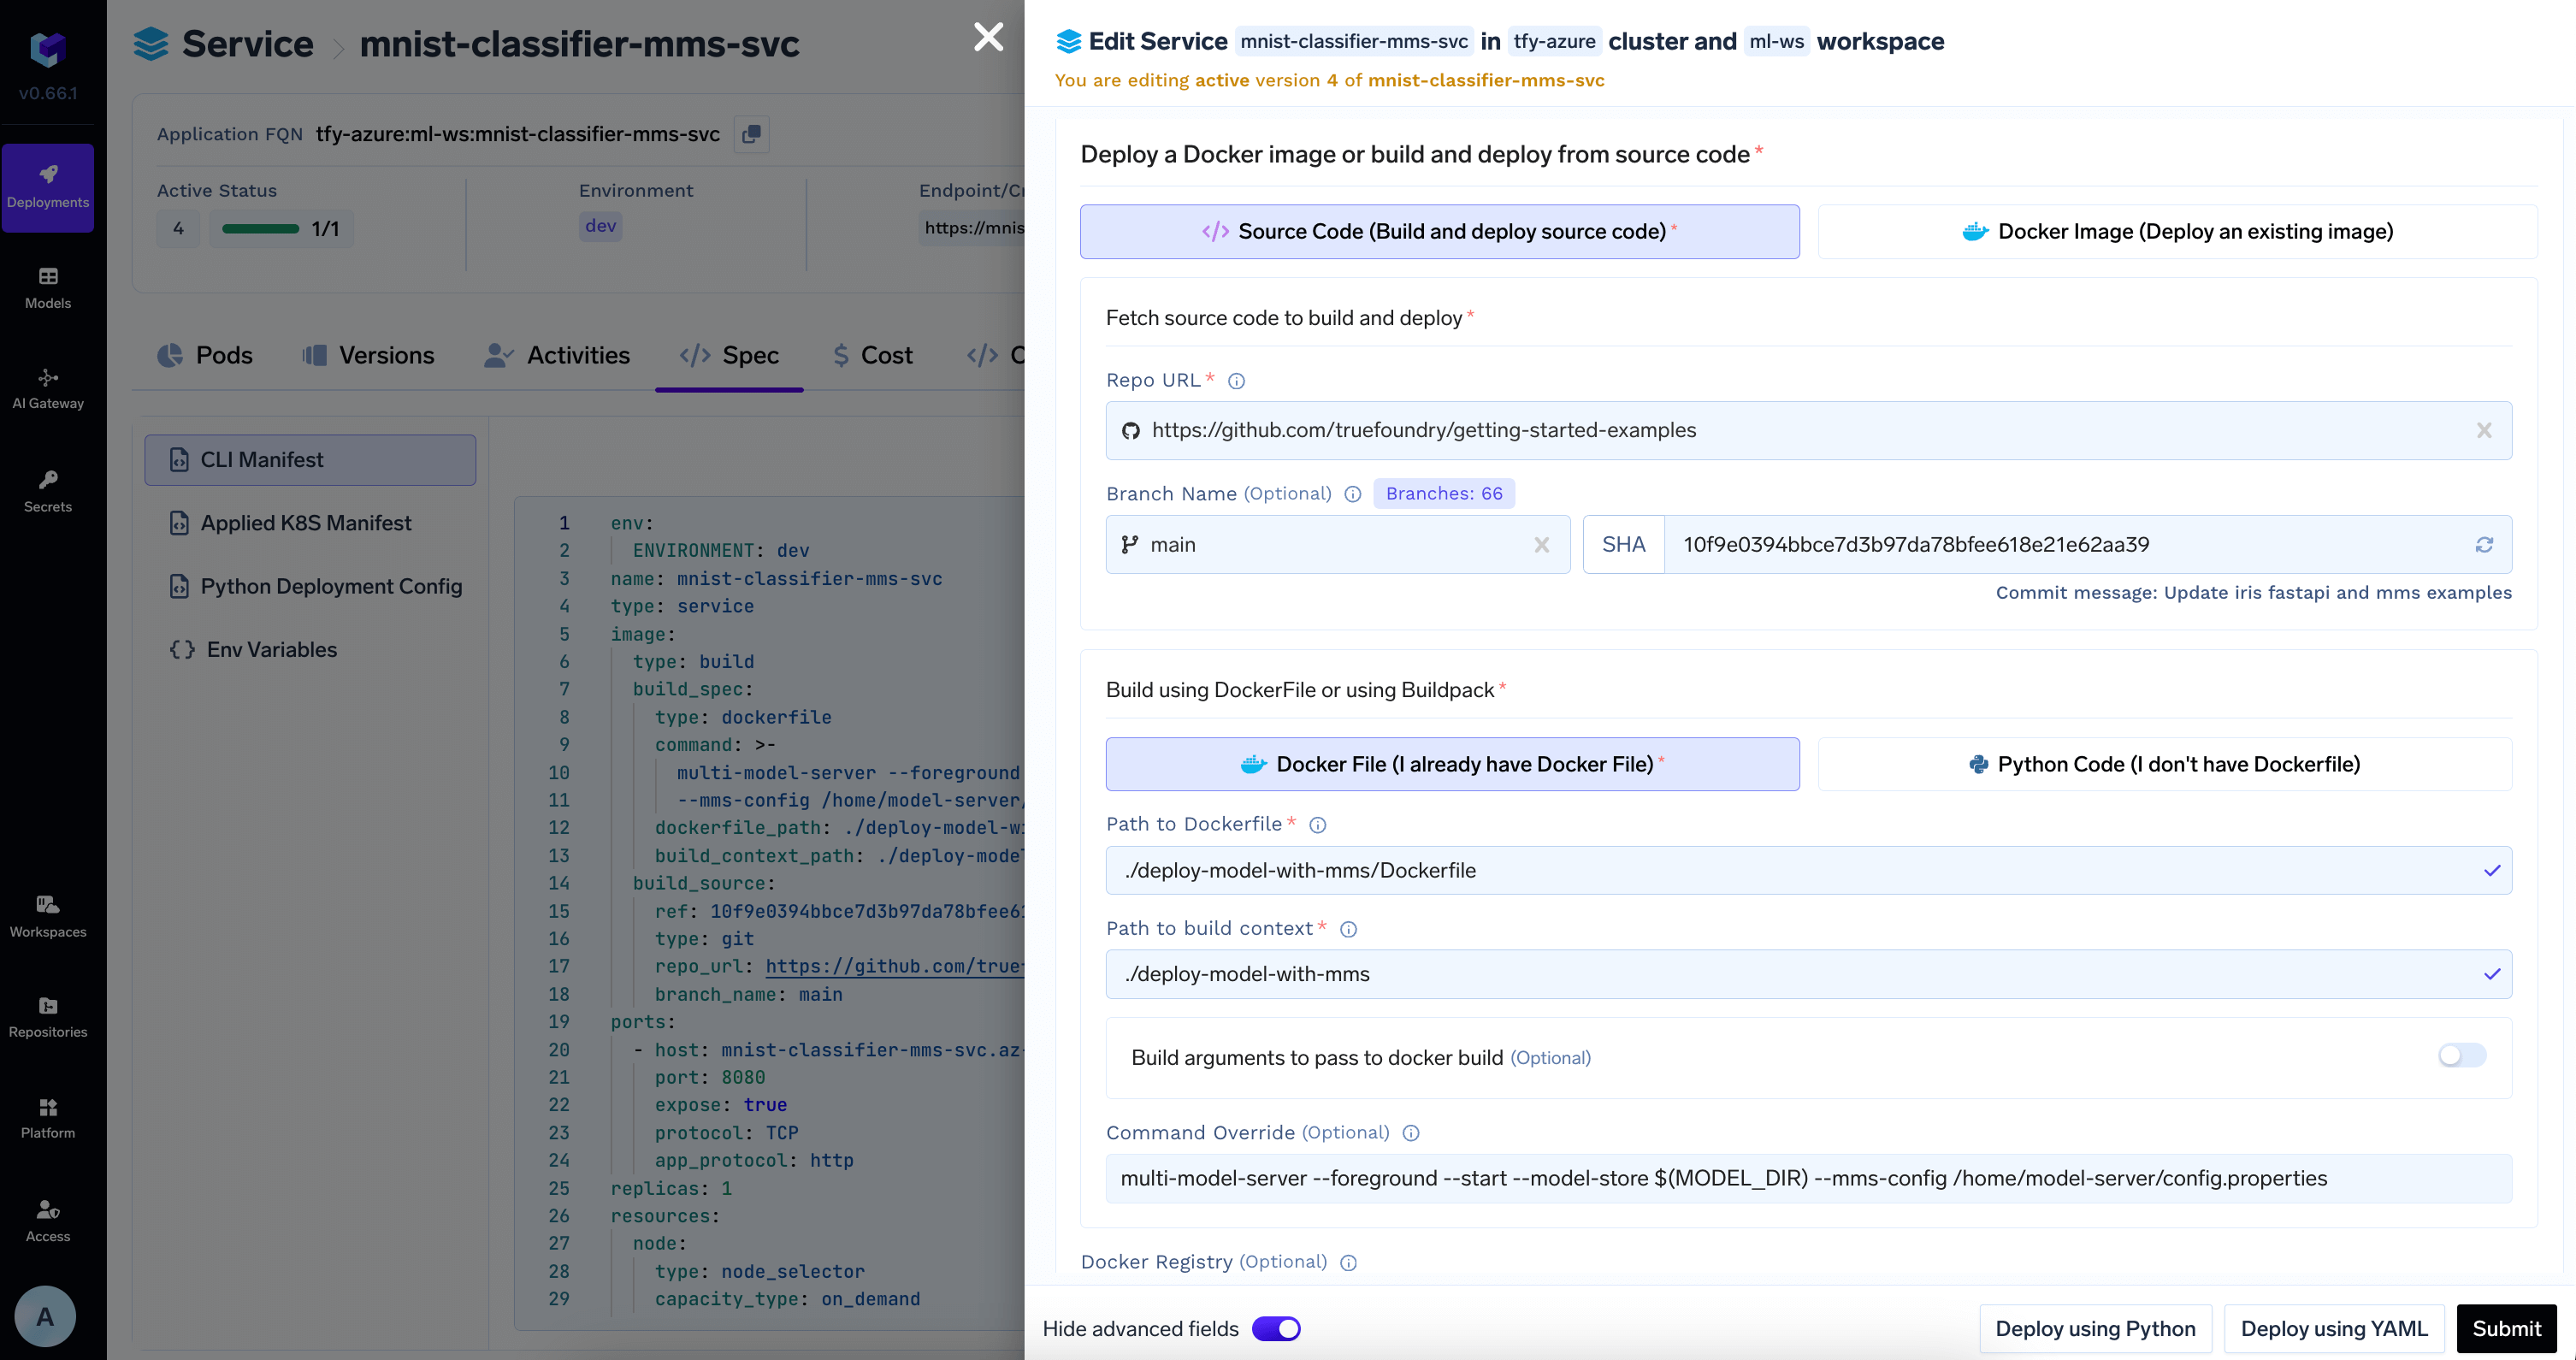 The command looks like this which references the `MODEL_DIR` environment variable where the model will be downloaded to.
```shell lines theme={"dark"}
multi-model-server --foreground --start --model-store $(MODEL_DIR) --mms-config /home/model-server/config.properties
```
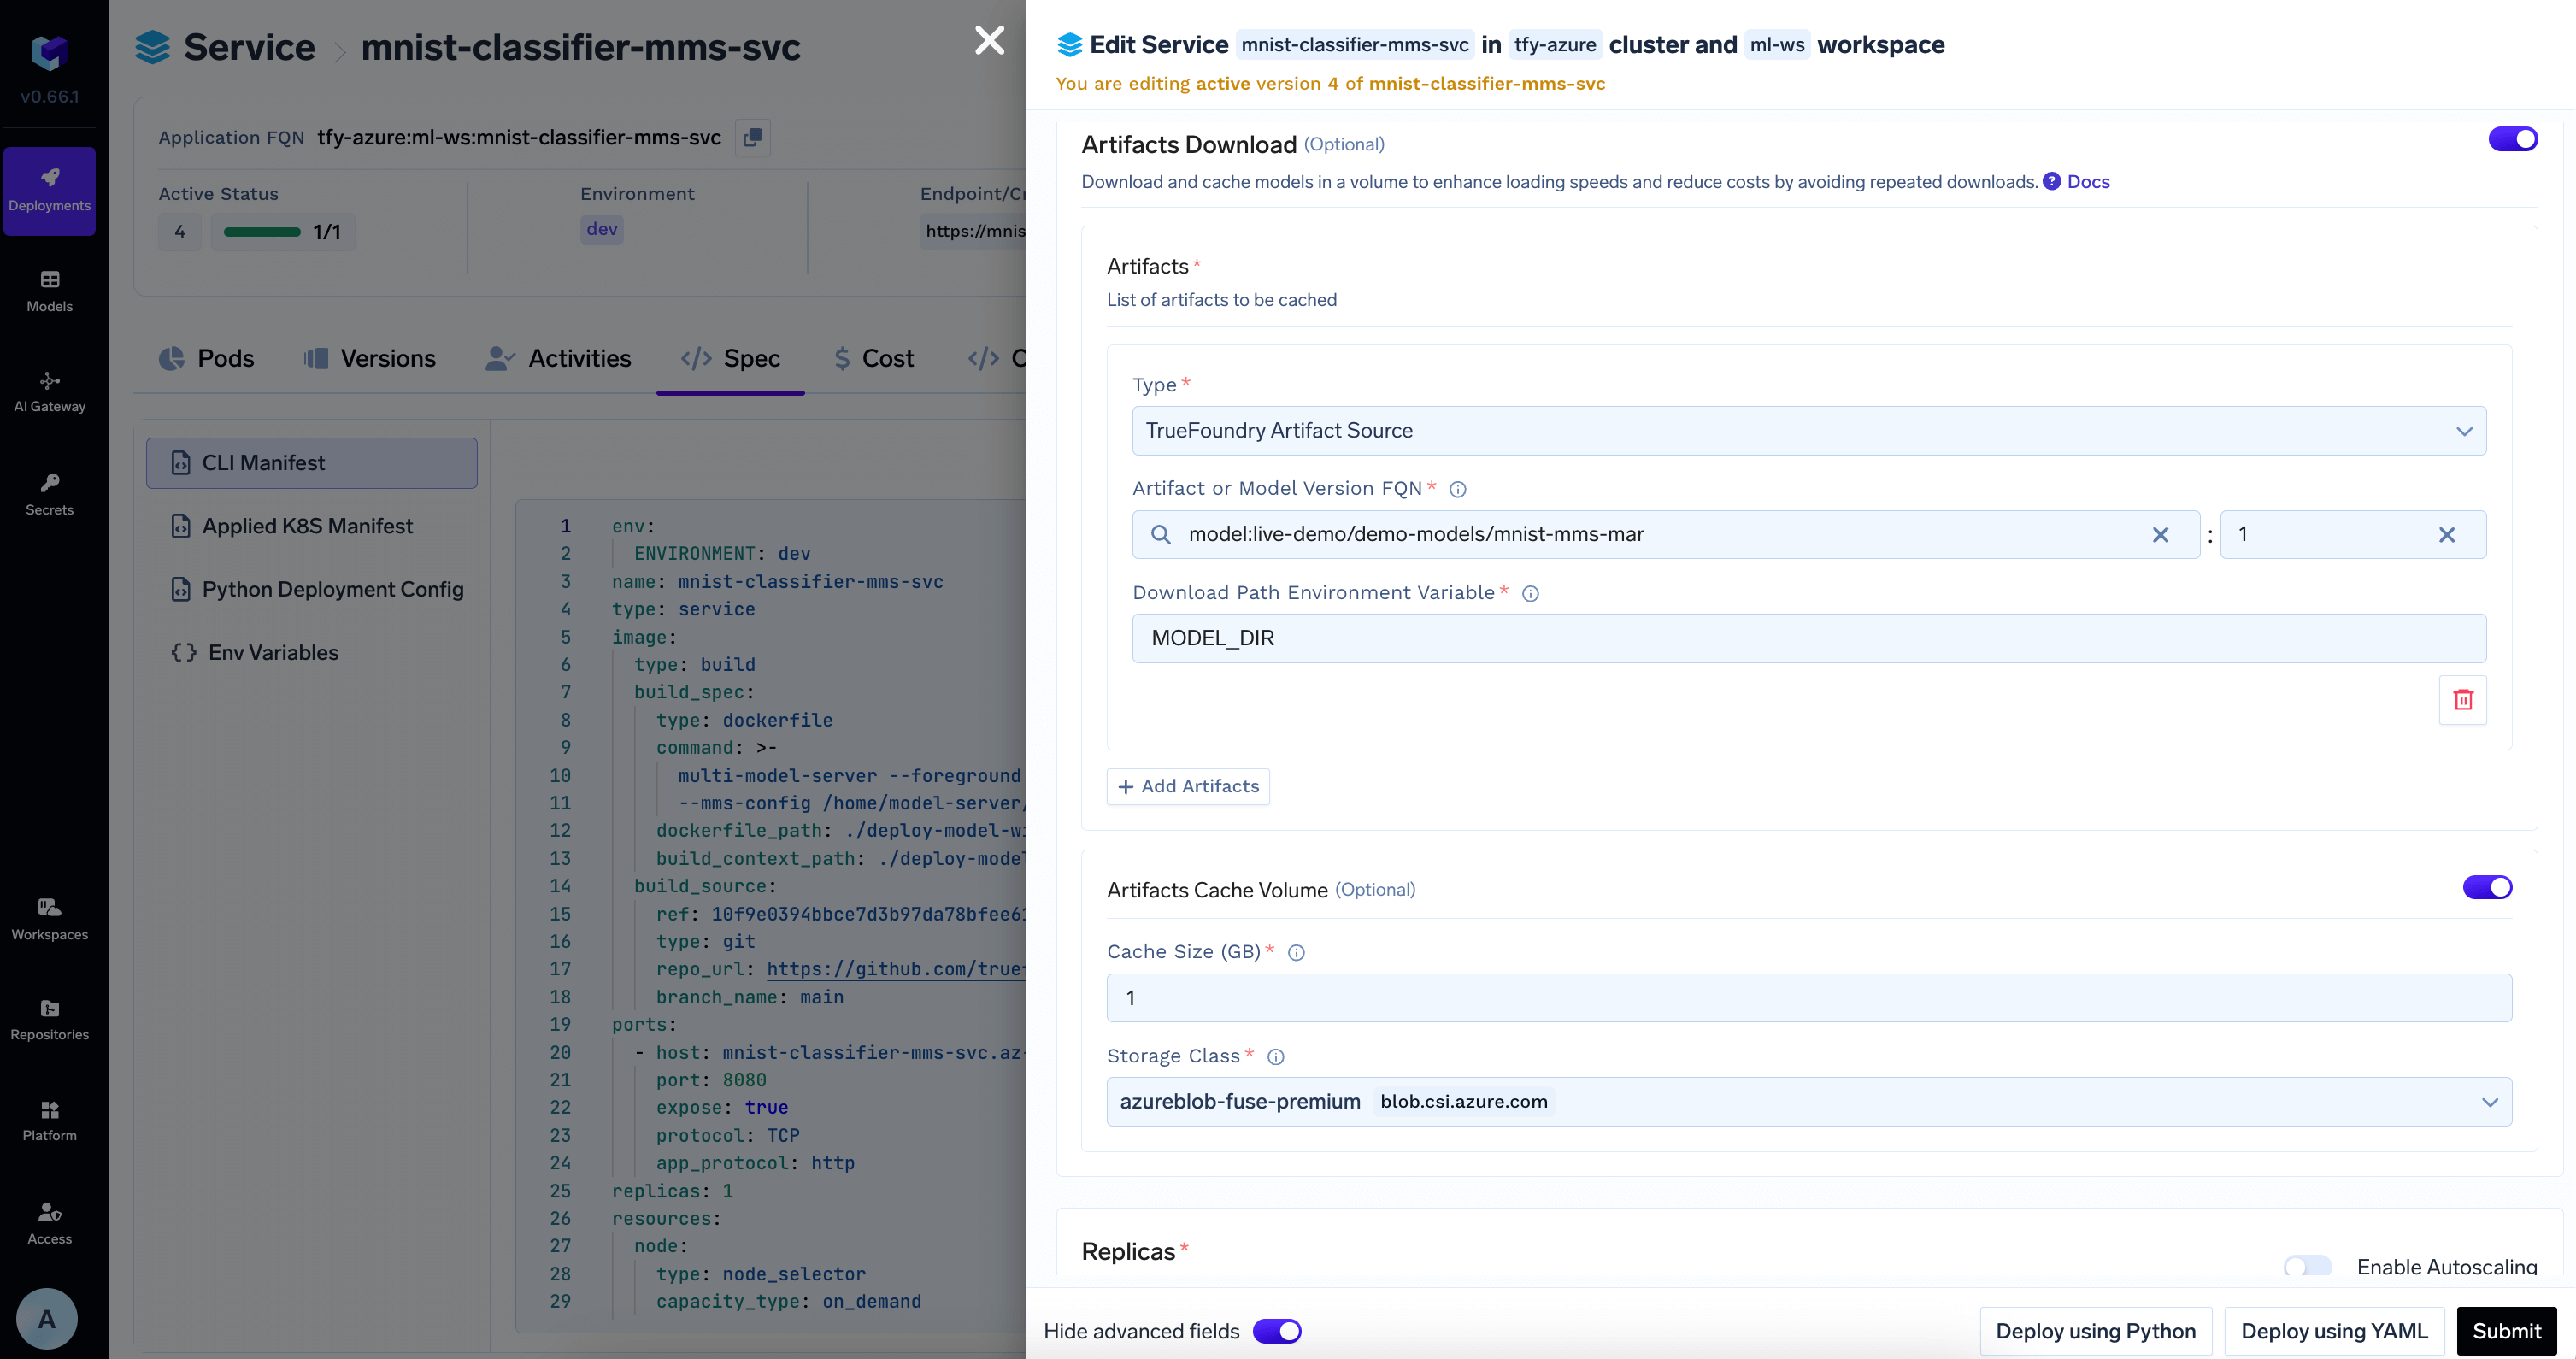
TrueFoundry can automatically download the model at the path specified in the `MODEL_DIR` environment variable to the deployed service.
Add the model id and revision from HuggingFace Hub in `Artifacts Download` section
The command looks like this which references the `MODEL_DIR` environment variable where the model will be downloaded to.
```shell lines theme={"dark"}
multi-model-server --foreground --start --model-store $(MODEL_DIR) --mms-config /home/model-server/config.properties
```
TrueFoundry can automatically download the model at the path specified in the `MODEL_DIR` environment variable to the deployed service.
Add the model id and revision from HuggingFace Hub in `Artifacts Download` section
 Once the deployment goes through, you can view the deployment, the pods, logs, metrics and events to debug any issues.