> ## Documentation Index
> Fetch the complete documentation index at: https://www.truefoundry.com/llms.txt
> Use this file to discover all available pages before exploring further.
# LitServe
> Deploying sample Whisper Speech to Text model with LitServe
[LitServe](https://github.com/Lightning-AI/LitServe) is a lightweight and fast inference server for machine learning models. It can be a good alternative to FastAPI if you are looking for dynamic batching support.
It also has higher level abstractions for authentication, middleware, OpenAI compatible spec, streaming etc built on top of FastAPI.
In this example, we will deploy a simple Whisper model (speech to text) using [faster-whisper](https://github.com/SYSTRAN/faster-whisper) and Litserve. You can find the code for this example [here](https://github.com/truefoundry/getting-started-examples/tree/main/deploy-model-with-litserve).
**Live Demo**
You can view this example deployed [here](https://platform.live-demo.truefoundry.cloud/deployments/cmblzymv1ft4g01rj52b2cjkc?tab=open-api).
The key files are:
* `whisper_server.py`: Contains the `WhisperLitAPI` that implements the `LitAPI` interface.
* `requirements.txt`: Contains the dependencies.
### How to write the inference function in LitServe
The `whisper_server.py` file contains the `WhisperLitAPI` class that implements the `LitAPI` interface.
```python whisper_server.py lines theme={"dark"}
...
def _get_model_dir():
if "MODEL_DIR" not in os.environ:
raise Exception(
"MODEL_DIR environment variable is not set. Please set it to the directory containing the model."
)
return os.environ["MODEL_DIR"]
MODEL_DIR = _get_model_dir()
class WhisperLitAPI(ls.LitAPI):
def setup(self, device):
# Load the OpenAI Whisper model
self.model = WhisperModel(MODEL_DIR, device="cpu")
def decode_request(self, request: UploadFile):
return request.file
def predict(self, audio_stream):
# Process the audio stream bytes and return the transcription result
output = []
segments, _ = self.model.transcribe(audio_stream)
for segment in segments:
output.append({"start": segment.start, "end": segment.end, "text": segment.text})
return output
def encode_response(self, output):
# Output is already a list of dicts. So we can return it as is.
return output
```
Mainly we inherit the `LitAPI` class and implement the `setup`, `decode_request`, `predict` and `encode_response` methods.
* `setup`: Load the model.
* `decode_request`: Decodes and transforms the request body to the input format expected by the model.
* `predict`: Processes the output of `decode_request` and runs model inference.
* `encode_response`: Formats the response. Can perform any postprocessing on the response.
See [LitServe Docs](https://lightning.ai/docs/litserve/examples) for reference and more examples.
**Load the file from the path specified in the `MODEL_DIR` environment variable**
We are using an environment variable `MODEL_DIR` to read the model path. This is useful when we want to load a model from a different path that can be downloaded and cached separately. See [Cache Models and Artifacts](/docs/download-and-cache-models#download-and-cache-models-through-the-user-interface) guide for more details.
### Running the server locally
1. Install the dependencies
```shell Shell lines theme={"dark"}
pip install -r requirements.txt
```
2. Run the server
```shell Shell lines theme={"dark"}
export MODEL_DIR="Systran/faster-whisper-tiny"
python whisper_server.py
```
3. Test the server
```shell Shell lines theme={"dark"}
curl -X POST http://0.0.0.0:8000/predict -F "request=@./audio.mp3"
```
We'll see something like this:
```json lines theme={"dark"}
[
{"start":0.0,"end":5.0,"text":" Oh, you think darkness is your ally."},
{"start":5.0,"end":8.0,"text":" Are you merely adopted the dark?"},
{"start":8.0,"end":11.0,"text":" I was born in it."},
{"start":11.0,"end":14.0,"text":" More lit by it."},
{"start":14.0,"end":17.0,"text":" I didn't see the light until I was already a man,"},
{"start":17.0,"end":20.0,"text":" but then it was nothing to me but brightened."}
]
```
## Deploying to TrueFoundry
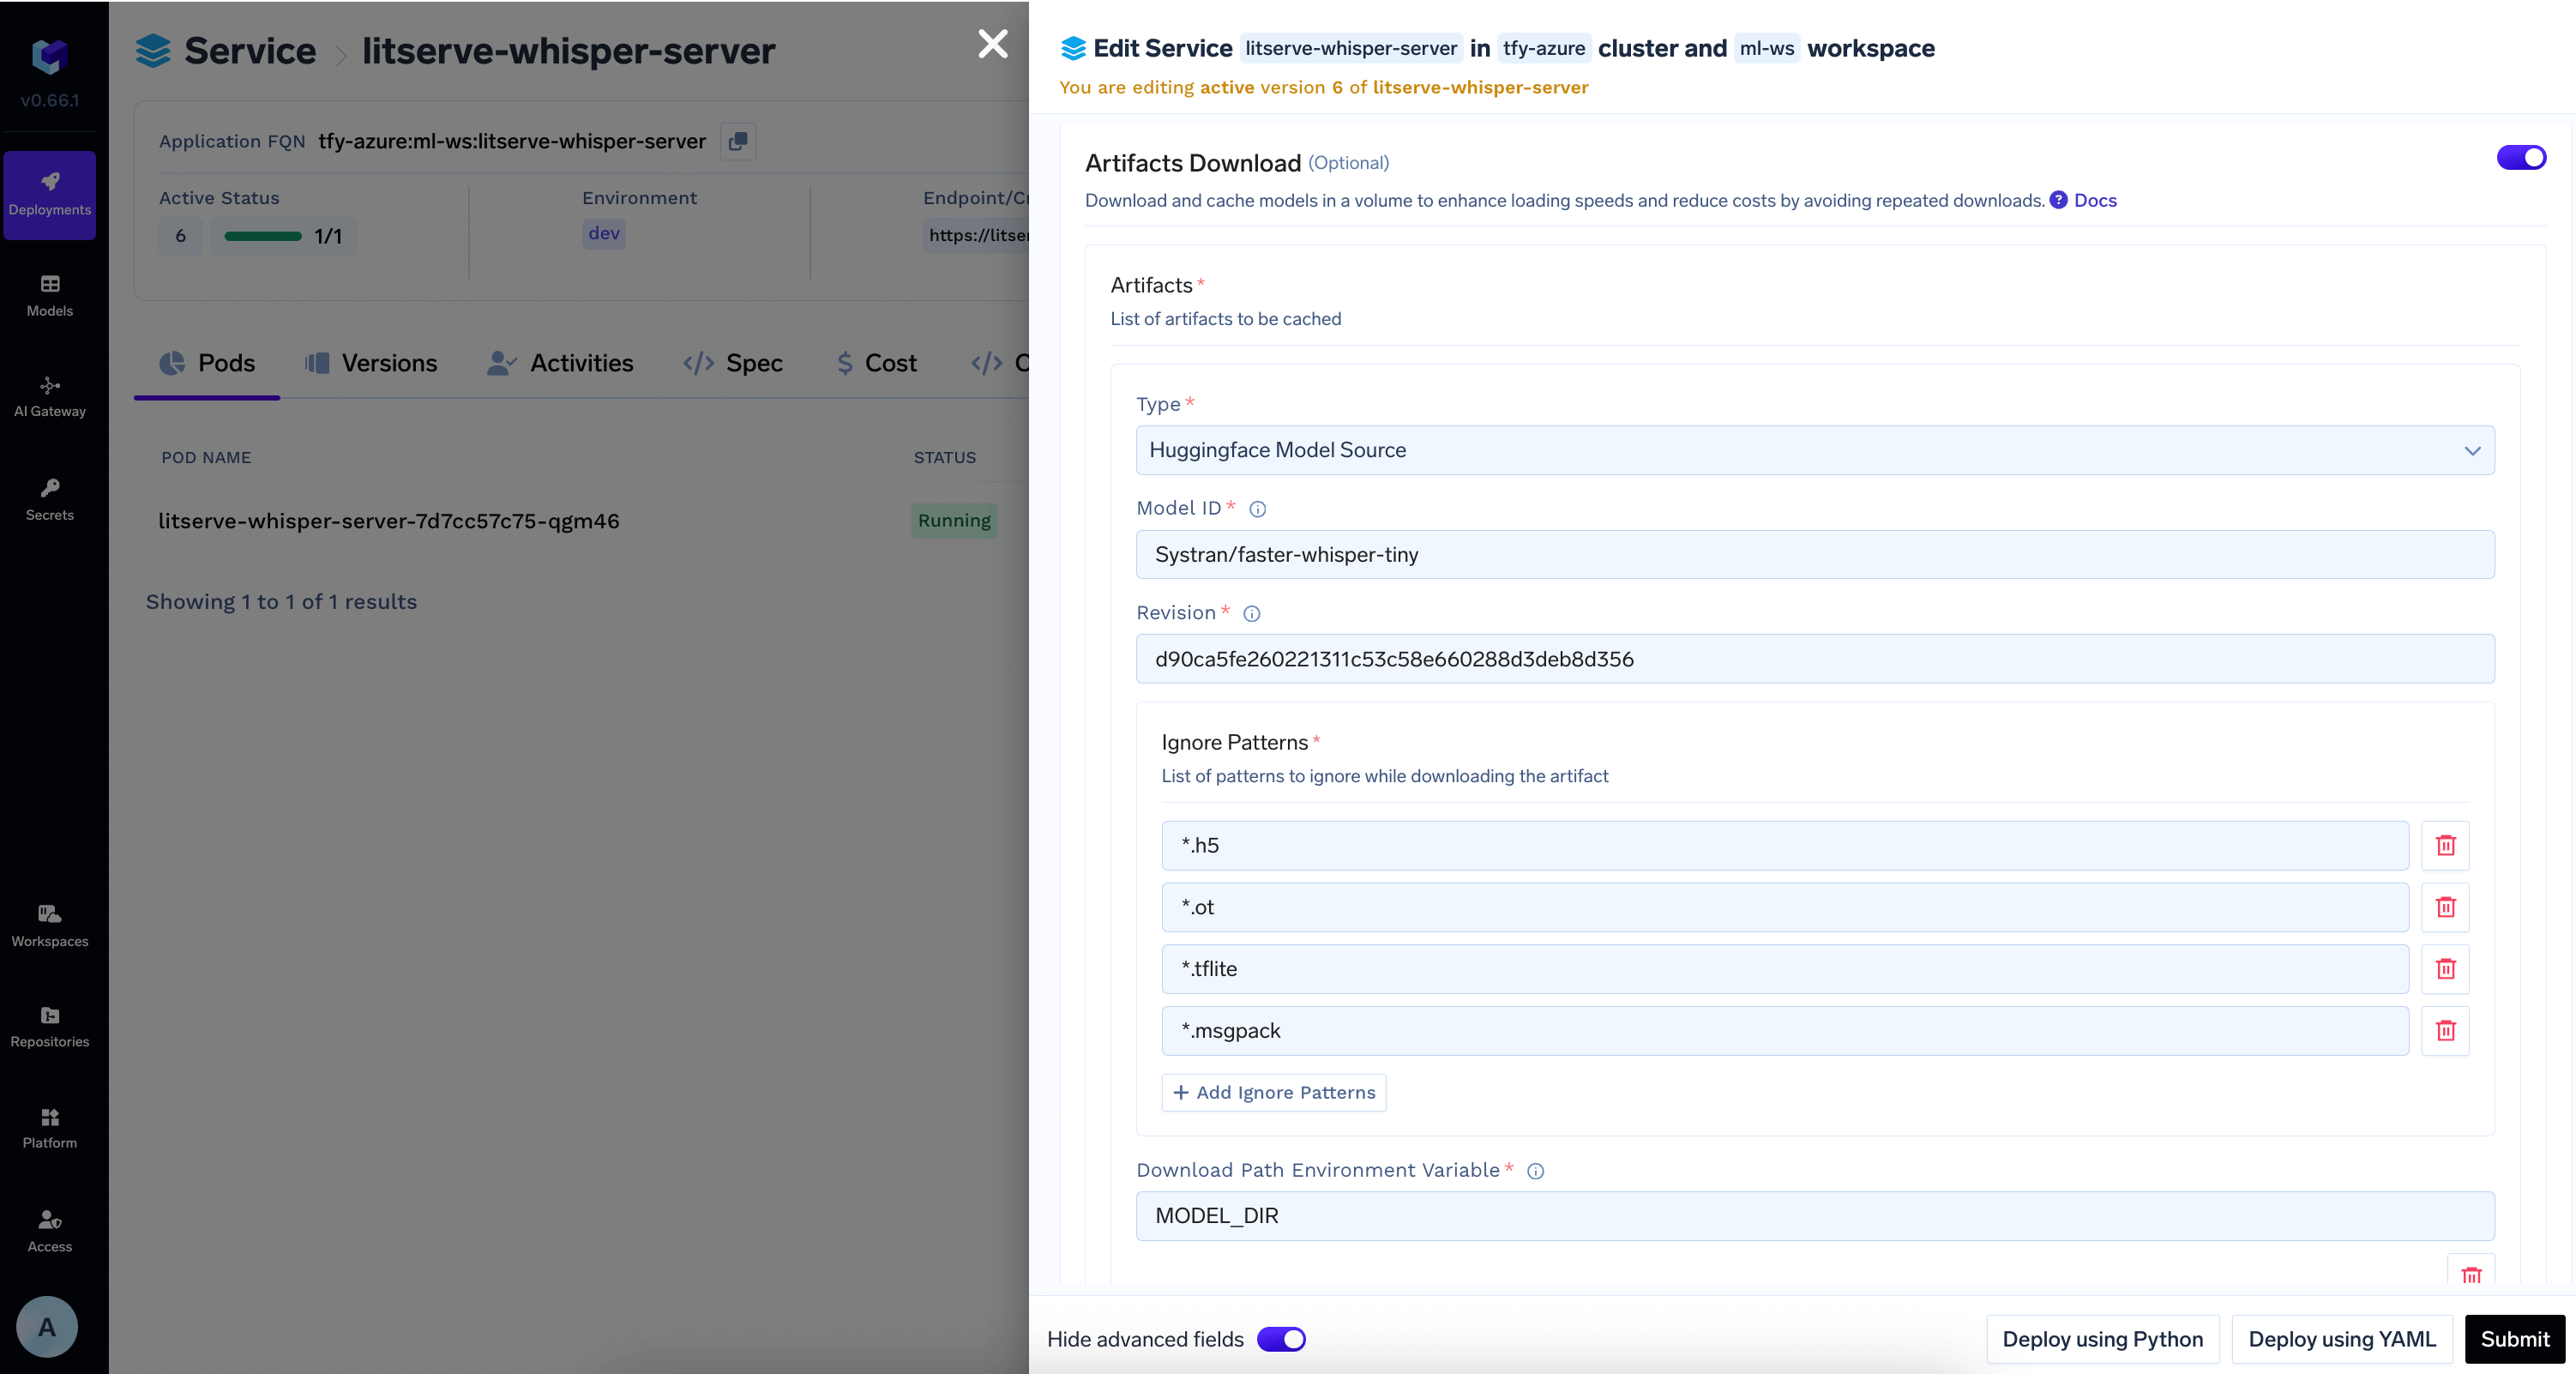
Since the [models](https://huggingface.co/Systran) are being pulled from HuggingFace Hub, we can directly deploy the code to TrueFoundry and use [Artifacts Download](/docs/download-and-cache-models#download-and-cache-models-through-the-user-interface) feature to automatically download the model.
You can also [log the model to TrueFoundry Model Registry](/docs/model-registry) and use it as source for automatic model download.
Once you have tested your code locally, we highly recommend pushing the code a Git repository. This allows you to version control the code and also makes the deployment process much easier. However, if you don't have access to a Git repository, or the Git repositories are not integrated with Truefoundry, you can directly deploy from local laptop.
You can follow the guide [here](/docs/deploy-first-service) to deploy your code.
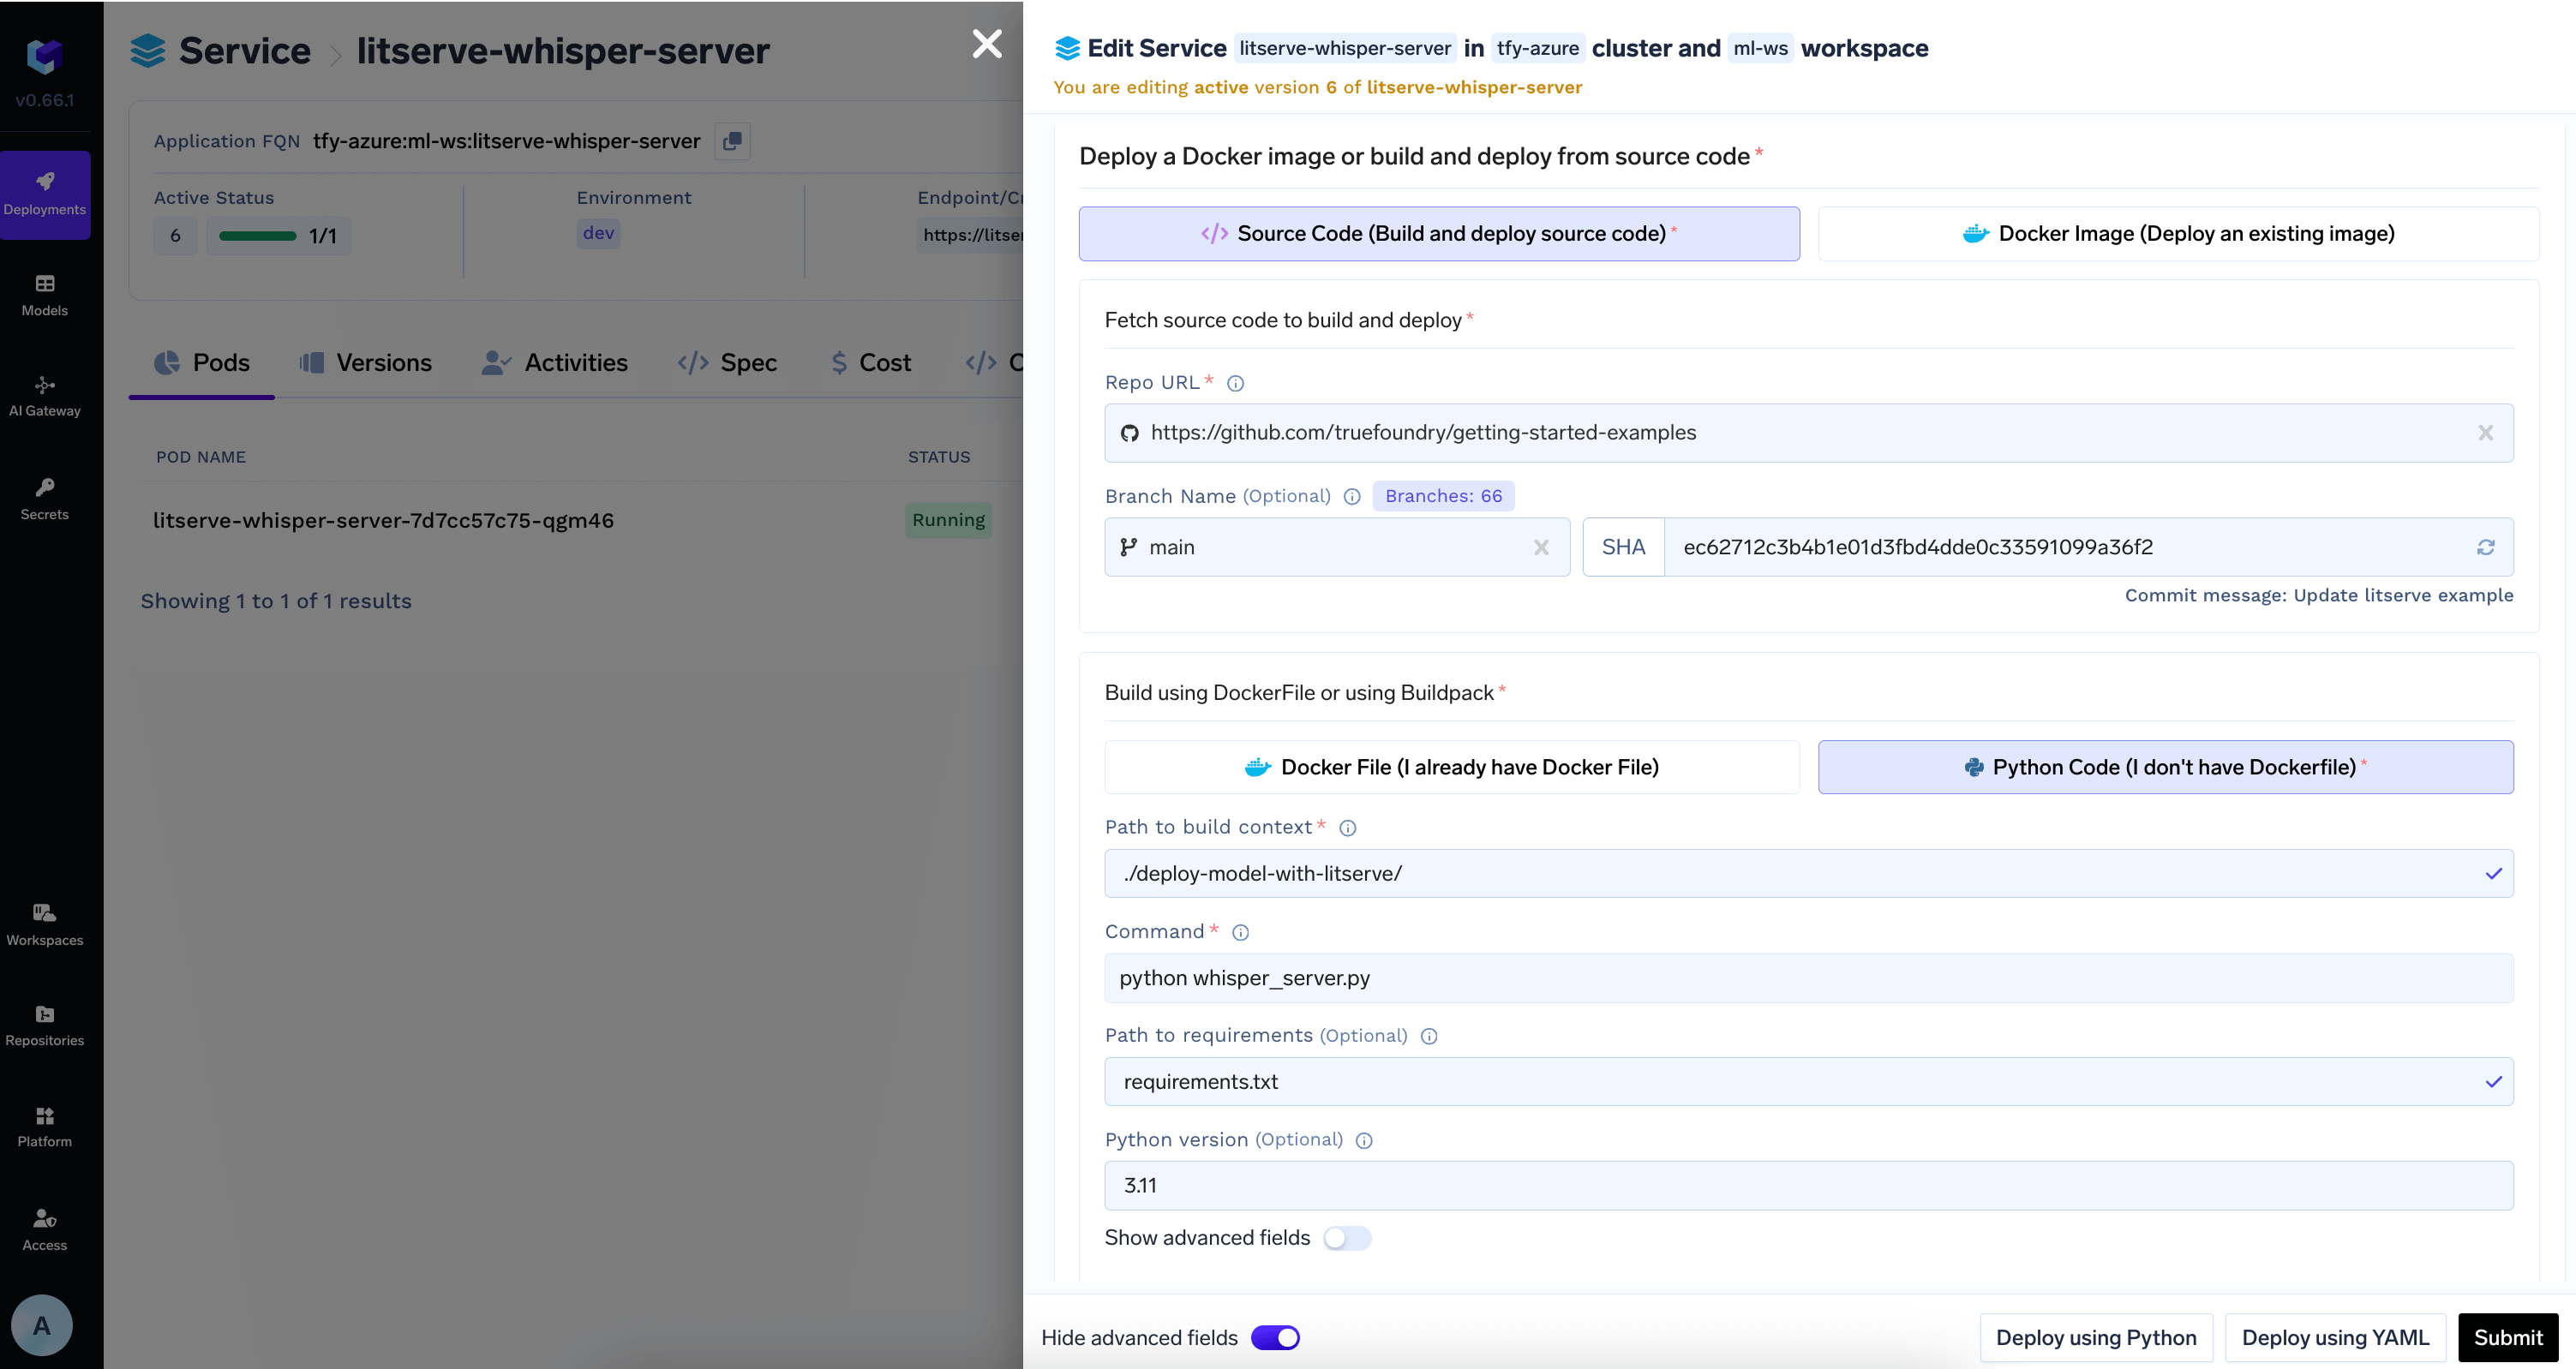
Configure `PythonBuild`
 Add the model id and revision from HuggingFace Hub in `Artifacts Download` section
 Once the deployment goes through, you can view the deployment, the pods, logs, metrics and events to debug any issues.