> ## Documentation Index
> Fetch the complete documentation index at: https://www.truefoundry.com/llms.txt
> Use this file to discover all available pages before exploring further.
# GCP
> Integrate GCP services into your TrueFoundry environment.
TrueFoundry supports integrating with multiple GCP services like GCS, GKE, GCR, GSM, GCP Models etc.
To integrate any of the above services, you simply need to add your GCP account as a provider account and add integrations for the same as shown below:
**Share access with users, teams or everyone in your TrueFoundry account**
As shown in the previous slides, you can share access of each integration with users, teams or everyone in your TrueFoundry account. This would allow them to view and use the integration. Only tenant-admins can edit the integrations.
### Create a custom serviceaccount
**Step 1 — Create a GCP IAM Service Account**
Create an [IAM service account](https://cloud.google.com/iam/docs/service-accounts-create) (name can be anything but add a prefix `tfy` to differentiate it with others).
```bash theme={"dark"}
export GCP_PROJECT_ID=
export GSA_NAME=
gcloud iam service-accounts create $GSA_NAME \
--project="$GCP_PROJECT_ID" \
--display-name="$GSA_NAME"
```
**Step 2 — Create a JSON Key for the Service Account**
Generate a JSON key file for the service account. This key will be used to authenticate the service account in TrueFoundry.
```bash theme={"dark"}
export GSA_EMAIL=$GSA_NAME@$GCP_PROJECT_ID.iam.gserviceaccount.com
gcloud iam service-accounts keys create $GSA_NAME-key.json \
--iam-account="$GSA_EMAIL" \
--project="$GCP_PROJECT_ID"
```
The generated `$GSA_NAME-key.json` file is what you will provide in TrueFoundry when adding the GCP provider account.
**Step 3 — (Optional) Workflow Propeller Binding**
If you are using the workflow propeller, add the following binding to the service account:
```bash theme={"dark"}
gcloud iam service-accounts add-iam-policy-binding $GSA_EMAIL \
--role roles/iam.workloadIdentityUser \
--member "serviceAccount:$GCP_PROJECT_ID.svc.id.goog[tfy-workflow-propeller/flytepropeller]" \
--project $GCP_PROJECT_ID
```
Workload Identity Federation (WIF) lets TrueFoundry authenticate to Google Cloud **without service account keys**, even when running **outside of GKE** — for example, on Amazon EKS, Azure AKS, or on-premises Kubernetes clusters. It works by exchanging a short-lived Kubernetes service account token for a Google Cloud access token through Google's Security Token Service.
Workload Identity Federation is the recommended approach for production deployments running outside of GKE. It eliminates long-lived service account keys while supporting any Kubernetes environment.
**Inputs required:**
* `GCP_PROJECT_ID` — Your GCP project ID
* `PROJECT_NUMBER` — Your GCP project number
* `POOL_NAME` — Name for the Workload Identity Pool (e.g. `tfy--pool`)
* `PROVIDER_NAME` — Name for the Workload Identity Provider (e.g. `tfy--provider`)
* `GSA_NAME` — Name for the Google Cloud service account (e.g. `tfy--platform`)
* `OIDC_ISSUER_URL` — The OIDC issuer URL of your Kubernetes cluster (for EKS: `aws eks describe-cluster --name --query "cluster.identity.oidc.issuer" --output text`)
* `NAMESPACE` — Kubernetes namespace where the TrueFoundry service account runs (for TrueFoundry SAAS, use `truefoundry`)
* `KSA_NAME` — Kubernetes service account name used by TrueFoundry (for TrueFoundry SAAS, use `truefoundry`)
```bash theme={"dark"}
export GCP_PROJECT_ID=
export PROJECT_NUMBER=
export POOL_NAME=tfy--pool
export PROVIDER_NAME=tfy--provider
export GSA_NAME=tfy--platform
export OIDC_ISSUER_URL=
export NAMESPACE=
export KSA_NAME=
export GSA_EMAIL=$GSA_NAME@$GCP_PROJECT_ID.iam.gserviceaccount.com
```
**Step 1 — Create a Workload Identity Pool**
```bash theme={"dark"}
gcloud iam workload-identity-pools create $POOL_NAME \
--location="global" \
--description="Workload identity pool for TrueFoundry" \
--display-name="$POOL_NAME" \
--project="$GCP_PROJECT_ID"
```
**Step 2 — Create a Workload Identity Provider**
The `--issuer-uri` must be the OIDC issuer URL of your Kubernetes cluster. The `--attribute-condition` restricts which Kubernetes service accounts can use this provider.
```bash theme={"dark"}
gcloud iam workload-identity-pools providers create-oidc $PROVIDER_NAME \
--location="global" \
--workload-identity-pool="$POOL_NAME" \
--issuer-uri="$OIDC_ISSUER_URL" \
--attribute-mapping="google.subject=assertion.sub,attribute.namespace=assertion['kubernetes.io']['namespace'],attribute.service_account_name=assertion['kubernetes.io']['serviceaccount']['name']" \
--attribute-condition="assertion.sub == 'system:serviceaccount:$NAMESPACE:$KSA_NAME'" \
--project="$GCP_PROJECT_ID"
```
**Step 3 — Create a Google Cloud Service Account**
```bash theme={"dark"}
gcloud iam service-accounts create $GSA_NAME \
--project="$GCP_PROJECT_ID" \
--display-name="$GSA_NAME"
```
**Step 4 — Allow the Federated Identity to Impersonate the Service Account**
Grant the `roles/iam.workloadIdentityUser` role so the Kubernetes service account (via the workload identity pool) can impersonate the Google Cloud service account:
```bash theme={"dark"}
gcloud iam service-accounts add-iam-policy-binding $GSA_EMAIL \
--member="principal://iam.googleapis.com/projects/$PROJECT_NUMBER/locations/global/workloadIdentityPools/$POOL_NAME/subject/system:serviceaccount:$NAMESPACE:$KSA_NAME" \
--role="roles/iam.workloadIdentityUser" \
--project="$GCP_PROJECT_ID"
```
Optionally, to allow **all** service accounts in a namespace (instead of a single one), use `principalSet`:
```bash theme={"dark"}
gcloud iam service-accounts add-iam-policy-binding $GSA_EMAIL \
--member="principalSet://iam.googleapis.com/projects/$PROJECT_NUMBER/locations/global/workloadIdentityPools/$POOL_NAME/attribute.namespace/$NAMESPACE" \
--role="roles/iam.workloadIdentityUser" \
--project="$GCP_PROJECT_ID"
```
**Step 5 — Generate the Credential Configuration File**
This is the file you will provide in TrueFoundry when configuring the GCP provider account.
```bash theme={"dark"}
gcloud iam workload-identity-pools create-cred-config \
projects/$PROJECT_NUMBER/locations/global/workloadIdentityPools/$POOL_NAME/providers/$PROVIDER_NAME \
--service-account=$GSA_EMAIL \
--credential-source-file=/token \
--credential-source-type=text \
--output-file=credential-configuration.json
```
The generated `credential-configuration.json` file contains `"type": "external_account"` describing the identity pool, audience, and STS token-exchange endpoints. It is **not** a private key. Provide this file in TrueFoundry under **Workload Identity Federation file** when adding the GCP provider account.
This method allows an AWS IAM role to authenticate to Google Cloud using Workload Identity Federation with AWS as the identity provider. This is useful when TrueFoundry is running on AWS (e.g. EKS) and you want to access GCP services using an AWS IAM role ARN instead of managing GCP service account keys.
This approach uses AWS STS `GetCallerIdentity` as the credential source, so it works with any AWS IAM role — including roles assumed via IRSA (IAM Roles for Service Accounts) on EKS.
**Inputs required:**
* `GCP_PROJECT_ID` — Your GCP project ID
* `PROJECT_NUMBER` — Your GCP project number
* `POOL_NAME` — Name for the Workload Identity Pool (e.g. `tfy--aws-pool`)
* `PROVIDER_NAME` — Name for the Workload Identity Provider (e.g. `tfy--aws-provider`)
* `GSA_NAME` — Name for the Google Cloud service account (e.g. `tfy--platform`)
* `AWS_ACCOUNT_ID` — Your AWS account ID (e.g. `123456789012`)
* `AWS_IAM_ROLE_ARN` — The ARN of the AWS IAM role (e.g. `arn:aws:iam::123456789012:role/my-truefoundry-role`)
* `AWS_IAM_ROLE_NAME` — The name of the AWS IAM role (e.g. `my-truefoundry-role`)
```bash theme={"dark"}
export GCP_PROJECT_ID=
export PROJECT_NUMBER=
export POOL_NAME=tfy--aws-pool
export PROVIDER_NAME=tfy--aws-provider
export GSA_NAME=tfy--platform
export AWS_IAM_ROLE_ARN=
export AWS_IAM_ROLE_NAME=
export AWS_ACCOUNT_ID=
export GSA_EMAIL=$GSA_NAME@$GCP_PROJECT_ID.iam.gserviceaccount.com
```
**Step 1 — Create a Workload Identity Pool**
```bash theme={"dark"}
gcloud iam workload-identity-pools create $POOL_NAME \
--location="global" \
--description="Workload identity pool for AWS" \
--display-name="$POOL_NAME" \
--project="$GCP_PROJECT_ID"
```
**Step 2 — Create an AWS Workload Identity Provider**
```bash theme={"dark"}
gcloud iam workload-identity-pools providers create-aws $PROVIDER_NAME \
--location="global" \
--workload-identity-pool="$POOL_NAME" \
--account-id="$AWS_ACCOUNT_ID" \
--attribute-mapping="google.subject=assertion.arn,attribute.aws_role=assertion.arn.extract('/assumed-role/{role}/')" \
--attribute-condition='assertion.arn.startsWith("arn:aws:sts::$AWS_ACCOUNT_ID:assumed-role/$AWS_IAM_ROLE_NAME/")'
--attribute-condition="assertion.arn == '$AWS_IAM_ROLE_ARN'" \
--project="$GCP_PROJECT_ID"
```
**Step 3 — Create a Google Cloud Service Account**
```bash theme={"dark"}
gcloud iam service-accounts create $GSA_NAME \
--project="$GCP_PROJECT_ID" \
--display-name="$GSA_NAME"
```
**Step 4 — Allow the AWS IAM Role to Impersonate the GCP Service Account**
Grant the `roles/iam.workloadIdentityUser` role so the AWS IAM role (via the workload identity pool) can impersonate the Google Cloud service account:
```bash theme={"dark"}
gcloud iam service-accounts add-iam-policy-binding $GSA_EMAIL \
--member="principal://iam.googleapis.com/projects/$PROJECT_NUMBER/locations/global/workloadIdentityPools/$POOL_NAME/subject/$AWS_IAM_ROLE_ARN" \
--role="roles/iam.workloadIdentityUser" \
--project="$GCP_PROJECT_ID"
```
**Step 5 — Generate the Credential Configuration File**
```bash theme={"dark"}
gcloud iam workload-identity-pools create-cred-config \
projects/$PROJECT_NUMBER/locations/global/workloadIdentityPools/$POOL_NAME/providers/$PROVIDER_NAME \
--service-account=$GSA_EMAIL \
--aws \
--output-file=credential-configuration.json
```
The generated `credential-configuration.json` uses AWS STS `GetCallerIdentity` as the credential source and exchanges it for a Google Cloud access token. Provide this file in TrueFoundry under **Workload Identity Federation file** when adding the GCP provider account.
### Integrations
Follow the steps below to connect GCS storage to TrueFoundry:
1. Create a [GCP bucket](https://cloud.google.com/storage/docs/creating-buckets).
* Make sure to add the lifecycle configurations on the bucket to delete multipart upload after 7 days.
* For this go to GCP bucket -> Lifecycle -> Add a rule
* Select `Delete multi-part upload` for 7 days
2. We also need to add the CORS policy to the GCP bucket. Right now adding the CORS policy to the GCP bucket is not possible through the console so for this, we will use *gsutil*
1. Create a file called `cors.json` using the below command
```powershell Shell lines theme={"dark"}
cat > cors.json <
2. Attach the above CORS policy to the service account by running the following command using [gsutils](https://cloud.google.com/storage/docs/gsutil_install)
```shell Shell lines theme={"dark"}
gsutil cors set cors.json gs://BUCKET_NAME
```
3. Create a [custom IAM role](https://cloud.google.com/iam/docs/creating-custom-roles#creating) with the following permissions and add to the `serviceaccount` created above:
```javascript JSON lines theme={"dark"}
[
"storage.objects.create",
"storage.objects.delete",
"storage.objects.get",
"storage.objects.list",
"storage.objects.update",
"storage.buckets.create",
"storage.buckets.get",
"storage.buckets.list",
"storage.buckets.create",
"storage.buckets.update",
"storage.multipartUploads.create",
"storage.multipartUploads.list",
"storage.multipartUploads.listParts",
"storage.multipartUploads.abort",
"resourcemanager.projects.get",
];
```
4. Add the following [IAM condition](https://cloud.google.com/iam/docs/conditions-overview) - `resource.name.startsWith('projects/\_/buckets/}')`
5. Navigate to **Integrations** tab and follow the steps shown the previous demo to integrate your storage.
1. Create a [custom IAM role](https://cloud.google.com/iam/docs/creating-custom-roles#creating) with the following permissions and add to the `serviceaccount` created above:
```javascript JSON lines theme={"dark"}
[
"artifactregistry.dockerimages.get",
"artifactregistry.dockerimages.list",
"artifactregistry.locations.get",
"artifactregistry.locations.list",
"artifactregistry.repositories.get",
"artifactregistry.repositories.list",
"artifactregistry.repositories.create",
"artifactregistry.repositories.createTagBinding",
"artifactregistry.repositories.delete",
"artifactregistry.repositories.deleteArtifacts",
"artifactregistry.repositories.deleteTagBinding",
"artifactregistry.repositories.downloadArtifacts",
"artifactregistry.repositories.get",
"artifactregistry.repositories.getIamPolicy",
"artifactregistry.repositories.list",
"artifactregistry.repositories.listEffectiveTags",
"artifactregistry.repositories.listTagBindings",
"artifactregistry.repositories.update",
"artifactregistry.repositories.uploadArtifacts",
"artifactregistry.tags.get",
"artifactregistry.tags.list",
"artifactregistry.tags.create",
"artifactregistry.tags.update",
"artifactregistry.versions.get",
"artifactregistry.versions.list",
"artifactregistry.versions.delete",
];
```
2. Navigate to **Integrations** tab and follow the steps shown the previous demo to integrate your Artifact registry.
1. Create a [custom IAM role](https://cloud.google.com/iam/docs/creating-custom-roles#creating) with the following permissions and add to the `serviceaccount` created above:
```javascript JSON lines theme={"dark"}
[
"secretmanager.secrets.get",
"secretmanager.secrets.list",
"secretmanager.secrets.create",
"secretmanager.secrets.delete",
"secretmanager.secrets.update",
"secretmanager.versions.access",
"secretmanager.versions.list",
"secretmanager.versions.get",
"secretmanager.versions.add",
"secretmanager.versions.destroy",
"resourcemanager.projects.get",
];
```
2. Add the following IAM condition- `resource.name.startsWith('projects//secrets/tfy')`
3. Navigate to **Integrations** tab and follow the steps shown the previous demo to integrate your secret manager.
1. Create a [custom IAM role](https://cloud.google.com/iam/docs/creating-custom-roles#creating) with the following permissions and add to the `serviceaccount` created above:
```javascript JSON lines theme={"dark"}
[
"container.clusters.get",
"container.clusters.list",
"container.clusters.update",
"container.nodes.delete",
"container.nodes.list",
"container.nodes.get",
"container.nodes.getStatus",
"container.nodes.list",
"container.operations.get",
"resourcemanager.projects.get",
];
```
2. Navigate to **Integrations** tab and follow the steps shown the previous demo to integrate your GKE cluster.
1. Create the GCP Provider Account as described in the demo at the top of this document.
2. Create a [custom IAM role](https://cloud.google.com/iam/docs/creating-custom-roles#creating) with the following permission and add to the `serviceaccount` created above:
```javascript JSON lines theme={"dark"}
["aiplatform.endpoints.predict"];
```
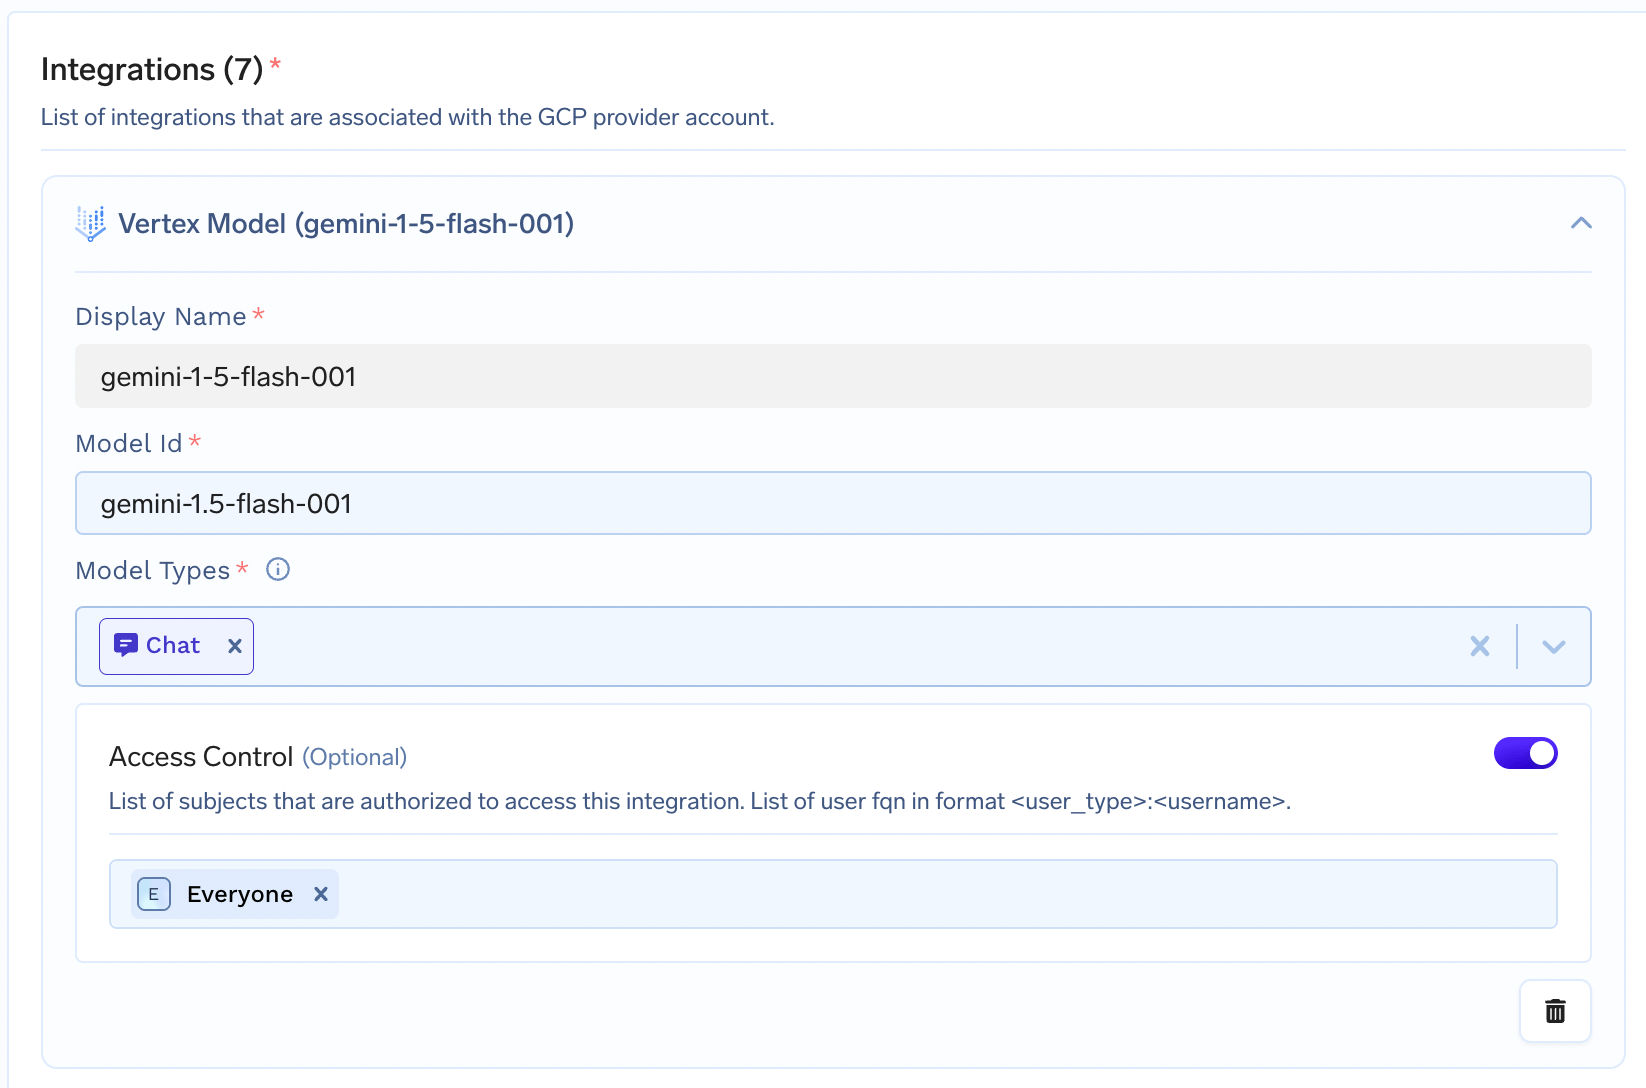
3. Navigate to **Integrations** tab and edit the GCP Provider Account previously created and add the required models using their `model id` and they should start showing up in the AI Gateway. Here's an example of adding `gemini-1.5-flash-001`.
 ***
***