> ## Documentation Index
> Fetch the complete documentation index at: https://www.truefoundry.com/llms.txt
> Use this file to discover all available pages before exploring further.
# Generic
> This page provides an overview of the architecture, requirements and steps to install the TrueFoundry compute plane cluster in your generic cluster
## Requirements
Common requirements for setting up the compute plane on an existing cluster:
* K8s version 1.28 or higher with ability to run 250 nodes and 4096 pods with GPU and CPU depending on your use case.
* Egress access to container registries — `public.ecr.aws`, `quay.io`, `ghcr.io`, `tfy.jfrog.io`, `docker.io/natsio`, `nvcr.io`, `registry.k8s.io` — to pull images for ArgoCD, NATS, GPU Operator, Argo Rollouts, Argo Workflows, Istio, and Keda.
* A domain mapped to the service endpoints, plus a certificate to encrypt traffic. A wildcard domain such as `*.services.example.com` is preferred. TrueFoundry supports path-based routing (e.g. `services.example.com/tfy/*`), but many frontend applications do not. See [Setting up TLS in Generic Cluster](#setting-up-tls-in-generic-cluster) for details.
* Support for block storage for disk volumes and NFS storage for artifact storage.
* A bucket and container registry will be required for the cluster.
* An IP pool is required for the load balancer to get an IP address. Check [metallb](https://metallb.io/) for more details.
## Setting up compute plane
TrueFoundry compute plane infrastructure, for generic cluster, is provisioned using helm. You can download the helm commands and execute them on your cluster.
Go to the platform section in the left panel and click on `Clusters`. You can click on `Attach Existing Cluster`. Read the requirements and if everything is satisfied, click on `Continue`.
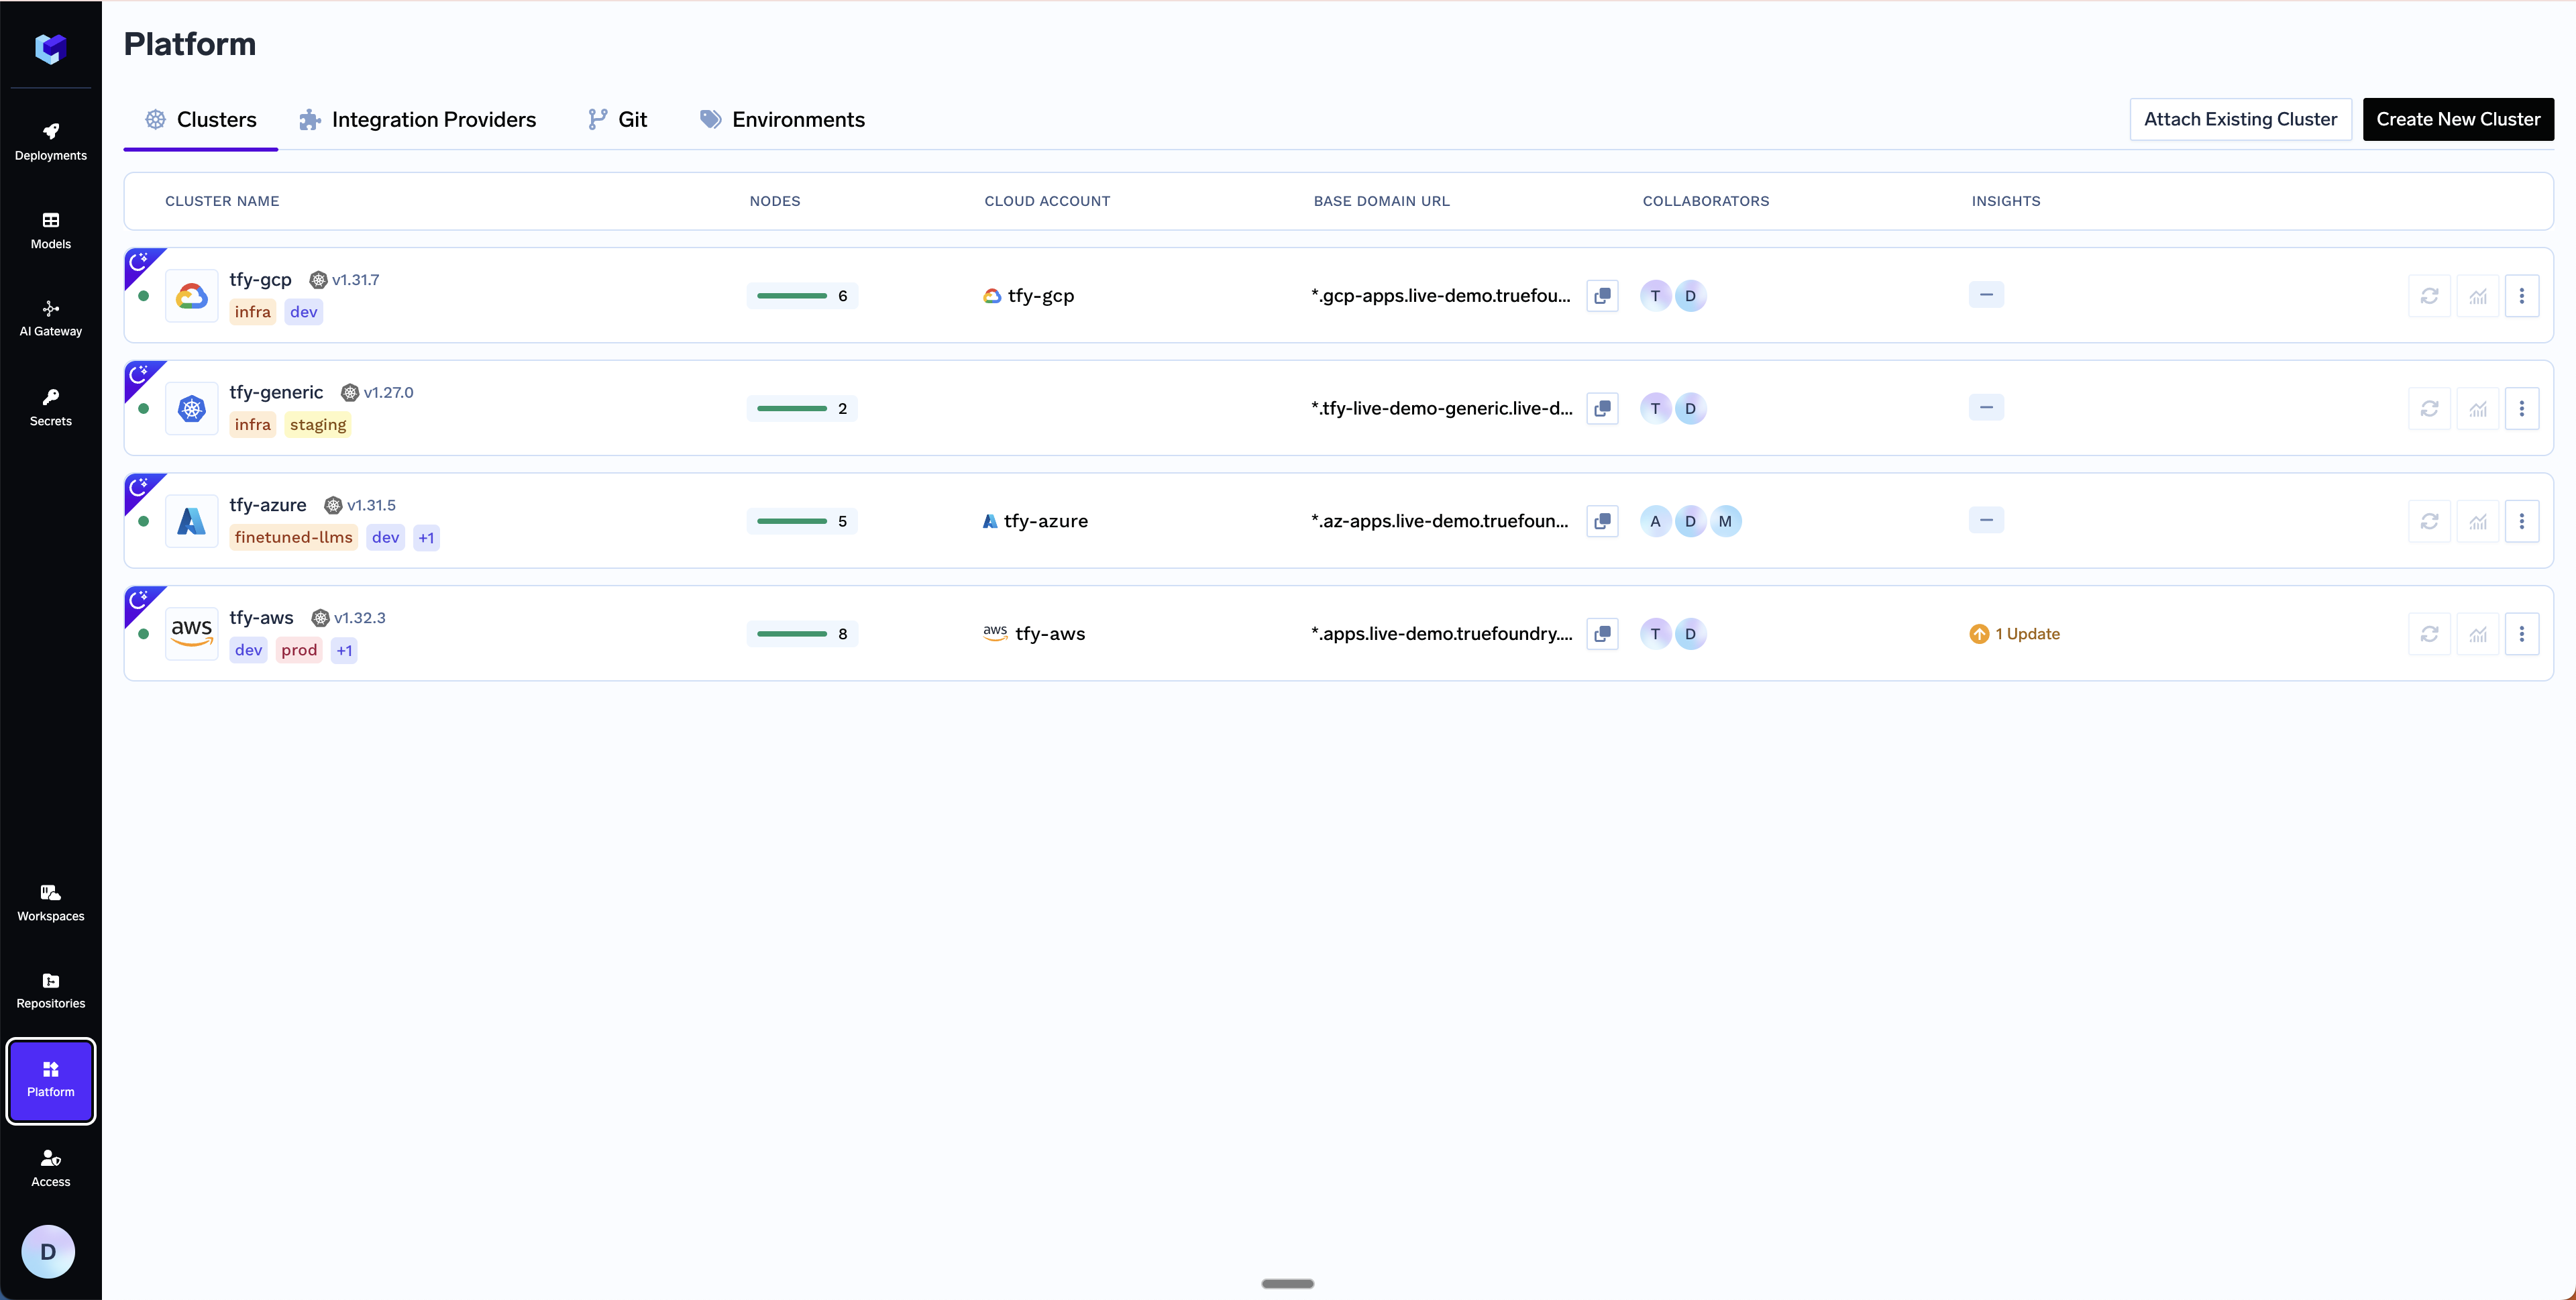 A form will be presented with the details for the new cluster to be created. Fill in with your cluster details. Click `Submit` when done.
The key fields to fill up here are:
* `Cluster Name` - Your cluster name.
* `Cluster Addons` - TrueFoundry needs to install addons like ArgoCD, Argo Workflows, Keda, Istio, etc. Please disable the addons that are already installed on your cluster so that the TrueFoundry installation does not override the existing configuration and affect your existing workloads.
You will be presented with `helm` commands to install the TrueFoundry compute plane.
A form will be presented with the details for the new cluster to be created. Fill in with your cluster details. Click `Submit` when done.
The key fields to fill up here are:
* `Cluster Name` - Your cluster name.
* `Cluster Addons` - TrueFoundry needs to install addons like ArgoCD, Argo Workflows, Keda, Istio, etc. Please disable the addons that are already installed on your cluster so that the TrueFoundry installation does not override the existing configuration and affect your existing workloads.
You will be presented with `helm` commands to install the TrueFoundry compute plane.
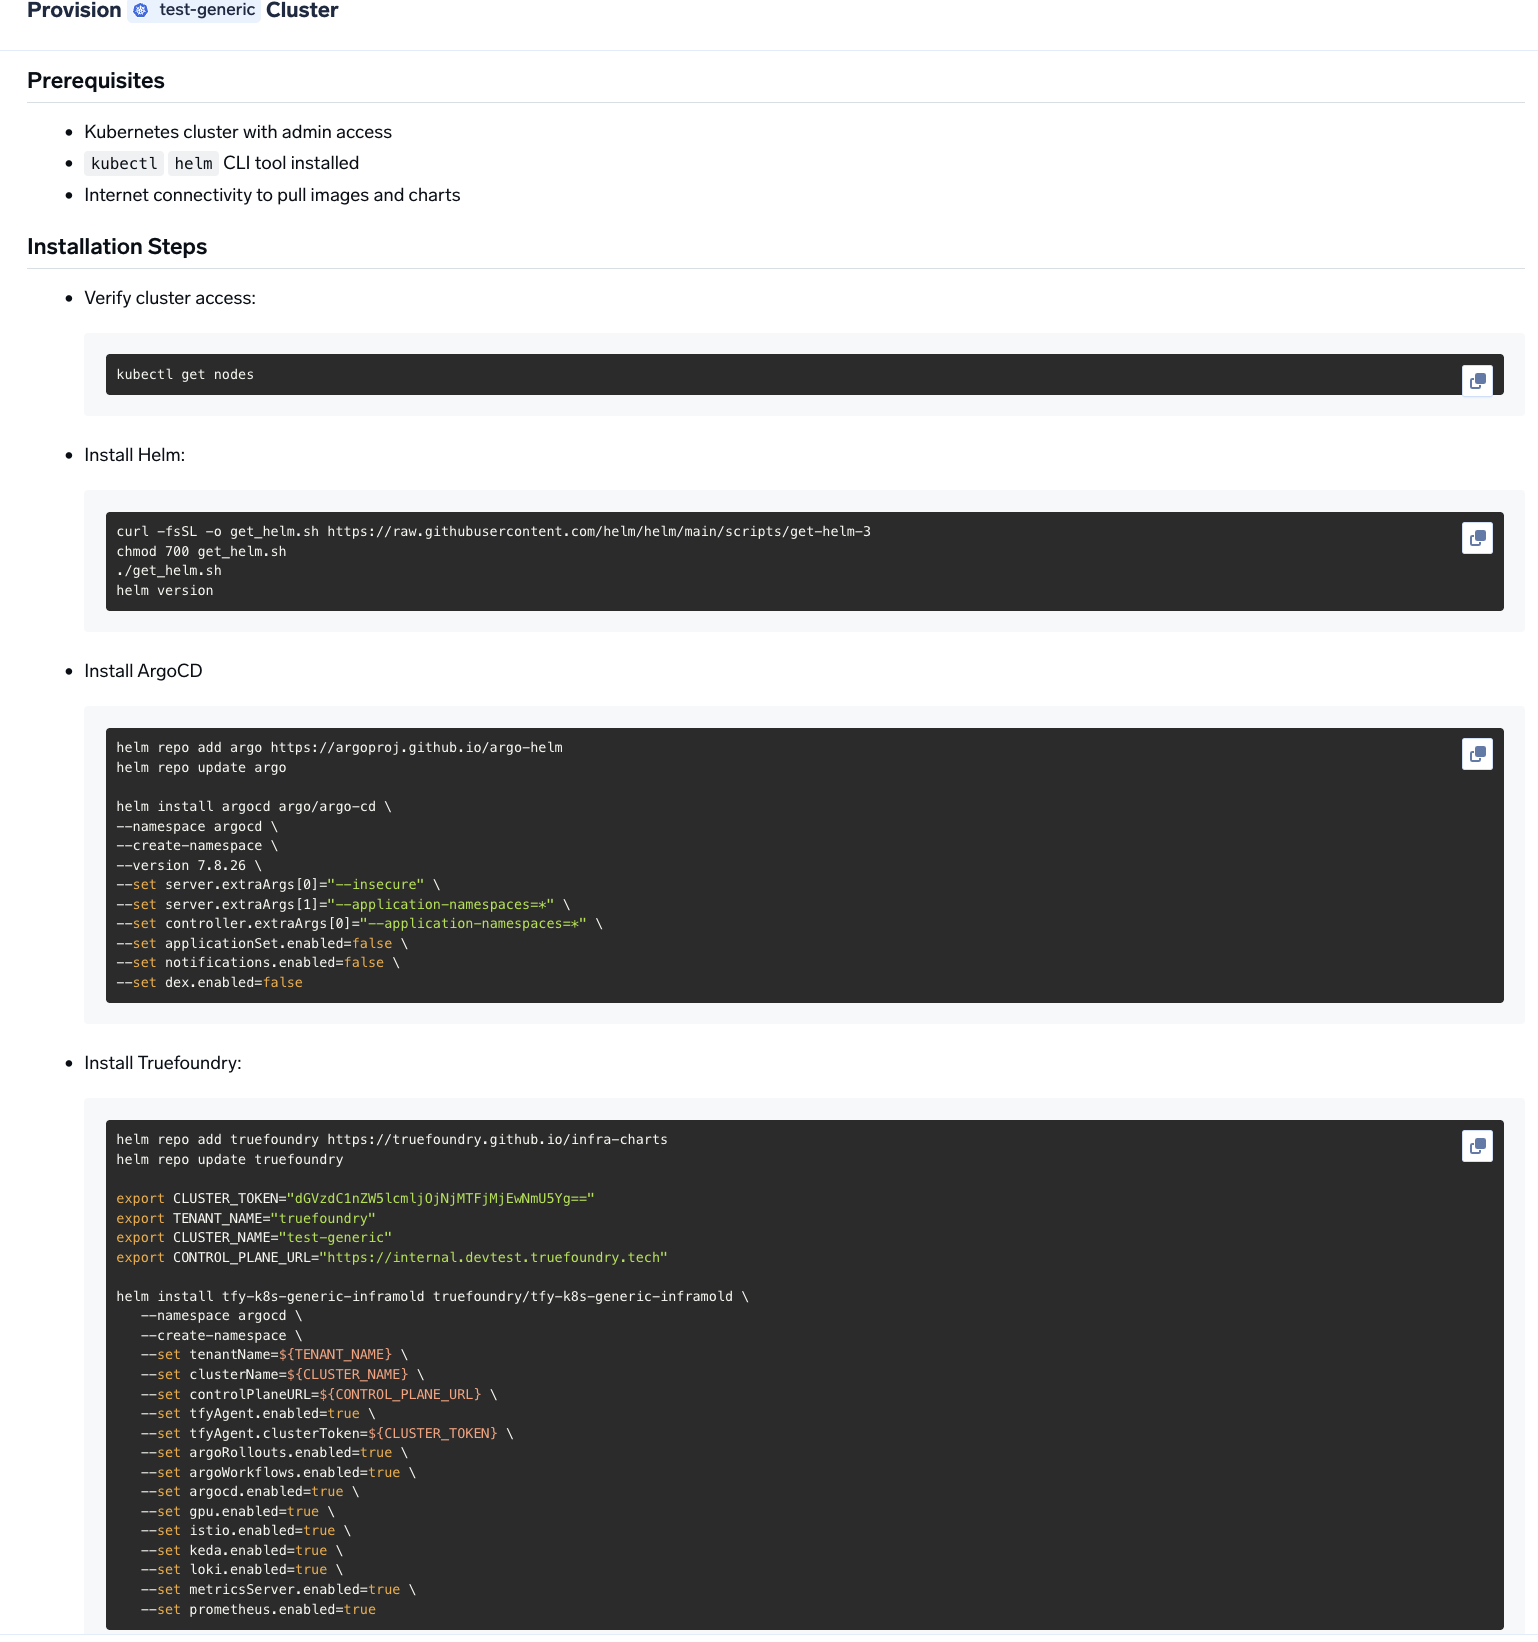 Once the helm commands are executed, the cluster will be shown as connected in the platform.
You can get the load balancer's IP address by going to the platform section in the bottom left panel under the Clusters section. Under the preferred cluster, you'll see the load balancer IP address under the `Base Domain URL` section.
Once the helm commands are executed, the cluster will be shown as connected in the platform.
You can get the load balancer's IP address by going to the platform section in the bottom left panel under the Clusters section. Under the preferred cluster, you'll see the load balancer IP address under the `Base Domain URL` section.
 Create a DNS record in your DNS provider with the following details:
| Record Type | Record Name | Record value |
| ----------- | ------------------ | ------------------------- |
| CNAME | \*.tfy.example.com | LOADBALANCER\_IP\_ADDRESS |
Follow [Setting up TLS in Generic Cluster](#setting-up-tls-in-generic-cluster) to set up DNS and TLS for deploying workloads to your cluster.
On managed Kubernetes (EKS, GKE, AKS), TrueFoundry automatically discovers node pools. For generic or on-prem clusters, you need to label your nodes so TrueFoundry can identify and group them into node pools.
**1. Add a node pool label to every node**
Pick a label key (e.g. `truefoundry.com/nodepool`) and apply it to each node with the pool name as the value:
```bash theme={"dark"}
kubectl label nodes truefoundry.com/nodepool=
```
Then tell TrueFoundry which label key to look for:
1. Go to **Clusters** in the platform, click **Edit** on your cluster.
2. Toggle on **Advanced Fields**.
3. Under **Node Label Keys**, set the **Nodepool Selector Label** to your chosen key (e.g. `truefoundry.com/nodepool`).
**2. Label GPU nodes with the GPU type**
If you have GPU node pools, each GPU node must also carry a GPU type label so TrueFoundry can match workloads to the right hardware:
```bash theme={"dark"}
kubectl label nodes truefoundry.com/gpu_type=
```
Supported `GPU_TYPE` values: `A10G`, `A10_12GB`, `A10_24GB`, `A10_4GB`, `A10_8GB`, `A100_40GB`, `A100_80GB`, `H100_80GB`, `H100_94GB`, `H200`, `L4`, `L40S`, `P100`, `P4`, `T4`, `V100`.
You can start by [deploying your first service](/docs/deploy-first-service#deploy-from-github).
***
## Setting up TLS in Generic Cluster
There are two primary ways to add TLS to the load balancer in a generic cluster.
Yes. We recommend using [cert-manager with Let's Encrypt](https://cert-manager.io/docs/getting-started/) if you have a DNS provider.
If you have your own certificate files (for example, from another certificate provider or self-signed), you can use them directly with TrueFoundry.
1. Create a Kubernetes secret with your certificate and key, or create a self-signed certificate:
```shell Shell lines theme={"dark"}
# Generate a self-signed certificate
openssl req -x509 -nodes -days 365 -newkey rsa:2048 \
-keyout tls.key -out tls.crt \
-subj "/CN=*.example.com" \
-addext "subjectAltName = DNS:example.com,DNS:*.example.com"
```
```shell Shell lines theme={"dark"}
# Create secret from local certificate files
kubectl create secret tls example-com-tls \
--cert=path/to/cert/file \
--key=path/to/key/file \
-n istio-system
```
2. Once the secret is created, head over to the cluster page and navigate to the `tfy-istio-ingress` add-on. Add the secret name in the `tfyGateway.spec.servers[1].tls.credentialName` section and ensure that `tfyGateway.spec.servers[1].port.protocol` is set to `HTTPS`. Here we are using `example-com-tls` as the secret name, which contains the certificate and key.
```yaml YAML lines theme={"dark"}
servers:
-
- hosts:
- "*"
port:
name: https-tfy-wildcard
number: 443
protocol: HTTPS
tls:
mode: SIMPLE
credentialName: example-com-tls
```
Self-signed certificates will cause browser warnings. They should only be used for testing or internal systems. To connect to services with self-signed certificates, you have to pass the CA certificate to verify the SSL certificate.
Create a DNS record in your DNS provider with the following details:
| Record Type | Record Name | Record value |
| ----------- | ------------------ | ------------------------- |
| CNAME | \*.tfy.example.com | LOADBALANCER\_IP\_ADDRESS |
Follow [Setting up TLS in Generic Cluster](#setting-up-tls-in-generic-cluster) to set up DNS and TLS for deploying workloads to your cluster.
On managed Kubernetes (EKS, GKE, AKS), TrueFoundry automatically discovers node pools. For generic or on-prem clusters, you need to label your nodes so TrueFoundry can identify and group them into node pools.
**1. Add a node pool label to every node**
Pick a label key (e.g. `truefoundry.com/nodepool`) and apply it to each node with the pool name as the value:
```bash theme={"dark"}
kubectl label nodes truefoundry.com/nodepool=
```
Then tell TrueFoundry which label key to look for:
1. Go to **Clusters** in the platform, click **Edit** on your cluster.
2. Toggle on **Advanced Fields**.
3. Under **Node Label Keys**, set the **Nodepool Selector Label** to your chosen key (e.g. `truefoundry.com/nodepool`).
**2. Label GPU nodes with the GPU type**
If you have GPU node pools, each GPU node must also carry a GPU type label so TrueFoundry can match workloads to the right hardware:
```bash theme={"dark"}
kubectl label nodes truefoundry.com/gpu_type=
```
Supported `GPU_TYPE` values: `A10G`, `A10_12GB`, `A10_24GB`, `A10_4GB`, `A10_8GB`, `A100_40GB`, `A100_80GB`, `H100_80GB`, `H100_94GB`, `H200`, `L4`, `L40S`, `P100`, `P4`, `T4`, `V100`.
You can start by [deploying your first service](/docs/deploy-first-service#deploy-from-github).
***
## Setting up TLS in Generic Cluster
There are two primary ways to add TLS to the load balancer in a generic cluster.
Yes. We recommend using [cert-manager with Let's Encrypt](https://cert-manager.io/docs/getting-started/) if you have a DNS provider.
If you have your own certificate files (for example, from another certificate provider or self-signed), you can use them directly with TrueFoundry.
1. Create a Kubernetes secret with your certificate and key, or create a self-signed certificate:
```shell Shell lines theme={"dark"}
# Generate a self-signed certificate
openssl req -x509 -nodes -days 365 -newkey rsa:2048 \
-keyout tls.key -out tls.crt \
-subj "/CN=*.example.com" \
-addext "subjectAltName = DNS:example.com,DNS:*.example.com"
```
```shell Shell lines theme={"dark"}
# Create secret from local certificate files
kubectl create secret tls example-com-tls \
--cert=path/to/cert/file \
--key=path/to/key/file \
-n istio-system
```
2. Once the secret is created, head over to the cluster page and navigate to the `tfy-istio-ingress` add-on. Add the secret name in the `tfyGateway.spec.servers[1].tls.credentialName` section and ensure that `tfyGateway.spec.servers[1].port.protocol` is set to `HTTPS`. Here we are using `example-com-tls` as the secret name, which contains the certificate and key.
```yaml YAML lines theme={"dark"}
servers:
-
- hosts:
- "*"
port:
name: https-tfy-wildcard
number: 443
protocol: HTTPS
tls:
mode: SIMPLE
credentialName: example-com-tls
```
Self-signed certificates will cause browser warnings. They should only be used for testing or internal systems. To connect to services with self-signed certificates, you have to pass the CA certificate to verify the SSL certificate.