> ## Documentation Index
> Fetch the complete documentation index at: https://www.truefoundry.com/llms.txt
> Use this file to discover all available pages before exploring further.
# GCP
> This page provides an overview of the architecture, requirements and steps to install the TrueFoundry compute plane cluster in GCP
## Architecture
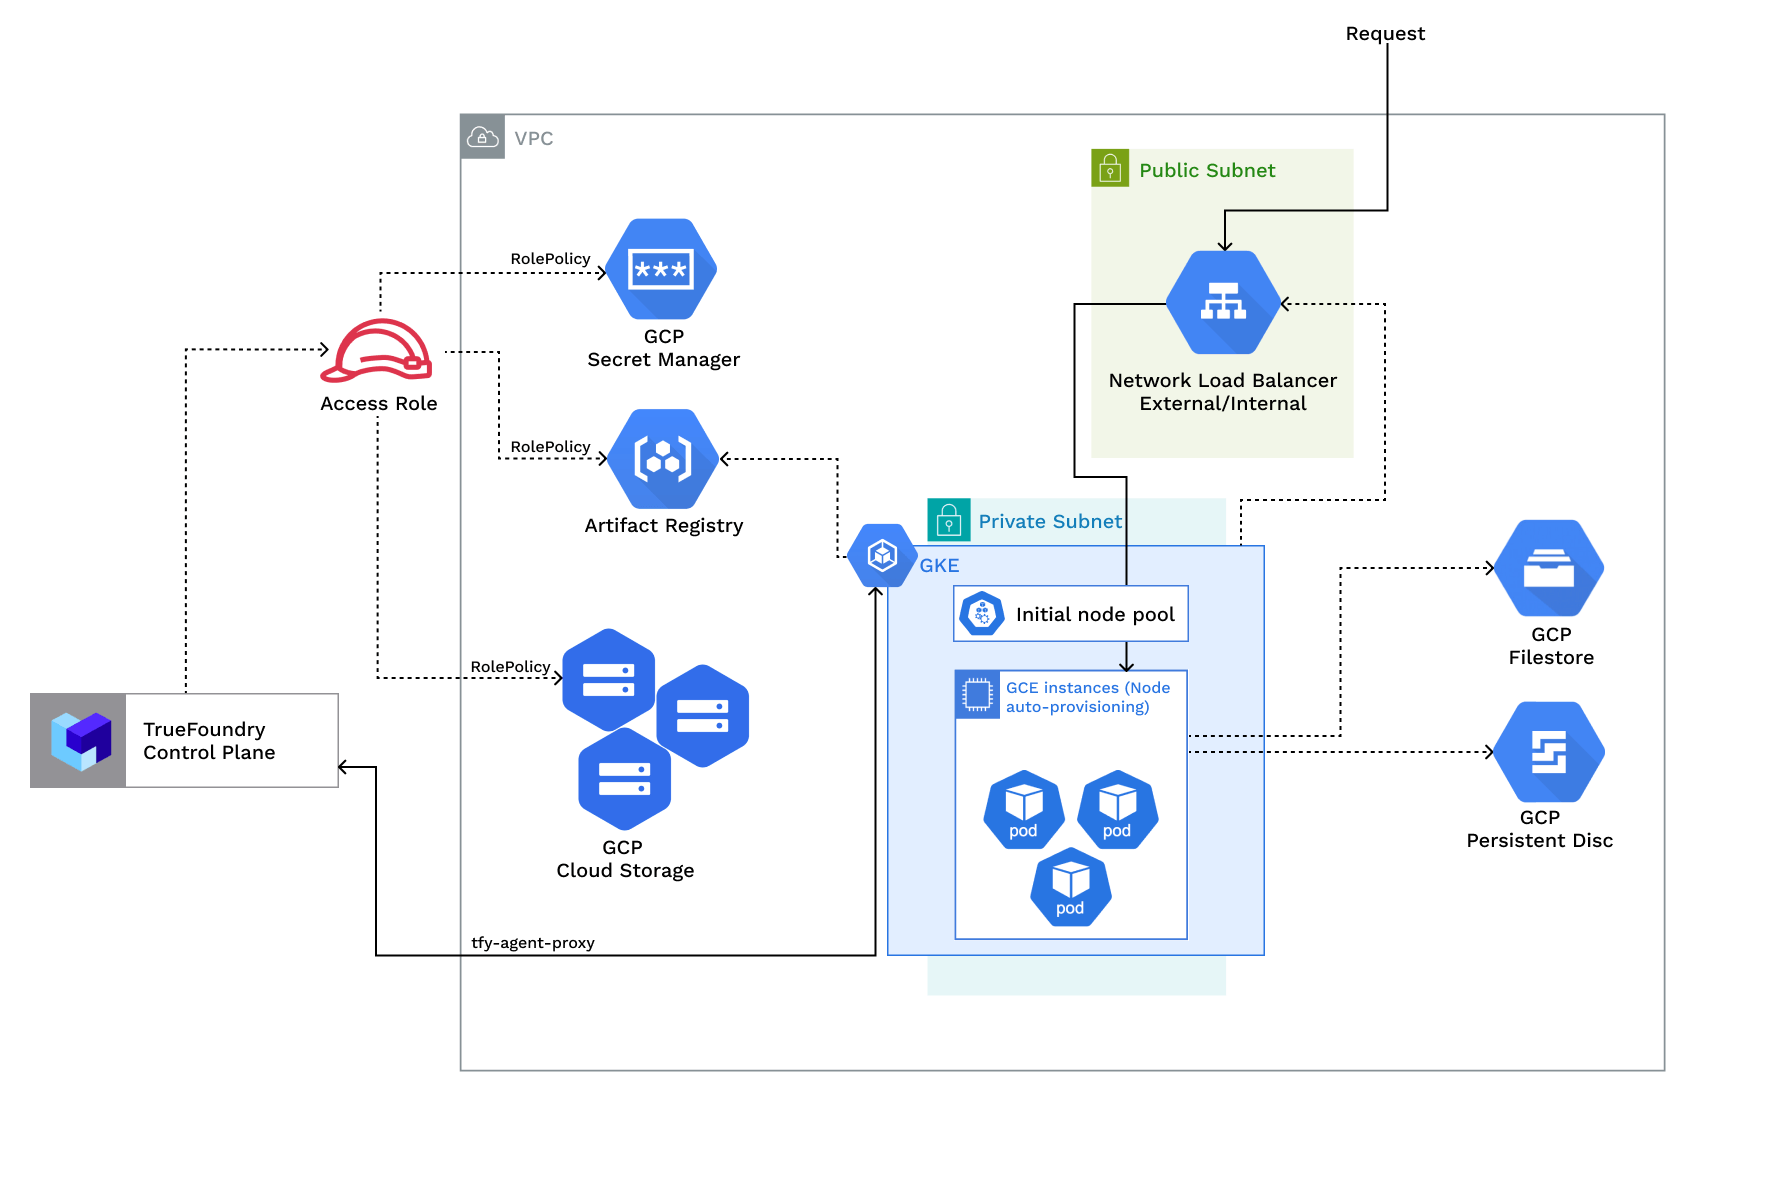
The diagram below shows the architecture of the TrueFoundry compute plane.
 ### Access Policies
The compute plane requires the following IAM policies to operate. These are created automatically during platform deployment.
| Policy | Description |
| --------------------------------------------------------------------------------------------------------------------------------------------------------------------------------------------------------------------------------------------------------------------------------------------------------------------------------------------------------------------------------------------------------------------------------------------------------------------------------------------------------------------------------------------------------------------------------------------------------------------------------------------------------------------------------------------------------------------------------------------------------------------------------------------------------------------------------------------------------------------------------------------------------------------------------------------------------------------------------------------------------------------------------- | -------------------------------------------------------------------------------------------------------------------------------------------------------------------------------------------------------------------------------------------------------------------------------------------------------------------------------------------------------------------------------------------------------- |
| RolePolicy with policies for - [Artifact registry](https://github.com/truefoundry/terraform-google-truefoundry-platform-features/blob/c1d198b003e6673e65a64c8e262bf8c07fb1f6ea/iam.tf#L117-L144), [Secrets manager](https://github.com/truefoundry/terraform-google-truefoundry-platform-features/blob/c1d198b003e6673e65a64c8e262bf8c07fb1f6ea/iam.tf#L16-L28), [Blob storage](https://github.com/truefoundry/terraform-google-truefoundry-platform-features/blob/c1d198b003e6673e65a64c8e262bf8c07fb1f6ea/iam.tf#L52-L68), [Cluster viewer](https://github.com/truefoundry/terraform-google-truefoundry-platform-features/blob/c1d198b003e6673e65a64c8e262bf8c07fb1f6ea/iam.tf#L92-L99), [IAM serviceaccount token creator](https://github.com/truefoundry/terraform-google-truefoundry-platform-features/blob/c1d198b003e6673e65a64c8e262bf8c07fb1f6ea/iam.tf#L160), [Logging viewer](https://github.com/truefoundry/terraform-google-truefoundry-platform-features/blob/c1d198b003e6673e65a64c8e262bf8c07fb1f6ea/iam.tf#L168) | Role `-platform-user` with permissions for:
### Access Policies
The compute plane requires the following IAM policies to operate. These are created automatically during platform deployment.
| Policy | Description |
| --------------------------------------------------------------------------------------------------------------------------------------------------------------------------------------------------------------------------------------------------------------------------------------------------------------------------------------------------------------------------------------------------------------------------------------------------------------------------------------------------------------------------------------------------------------------------------------------------------------------------------------------------------------------------------------------------------------------------------------------------------------------------------------------------------------------------------------------------------------------------------------------------------------------------------------------------------------------------------------------------------------------------------- | -------------------------------------------------------------------------------------------------------------------------------------------------------------------------------------------------------------------------------------------------------------------------------------------------------------------------------------------------------------------------------------------------------- |
| RolePolicy with policies for - [Artifact registry](https://github.com/truefoundry/terraform-google-truefoundry-platform-features/blob/c1d198b003e6673e65a64c8e262bf8c07fb1f6ea/iam.tf#L117-L144), [Secrets manager](https://github.com/truefoundry/terraform-google-truefoundry-platform-features/blob/c1d198b003e6673e65a64c8e262bf8c07fb1f6ea/iam.tf#L16-L28), [Blob storage](https://github.com/truefoundry/terraform-google-truefoundry-platform-features/blob/c1d198b003e6673e65a64c8e262bf8c07fb1f6ea/iam.tf#L52-L68), [Cluster viewer](https://github.com/truefoundry/terraform-google-truefoundry-platform-features/blob/c1d198b003e6673e65a64c8e262bf8c07fb1f6ea/iam.tf#L92-L99), [IAM serviceaccount token creator](https://github.com/truefoundry/terraform-google-truefoundry-platform-features/blob/c1d198b003e6673e65a64c8e262bf8c07fb1f6ea/iam.tf#L160), [Logging viewer](https://github.com/truefoundry/terraform-google-truefoundry-platform-features/blob/c1d198b003e6673e65a64c8e262bf8c07fb1f6ea/iam.tf#L168) | Role `-platform-user` with permissions for:
- Creating and managing blob storage buckets
- Managing secrets in secret manager
- Pulling and pushing images to artifact registry
- Enabling cloud integration for GCP (node level details)
- Viewing cluster autoscaler logs
- Creating Service Account keys (Service Account key creation should be allowed) |
## Requirements
Common requirements for setting up the compute plane:
* Billing must be enabled for the GCP account.
* The following APIs must be enabled in the project:
* Compute Engine API
* Kubernetes Engine API
* Cloud Storage API (blob storage buckets)
* Artifact Registry API (Docker registry and image builds)
* Secret Manager API
* Egress access to container registries — `public.ecr.aws`, `quay.io`, `ghcr.io`, `tfy.jfrog.io`, `docker.io/natsio`, `nvcr.io`, `registry.k8s.io` — to pull images for ArgoCD, NATS, GPU Operator, Argo Rollouts, Argo Workflows, Istio, and Keda.
* A domain mapped to the service endpoints, plus a certificate to encrypt traffic. A wildcard domain such as `*.services.example.com` is preferred. TrueFoundry supports path-based routing (e.g. `services.example.com/tfy/*`), but many frontend applications do not. See [Setting up TLS in GCP](#setting-up-tls-in-gcp) for details.
* Sufficient CPU/GPU quotas for your use case. Check and increase them at [GCP compute quotas](https://cloud.google.com/compute/quotas).
* Service account key creation must be allowed for the service account used by the platform.
* Sufficient permissions on the GCP project to create the compute-plane resources. Project Owner/Editor is the simplest; for least privilege, see [Permissions required to create the infrastructure](#permissions-required-to-create-the-infrastructure).
### Permissions required to create the infrastructure
Bind the following predefined roles to the service account **at the project**. This is the base cluster set plus the compute-plane (blob + registry + identity) delta. These roles are service-scoped — broad within a service, never project-wide `roles/editor`/`roles/owner`.
| Predefined role | Why it is needed |
| --------------------------------------- | -------------------------------------------------------------------------------- |
| `roles/container.admin` | GKE cluster + node pools, cluster credentials, and the helm-phase Kubernetes API |
| `roles/compute.networkAdmin` | VPC network, subnetwork, Cloud Router + NAT, firewall, routes |
| `roles/iam.serviceAccountUser` | `actAs` the node service account onto GKE nodes |
| `roles/dns.admin` | Managed DNS zone (only when the DNS feature is enabled) |
| `roles/serviceusage.serviceUsageAdmin` | Enable the prerequisite APIs (only if the principal enables them itself) |
| `roles/storage.admin` | The platform-features GCS bucket (and its objects on `force_destroy` teardown) |
| `roles/iam.serviceAccountAdmin` | Create and manage the platform-features service account |
| `roles/iam.serviceAccountKeyAdmin` | Create the downloadable service-account key |
| `roles/iam.roleAdmin` | Create the four platform-features custom roles |
| `roles/resourcemanager.projectIamAdmin` | Set the platform-features project IAM bindings |
`roles/resourcemanager.projectIamAdmin`, `roles/iam.roleAdmin`, and `roles/iam.serviceAccountKeyAdmin` are **high-privilege**: they can set any project IAM binding, define a role with arbitrary permissions, and mint a long-lived downloadable key respectively. Review before granting, and treat the generated key as secret material.
API enablement is a prerequisite, not a resource in any module. Either pre-enable these on the project, or grant `roles/serviceusage.serviceUsageAdmin` so the principal can enable them:
* `container.googleapis.com` — GKE
* `compute.googleapis.com` — VPC / subnet / router / NAT / firewall
* `iam.googleapis.com` — service accounts + custom roles
* `storage.googleapis.com` — GCS bucket
* `secretmanager.googleapis.com` — referenced by the secret-manager custom role
* `artifactregistry.googleapis.com` — referenced by the artifact-registry custom role
* `dns.googleapis.com` — only when the DNS feature is enabled
1. The new VPC subnet should have a CIDR range of /24 or larger. Secondary ranges for pods (min /20) and services (min /24) are required. Secondary range can be from a non-routable range. This is to ensure capacity for \~250 instances and 4096 pods.
2. A user/service account to provision the infrastructure.
1. The existing VPC subnet should have a CIDR range of /24 or larger. Secondary ranges for pods (min /20) and services (min /24) are required. Secondary range can be from a non-routable range. This is to ensure capacity for \~250 instances and 4096 pods. Secondary ranges for pods **should be named** as `pods` and secondary ranges for services **should be named** as `services`.
2. The VPC should have Cloud Router and Cloud NAT for private subnets. Ports 80 and 443 should be open for the load balancer. Allow all traffic between the subnets. Ports 443, 6443, 8443, 9443, and 15017 should be allowed from the GKE control plane.
3. A user/service account to provision the infrastructure.
4. If you want to use a shared VPC (subnet) for the GKE cluster, ensure that you have followed this [GCP document](https://cloud.google.com/kubernetes-engine/docs/how-to/cluster-shared-vpc) and have given all the [right permissions](https://cloud.google.com/kubernetes-engine/docs/how-to/cluster-shared-vpc#summary_of_roles_granted_on_subnets) to the internal project service account.
1. GKE Version should be 1.30 or later.
2. [NAP](https://cloud.google.com/kubernetes-engine/docs/how-to/node-auto-provisioning) should be enabled for the cluster. Ensure min and max for GPUs are also set.
```bash theme={"dark"}
gcloud container clusters update CLUSTER_NAME \
--enable-autoprovisioning \
--autoprovisioning-resource-limits=nvidia-tesla-t4=0:256 \
--location=REGION
```
3. Workload identity should be enabled for the cluster with workload pool `project_id.svc.id.goog`.
```bash theme={"dark"}
# Enable Workload Identity feature
gcloud container clusters update CLUSTER_NAME \
--workload-pool=PROJECT_ID.svc.id.goog \
--region=REGION
# Enable Workload Identity on the node pool
gcloud container node-pools update NODE_POOL_NAME \
--cluster=CLUSTER_NAME \
--workload-identity-config=workload-pool=PROJECT_ID.svc.id.goog \
--region=REGION
```
## Setting up compute plane
TrueFoundry compute plane infrastructure is provisioned using OpenTofu/Terraform. You can download the OpenTofu/Terraform code for your exact account by filling up your account details and downloading a script that can be executed on your local machine.
To enable the deployment feature which allows you to deploy services through the platform, you need to enable it;
* In the left hand navigation, go to `Settings` then `Platform Feature Visibility` under `Preferences`
* Click on `Edit` button. Then enable the toggle for `Enable Deployment`
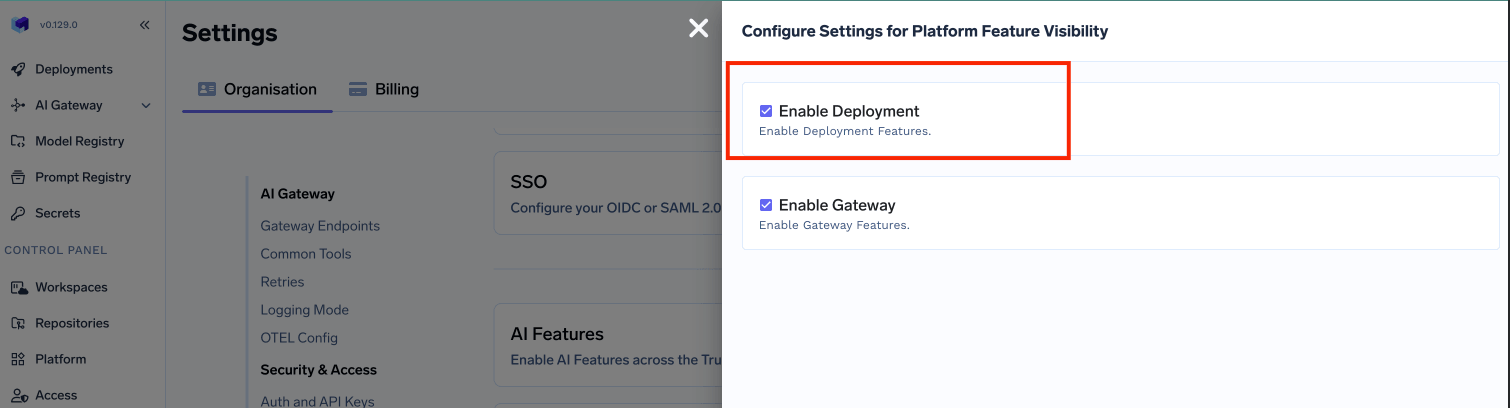 * Click on `Save` button.
This will enable the deployment feature in the platform and allow you to create either a control plane and compute plane.
* Click on `Save` button.
This will enable the deployment feature in the platform and allow you to create either a control plane and compute plane.
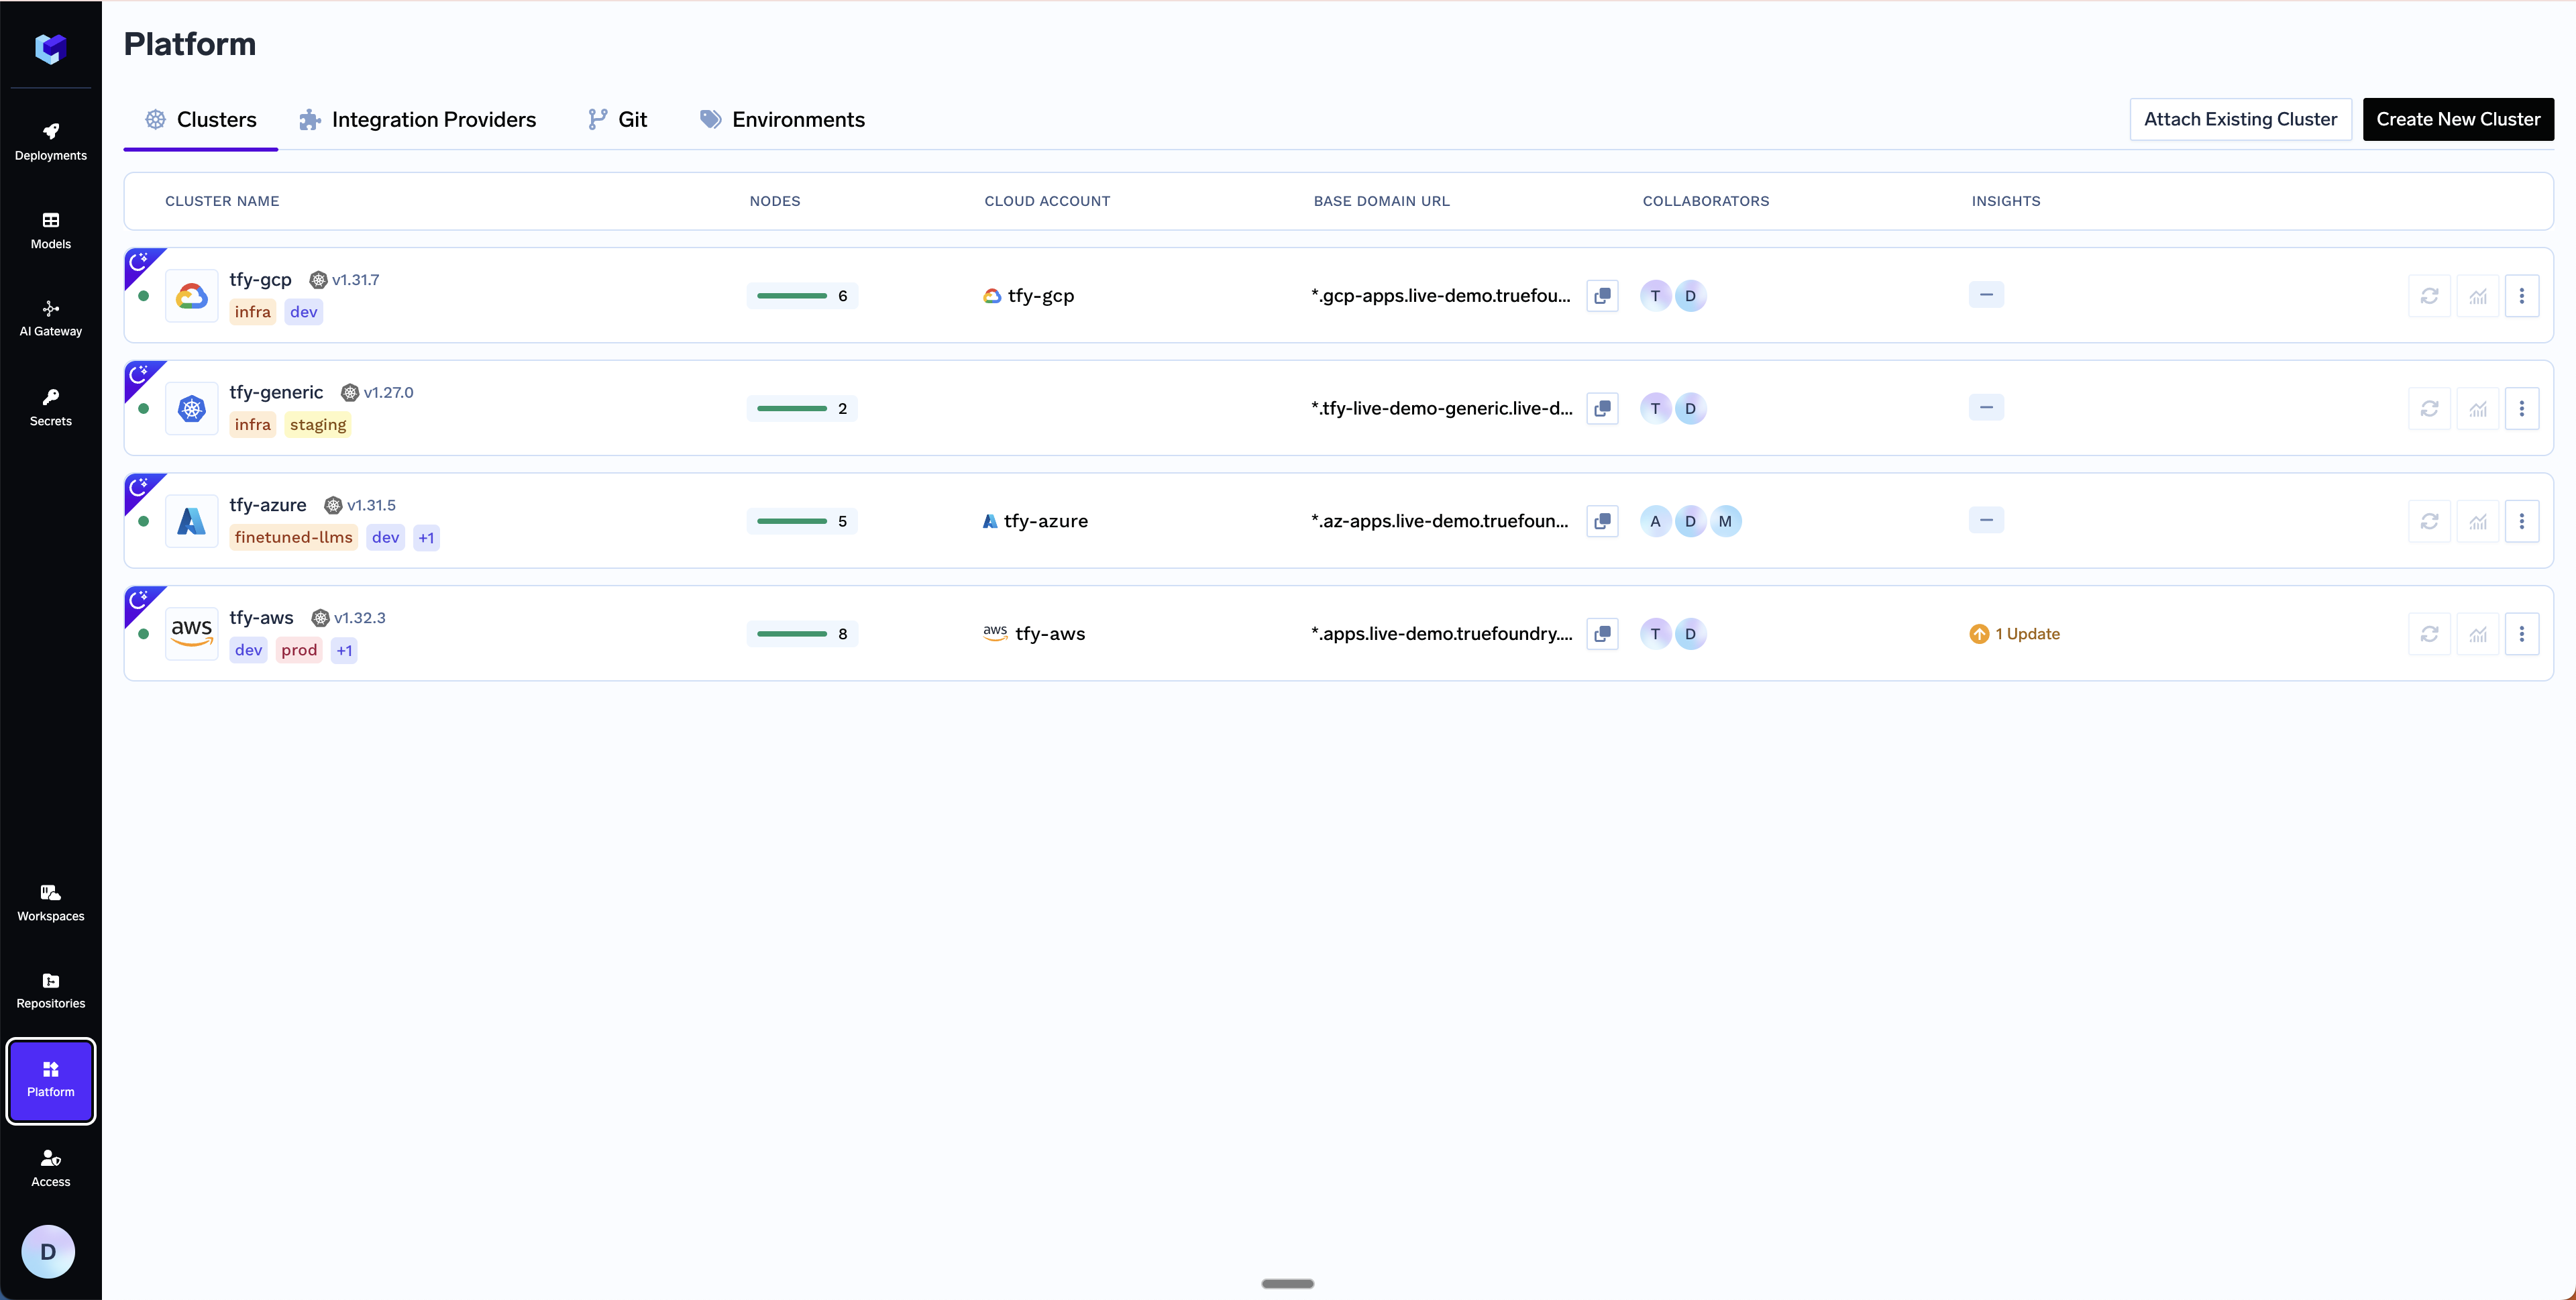
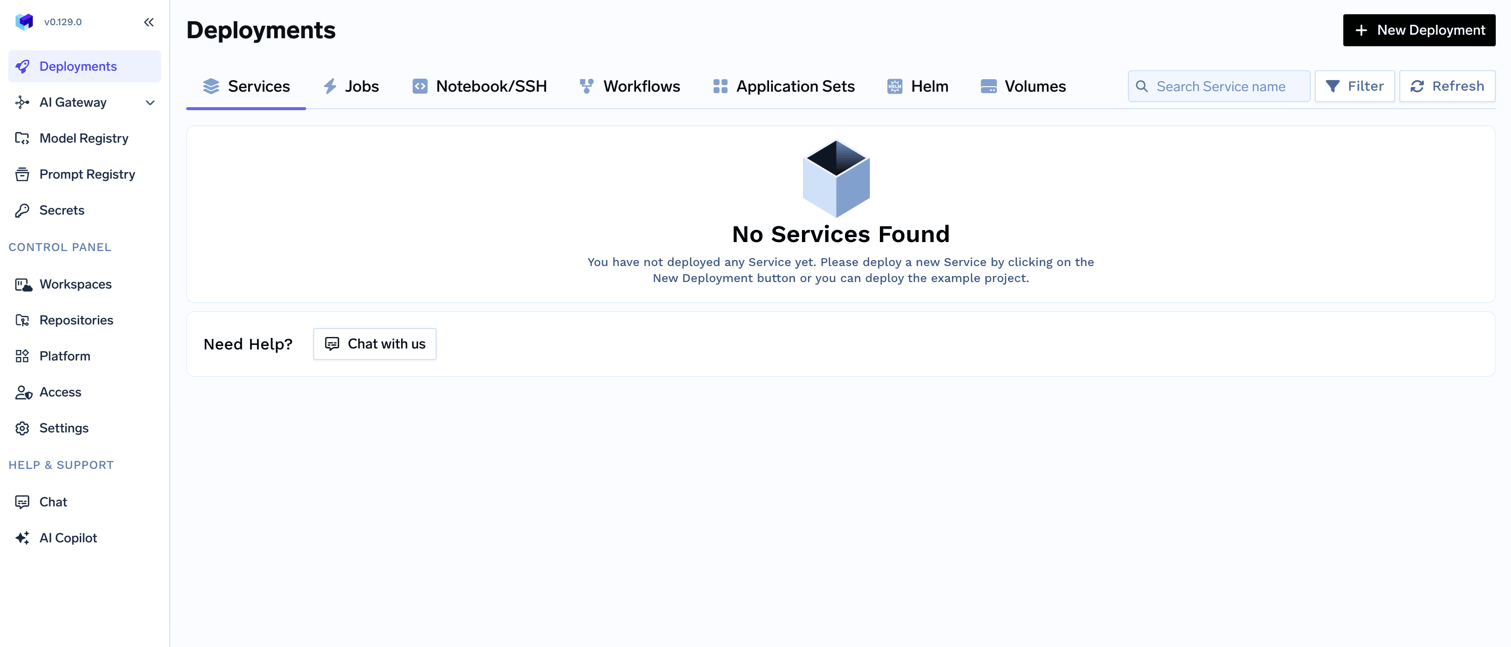 Go to the platform section in the left panel and click on `Clusters`. You can click on `Create New Cluster` or `Attach Existing Cluster` depending on your use case. Read the requirements and if everything is satisfied, click on `Continue`.
 A form will be presented with the details for the new cluster to be created. Fill in with your cluster details. Click `Submit` when done.
The key fields to fill up here are:
* `Region` - The region and availability zones where you want to create the cluster.
* `Project ID` - The project ID where you want to create the cluster.
* `Cluster Name` - A name for your cluster.
* `Cluster Version` and `Master node IPv4 block` - The version of the cluster and the IPv4 block for the master nodes.
* `Network Configuration` - Choose between `New network` or `Existing network` depending on your use case.
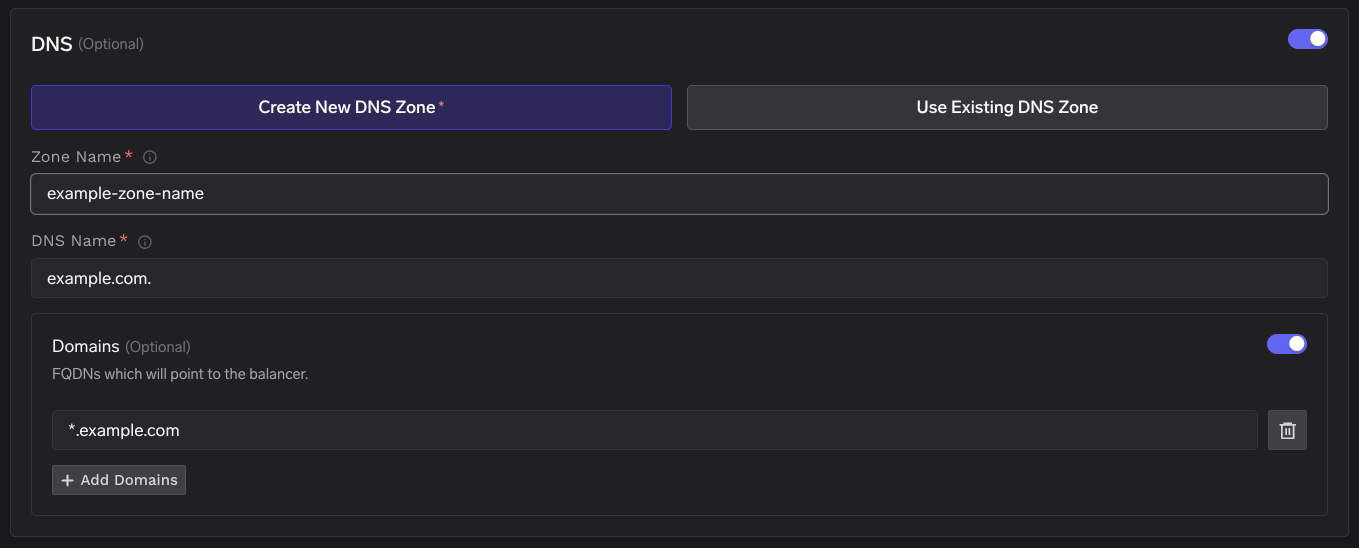
* `DNS Configuration` - Configure the DNS zone and domains that will point to the cluster’s load balancer. This also provisions a TLS certificate for those domains. Select New DNS Zone or Existing DNS Zone if you want TrueFoundry to provision DNS in GCP. If you use an external DNS provider (e.g., Route53, Cloudflare), you can skip this section.
A form will be presented with the details for the new cluster to be created. Fill in with your cluster details. Click `Submit` when done.
The key fields to fill up here are:
* `Region` - The region and availability zones where you want to create the cluster.
* `Project ID` - The project ID where you want to create the cluster.
* `Cluster Name` - A name for your cluster.
* `Cluster Version` and `Master node IPv4 block` - The version of the cluster and the IPv4 block for the master nodes.
* `Network Configuration` - Choose between `New network` or `Existing network` depending on your use case.
* `DNS Configuration` - Configure the DNS zone and domains that will point to the cluster’s load balancer. This also provisions a TLS certificate for those domains. Select New DNS Zone or Existing DNS Zone if you want TrueFoundry to provision DNS in GCP. If you use an external DNS provider (e.g., Route53, Cloudflare), you can skip this section.
 * `GCS Bucket for OpenTofu/Terraform State` - OpenTofu/Terraform state will be stored in this bucket. It can be a preexisting bucket or a new bucket name. The new bucket will automatically be created by our script.
* `Platform Features` - This is to decide which features like Blob Storage, Cluster Integration, Docker Registry, and Secrets Manager will be enabled for your cluster. To read more on how these integrations are used in the platform, please refer to the [platform features](/docs/infrastructure/deploy-compute-plane) page.
The key fields to fill up here are:
* `Region` - The region and availability zones where you want to create the cluster.
* `Project ID` - The project ID where you want to create the cluster.
* `Cluster Name` - A name for your cluster.
* `Cluster Addons` - TrueFoundry needs to install addons like ArgoCD, Argo Workflows, Keda, Istio, etc. Please disable the addons that are already installed on your cluster so that the TrueFoundry installation does not override the existing configuration and affect your existing workloads.
* `DNS Configuration` - Configure the DNS zone and domains that will point to the cluster’s load balancer. This also provisions a TLS certificate for those domains. Select New DNS Zone or Existing DNS Zone if you want TrueFoundry to provision DNS in GCP. If you use an external DNS provider (e.g., Route53, Cloudflare), you can skip this section.
* `GCS Bucket for OpenTofu/Terraform State` - OpenTofu/Terraform state will be stored in this bucket. It can be a preexisting bucket or a new bucket name. The new bucket will automatically be created by our script.
* `Platform Features` - This is to decide which features like Blob Storage, Cluster Integration, Parameter Store, Docker Registry, and Secrets Manager will be enabled for your cluster. To read more on how these integrations are used in the platform, please refer to the [platform features](/docs/infrastructure/deploy-compute-plane) page.
You will be presented with a `curl` command to download and execute the script. The script will take care of installing the prerequisites, downloading OpenTofu/Terraform code, and running it on your local machine to create the cluster. This will take around 40-50 minutes to complete.
* `GCS Bucket for OpenTofu/Terraform State` - OpenTofu/Terraform state will be stored in this bucket. It can be a preexisting bucket or a new bucket name. The new bucket will automatically be created by our script.
* `Platform Features` - This is to decide which features like Blob Storage, Cluster Integration, Docker Registry, and Secrets Manager will be enabled for your cluster. To read more on how these integrations are used in the platform, please refer to the [platform features](/docs/infrastructure/deploy-compute-plane) page.
The key fields to fill up here are:
* `Region` - The region and availability zones where you want to create the cluster.
* `Project ID` - The project ID where you want to create the cluster.
* `Cluster Name` - A name for your cluster.
* `Cluster Addons` - TrueFoundry needs to install addons like ArgoCD, Argo Workflows, Keda, Istio, etc. Please disable the addons that are already installed on your cluster so that the TrueFoundry installation does not override the existing configuration and affect your existing workloads.
* `DNS Configuration` - Configure the DNS zone and domains that will point to the cluster’s load balancer. This also provisions a TLS certificate for those domains. Select New DNS Zone or Existing DNS Zone if you want TrueFoundry to provision DNS in GCP. If you use an external DNS provider (e.g., Route53, Cloudflare), you can skip this section.
* `GCS Bucket for OpenTofu/Terraform State` - OpenTofu/Terraform state will be stored in this bucket. It can be a preexisting bucket or a new bucket name. The new bucket will automatically be created by our script.
* `Platform Features` - This is to decide which features like Blob Storage, Cluster Integration, Parameter Store, Docker Registry, and Secrets Manager will be enabled for your cluster. To read more on how these integrations are used in the platform, please refer to the [platform features](/docs/infrastructure/deploy-compute-plane) page.
You will be presented with a `curl` command to download and execute the script. The script will take care of installing the prerequisites, downloading OpenTofu/Terraform code, and running it on your local machine to create the cluster. This will take around 40-50 minutes to complete.
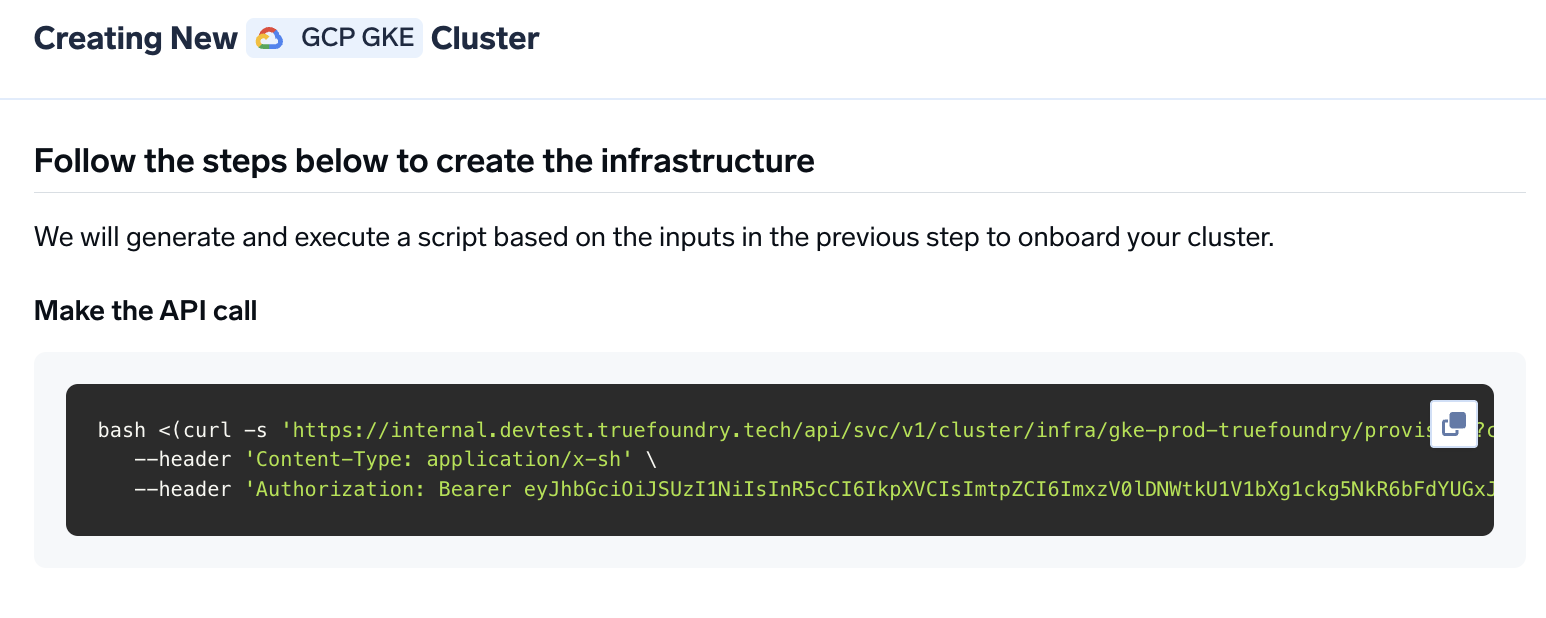 Once the script is executed, the cluster will be shown as connected in the platform.
You can get the load balancer's IP address by going to the platform section in the bottom left panel under the Clusters section. Under the preferred cluster, you'll see the load balancer IP address under the `Base Domain URL` section.
Once the script is executed, the cluster will be shown as connected in the platform.
You can get the load balancer's IP address by going to the platform section in the bottom left panel under the Clusters section. Under the preferred cluster, you'll see the load balancer IP address under the `Base Domain URL` section.
 Create a DNS record in Google Cloud DNS or your DNS provider with the following details:
| Record Type | Record Name | Record value |
| ----------- | ------------------ | ------------------------- |
| A. | \*.tfy.example.com | LOADBALANCER\_IP\_ADDRESS |
You can start by [deploying your first service](/docs/deploy-first-service#deploy-from-github).
## FAQ
If you have your own certificate files (for example, from another certificate provider or self-signed), you can use them directly with TrueFoundry.
1. Create a Kubernetes secret with your certificate and key, or create a self-signed certificate:
```shell Shell lines theme={"dark"}
# Generate a self-signed certificate
openssl req -x509 -nodes -days 365 -newkey rsa:2048 \
-keyout tls.key -out tls.crt \
-subj "/CN=*.example.com" \
-addext "subjectAltName = DNS:example.com,DNS:*.example.com"
```
```shell Shell lines theme={"dark"}
# Create secret from local certificate files
kubectl create secret tls example-com-tls \
--cert=path/to/cert/file \
--key=path/to/key/file \
-n istio-system
```
2. Once the secret is created, head over to the cluster page and navigate to the `tfy-istio-ingress` add-on. Add the secret name in the `tfyGateway.spec.servers[1].tls.credentialName` section and ensure that `tfyGateway.spec.servers[1].port.protocol` is set to `HTTPS`. Here we are using `example-com-tls` as the secret name, which contains the certificate and key.
```yaml YAML lines theme={"dark"}
servers:
-
- hosts:
- "*"
port:
name: https-tfy-wildcard
number: 443
protocol: HTTPS
tls:
mode: SIMPLE
credentialName: example-com-tls
```
Self-signed certificates will cause browser warnings. They should only be used for testing or internal systems. To connect to services with self-signed certificates, you have to pass the CA certificate to verify the SSL certificate.
Create a DNS record in Google Cloud DNS or your DNS provider with the following details:
| Record Type | Record Name | Record value |
| ----------- | ------------------ | ------------------------- |
| A. | \*.tfy.example.com | LOADBALANCER\_IP\_ADDRESS |
You can start by [deploying your first service](/docs/deploy-first-service#deploy-from-github).
## FAQ
If you have your own certificate files (for example, from another certificate provider or self-signed), you can use them directly with TrueFoundry.
1. Create a Kubernetes secret with your certificate and key, or create a self-signed certificate:
```shell Shell lines theme={"dark"}
# Generate a self-signed certificate
openssl req -x509 -nodes -days 365 -newkey rsa:2048 \
-keyout tls.key -out tls.crt \
-subj "/CN=*.example.com" \
-addext "subjectAltName = DNS:example.com,DNS:*.example.com"
```
```shell Shell lines theme={"dark"}
# Create secret from local certificate files
kubectl create secret tls example-com-tls \
--cert=path/to/cert/file \
--key=path/to/key/file \
-n istio-system
```
2. Once the secret is created, head over to the cluster page and navigate to the `tfy-istio-ingress` add-on. Add the secret name in the `tfyGateway.spec.servers[1].tls.credentialName` section and ensure that `tfyGateway.spec.servers[1].port.protocol` is set to `HTTPS`. Here we are using `example-com-tls` as the secret name, which contains the certificate and key.
```yaml YAML lines theme={"dark"}
servers:
-
- hosts:
- "*"
port:
name: https-tfy-wildcard
number: 443
protocol: HTTPS
tls:
mode: SIMPLE
credentialName: example-com-tls
```
Self-signed certificates will cause browser warnings. They should only be used for testing or internal systems. To connect to services with self-signed certificates, you have to pass the CA certificate to verify the SSL certificate.