> ## Documentation Index
> Fetch the complete documentation index at: https://www.truefoundry.com/llms.txt
> Use this file to discover all available pages before exploring further.
# Add authentication to your Endpoints
> Configure endpoint authentication. Secure your services with tokens and access rules.
Truefoundry makes it easy to add authentication to your endpoints. You can authenticate your
endpoint in any of the following ways:
1. **Username and Password Authentication**: In this case, you can provide a username:password combination as a security measure to guard the point. This is very easy to configure but requires passing the credentials around.
2. **JWT Authentication**: In this case, you can provide a JWT token as a security measure to guard the point. In this case, the request to the endpoint will need to have a valid JWT token issued by your identity providers (IDP) like Amazon Cognito, Google, Okta, or Microsoft Entra ID. The gateway will validate the JWT using the public key from the IDP's JWKS endpoint.
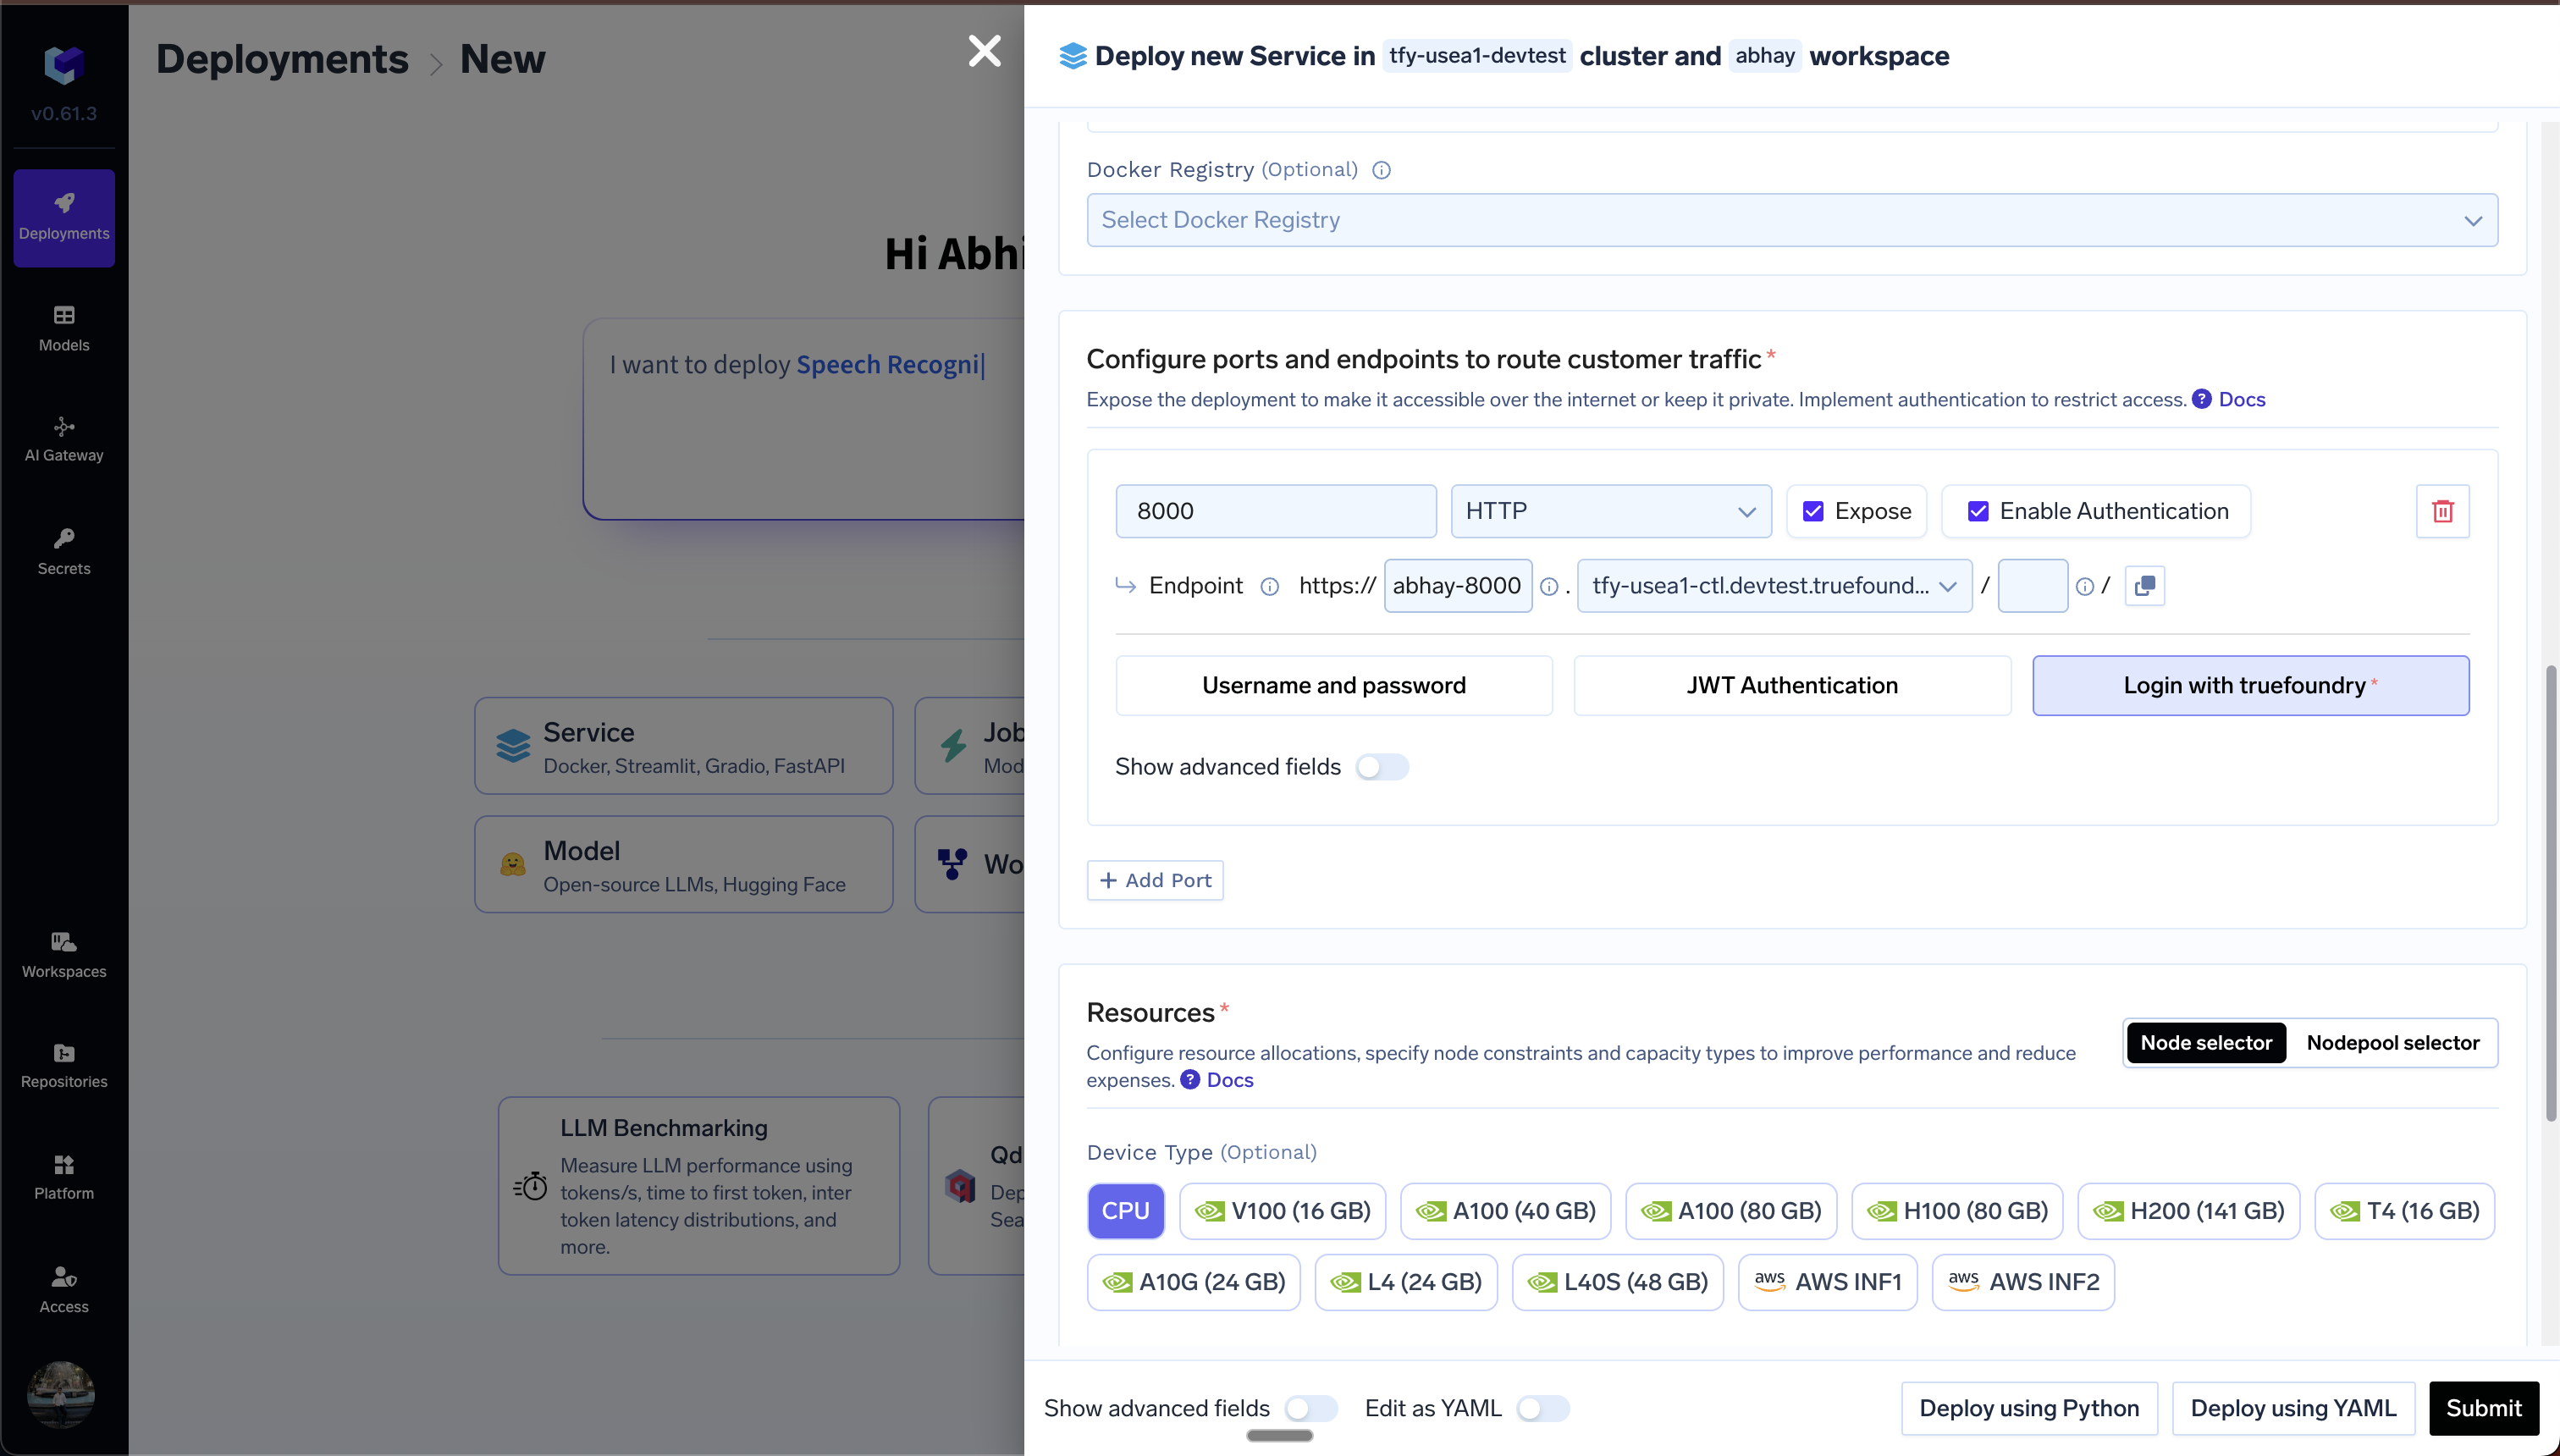
3. **Login With Truefoundry**: In this case, you can provide a Truefoundry login to guard the point. This is very easy to configure by just clicking on the checkbox to enable. In this case, the user will need to be logged in to Truefoundry to be able to access the endpoint.
 ## Username and Password Authentication
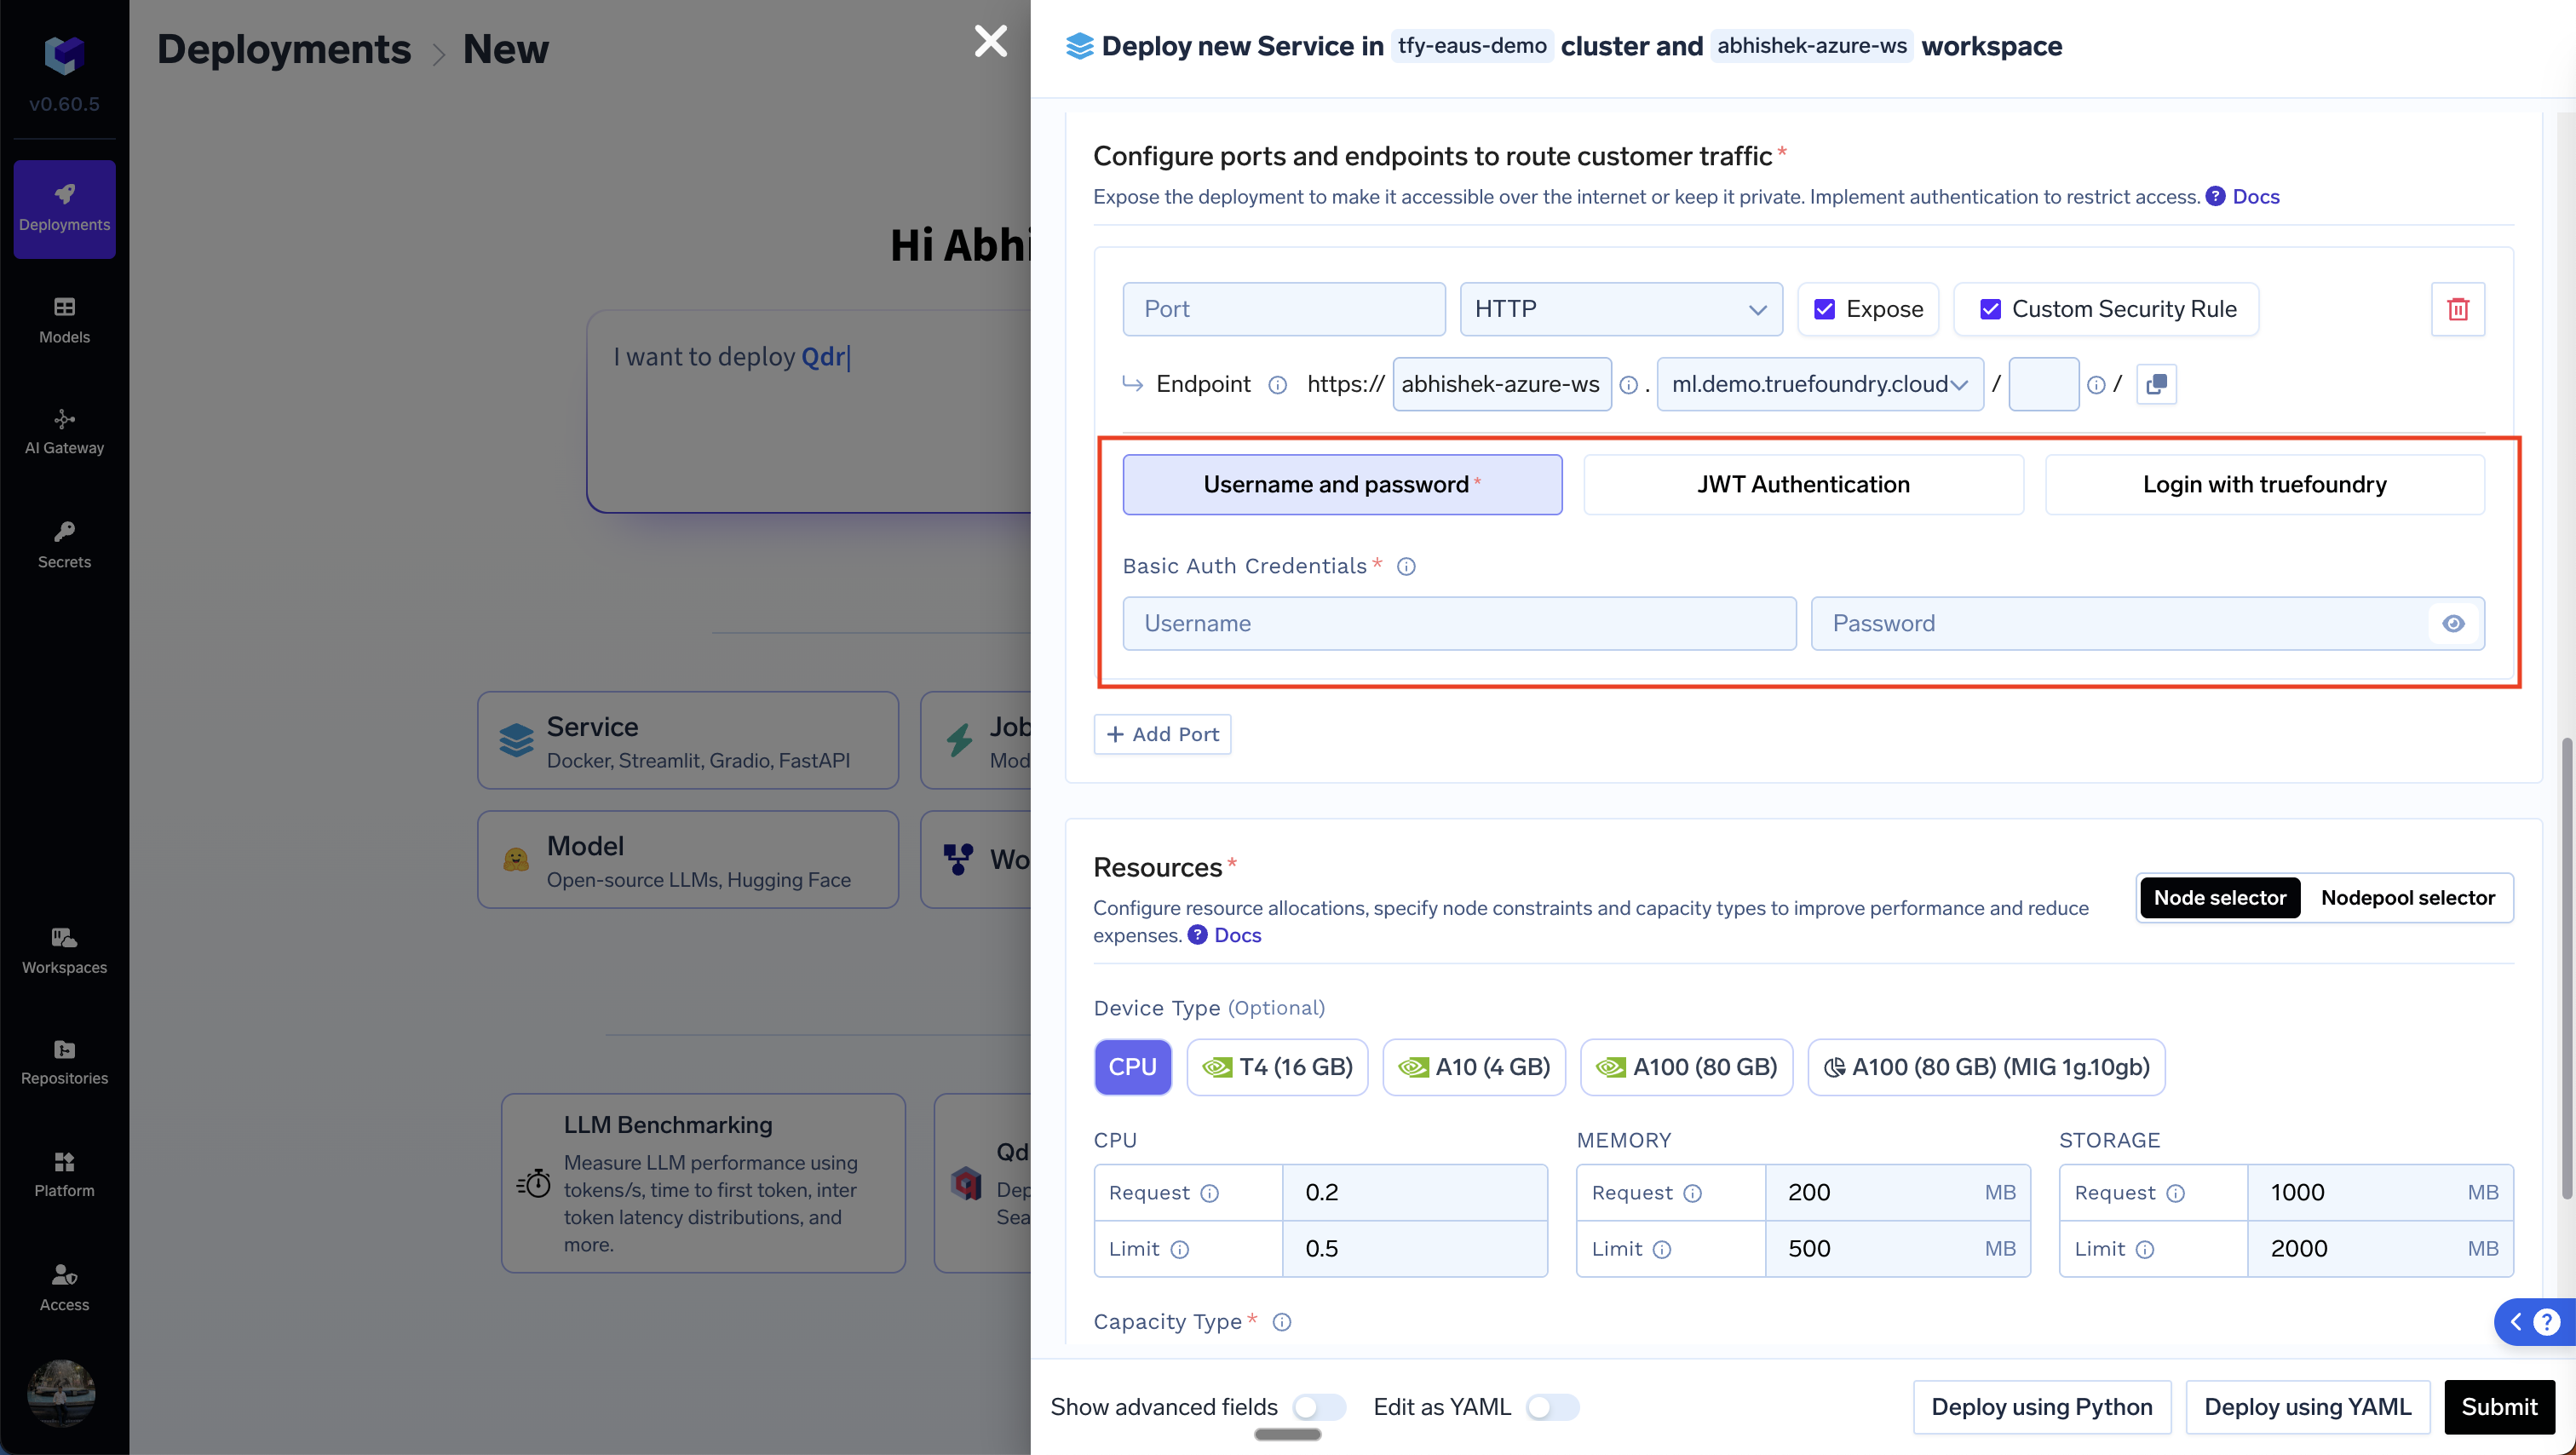
To configure this, please choose the `Username and Password` option after clicking on `Enable Authentication` and provide a value for username and password (Let's say you set the username to *`hello`* and the password to *`pass`*). Once you update the deployment, you can access the endpoint with the credentials in the following ways:
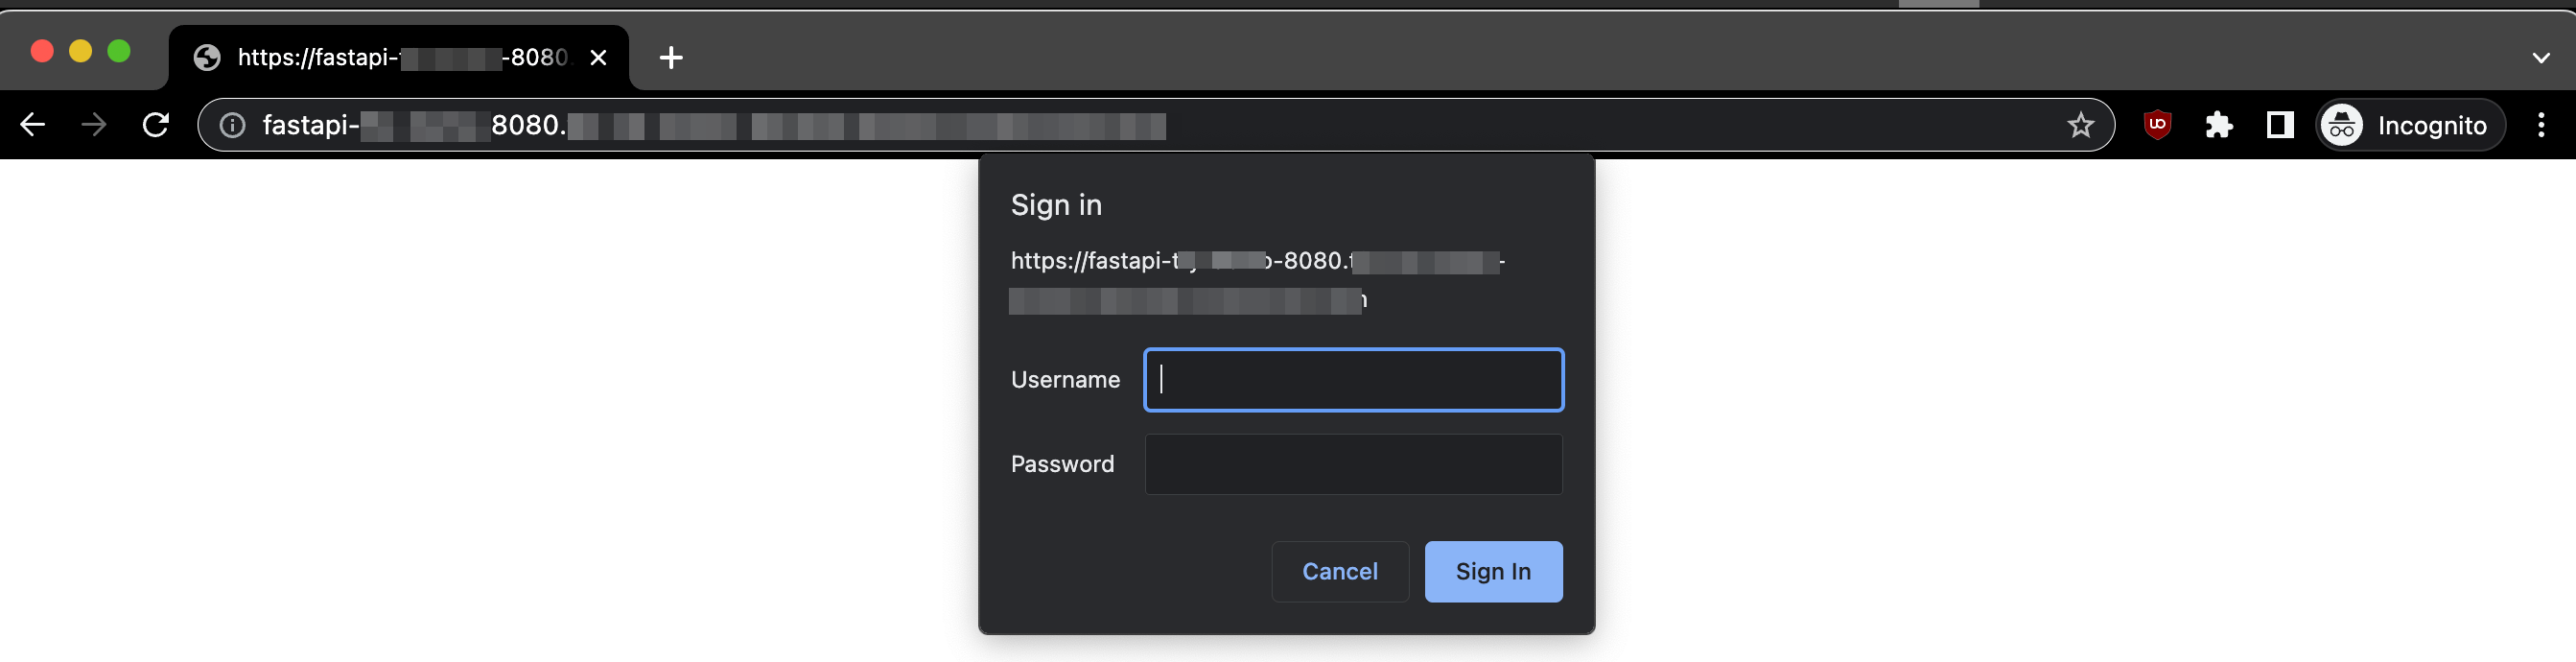
When attempting to access the endpoint from a web browser, you will be prompted to enter your credentials.
## Username and Password Authentication
To configure this, please choose the `Username and Password` option after clicking on `Enable Authentication` and provide a value for username and password (Let's say you set the username to *`hello`* and the password to *`pass`*). Once you update the deployment, you can access the endpoint with the credentials in the following ways:
When attempting to access the endpoint from a web browser, you will be prompted to enter your credentials.
 When using Python, you can pass the credentials in the following manner:
```python lines theme={"dark"}
import requests
endpoint = 'https://fastapi-my-workspace-8080.my-org.com/'
response = requests.get(endpoint, auth=('hello', 'pass'))
```
When using cURL, you'll need to include the credentials as part of the command:
```bash cURL lines theme={"dark"}
curl -v -X GET --user hello:pass https://fastapi-my-workspace-8080.my-org.com/
```
## JWT Authentication
To setup JWT authentication, we first need to setup a **Custom JWT Auth** integration that tells Truefoundry how to validate the JWT token and also do login via Oauth in case you want Oauth2 based login for your service.
### Create a Custom JWT Auth Integration
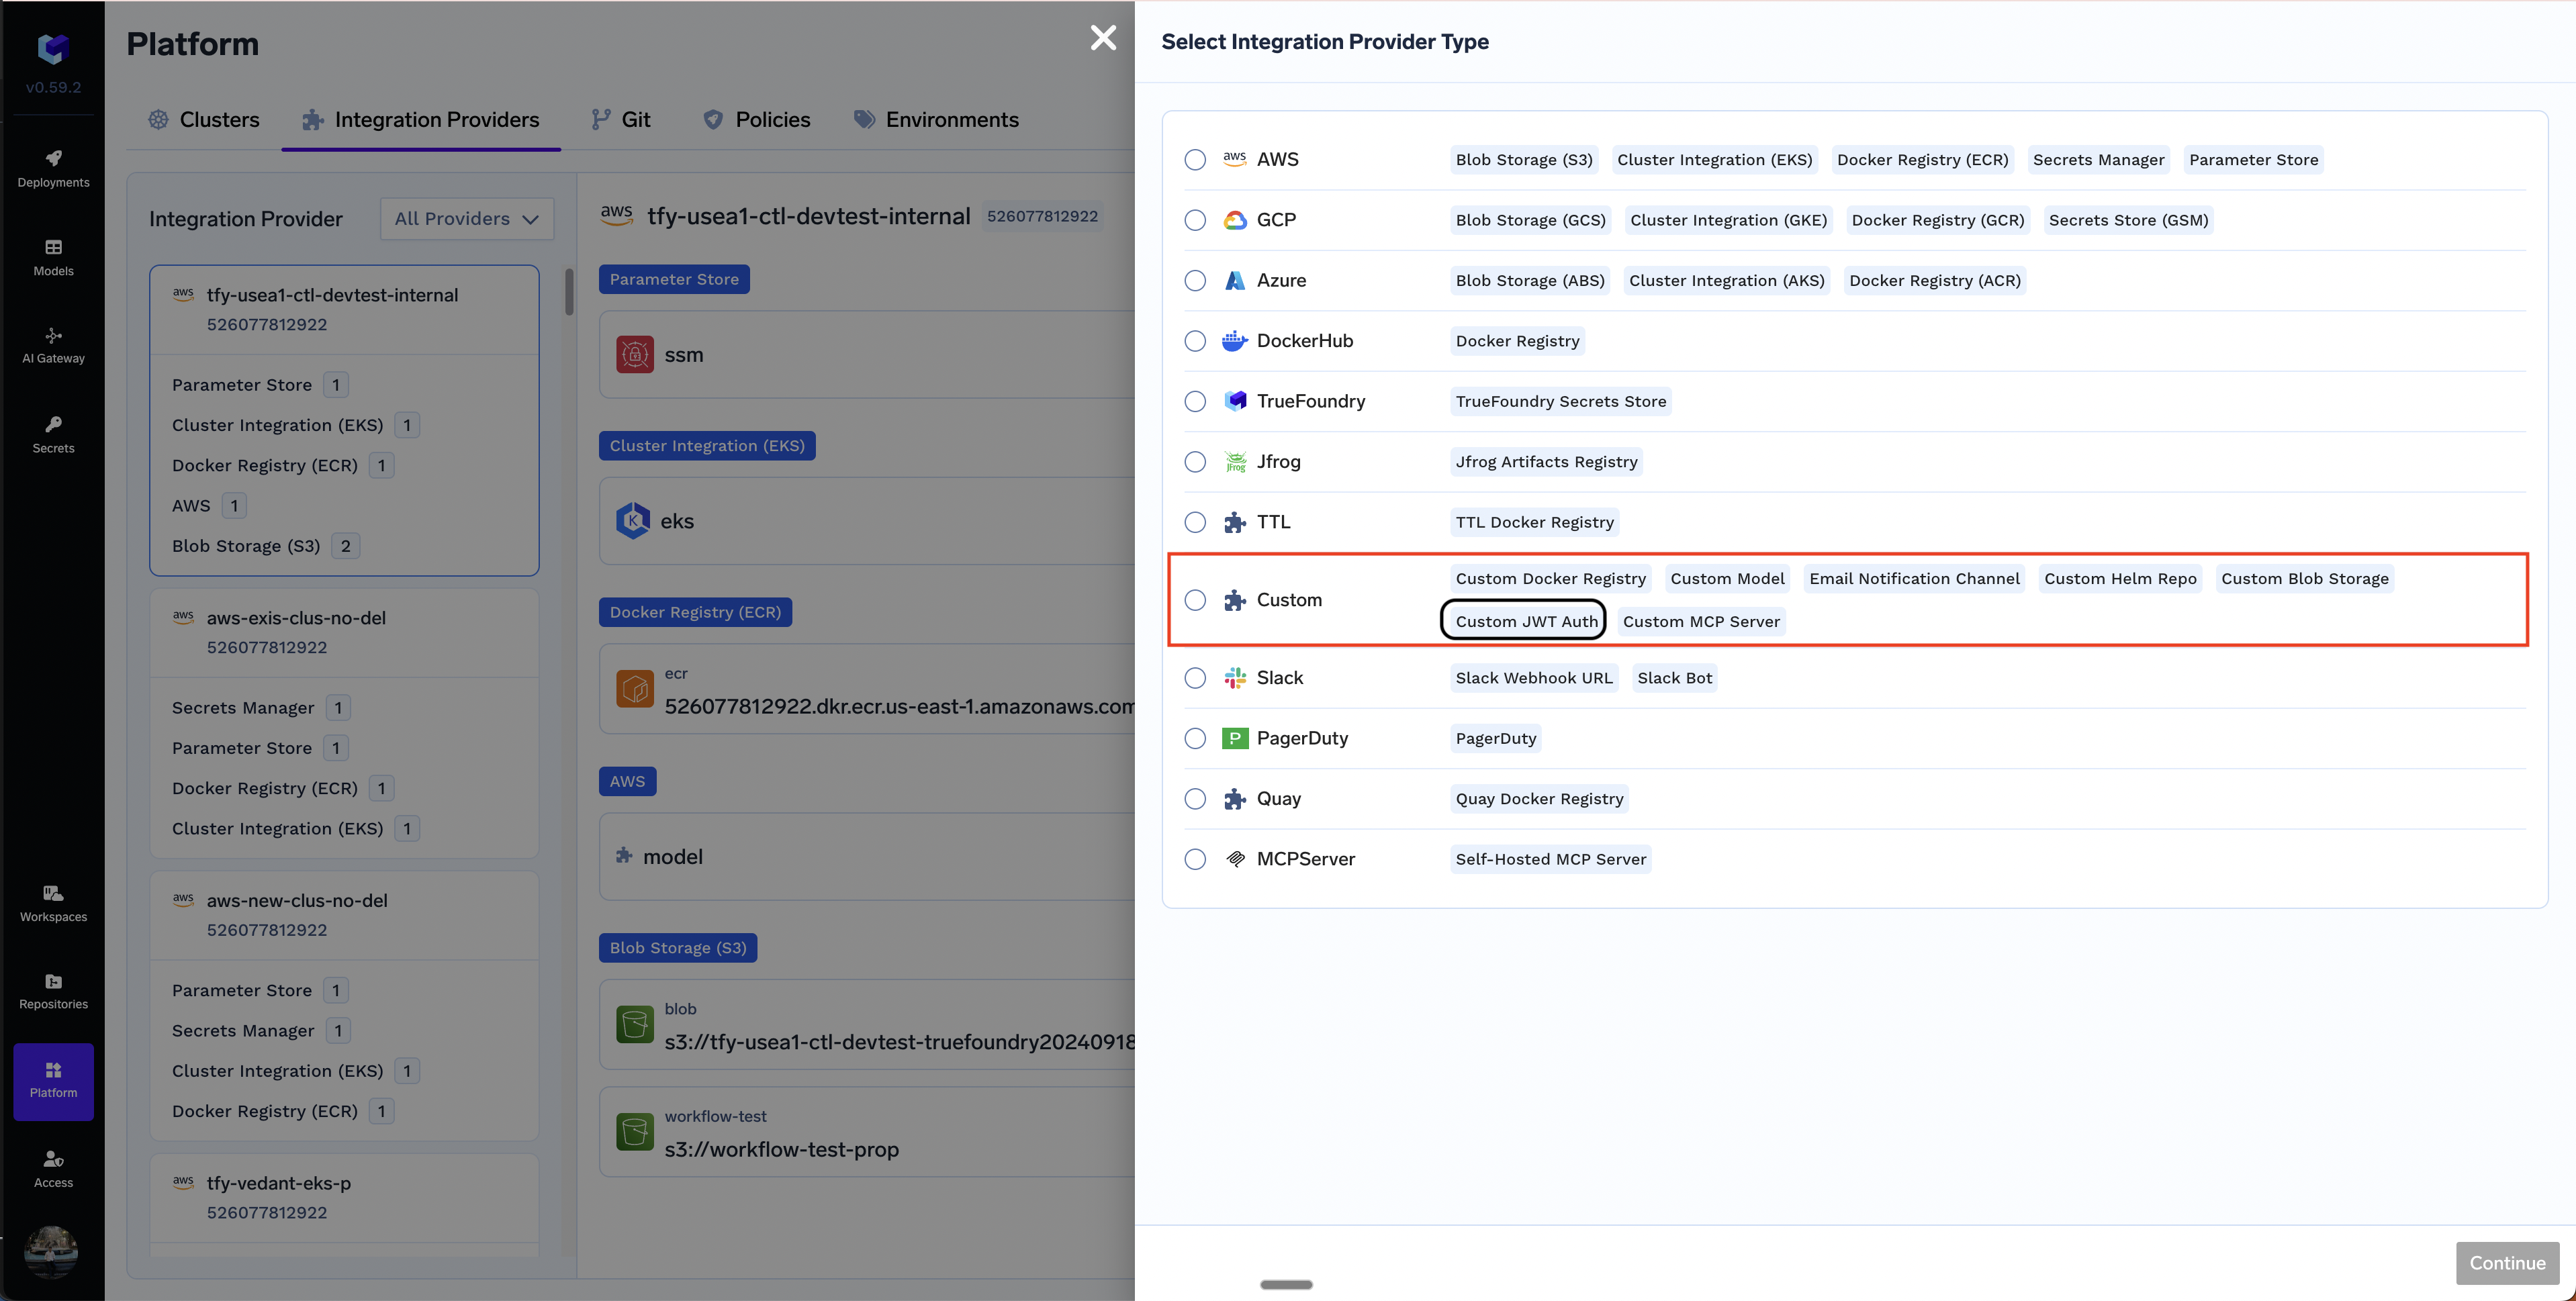
1. Go to the **Platform** page in the left sidebar and click on Integration Providers. Click on **Add Integration Provider** button and choose the **Custom** option.
When using Python, you can pass the credentials in the following manner:
```python lines theme={"dark"}
import requests
endpoint = 'https://fastapi-my-workspace-8080.my-org.com/'
response = requests.get(endpoint, auth=('hello', 'pass'))
```
When using cURL, you'll need to include the credentials as part of the command:
```bash cURL lines theme={"dark"}
curl -v -X GET --user hello:pass https://fastapi-my-workspace-8080.my-org.com/
```
## JWT Authentication
To setup JWT authentication, we first need to setup a **Custom JWT Auth** integration that tells Truefoundry how to validate the JWT token and also do login via Oauth in case you want Oauth2 based login for your service.
### Create a Custom JWT Auth Integration
1. Go to the **Platform** page in the left sidebar and click on Integration Providers. Click on **Add Integration Provider** button and choose the **Custom** option.
 2. Provide the following details about the JWT Integration:
* **Name**: A name to refer to this integration later.
* **Issuer**: The base URL of the authentication provider
* **JWKS URL**: The JSON Web Key Set URI for JWT verification.
* **Oauth2 Client Configuration (Optional)**: Enable Login Provider and provide the values for `Client ID`, `Client Secret`, `Authorization URL`, `Token URL`, and any `Scopes` (e.g. `openid`, `profile`, `email`, etc.)
To get the above values, you will need to create / use an existing application with your identity provider such as Amazon Cognito, Google, Okta, or Azure AD. The steps for each of these providers are outlines below:
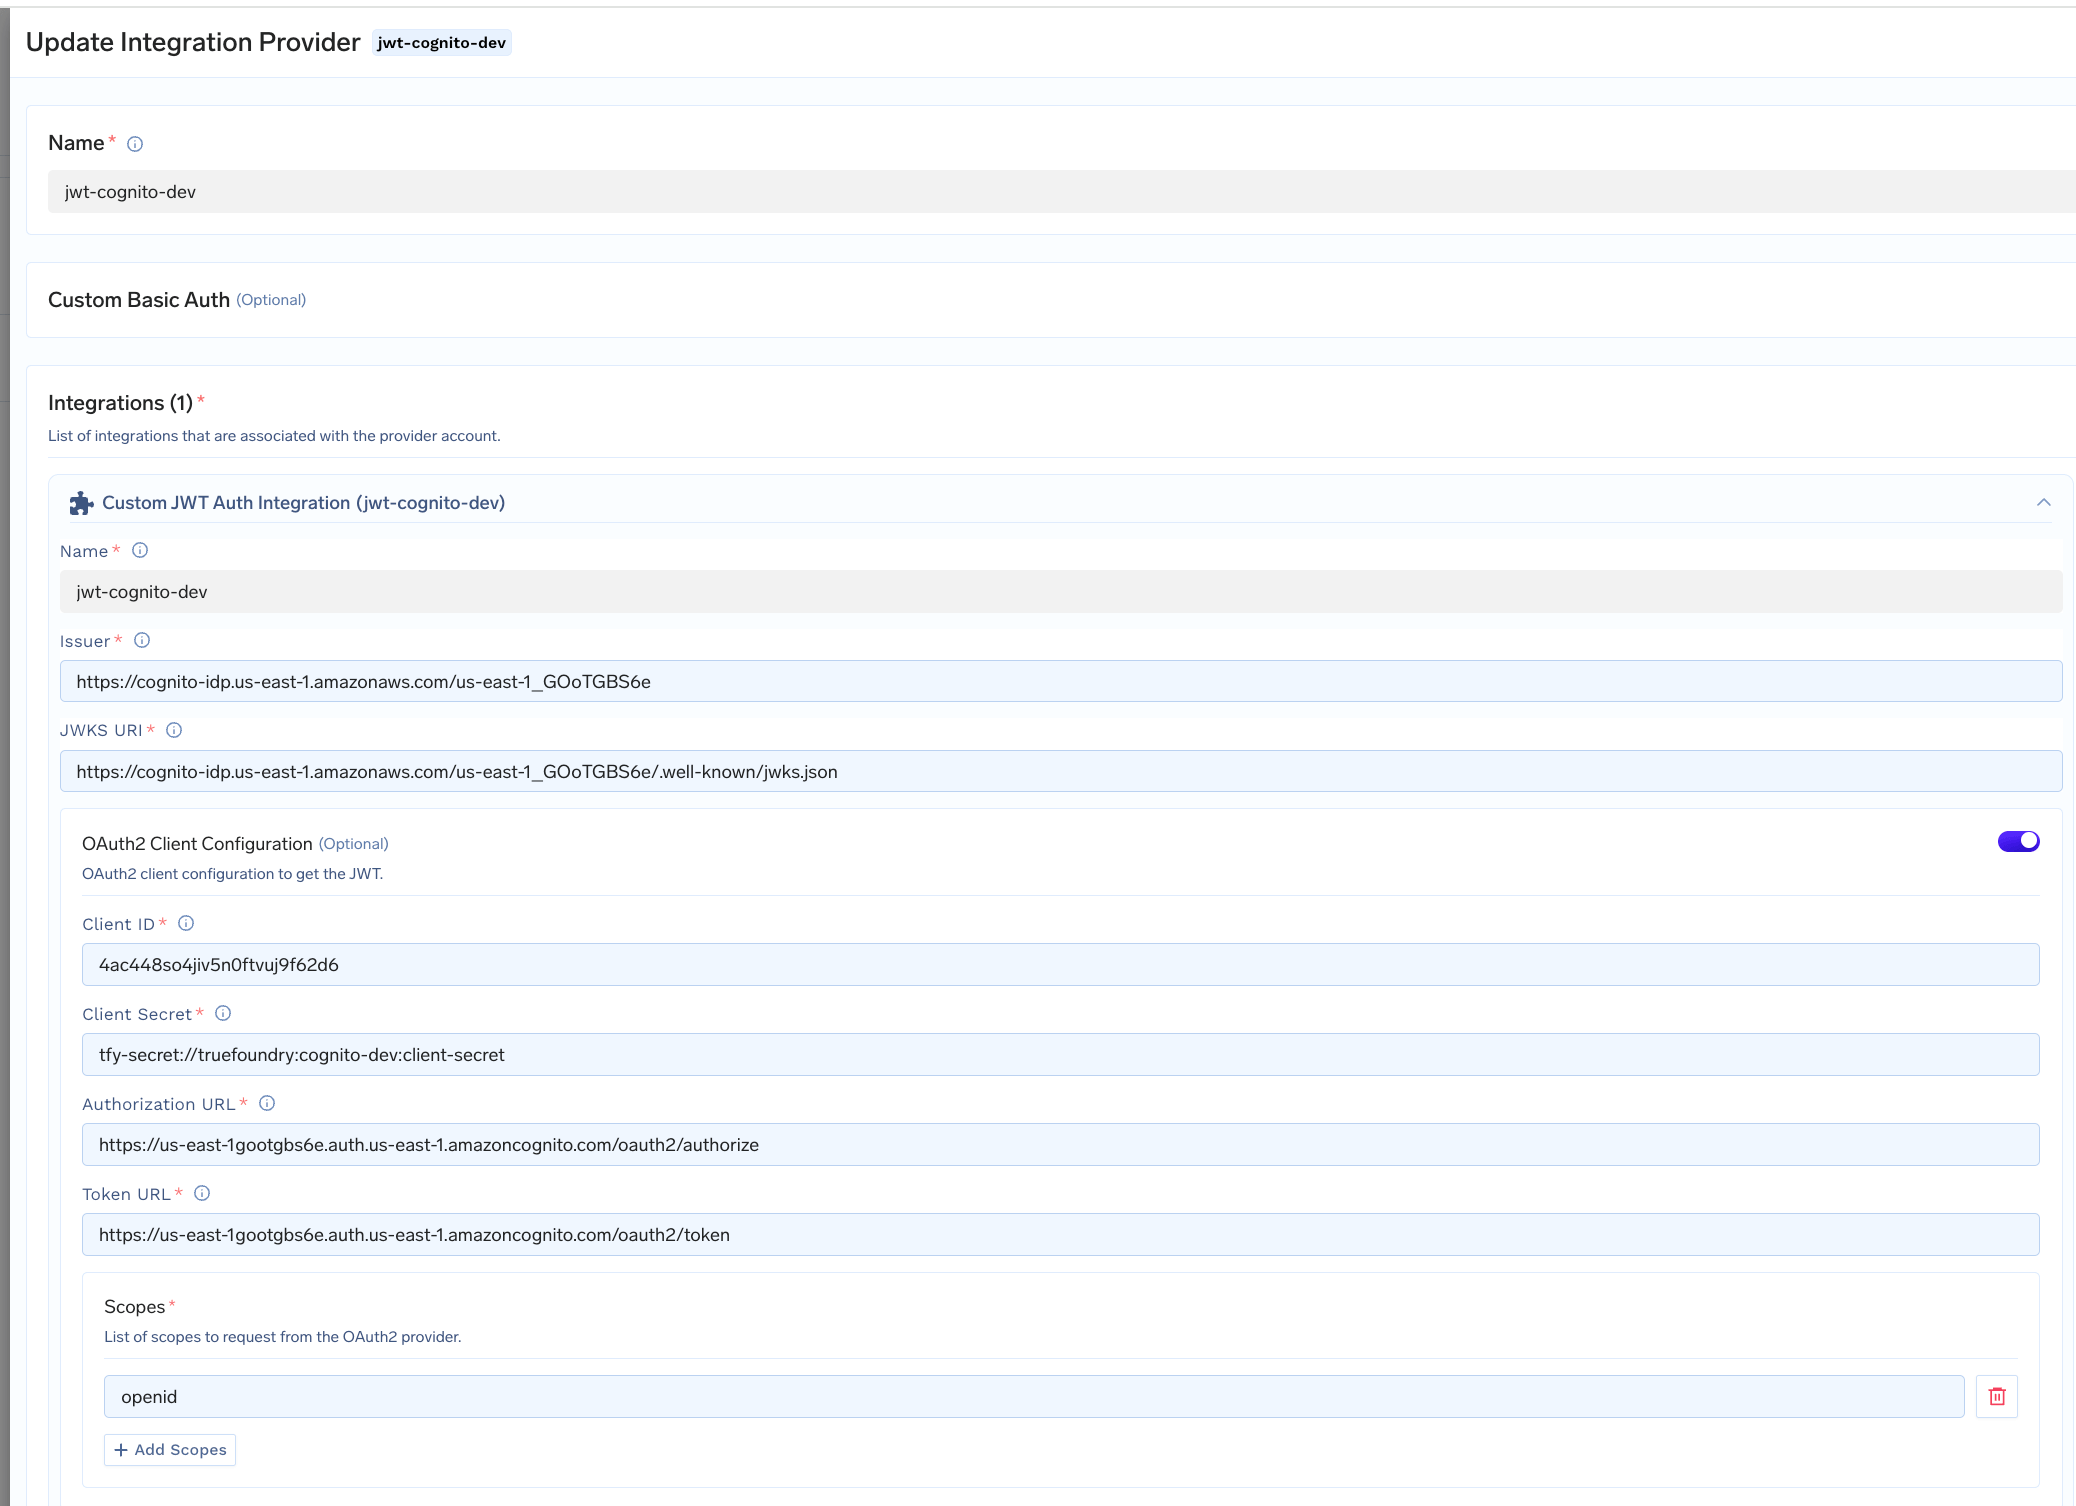
Follow the [AWS Cognito guide](https://docs.aws.amazon.com/cognito/latest/developerguide/getting-started-user-pools-application.html) to create a Cognito application or use an existing one.
* Choose Traditional Web Application as the Application Type.
* Skip adding the return URL for now - it can be added later after deploying the TrueFoundry service.
* Save ClientID and ClientSecret
For e.g. the URL will look something like [https://cognito-idp.us-east-1.amazonaws.com/us-east-1\_GOoTGBS6e/.well-known/openid-configuration](https://cognito-idp.us-east-1.amazonaws.com/us-east-1_GOoTGBS6e/.well-known/openid-configuration)
On opening the URL, you will see a JSON response and we need to extract the following details: `issuer`, `jwks_uri`, `authorization_endpoint`, `token_endpoint`, `scopes_supported`
* Use the values from the previous step in the integration
* For Client Secret, you can either directly add the value in the form or first create a [Truefoundry Secret](/docs/manage-secrets) and then use the FQN of the secret.
* Include appropriate scopes as required for your integration (e.g., `openid`, `email`, etc.).
* Retain JWT Source as Access Token (no changes needed).
2. Provide the following details about the JWT Integration:
* **Name**: A name to refer to this integration later.
* **Issuer**: The base URL of the authentication provider
* **JWKS URL**: The JSON Web Key Set URI for JWT verification.
* **Oauth2 Client Configuration (Optional)**: Enable Login Provider and provide the values for `Client ID`, `Client Secret`, `Authorization URL`, `Token URL`, and any `Scopes` (e.g. `openid`, `profile`, `email`, etc.)
To get the above values, you will need to create / use an existing application with your identity provider such as Amazon Cognito, Google, Okta, or Azure AD. The steps for each of these providers are outlines below:
Follow the [AWS Cognito guide](https://docs.aws.amazon.com/cognito/latest/developerguide/getting-started-user-pools-application.html) to create a Cognito application or use an existing one.
* Choose Traditional Web Application as the Application Type.
* Skip adding the return URL for now - it can be added later after deploying the TrueFoundry service.
* Save ClientID and ClientSecret
For e.g. the URL will look something like [https://cognito-idp.us-east-1.amazonaws.com/us-east-1\_GOoTGBS6e/.well-known/openid-configuration](https://cognito-idp.us-east-1.amazonaws.com/us-east-1_GOoTGBS6e/.well-known/openid-configuration)
On opening the URL, you will see a JSON response and we need to extract the following details: `issuer`, `jwks_uri`, `authorization_endpoint`, `token_endpoint`, `scopes_supported`
* Use the values from the previous step in the integration
* For Client Secret, you can either directly add the value in the form or first create a [Truefoundry Secret](/docs/manage-secrets) and then use the FQN of the secret.
* Include appropriate scopes as required for your integration (e.g., `openid`, `email`, etc.).
* Retain JWT Source as Access Token (no changes needed).
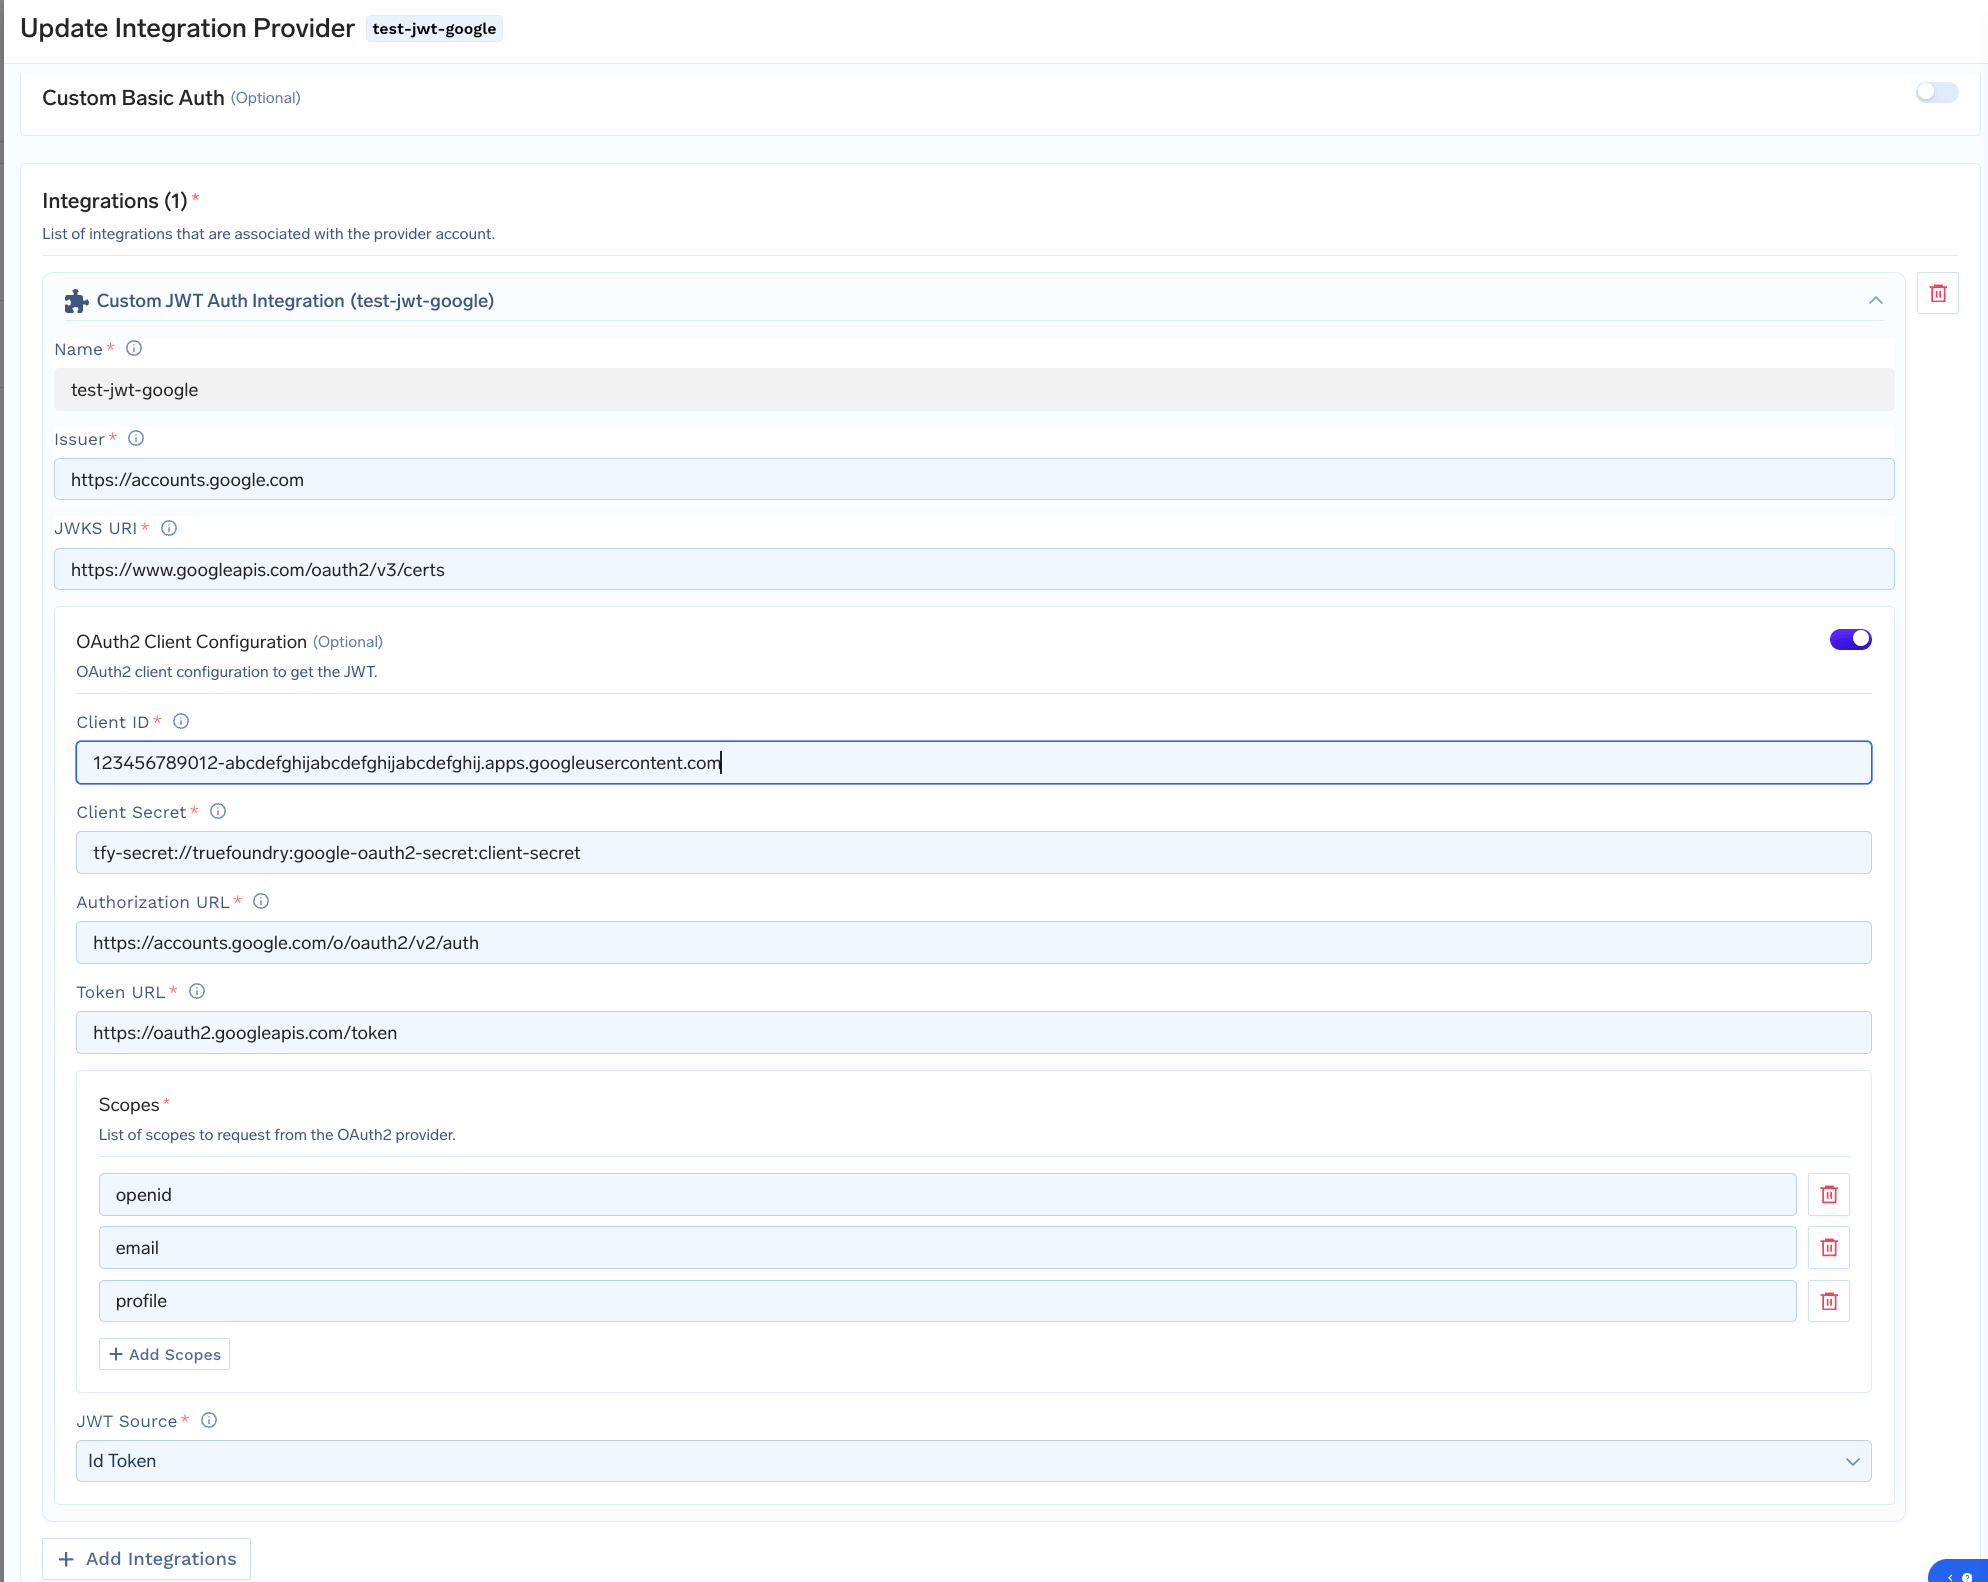
 Follow the [Google Cloud Console guide](https://console.cloud.google.com/) to create a Google Cloud Project (if not already available)
* Go to APIs & Services > Credentials.
* Click **Create Credentials** and select **OAuth Client ID**.
* Choose **"Web Application"** as the Application Type.
* Skip adding the Authorized Redirect URI for now - it can be added later after deploying the TrueFoundry service.
* Save the Client ID and Client Secret
* Open the URL [https://accounts.google.com/.well-known/openid-configuration](https://accounts.google.com/.well-known/openid-configuration)
* Copy the values for `issuer`, `jwks_uri`, `authorization_endpoint`, `token_endpoint`, `scopes_supported`
* Use the values from the previous step in the integration
* For Client Secret, you can either directly add the value in the form or first create a [Truefoundry Secret](/docs/manage-secrets) and then use the FQN of the secret.
* Include the mandatory `openid` scope, along with other required scopes (e.g., `email` etc.).
* Set JWT Source to `ID Token` instead of Access Token.
Follow the [Google Cloud Console guide](https://console.cloud.google.com/) to create a Google Cloud Project (if not already available)
* Go to APIs & Services > Credentials.
* Click **Create Credentials** and select **OAuth Client ID**.
* Choose **"Web Application"** as the Application Type.
* Skip adding the Authorized Redirect URI for now - it can be added later after deploying the TrueFoundry service.
* Save the Client ID and Client Secret
* Open the URL [https://accounts.google.com/.well-known/openid-configuration](https://accounts.google.com/.well-known/openid-configuration)
* Copy the values for `issuer`, `jwks_uri`, `authorization_endpoint`, `token_endpoint`, `scopes_supported`
* Use the values from the previous step in the integration
* For Client Secret, you can either directly add the value in the form or first create a [Truefoundry Secret](/docs/manage-secrets) and then use the FQN of the secret.
* Include the mandatory `openid` scope, along with other required scopes (e.g., `email` etc.).
* Set JWT Source to `ID Token` instead of Access Token.
 #### Steps
1. **Create a Google Cloud Project** (if not already available) at [Google Cloud Console](https://console.cloud.google.com/).
2. **Enable the OAuth 2.0 API:**
* Go to **APIs & Services > Credentials**.
* Click **"Create Credentials"** and select **OAuth Client ID**.
3. **Create an OAuth 2.0 Application:**
* Choose **"Web Application"** as the **Application Type**.
* **Skip adding the Authorized Redirect URI** for now; it can be added later after deploying the TrueFoundry service.
4. **Save the following details:**
* **Client ID**
* **Client Secret**
5. **Open the OpenID Configuration:**
* Example:
```javascript lines theme={"dark"}
https://accounts.google.com/.well-known/openid-configuration
```
* This contains required fields like:
* **Issuer**
* **JWKS URI**
* **Authorization URL**
* **Token URL**
* **Supported Scopes**
#### Integration with TrueFoundry
* Use the values from the OpenID configuration in the integration.
* For **Client Secret**, you can:
* Create a **TrueFoundry Secret**, or
* Directly add the value.
* **Include the mandatory`openid` scope**, along with other required scopes (e.g., `email` etc.).
* **Set JWT Source to`ID Token`** instead of Access Token.
**Example configuration**
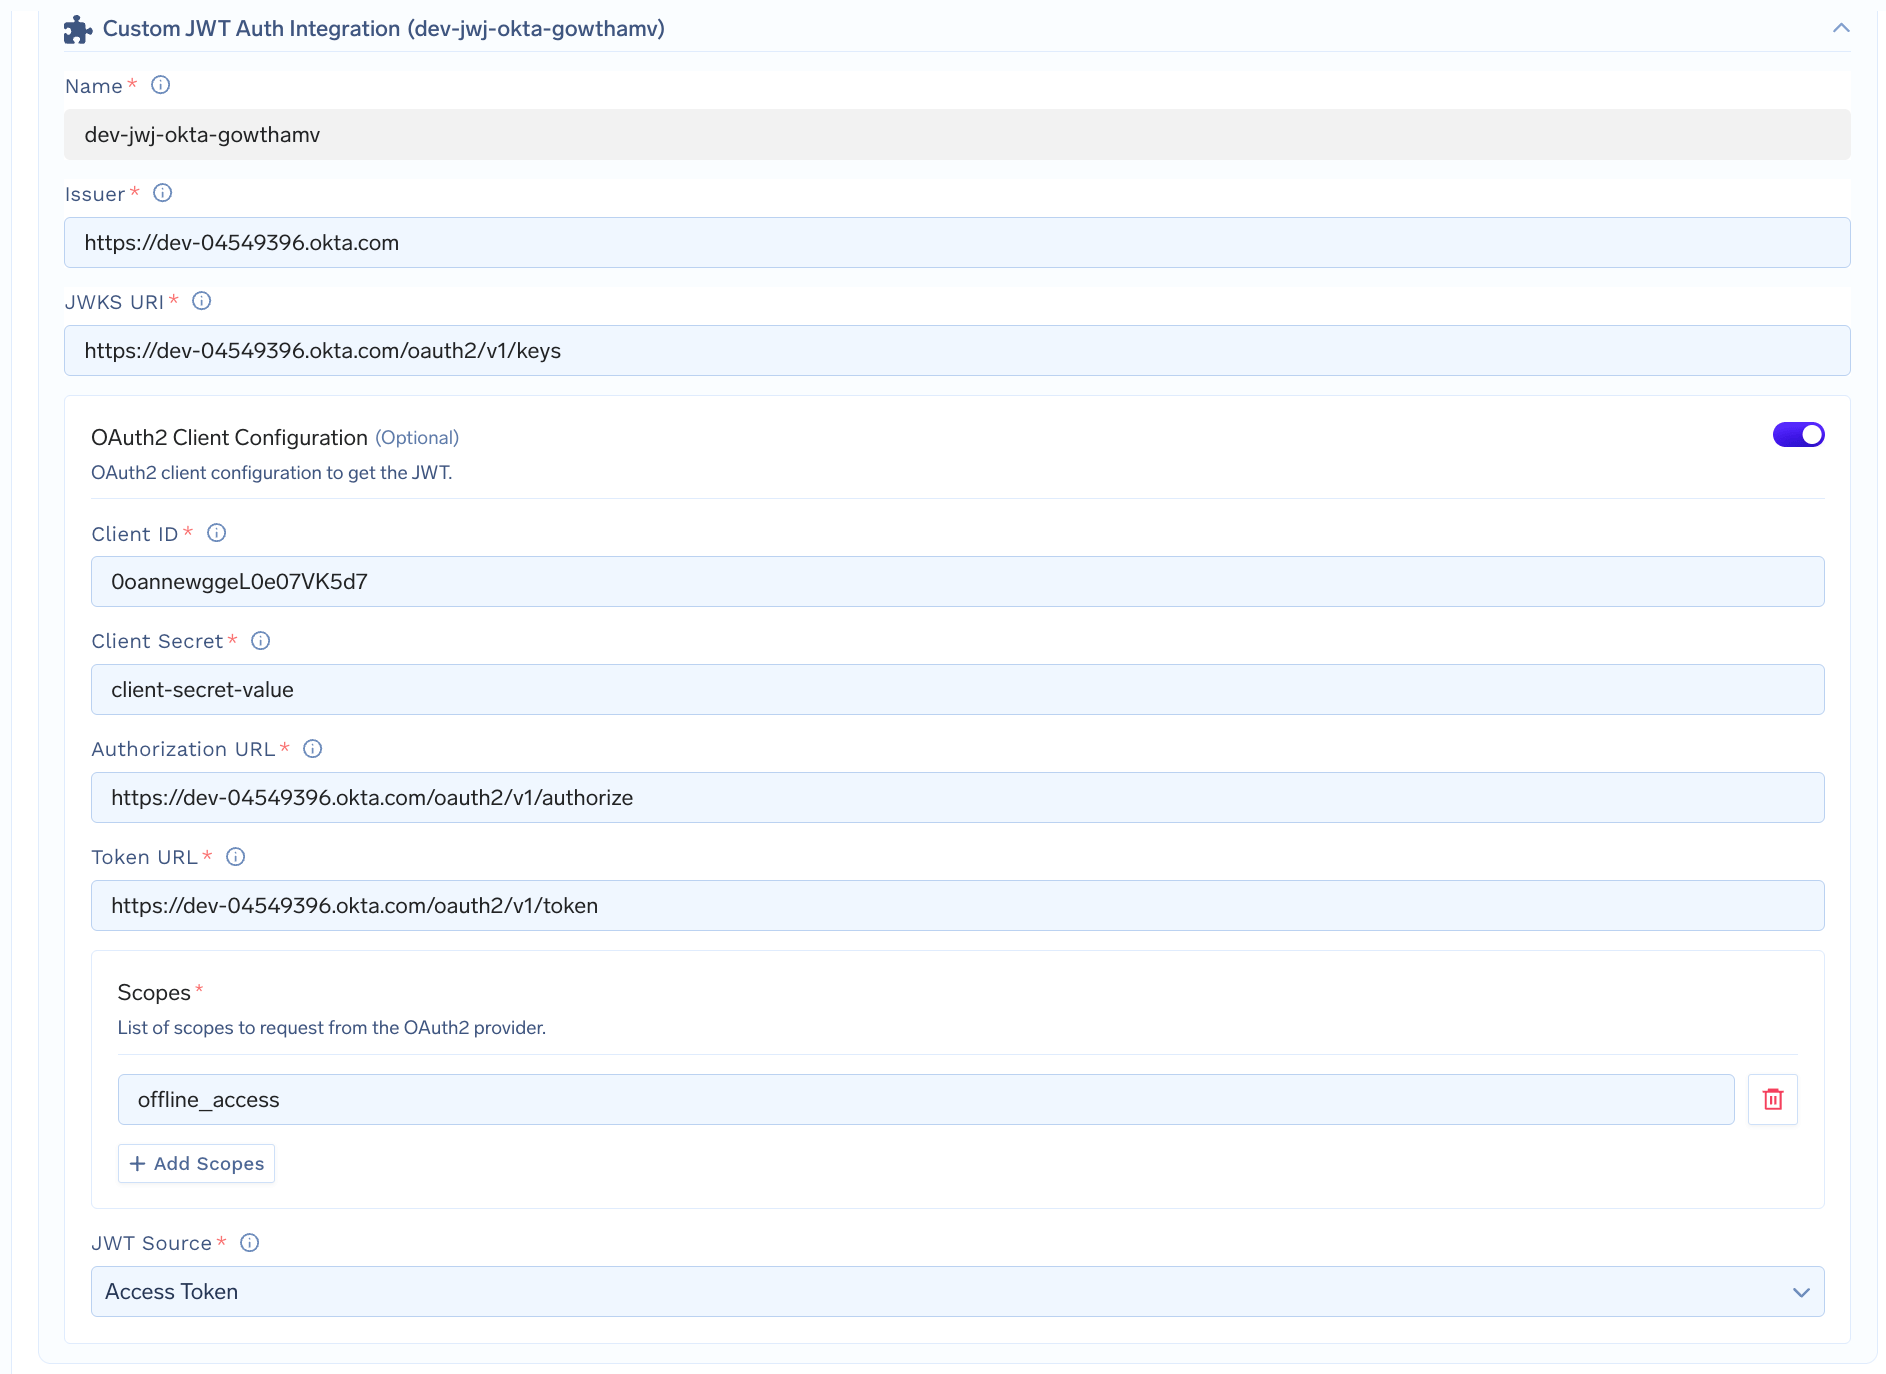
**Create an Okta Developer Account** (if not already available) at [https://developer.okta.com/signup/](https://developer.okta.com/signup/).
* Choose Web Application as the Application Type.
* Skip adding the Sign-in redirect URI for now - it can be added later after deploying the TrueFoundry service.
* Save ClientID, Client Secret and Okta Domain (e.g., `https://dev-123456.okta.com`)
* Open the URL [https://dev-123456.okta.com/.well-known/openid-configuration](https://dev-123456.okta.com/.well-known/openid-configuration)
* Copy the values for `issuer`, `jwks_uri`, `authorization_endpoint`, `token_endpoint`, `scopes_supported`
* Use the values from the previous step in the integration
* For Client Secret, you can either directly add the value in the form or first create a [Truefoundry Secret](/docs/manage-secrets) and then use the FQN of the secret.
* Include appropriate scopes as required for your integration (e.g., `offline_access`, `openid`, `email`, etc.).
* Retain JWT Source as Access Token (no changes needed).
#### Steps
1. **Create a Google Cloud Project** (if not already available) at [Google Cloud Console](https://console.cloud.google.com/).
2. **Enable the OAuth 2.0 API:**
* Go to **APIs & Services > Credentials**.
* Click **"Create Credentials"** and select **OAuth Client ID**.
3. **Create an OAuth 2.0 Application:**
* Choose **"Web Application"** as the **Application Type**.
* **Skip adding the Authorized Redirect URI** for now; it can be added later after deploying the TrueFoundry service.
4. **Save the following details:**
* **Client ID**
* **Client Secret**
5. **Open the OpenID Configuration:**
* Example:
```javascript lines theme={"dark"}
https://accounts.google.com/.well-known/openid-configuration
```
* This contains required fields like:
* **Issuer**
* **JWKS URI**
* **Authorization URL**
* **Token URL**
* **Supported Scopes**
#### Integration with TrueFoundry
* Use the values from the OpenID configuration in the integration.
* For **Client Secret**, you can:
* Create a **TrueFoundry Secret**, or
* Directly add the value.
* **Include the mandatory`openid` scope**, along with other required scopes (e.g., `email` etc.).
* **Set JWT Source to`ID Token`** instead of Access Token.
**Example configuration**
**Create an Okta Developer Account** (if not already available) at [https://developer.okta.com/signup/](https://developer.okta.com/signup/).
* Choose Web Application as the Application Type.
* Skip adding the Sign-in redirect URI for now - it can be added later after deploying the TrueFoundry service.
* Save ClientID, Client Secret and Okta Domain (e.g., `https://dev-123456.okta.com`)
* Open the URL [https://dev-123456.okta.com/.well-known/openid-configuration](https://dev-123456.okta.com/.well-known/openid-configuration)
* Copy the values for `issuer`, `jwks_uri`, `authorization_endpoint`, `token_endpoint`, `scopes_supported`
* Use the values from the previous step in the integration
* For Client Secret, you can either directly add the value in the form or first create a [Truefoundry Secret](/docs/manage-secrets) and then use the FQN of the secret.
* Include appropriate scopes as required for your integration (e.g., `offline_access`, `openid`, `email`, etc.).
* Retain JWT Source as Access Token (no changes needed).
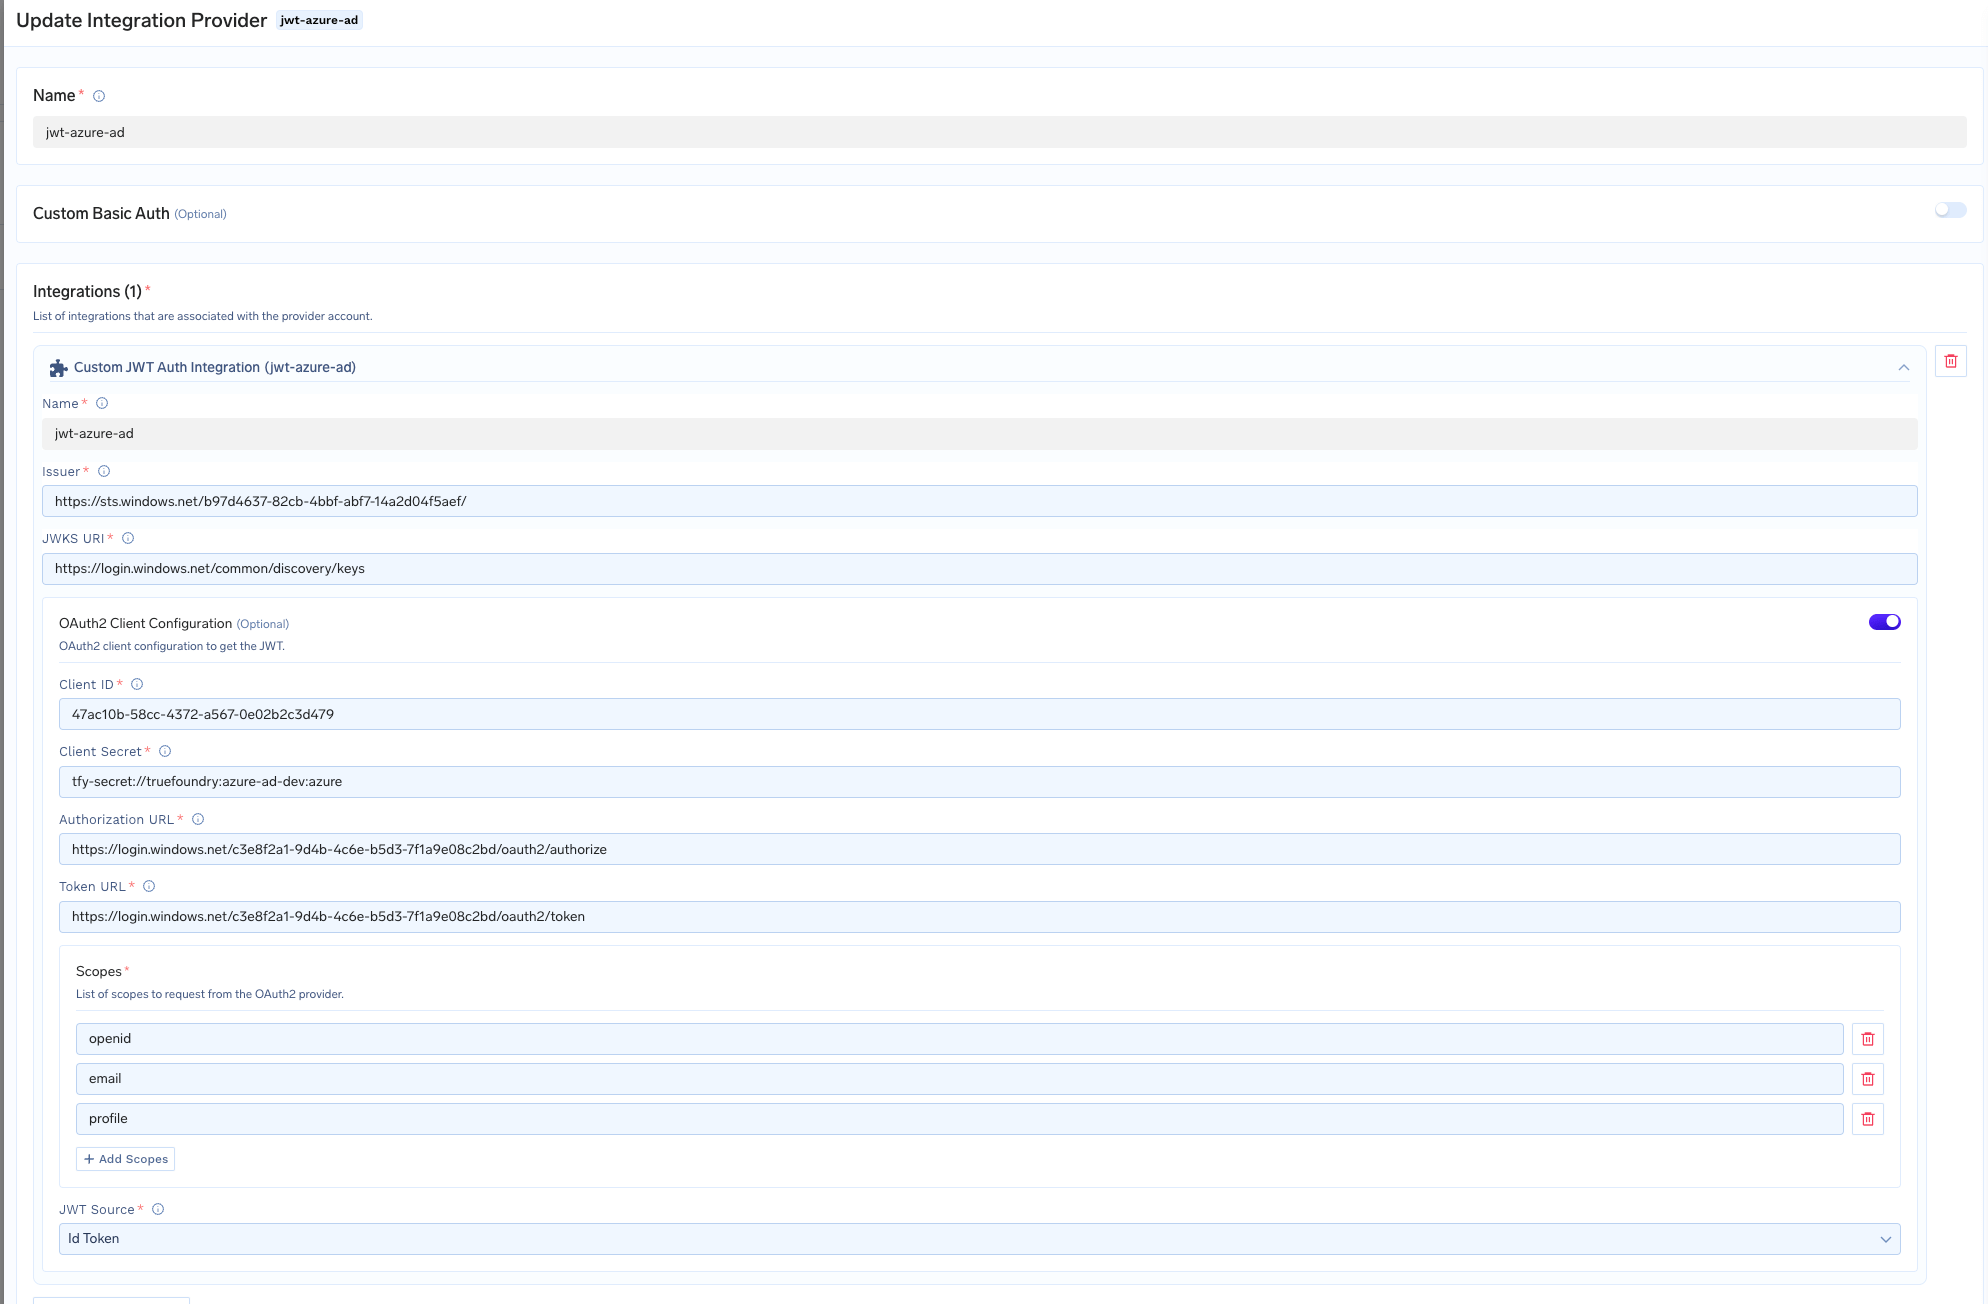
 * Follow the [Microsoft Entra ID guide](https://learn.microsoft.com/en-us/azure/active-directory/develop/quickstart-register-app) to create an application or use an existing one.
* Save the Client ID, Client Secret and Tenant ID.
* Skip adding the redirect URI initially. This can be added later once the TrueFoundry service deployment is created.
* Open the URL [https://login.microsoftonline.com/{tenant_id}/.well-known/openid-configuration](https://login.microsoftonline.com/\{tenant_id}/.well-known/openid-configuration)
* Copy the values for `issuer`, `jwks_uri`, `authorization_endpoint`, `token_endpoint`, `scopes_supported`
* Use the values from the previous step in the integration
* For Client Secret, you can either directly add the value in the form or first create a [Truefoundry Secret](/docs/manage-secrets) and then use the FQN of the secret.
* Include the mandatory`openid` scope, along with other required scopes (e.g., `email`, `profile`, etc.).
* Set JWT Source to`ID Token`
* Follow the [Microsoft Entra ID guide](https://learn.microsoft.com/en-us/azure/active-directory/develop/quickstart-register-app) to create an application or use an existing one.
* Save the Client ID, Client Secret and Tenant ID.
* Skip adding the redirect URI initially. This can be added later once the TrueFoundry service deployment is created.
* Open the URL [https://login.microsoftonline.com/{tenant_id}/.well-known/openid-configuration](https://login.microsoftonline.com/\{tenant_id}/.well-known/openid-configuration)
* Copy the values for `issuer`, `jwks_uri`, `authorization_endpoint`, `token_endpoint`, `scopes_supported`
* Use the values from the previous step in the integration
* For Client Secret, you can either directly add the value in the form or first create a [Truefoundry Secret](/docs/manage-secrets) and then use the FQN of the secret.
* Include the mandatory`openid` scope, along with other required scopes (e.g., `email`, `profile`, etc.).
* Set JWT Source to`ID Token`
 ### Enabling JWT Authentication in Your Service
Once you have set up the Custom JWT Auth integration, you can select `Enable Authentication` in the Ports section and choose `JWT Integration` from the options below.
### Enabling JWT Authentication in Your Service
Once you have set up the Custom JWT Auth integration, you can select `Enable Authentication` in the Ports section and choose `JWT Integration` from the options below.
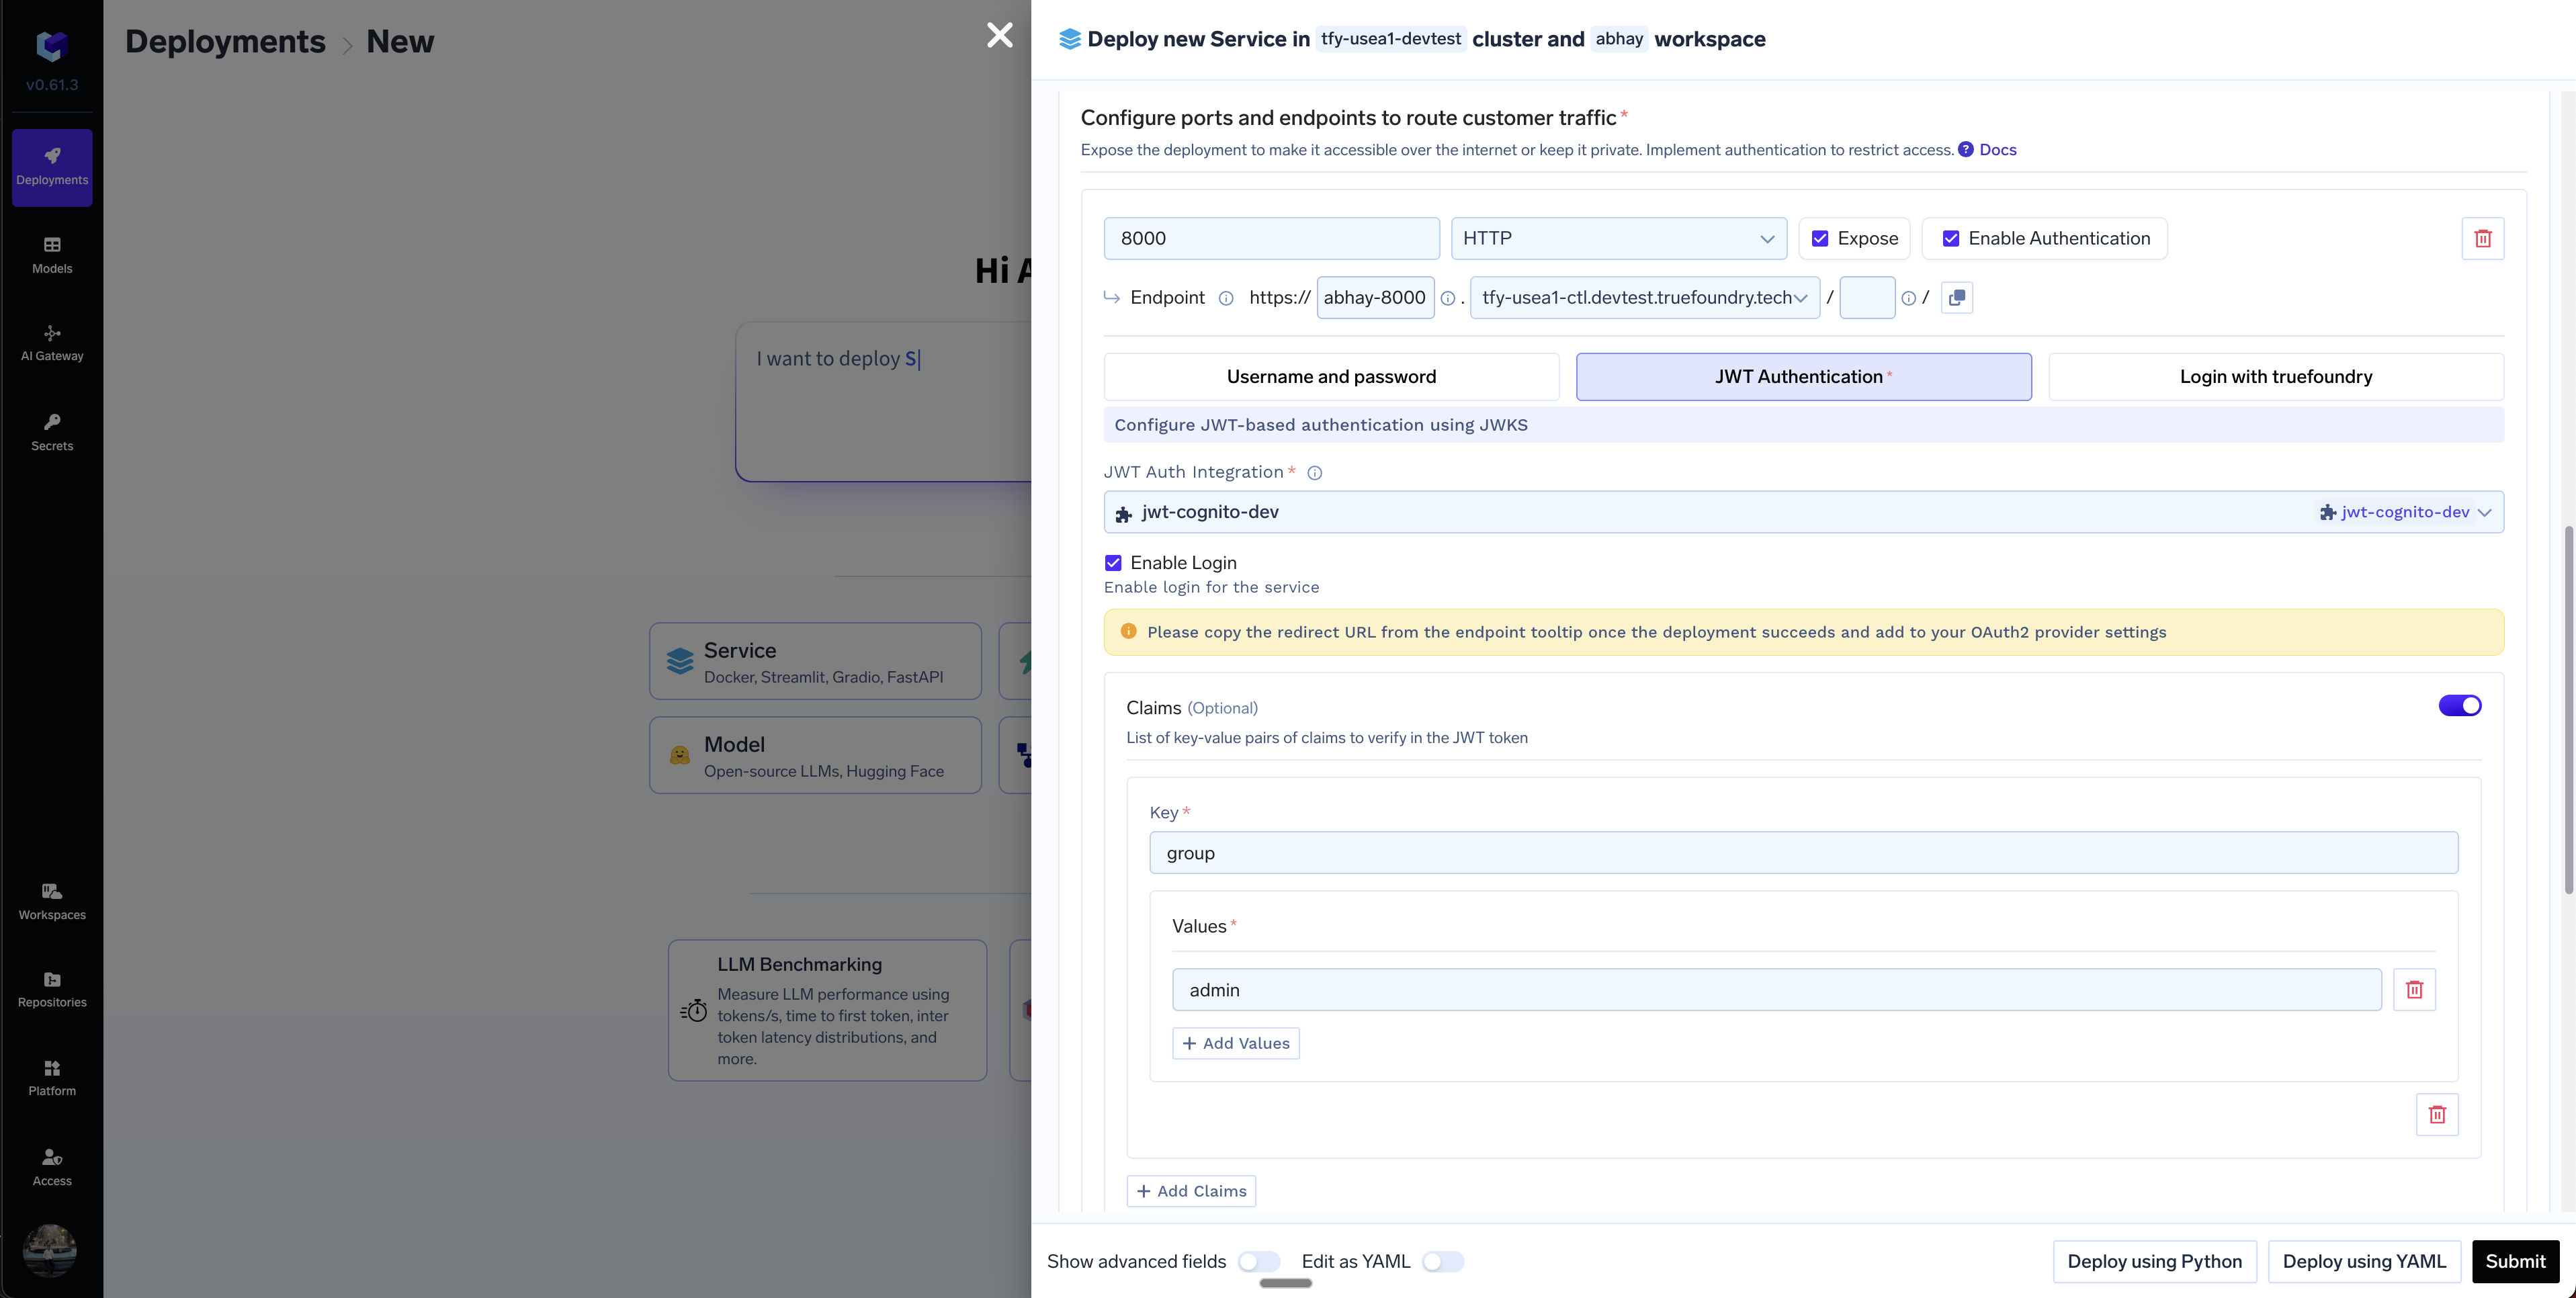 You can use the **Enable Login** option to enable OAuth2-based login for your service. This will redirect users to the OAuth2 provider's login page and, after authentication, returned to your application. This is useful for web applications and UI applications like Streamlit, Gradio. For backend APIs that only need to validate JWTs in requests, this option is not required.
A few key points to note:
* You can enforce additional security by verifying claims in the token by providing the key and the accepted values for that key. For e.g. if we want to restrict access to users with emails from `truefoundry.com`, we can provide key as `email` and accepted values as `*@truefoundry.com` in the Claims section.
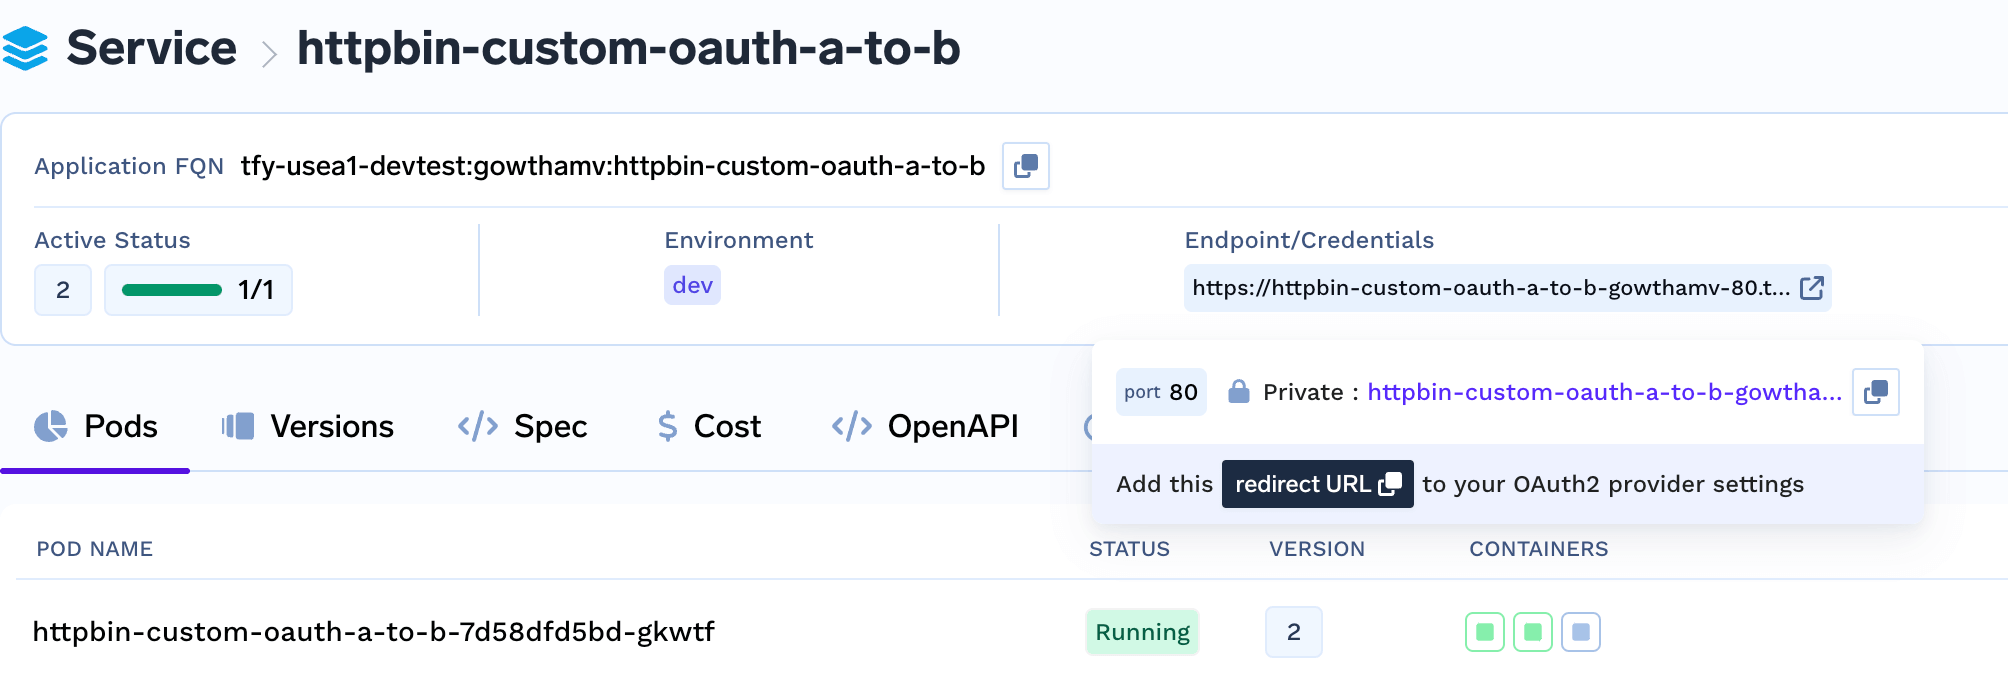
* If **OAuth2-based login** is enabled, you must configure the **Redirect URL** in your OAuth2 provider settings.
* After deploying the service, the Redirect URL will be displayed on the deployment page.
* Copy this URL and add it to your OAuth2 provider's **redirect URIs** section.
You can use the **Enable Login** option to enable OAuth2-based login for your service. This will redirect users to the OAuth2 provider's login page and, after authentication, returned to your application. This is useful for web applications and UI applications like Streamlit, Gradio. For backend APIs that only need to validate JWTs in requests, this option is not required.
A few key points to note:
* You can enforce additional security by verifying claims in the token by providing the key and the accepted values for that key. For e.g. if we want to restrict access to users with emails from `truefoundry.com`, we can provide key as `email` and accepted values as `*@truefoundry.com` in the Claims section.
* If **OAuth2-based login** is enabled, you must configure the **Redirect URL** in your OAuth2 provider settings.
* After deploying the service, the Redirect URL will be displayed on the deployment page.
* Copy this URL and add it to your OAuth2 provider's **redirect URIs** section.
 ### Sending request to your Authenticated Endpoint
While sending request to an endpoint with JWT authentication enabled, you need to provide the token in the `Authorization`header. This header carries the token, allowing your service to verify and authenticate the request based on the credentials and claims present in the JWT.
Here is an example of how to send a request using curl:
```powershell cURL lines theme={"dark"}
curl -X GET "https://your-service-endpoint.truefoundry.cloud/api/data" \
-H "Authorization: Bearer YOUR_JWT_HERE"
```
Unauthenticated requests would return `403`.
## Login with Truefoundry
If you want a quick solution to enable authentication for your service - and the users are all Truefoundry users - you can enable login with Truefoundry. In this case, the users will be prompted with a Login to Truefoundry screen and after authentication, they will be redirected to your application. To enable this, you need to tick `Enable Authentication` and select `Login with Truefoundry` option.
### Sending request to your Authenticated Endpoint
While sending request to an endpoint with JWT authentication enabled, you need to provide the token in the `Authorization`header. This header carries the token, allowing your service to verify and authenticate the request based on the credentials and claims present in the JWT.
Here is an example of how to send a request using curl:
```powershell cURL lines theme={"dark"}
curl -X GET "https://your-service-endpoint.truefoundry.cloud/api/data" \
-H "Authorization: Bearer YOUR_JWT_HERE"
```
Unauthenticated requests would return `403`.
## Login with Truefoundry
If you want a quick solution to enable authentication for your service - and the users are all Truefoundry users - you can enable login with Truefoundry. In this case, the users will be prompted with a Login to Truefoundry screen and after authentication, they will be redirected to your application. To enable this, you need to tick `Enable Authentication` and select `Login with Truefoundry` option.