> ## Documentation Index
> Fetch the complete documentation index at: https://www.truefoundry.com/llms.txt
> Use this file to discover all available pages before exploring further.
# Getting Started
> Deploy jobs directly from a public GitHub repo. Simple setup with version control.
In this guide, we'll deploy a Job to train a machine learning model. The model will learn to predict the species of an iris flower based on its sepal length, sepal width, petal length, and petal width. There are three species: Iris setosa, Iris versicolor, and Iris virginica.
 The model has 4 inputs: sepal length, sepal width, petal length, and petal width and ouputs the confidence scores for each species in the following format:
```json lines theme={"dark"}
{
"predictions": [
{
"label": "setosa",
"score": 2.1184377821359003e-16
},
{
"label": "versicolor",
"score": 3.264647319023382e-9
},
{
"label": "virginica",
"score": 0.9999999967353526
}
]
}
```
We've already created a Training script that trains a model on the Iris dataset, and you can find the code in our [GitHub Repository](https://github.com/truefoundry/getting-started-examples/tree/main/train-model).
Please visit the repository to familiarise yourself with the code you'll be deploying. The project files are organized as follows:
```plain Directory Structure theme={"dark"}
.
├── train.py - Contains the training script code.
└── requirements.txt - Contains the list of all dependencies.
```
## Getting Started With TrueFoundry Job
To deploy a job, you'll need a workspace. If you don't have one, you can create it using this guide: [Creating a Workspace](/docs/key-concepts#creating-a-workspace) or seek assistance from your cluster administrator in case you don't have permission to create a workspace.
In TrueFoundry, you can either deploy code from your Github repository or from your local machine in case the code is not pushed to a Github repository.
In the above walkthrough, we did the following steps:
1. Select a workspace to deploy the job. This basically decides which cluster and environment the job will be deployed to.
2. Select the Job option since this is a job.
3. We chose the Github option since the code is already pushed to a Github repository.
The key fields that we need to fill up in the deployment form are:
1. `Repo Url`: This is the URL of the Github repository that contains the code for the job. For this example, the repo url is [https://github.com/truefoundry/getting-started-examples](https://github.com/truefoundry/getting-started-examples)
2. `Path to build context`: This is the path to the directory in the Github repository that contains the code for the job. For this example, the path to the build context is `./train-model/`
3. `Command`: This is the command to run the job. For this example, the command is `python train.py`
On filling up the form, we can press the Submit button to deploy the job.
Clone the github repository and navigate to the `train-model` directory.
```bash lines theme={"dark"}
git clone https://github.com/truefoundry/getting-started-examples.git
cd getting-started-examples/train-model
```
To deploy from your local machine, follow these steps on the TrueFoundry UI to generate the deployment script:
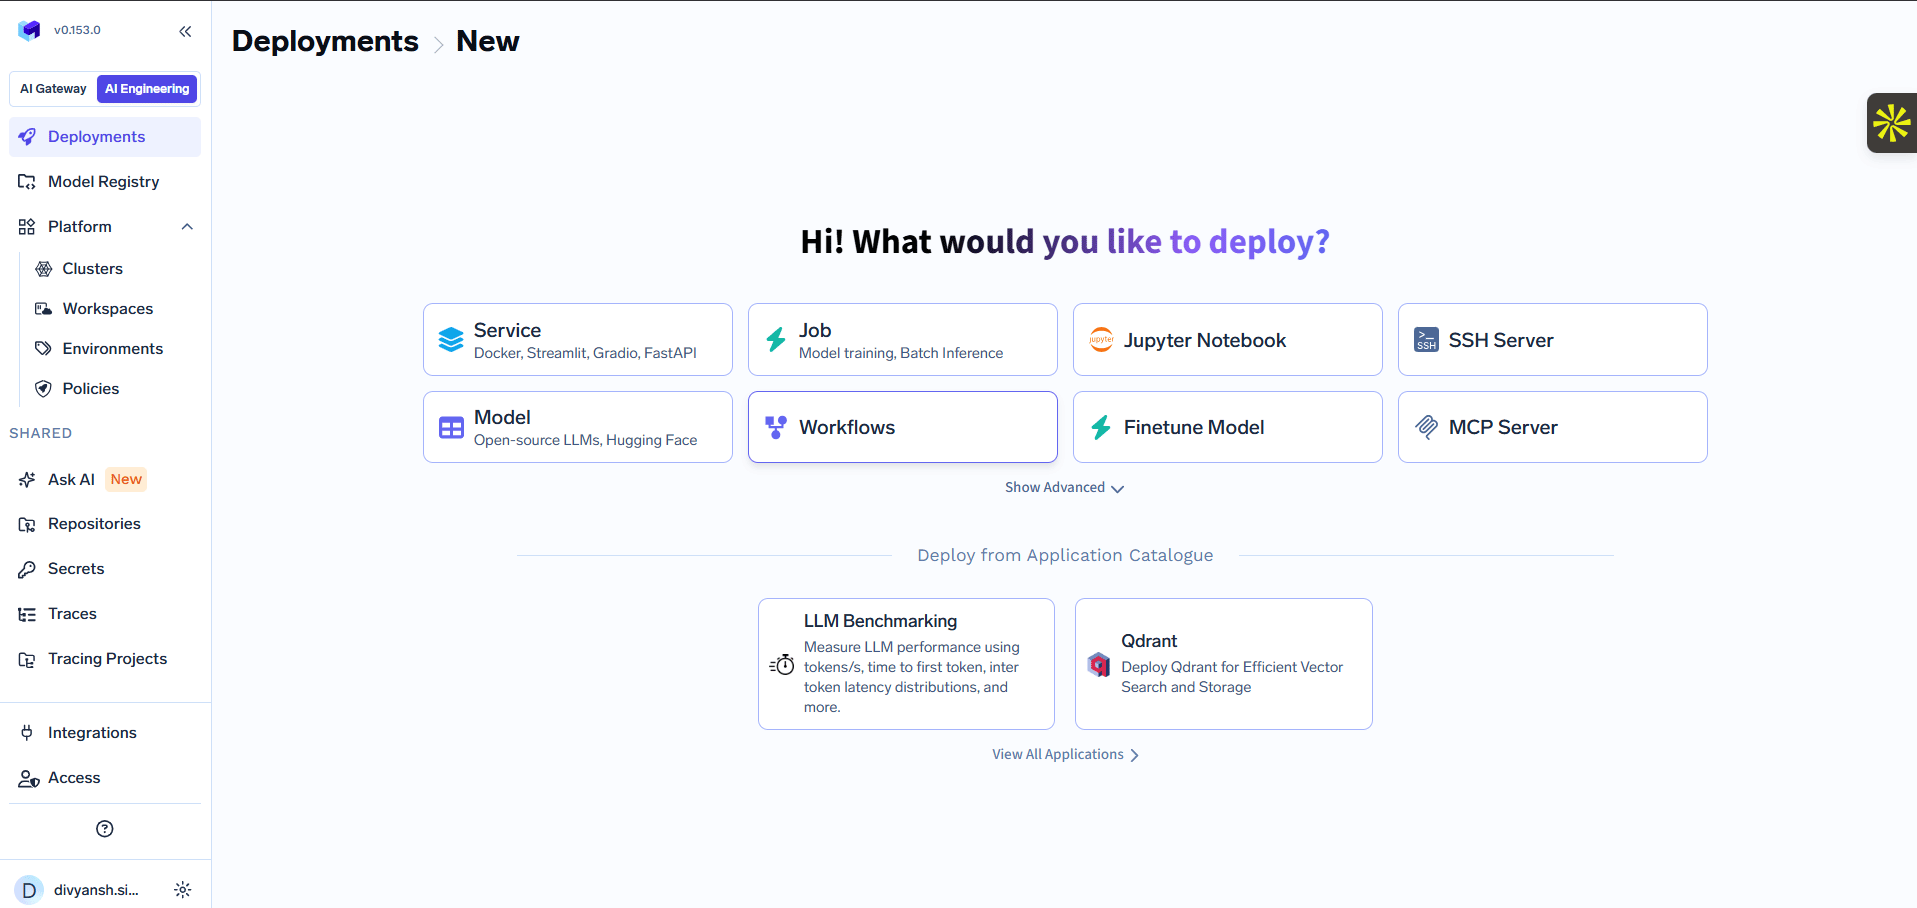
Navigate to **Deployments > New** and select **Job** (Model training, Batch Inference).
The model has 4 inputs: sepal length, sepal width, petal length, and petal width and ouputs the confidence scores for each species in the following format:
```json lines theme={"dark"}
{
"predictions": [
{
"label": "setosa",
"score": 2.1184377821359003e-16
},
{
"label": "versicolor",
"score": 3.264647319023382e-9
},
{
"label": "virginica",
"score": 0.9999999967353526
}
]
}
```
We've already created a Training script that trains a model on the Iris dataset, and you can find the code in our [GitHub Repository](https://github.com/truefoundry/getting-started-examples/tree/main/train-model).
Please visit the repository to familiarise yourself with the code you'll be deploying. The project files are organized as follows:
```plain Directory Structure theme={"dark"}
.
├── train.py - Contains the training script code.
└── requirements.txt - Contains the list of all dependencies.
```
## Getting Started With TrueFoundry Job
To deploy a job, you'll need a workspace. If you don't have one, you can create it using this guide: [Creating a Workspace](/docs/key-concepts#creating-a-workspace) or seek assistance from your cluster administrator in case you don't have permission to create a workspace.
In TrueFoundry, you can either deploy code from your Github repository or from your local machine in case the code is not pushed to a Github repository.
In the above walkthrough, we did the following steps:
1. Select a workspace to deploy the job. This basically decides which cluster and environment the job will be deployed to.
2. Select the Job option since this is a job.
3. We chose the Github option since the code is already pushed to a Github repository.
The key fields that we need to fill up in the deployment form are:
1. `Repo Url`: This is the URL of the Github repository that contains the code for the job. For this example, the repo url is [https://github.com/truefoundry/getting-started-examples](https://github.com/truefoundry/getting-started-examples)
2. `Path to build context`: This is the path to the directory in the Github repository that contains the code for the job. For this example, the path to the build context is `./train-model/`
3. `Command`: This is the command to run the job. For this example, the command is `python train.py`
On filling up the form, we can press the Submit button to deploy the job.
Clone the github repository and navigate to the `train-model` directory.
```bash lines theme={"dark"}
git clone https://github.com/truefoundry/getting-started-examples.git
cd getting-started-examples/train-model
```
To deploy from your local machine, follow these steps on the TrueFoundry UI to generate the deployment script:
Navigate to **Deployments > New** and select **Job** (Model training, Batch Inference).
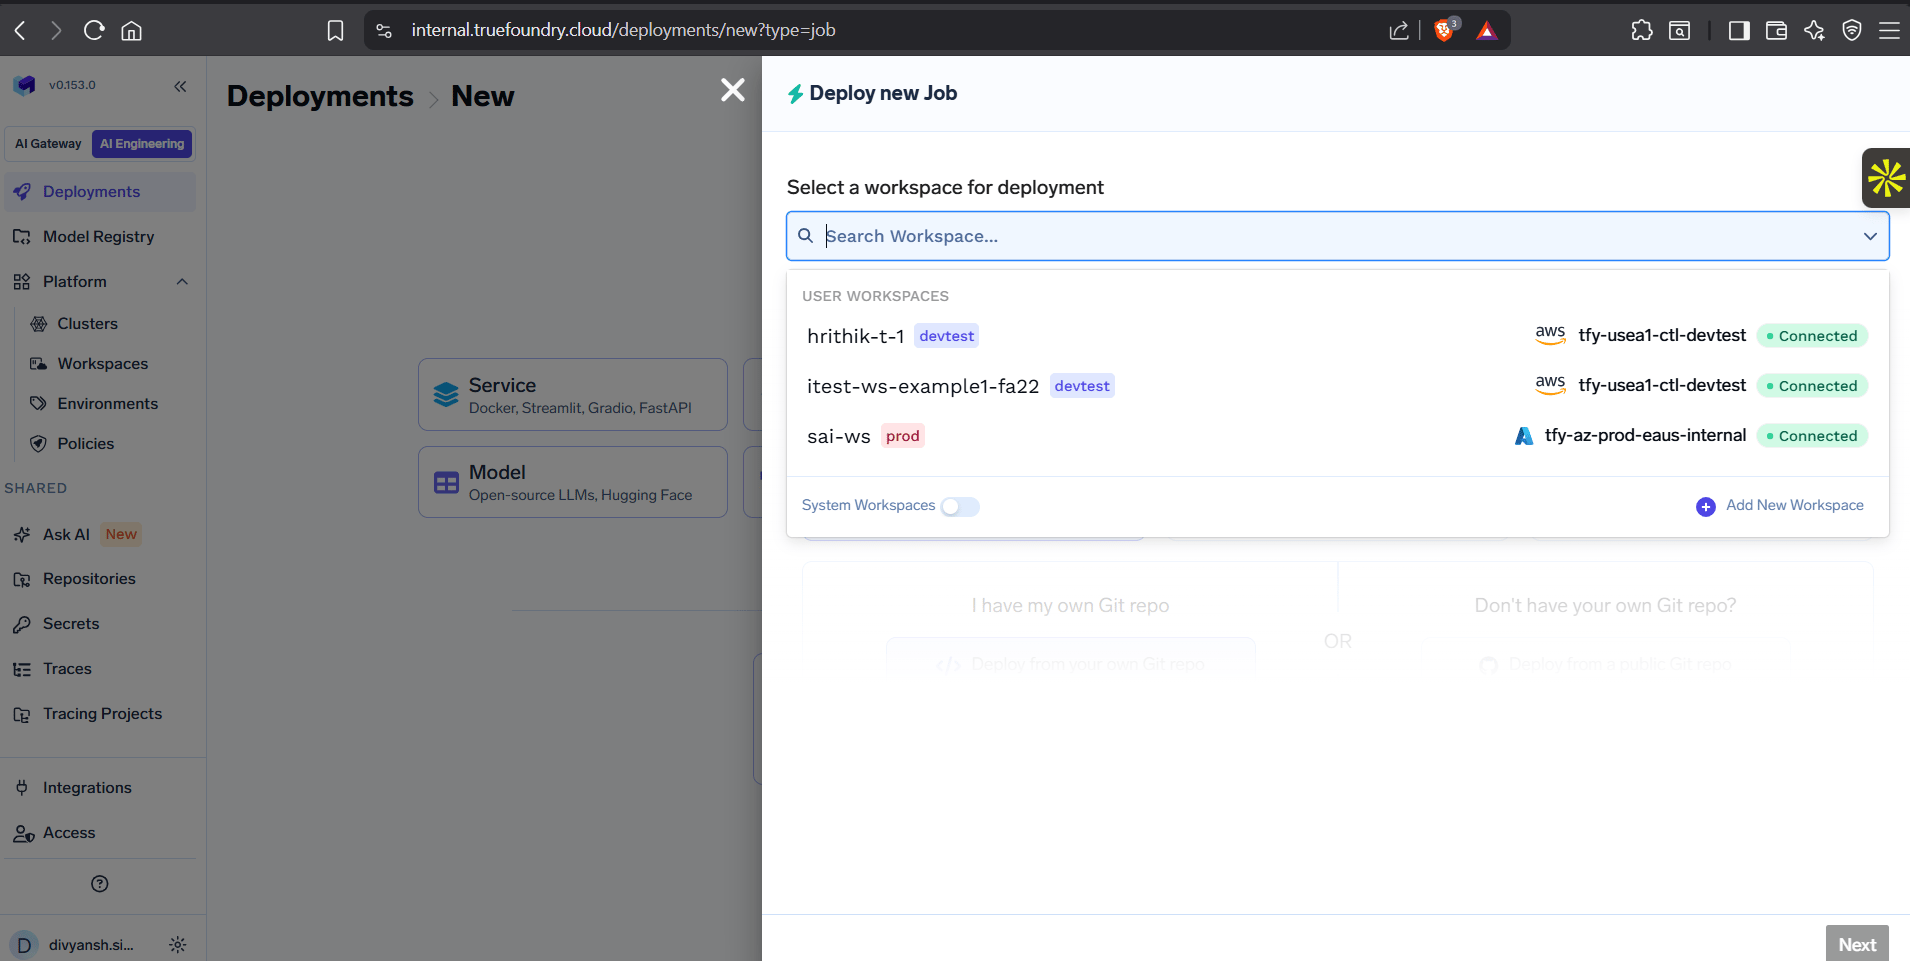
 Choose the workspace where you want to deploy the job. This determines which cluster and environment the job will be deployed to.
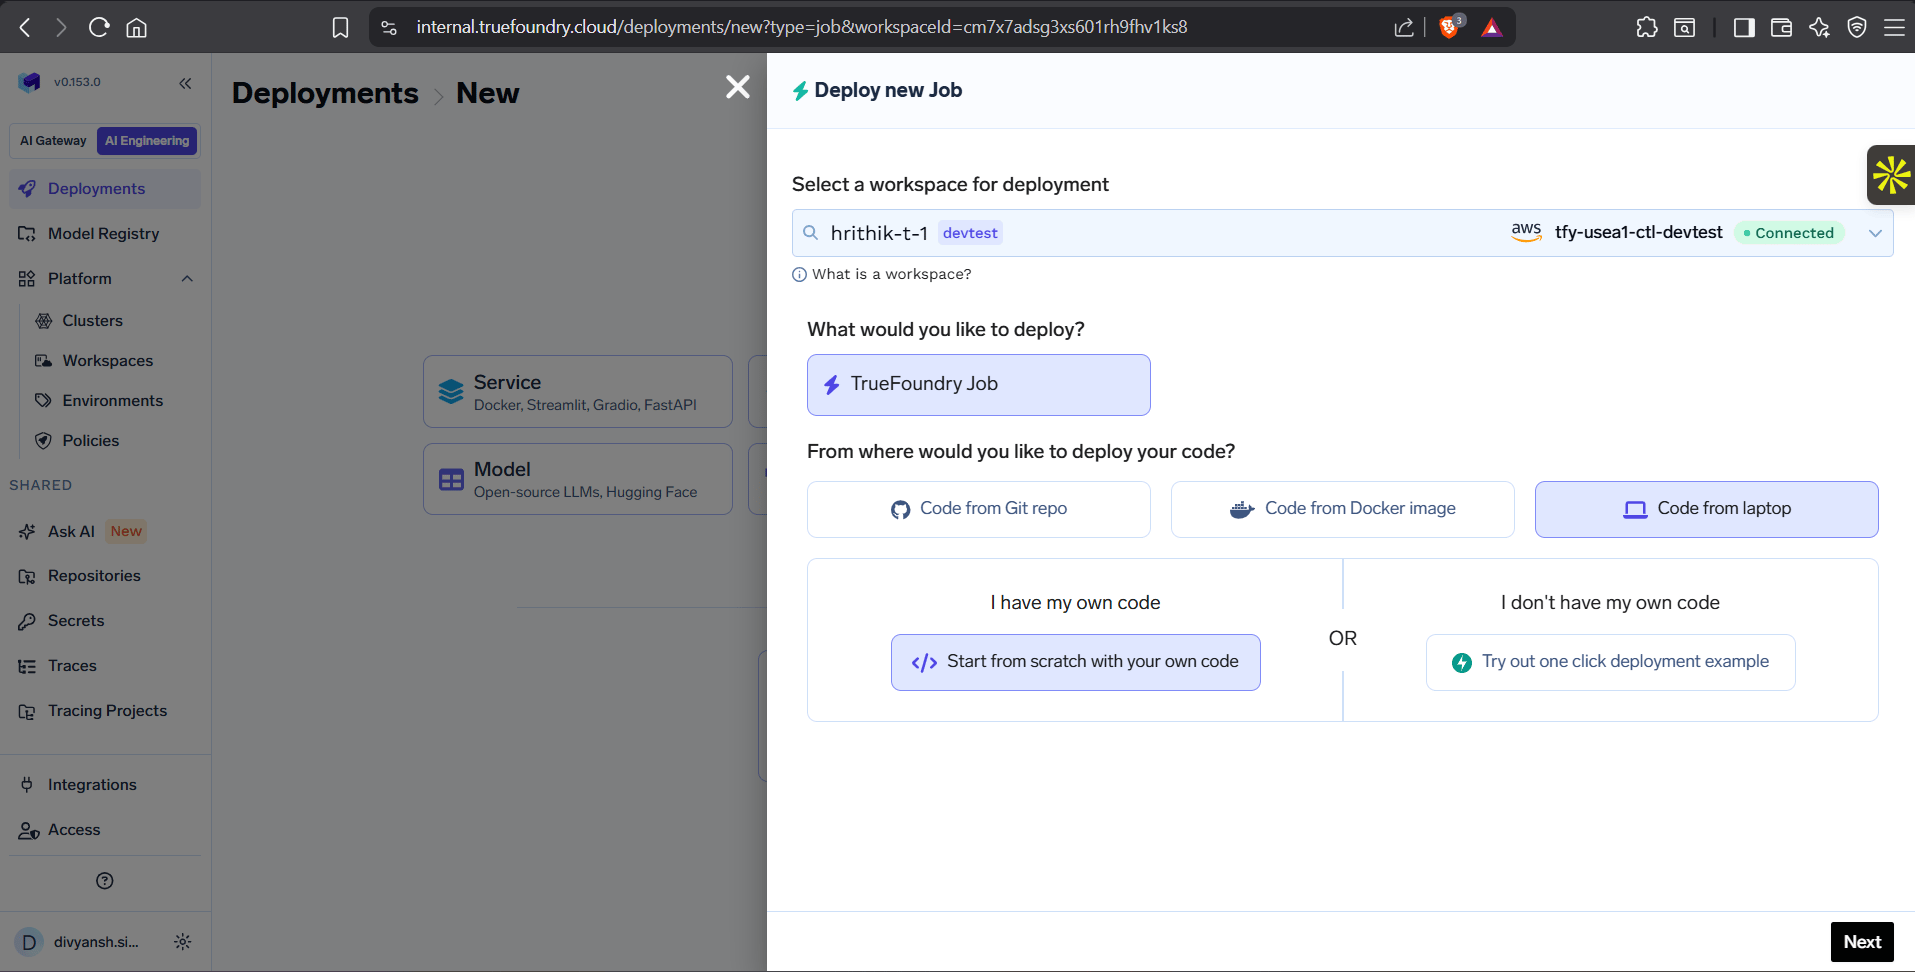
 Under "From where would you like to deploy your code?", select **Code from laptop** and then choose **Start from scratch with your own code**.
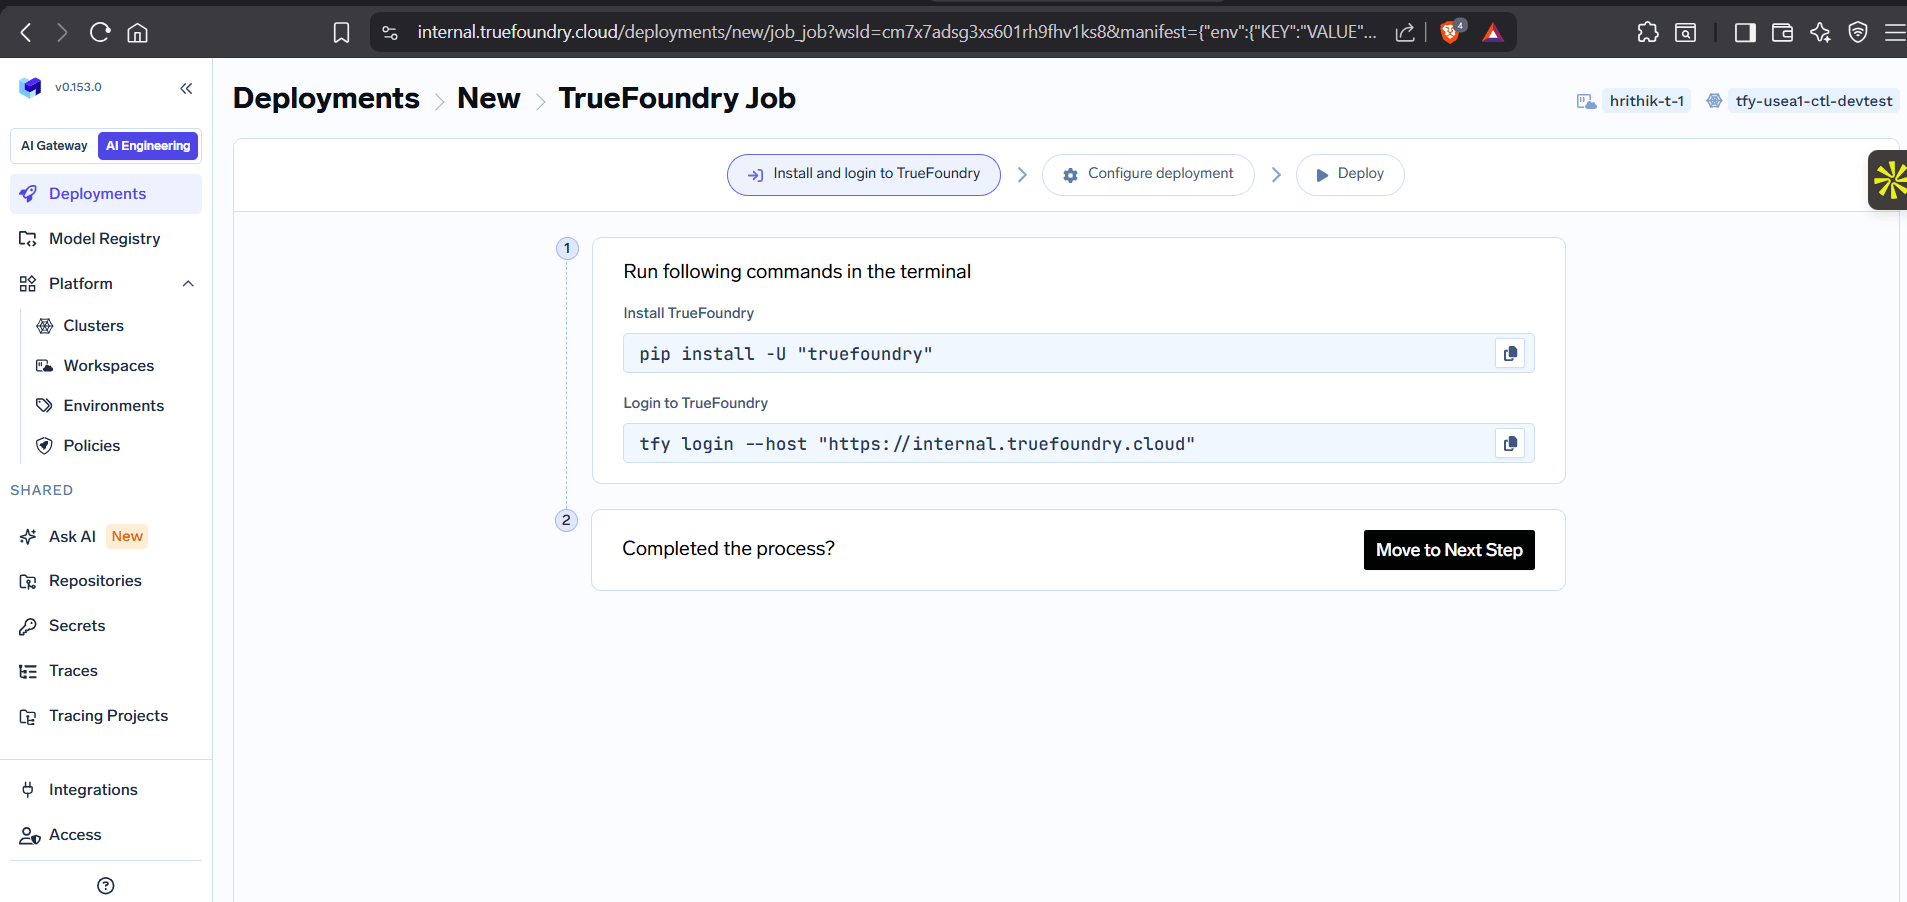
 Run the following commands in your terminal to install and authenticate the TrueFoundry CLI:
```bash theme={"dark"}
pip install -U "truefoundry"
tfy login --host "https://internal.truefoundry.cloud"
```
Once completed, click **Move to Next Step**.
Run the following commands in your terminal to install and authenticate the TrueFoundry CLI:
```bash theme={"dark"}
pip install -U "truefoundry"
tfy login --host "https://internal.truefoundry.cloud"
```
Once completed, click **Move to Next Step**.
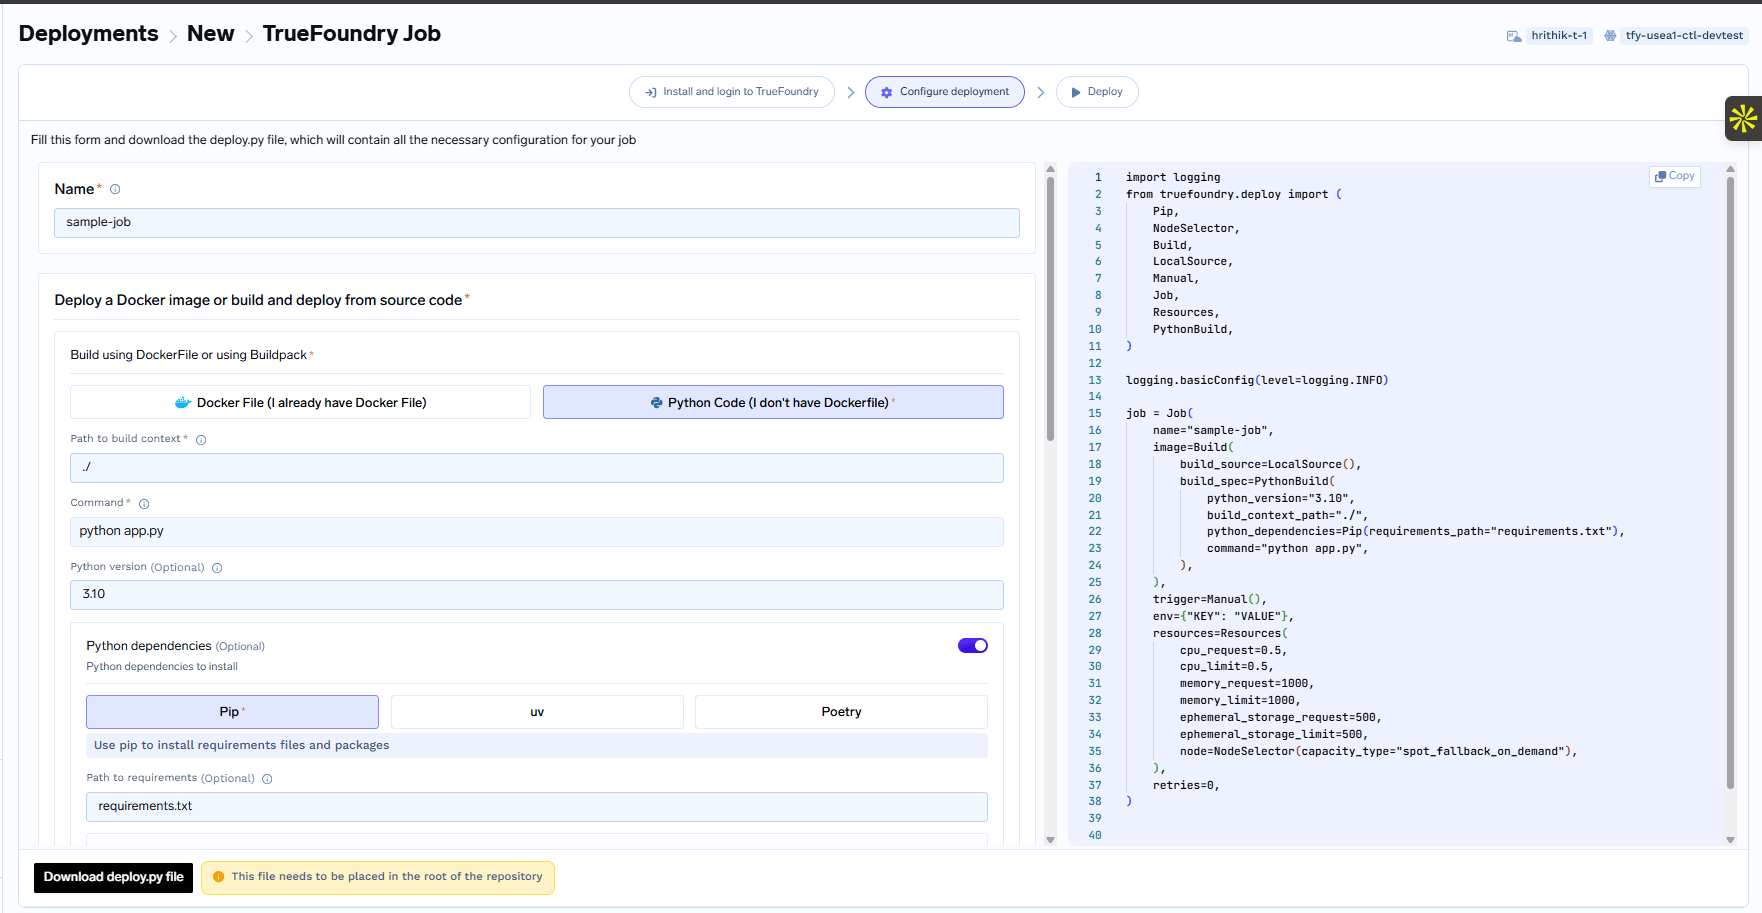
 Fill in the deployment configuration form:
1. `Name`: A name for your job (e.g. `sample-job`)
2. `Build using`: Select **Python Code (I don't have Dockerfile)**
3. `Path to build context`: `.`
4. `Command`: The command to run your job (e.g. `python app.py`)
5. `Python version`: `3.10`
6. `Path to requirements`: `requirements.txt`
The generated `deploy.py` script will appear on the right side. Click **Download deploy.py file** at the bottom to save it.
Fill in the deployment configuration form:
1. `Name`: A name for your job (e.g. `sample-job`)
2. `Build using`: Select **Python Code (I don't have Dockerfile)**
3. `Path to build context`: `.`
4. `Command`: The command to run your job (e.g. `python app.py`)
5. `Python version`: `3.10`
6. `Path to requirements`: `requirements.txt`
The generated `deploy.py` script will appear on the right side. Click **Download deploy.py file** at the bottom to save it.
 Place the downloaded `deploy.py` in the root of your project.
The deploy.py should be placed in the root of your project.
The deploy.py has a field called `project_root_path` in the build\_source section.
The project\_root\_path is considered relative to where the command `python deploy.py` is executed from.
The build\_context\_path is relative to the project\_root\_path.
All the code in the `build_context_path` will be packaged into a docker image and deployed.
**It's usually recommended to use "./" as the project\_root\_path, put the `deploy.py` in that path and execute the command `python deploy.py` from the project\_root\_path directory.**
The directory structure will then appear as follows:
```plain Directory Structure theme={"dark"}
.
├── train.py
├── deploy.py
└── requirements.txt
```
To deploy, execute the command:
```shell Shell lines theme={"dark"}
python deploy.py
```
You can find more details about the deploy.py file in the [Deploy Job Programatically](/docs/deploy-job-programatically) section. Here's a brief explanation of the file:
```python deploy.py wrap lines theme={"dark"}
import argparse
import logging
from truefoundry.deploy import Build, Job, PythonBuild, Resources
# Set up logging to display informational messages
logging.basicConfig(level=logging.INFO)
# Create a TrueFoundry **Job** object to configure your service
job = Job(
# Specify the name of the job
name="your-job",
# Define how to build your code into a Docker image
image=Build(
# `PythonBuild` helps specify the details of your Python Code.
# These details will be used to templatize a DockerFile to build your Docker Image
build_spec=PythonBuild(
# Define the command to run the training script
command="python train.py",
# Specify the path to requirements file
requirements_path="requirements.txt",
)
),
# Define the resource constraints.
#
# Requests are the minimum amount of resources that a container needs to run.
# Limits are the maximum amount of resources that a container can use.
#
# If a container tries to use more resources than its limits, it will be throttled or killed.
resources=Resources(
# CPU is specified as a number. 1 CPU unit is equivalent to 1 physical CPU core, or 1 virtual core.
cpu_request=0.2,
cpu_limit=0.5,
# Memory is defined as an integer and the unit is Megabytes.
memory_request=200,
memory_limit=500,
# Ephemeral storage is defined as an integer and the unit is Megabytes.
ephemeral_storage_request=1000,
ephemeral_storage_limit=2000,
),
# Define environment variables that your Job will have access to
env={
"ENVIRONMENT": "dev"
}
)
# Deploy the job to the specified workspace, copy workspace FQN using the following guide
# https://docs.truefoundry.com/docs/key-concepts#creating-a-workspace
job.deploy(workspace_fqn="your-workspace-fqn")
```
After running the command mentioned above, wait for the deployment process to complete. Monitor the status until it shows **`DEPLOY_SUCCESS:`**, indicating a successful deployment.
Place the downloaded `deploy.py` in the root of your project.
The deploy.py should be placed in the root of your project.
The deploy.py has a field called `project_root_path` in the build\_source section.
The project\_root\_path is considered relative to where the command `python deploy.py` is executed from.
The build\_context\_path is relative to the project\_root\_path.
All the code in the `build_context_path` will be packaged into a docker image and deployed.
**It's usually recommended to use "./" as the project\_root\_path, put the `deploy.py` in that path and execute the command `python deploy.py` from the project\_root\_path directory.**
The directory structure will then appear as follows:
```plain Directory Structure theme={"dark"}
.
├── train.py
├── deploy.py
└── requirements.txt
```
To deploy, execute the command:
```shell Shell lines theme={"dark"}
python deploy.py
```
You can find more details about the deploy.py file in the [Deploy Job Programatically](/docs/deploy-job-programatically) section. Here's a brief explanation of the file:
```python deploy.py wrap lines theme={"dark"}
import argparse
import logging
from truefoundry.deploy import Build, Job, PythonBuild, Resources
# Set up logging to display informational messages
logging.basicConfig(level=logging.INFO)
# Create a TrueFoundry **Job** object to configure your service
job = Job(
# Specify the name of the job
name="your-job",
# Define how to build your code into a Docker image
image=Build(
# `PythonBuild` helps specify the details of your Python Code.
# These details will be used to templatize a DockerFile to build your Docker Image
build_spec=PythonBuild(
# Define the command to run the training script
command="python train.py",
# Specify the path to requirements file
requirements_path="requirements.txt",
)
),
# Define the resource constraints.
#
# Requests are the minimum amount of resources that a container needs to run.
# Limits are the maximum amount of resources that a container can use.
#
# If a container tries to use more resources than its limits, it will be throttled or killed.
resources=Resources(
# CPU is specified as a number. 1 CPU unit is equivalent to 1 physical CPU core, or 1 virtual core.
cpu_request=0.2,
cpu_limit=0.5,
# Memory is defined as an integer and the unit is Megabytes.
memory_request=200,
memory_limit=500,
# Ephemeral storage is defined as an integer and the unit is Megabytes.
ephemeral_storage_request=1000,
ephemeral_storage_limit=2000,
),
# Define environment variables that your Job will have access to
env={
"ENVIRONMENT": "dev"
}
)
# Deploy the job to the specified workspace, copy workspace FQN using the following guide
# https://docs.truefoundry.com/docs/key-concepts#creating-a-workspace
job.deploy(workspace_fqn="your-workspace-fqn")
```
After running the command mentioned above, wait for the deployment process to complete. Monitor the status until it shows **`DEPLOY_SUCCESS:`**, indicating a successful deployment.
 Once deployed, you'll receive a dashboard access link in the output, typically mentioned as **`You can find the application on the dashboard:`**. Click this link to access the deployment dashboard.
## View your deployed job
Congratulations! You've successfully deployed your job.
Once you click **`Submit`**, your deployment will be successful in a few seconds, and your job will be displayed as Suspended, indicating that it's successfully deployed but not running.
You can view all the information about your job following the steps below:
## Configure Job Trigger
You can trigger your job manually by clicking the **`Run Job`** button on the dashboard or programatically. You can find more details about how to trigger your job programatically in the dashboard itself by selecting `Run Job Programatically`.
You can schedule your job to run at a specific time using the [Schedule Job](/docs/deploy-a-cron-job) feature.
## Terminate your job
To terminate your job, you can click the **`Terminate`** button on the dashboard.
## Getting Started With Spark Job
Spark jobs are not enabled by default on TrueFoundry. Please contact your cluster administrator to enable them.
To deploy an Apache Spark job, you'll need a workspace. If you don't have one, you can create it using this guide: [Creating a Workspace](/docs/key-concepts#creating-a-workspace) or seek assistance from your cluster administrator in case you don't have permission to create a workspace.
In TrueFoundry, you can run python `(.py)`, scala or java `(.jar)` code or Jupyter notebooks `(.ipynb)` with either Python or Scala code as Spark jobs.
In the above walkthrough, we followed the following steps:
1. Select a workspace to deploy the job. This basically decides which cluster and environment the job will be deployed to.
2. Select the `Spark Job` option since this is a spark job.
3. Select `Deploy an existing image` since we have the code that can be directly run.
4. Enter the `Image URI` for the docker image we want to use.
5. Select `python` as the entrypoint.
6. Enter `Main Application File` as the path to the file. In this example, its a file in the docker image hence the path with `local:///` prefix.
7. Set `Spark Config Properties`.
On filling up the form, we can press the Submit button to deploy the spark job.
This flow currently only supports Python notebooks and Scala notebooks.
In the above walkthrough, we followed the following steps:
1. Select a workspace to deploy the job. This basically decides which cluster and environment the job will be deployed to.
2. Select the `Spark Job` option since this is a spark job.
3. Select `Build a new image` since we have the code that can be directly run.
4. Enter the `Repo URL` for the git repository containing your Jupyter notebook.
5. Select `python notebook` as the entrypoint.
6. Enter `Main Application File` as the path to the file. In this example, its a file in the docker image hence the path with `local:///` prefix.
7. Set `Spark Config Properties`
On filling up the form, we can press the Submit button to deploy the spark job.
Your deployment will be successful in a short while, and your job will be displayed as Suspended, indicating that it's successfully deployed but not running.
To trigger the Spark job, click on the play icon and change the arguments if required for the run.
The link to Spark UI is shown up against the job run once its in the running stage. In case of Jupyter notebook the link to the final executed notebook is shown once the job finishes successfully.
## FAQ
It's possible there are certain files in your repository that you don't want to package in the docker image like like test files, etc.
To exclude specific files from being built and deployed, create a .tfyignore file in the root directory of your project. The `.tfyignore` file follows the same rules as the `.gitignore` file.
If your repository already has a `.gitignore` file, you don't need to create a `.tfyignore` file. Truefoundry will automatically detect the files to ignore.
If you are deploying from a Github repository, the docker image is built in Truefoundry control-plane and pushed to your configured container registry.
If you are deploying code from your local machine, the Truefoundry SDK first checks is docker is installed on your local environment.
It tries to build using the locally installed Docker, failing which it uses the remote builder on the Truefoundry control-plane. If docker is not installed, the SDK will use the remote builder on the Truefoundry control-plane.
You need to use the cron string format to specify job schedule. The cron expression consists of five fields representing the time to execute a specified command.
```java lines theme={"dark"}
* * * * *
| | | | |
| | | | |___ day of week (0-6) (Sunday is 0)
| | | |_____ month (1-12)
| | |_______ day of month (1-31)
| |_________ hour (0-23)
|___________ minute (0-59)
```
For example,
`0 11 1 * *` represents "first day of every month at 11:00 AM", or
`30 9 * * 1` represents "every Monday at 9:30 AM"
We can use a site like [https://crontab.guru/](https://crontab.guru/) to tryout cron expression and get a human-readable description of the same.
Say for example, you schedule a daily job which runs at midnight to process and store some data in an S3 bucket but for some reason it is still running even at next midnight. So it is possible that the previous run of the job hasn't been completed while it is already time for the job to run again as per schedule. What should happen in this case? Should we:
1. Skip the new run and continue the current run
2. Stop the ongoing run and start the new one, or
3. Run both in parallel
On TrueFoundry you can select the behaviour using something called concurrency policy based on your requirements and use case. The possible options are:
1. **`Forbid`**: *This is the default*. Do not allow concurrent runs.
2. **`Allow`**: Allow jobs to run concurrently.
3. **`Replace`**: Replace the current job with the new one.
Concurrency doesn't apply to manually triggered jobs. In that case, it always creates a new job run.
***
Once deployed, you'll receive a dashboard access link in the output, typically mentioned as **`You can find the application on the dashboard:`**. Click this link to access the deployment dashboard.
## View your deployed job
Congratulations! You've successfully deployed your job.
Once you click **`Submit`**, your deployment will be successful in a few seconds, and your job will be displayed as Suspended, indicating that it's successfully deployed but not running.
You can view all the information about your job following the steps below:
## Configure Job Trigger
You can trigger your job manually by clicking the **`Run Job`** button on the dashboard or programatically. You can find more details about how to trigger your job programatically in the dashboard itself by selecting `Run Job Programatically`.
You can schedule your job to run at a specific time using the [Schedule Job](/docs/deploy-a-cron-job) feature.
## Terminate your job
To terminate your job, you can click the **`Terminate`** button on the dashboard.
## Getting Started With Spark Job
Spark jobs are not enabled by default on TrueFoundry. Please contact your cluster administrator to enable them.
To deploy an Apache Spark job, you'll need a workspace. If you don't have one, you can create it using this guide: [Creating a Workspace](/docs/key-concepts#creating-a-workspace) or seek assistance from your cluster administrator in case you don't have permission to create a workspace.
In TrueFoundry, you can run python `(.py)`, scala or java `(.jar)` code or Jupyter notebooks `(.ipynb)` with either Python or Scala code as Spark jobs.
In the above walkthrough, we followed the following steps:
1. Select a workspace to deploy the job. This basically decides which cluster and environment the job will be deployed to.
2. Select the `Spark Job` option since this is a spark job.
3. Select `Deploy an existing image` since we have the code that can be directly run.
4. Enter the `Image URI` for the docker image we want to use.
5. Select `python` as the entrypoint.
6. Enter `Main Application File` as the path to the file. In this example, its a file in the docker image hence the path with `local:///` prefix.
7. Set `Spark Config Properties`.
On filling up the form, we can press the Submit button to deploy the spark job.
This flow currently only supports Python notebooks and Scala notebooks.
In the above walkthrough, we followed the following steps:
1. Select a workspace to deploy the job. This basically decides which cluster and environment the job will be deployed to.
2. Select the `Spark Job` option since this is a spark job.
3. Select `Build a new image` since we have the code that can be directly run.
4. Enter the `Repo URL` for the git repository containing your Jupyter notebook.
5. Select `python notebook` as the entrypoint.
6. Enter `Main Application File` as the path to the file. In this example, its a file in the docker image hence the path with `local:///` prefix.
7. Set `Spark Config Properties`
On filling up the form, we can press the Submit button to deploy the spark job.
Your deployment will be successful in a short while, and your job will be displayed as Suspended, indicating that it's successfully deployed but not running.
To trigger the Spark job, click on the play icon and change the arguments if required for the run.
The link to Spark UI is shown up against the job run once its in the running stage. In case of Jupyter notebook the link to the final executed notebook is shown once the job finishes successfully.
## FAQ
It's possible there are certain files in your repository that you don't want to package in the docker image like like test files, etc.
To exclude specific files from being built and deployed, create a .tfyignore file in the root directory of your project. The `.tfyignore` file follows the same rules as the `.gitignore` file.
If your repository already has a `.gitignore` file, you don't need to create a `.tfyignore` file. Truefoundry will automatically detect the files to ignore.
If you are deploying from a Github repository, the docker image is built in Truefoundry control-plane and pushed to your configured container registry.
If you are deploying code from your local machine, the Truefoundry SDK first checks is docker is installed on your local environment.
It tries to build using the locally installed Docker, failing which it uses the remote builder on the Truefoundry control-plane. If docker is not installed, the SDK will use the remote builder on the Truefoundry control-plane.
You need to use the cron string format to specify job schedule. The cron expression consists of five fields representing the time to execute a specified command.
```java lines theme={"dark"}
* * * * *
| | | | |
| | | | |___ day of week (0-6) (Sunday is 0)
| | | |_____ month (1-12)
| | |_______ day of month (1-31)
| |_________ hour (0-23)
|___________ minute (0-59)
```
For example,
`0 11 1 * *` represents "first day of every month at 11:00 AM", or
`30 9 * * 1` represents "every Monday at 9:30 AM"
We can use a site like [https://crontab.guru/](https://crontab.guru/) to tryout cron expression and get a human-readable description of the same.
Say for example, you schedule a daily job which runs at midnight to process and store some data in an S3 bucket but for some reason it is still running even at next midnight. So it is possible that the previous run of the job hasn't been completed while it is already time for the job to run again as per schedule. What should happen in this case? Should we:
1. Skip the new run and continue the current run
2. Stop the ongoing run and start the new one, or
3. Run both in parallel
On TrueFoundry you can select the behaviour using something called concurrency policy based on your requirements and use case. The possible options are:
1. **`Forbid`**: *This is the default*. Do not allow concurrent runs.
2. **`Allow`**: Allow jobs to run concurrently.
3. **`Replace`**: Replace the current job with the new one.
Concurrency doesn't apply to manually triggered jobs. In that case, it always creates a new job run.
***