> ## Documentation Index
> Fetch the complete documentation index at: https://www.truefoundry.com/llms.txt
> Use this file to discover all available pages before exploring further.
# Deploy Helm Charts
> Complete guide to deploying Helm charts in TrueFoundry with support for multiple repository types, Kustomize integration, and advanced configurations
TrueFoundry provides a way to deploy Helm charts directly through the platform, making it easy to deploy any Helm chart without needing to use kubectl or other command-line tools. It also helps keep track of the helm charts that are deployed along with their versions and change history.
Truefoundry also provides the following additional features for helm charts deployment:
1. **Support for multiple repository types**: Truefoundry allows deploying a Helm chart from public/private helm repository, OCI registry, and or your own Git repository.
2. **Support for Kustomize patches and additional manifests**: Truefoundry allows you to add Kustomize patches and additional manifests to the Helm chart deployment. This is specially useful in case the helm chart doesn't allow you to customize the values you need.
3. **Support for secrets management**: While installing helm charts, we often need to create kubernetes secrets manually and then refer to them in the helm chart. Truefoundry makes this process secure by allowing you to create the secrets in Truefoundry(on your secret manager) and then add a kubernetes secret manifest via Kustomize to the helm chart deployment. You can read more on this in the steps below.
4. **Validation for cluster-scoped objects**: Helm-charts downloaded from the internet can have malicious code in them, which can impact the security of your cluster. Truefoundry validates the helm chart by checking for any cluster-scoped objects in the helm chart.
Cluster-scoped objects (like ClusterRole, ClusterRoleBinding, or
non-namespace scoped resources) cannot be applied when deploying Helm
charts unless you have cluster admin privileges. This restriction prevents
workspace users from creating cluster-level resources that could impact
other workloads.
5. **Pause Helm Chart**: Truefoundry allows you to pause the helm chart deployment. This is useful in case you want to stop the deployment and resume it later to save cost. Pausing the helm chart will scale all the pods in the helm chart to 0.
## Step-by-Step Deployment Guide
Log in to your TrueFoundry dashboard and click on **Deployments** in the
left sidebar, then click **New** to create a new deployment.
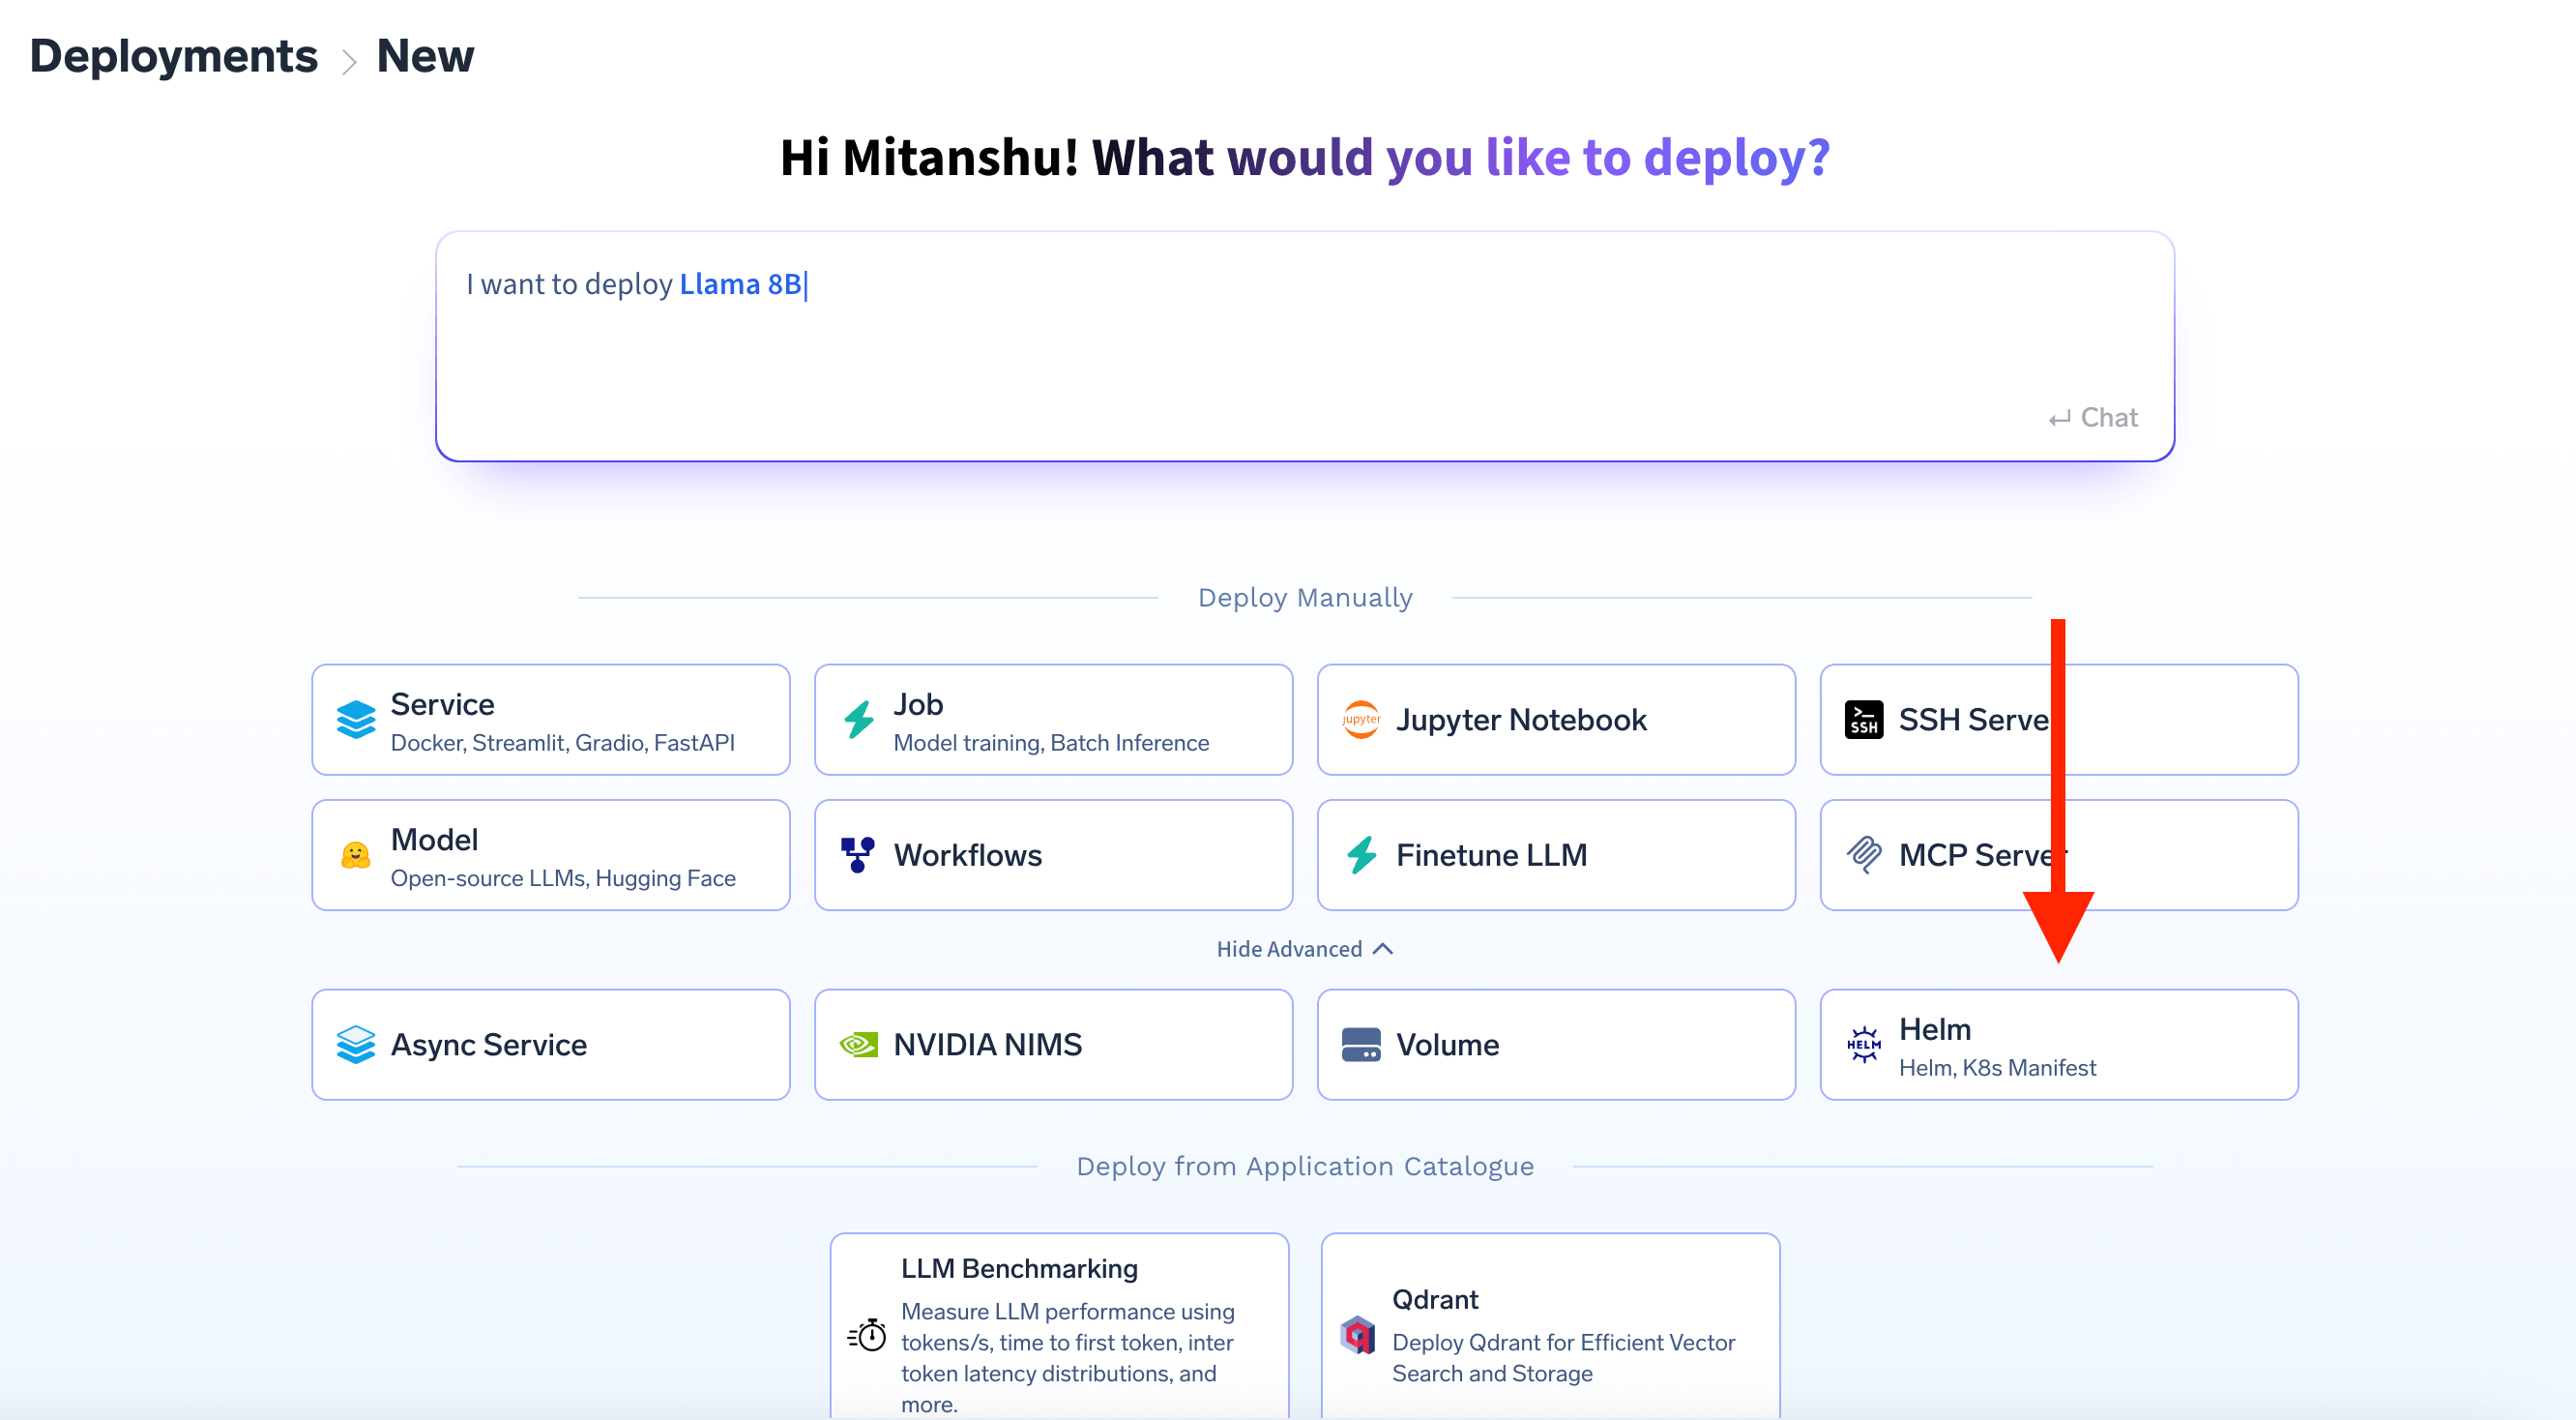
 In the application type page, click on **show advanced** and select **Helm**.
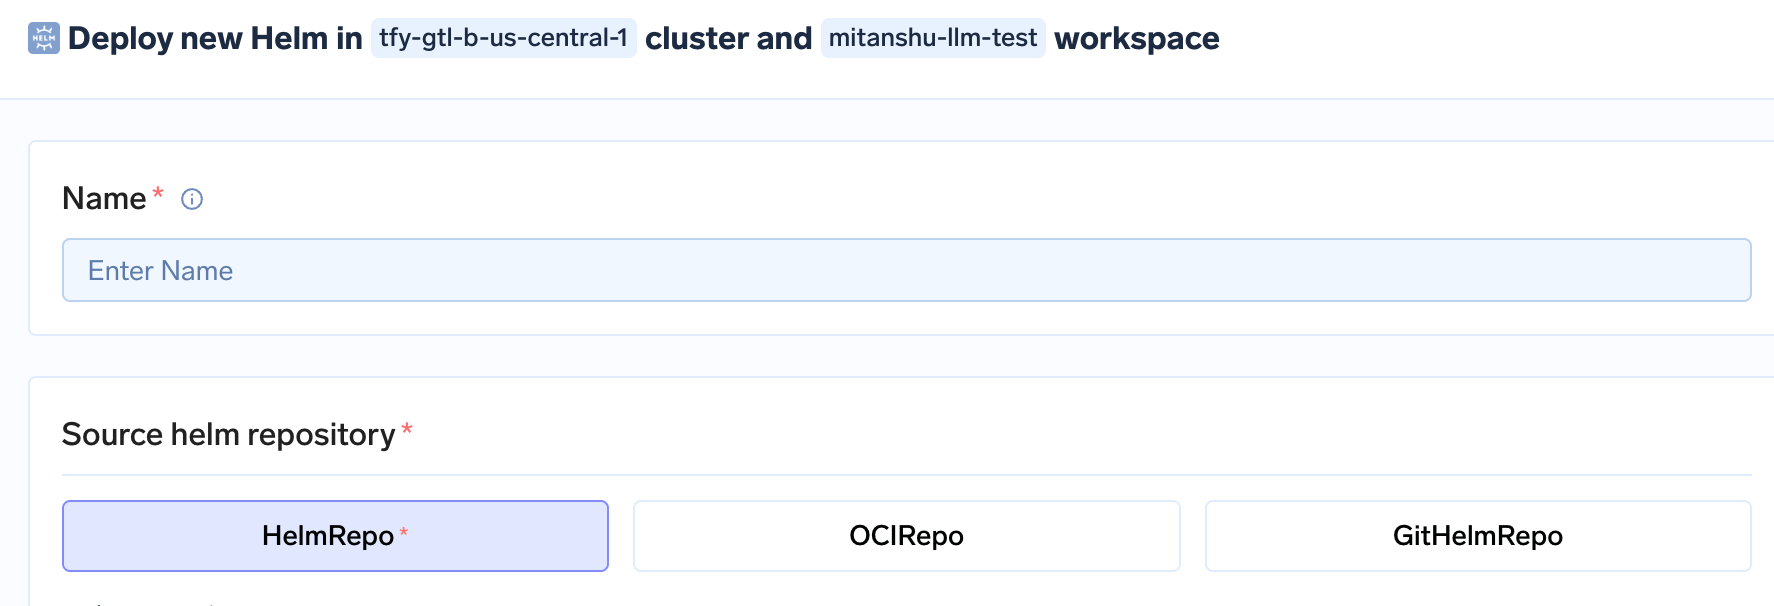
 Now you need to tell TrueFoundry where your Helm chart is located. You have three options:
You can use this option to deploy charts from public helm repositories like Bitnami, Helm Charts, etc.
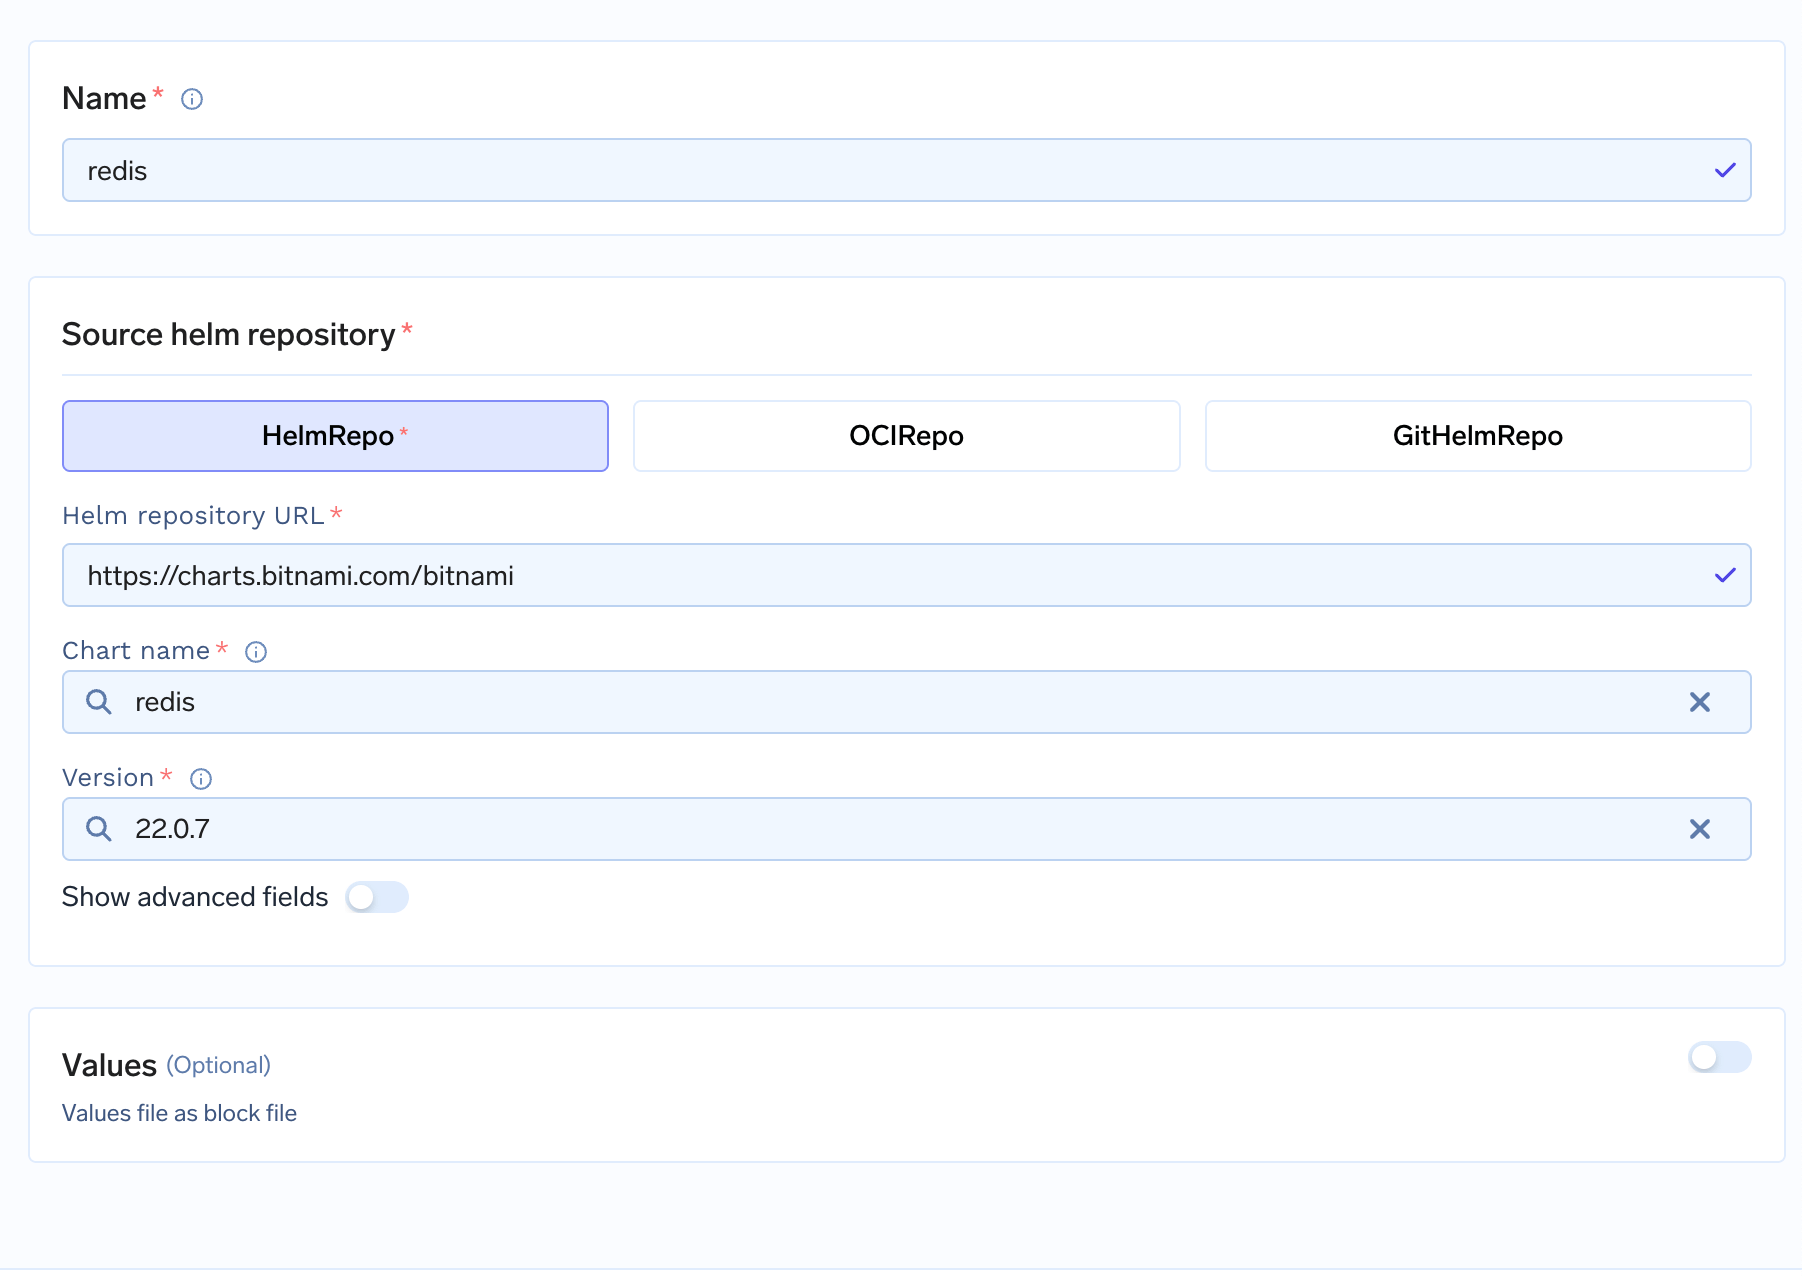 **What you need to fill:**
* `Helm repository URL`: The URL of the chart repository (e.g., `https://charts.bitnami.com/bitnami`)
* `Chart name`: The name of the chart (e.g., `redis`, `postgresql`)
* `Version`: The specific version you want to deploy
**Example:** Deploy Redis from Bitnami
```yaml lines theme={"dark"}
source:
type: helm-repo
repo_url: https://charts.bitnami.com/bitnami
chart: redis
version: 22.0.7
```
You can use this option to deploy charts from container registries like Docker Hub, Google Container Registry, etc.
To deploy charts from private container registries, you have to add the container registry as an integration first. To do this, go to **Integrations** → **Add Integration Provider** and select your registry provider and add an integration for your registry. You can refer to the [Integrations Overview](/docs/integrations-overview) guide for more details on how to add integrations. For an end-to-end flow (including optional Argo CD manifest), see [Private OCI Registry](/docs/deploy-helm-charts#private-oci-registry) under **Private Repository Configuration** below.
**What you need to fill:**
* `Helm repository URL`: The URL of the chart repository (e.g., `https://charts.bitnami.com/bitnami`)
* `Chart name`: The name of the chart (e.g., `redis`, `postgresql`)
* `Version`: The specific version you want to deploy
**Example:** Deploy Redis from Bitnami
```yaml lines theme={"dark"}
source:
type: helm-repo
repo_url: https://charts.bitnami.com/bitnami
chart: redis
version: 22.0.7
```
You can use this option to deploy charts from container registries like Docker Hub, Google Container Registry, etc.
To deploy charts from private container registries, you have to add the container registry as an integration first. To do this, go to **Integrations** → **Add Integration Provider** and select your registry provider and add an integration for your registry. You can refer to the [Integrations Overview](/docs/integrations-overview) guide for more details on how to add integrations. For an end-to-end flow (including optional Argo CD manifest), see [Private OCI Registry](/docs/deploy-helm-charts#private-oci-registry) under **Private Repository Configuration** below.
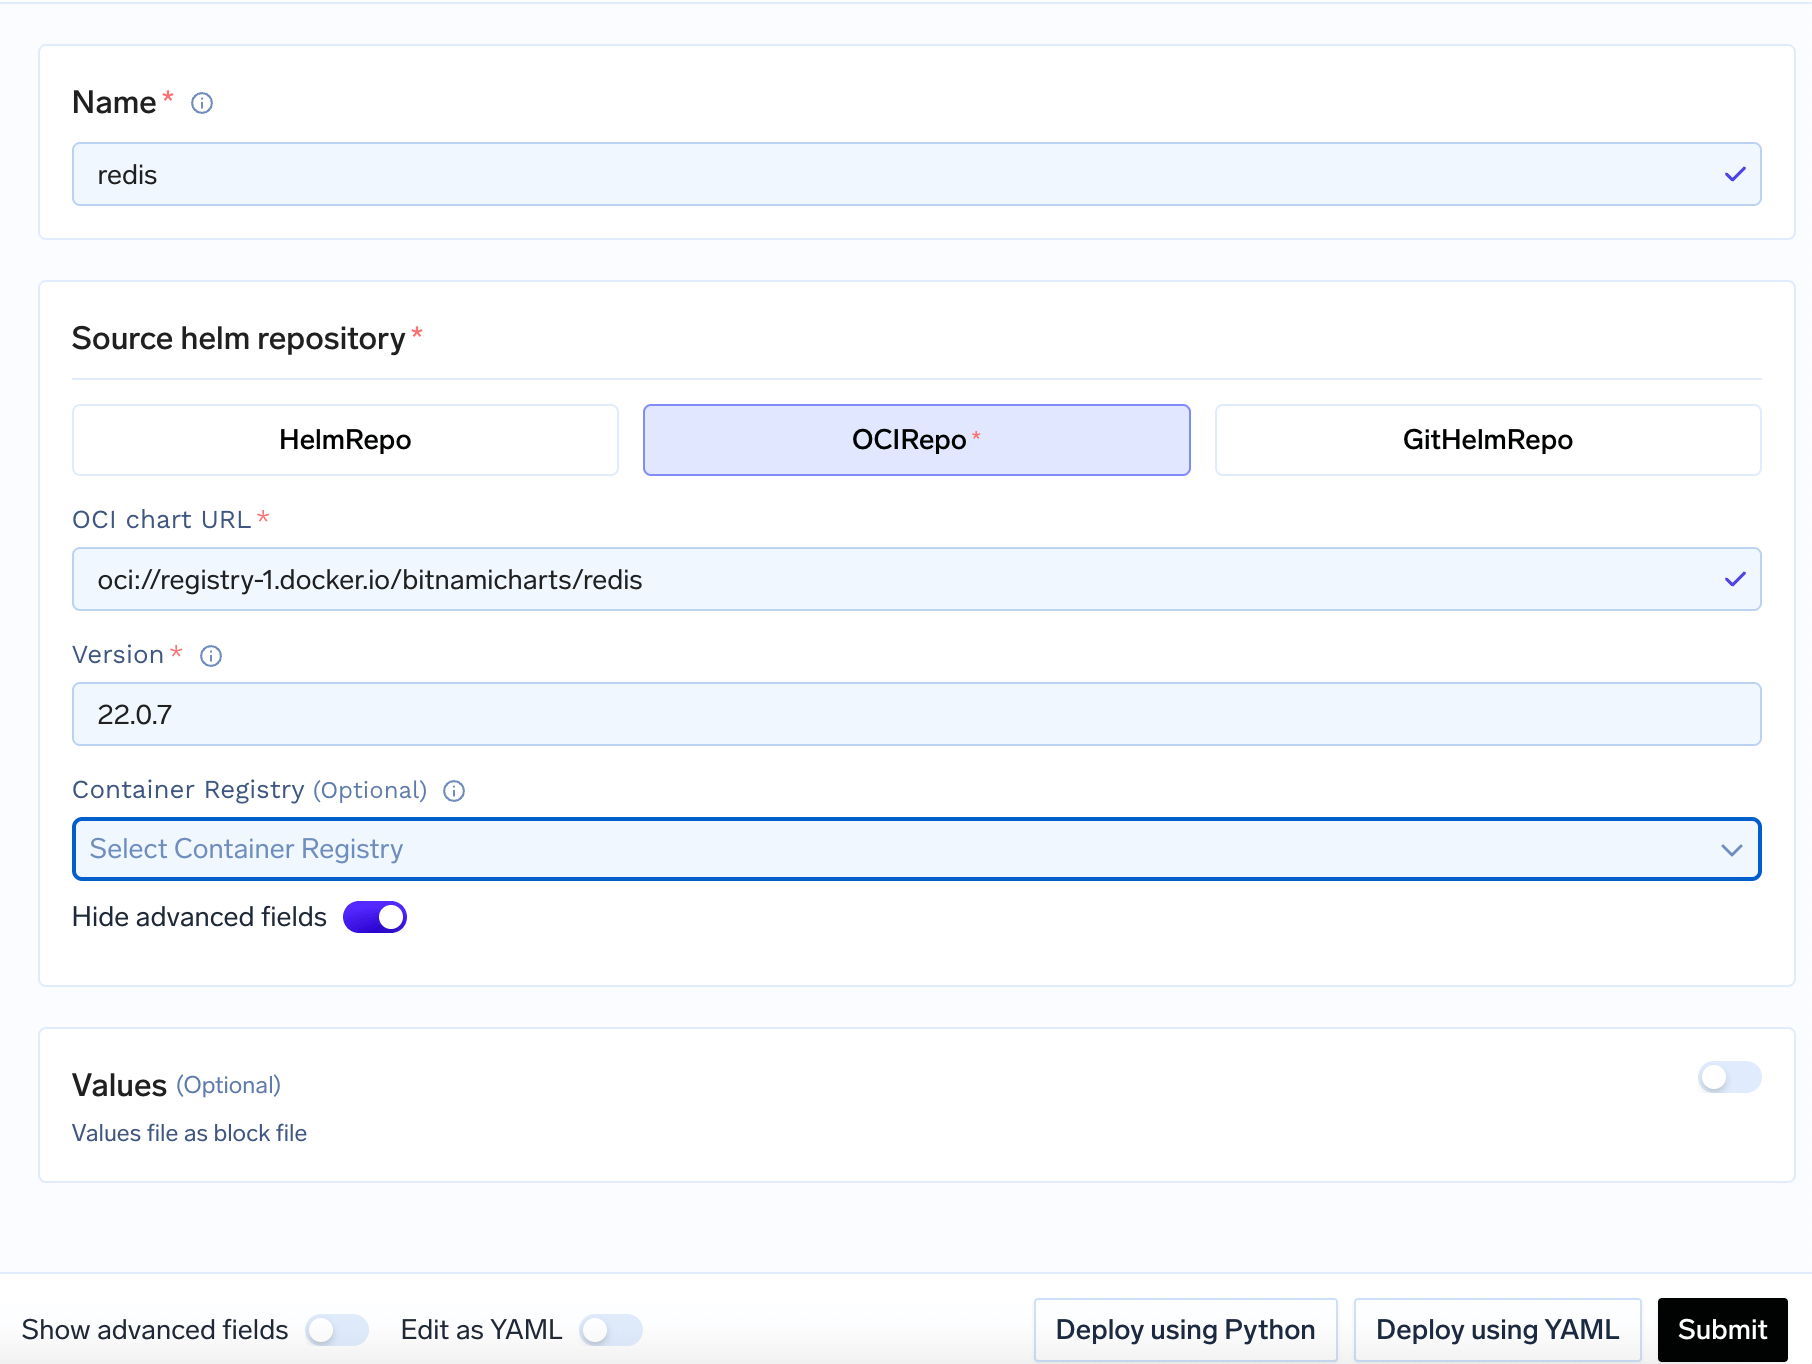 **What you need to fill:**
* `OCI chart URL`: The OCI URL of your chart (e.g., `oci://registry-1.docker.io/bitnamicharts/redis`)
* `Version`: The specific version of the chart
* `Container Registry`: This is only needed if you are deploying helm chart from your private container registry. Toggle the **Show Advanced Fields** and select the integration from the dropdown which contains your helm charts.
**Example:** Deploy Redis from Docker Hub
```yaml lines theme={"dark"}
source:
type: oci-repo
oci_chart_url: oci://registry-1.docker.io/bitnamicharts/redis
version: 22.0.7
```
You can use this option to deploy charts from your own Git repositories.
To deploy charts from private Git repositories, you have to create a repository secret first, you can refer to the [Private Repository Configuration](/docs/deploy-helm-charts#github-private-repository) section on how to do that.
**What you need to fill:**
* `OCI chart URL`: The OCI URL of your chart (e.g., `oci://registry-1.docker.io/bitnamicharts/redis`)
* `Version`: The specific version of the chart
* `Container Registry`: This is only needed if you are deploying helm chart from your private container registry. Toggle the **Show Advanced Fields** and select the integration from the dropdown which contains your helm charts.
**Example:** Deploy Redis from Docker Hub
```yaml lines theme={"dark"}
source:
type: oci-repo
oci_chart_url: oci://registry-1.docker.io/bitnamicharts/redis
version: 22.0.7
```
You can use this option to deploy charts from your own Git repositories.
To deploy charts from private Git repositories, you have to create a repository secret first, you can refer to the [Private Repository Configuration](/docs/deploy-helm-charts#github-private-repository) section on how to do that.
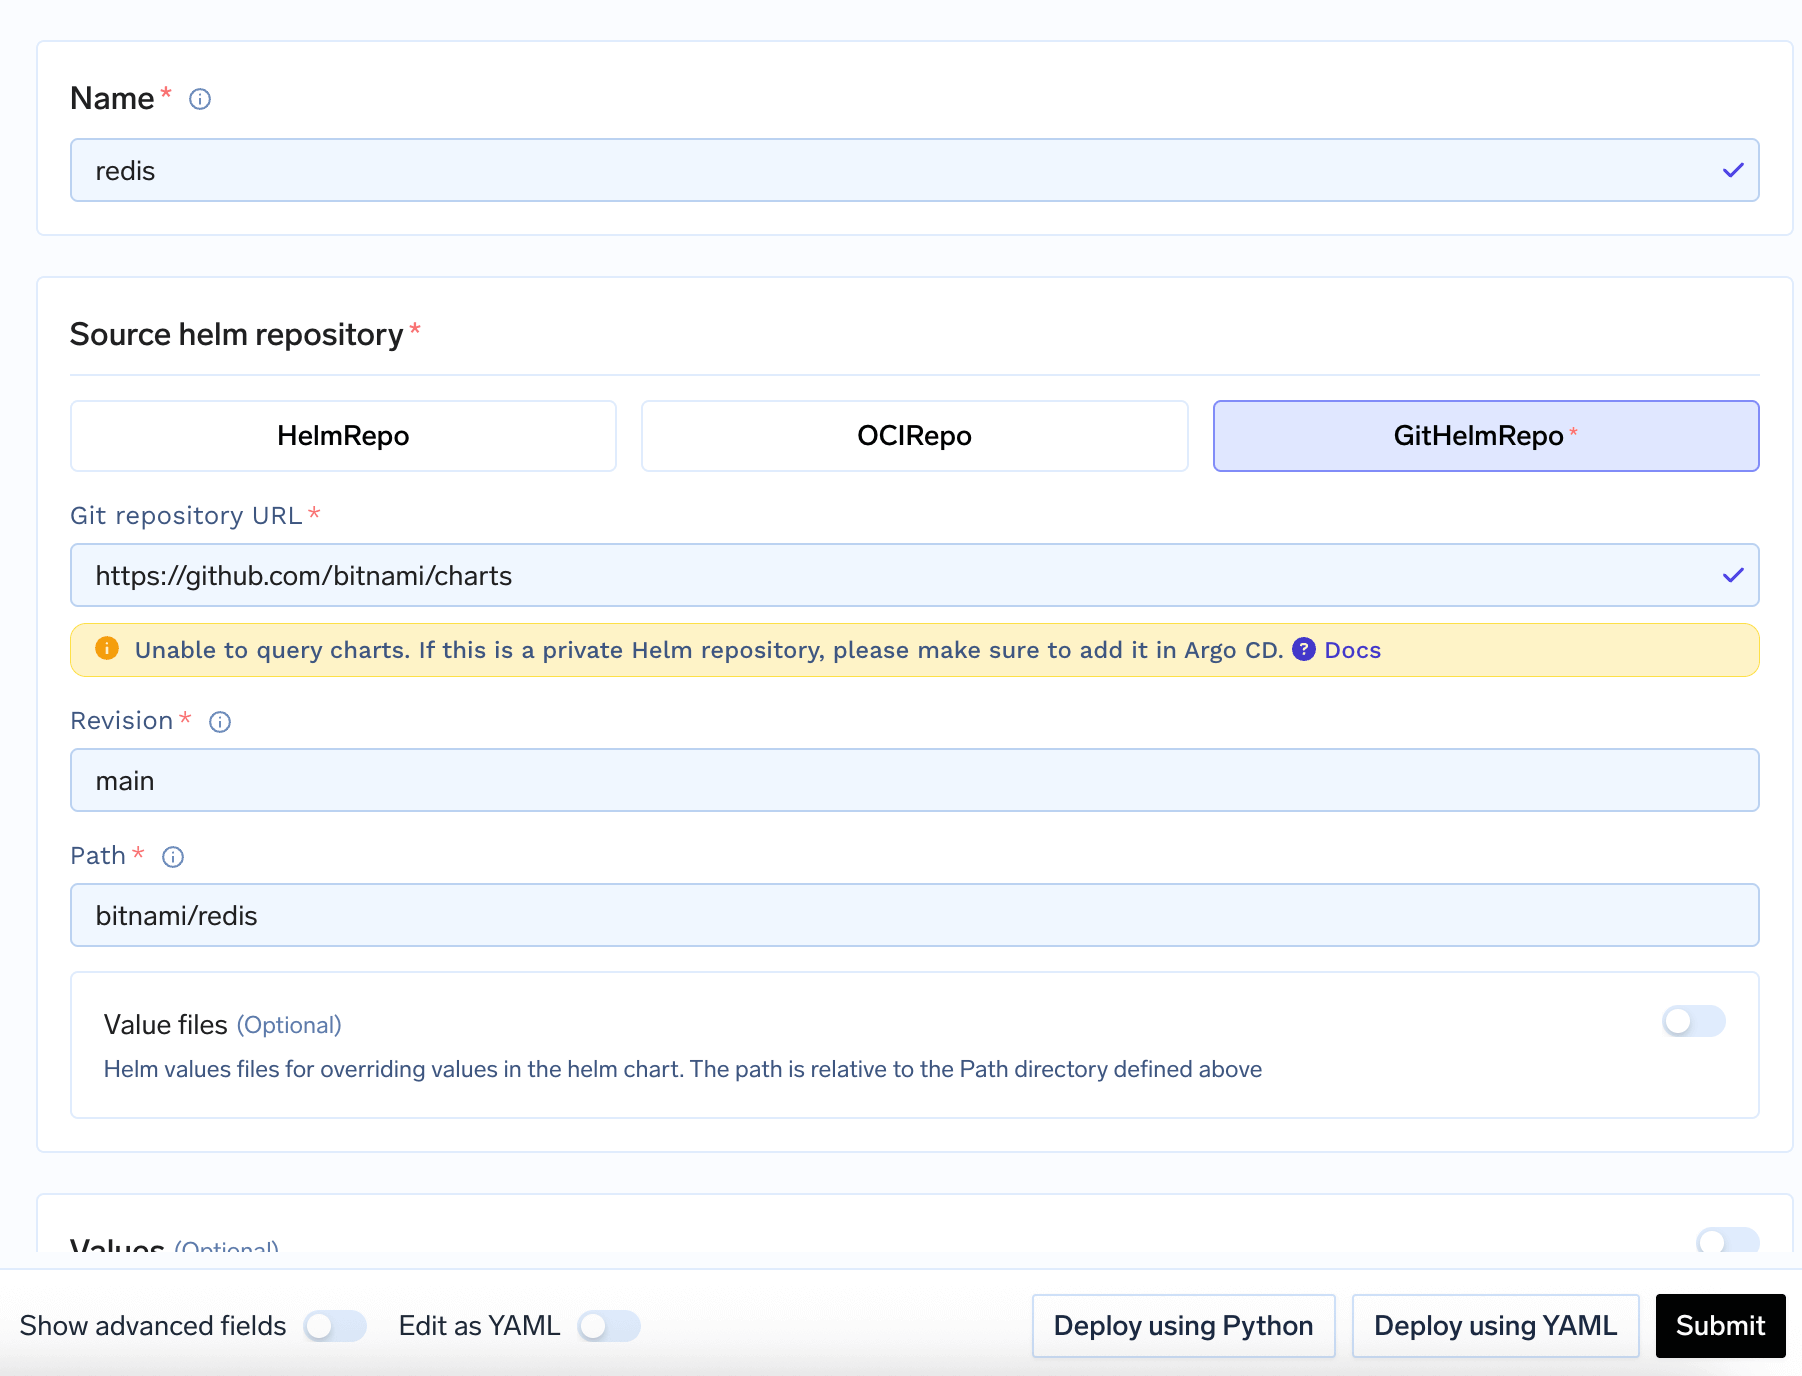 **What you need to fill:**
* `Git repository URL`: The URL of your Git repository
* `Revision`: Branch, tag, or commit SHA to use (e.g., `main`, `v1.0.0`)
* `Path`: Path to the chart within the repository (e.g., `charts/my-app`)
**Example:** Deploy from your own Git repo
```yaml lines theme={"dark"}
source:
type: git-helm-repo
git_repo_url: https://github.com/your-org/helm-charts.git
revision: main
path: charts/redis
```
This is where you can update the values file, add kustomize patches and additional manifests.
You can override the default values of the helm chart by updating the values in values block. This is useful if you want to change the default values of the helm chart.
**What you need to fill:**
* `Git repository URL`: The URL of your Git repository
* `Revision`: Branch, tag, or commit SHA to use (e.g., `main`, `v1.0.0`)
* `Path`: Path to the chart within the repository (e.g., `charts/my-app`)
**Example:** Deploy from your own Git repo
```yaml lines theme={"dark"}
source:
type: git-helm-repo
git_repo_url: https://github.com/your-org/helm-charts.git
revision: main
path: charts/redis
```
This is where you can update the values file, add kustomize patches and additional manifests.
You can override the default values of the helm chart by updating the values in values block. This is useful if you want to change the default values of the helm chart.
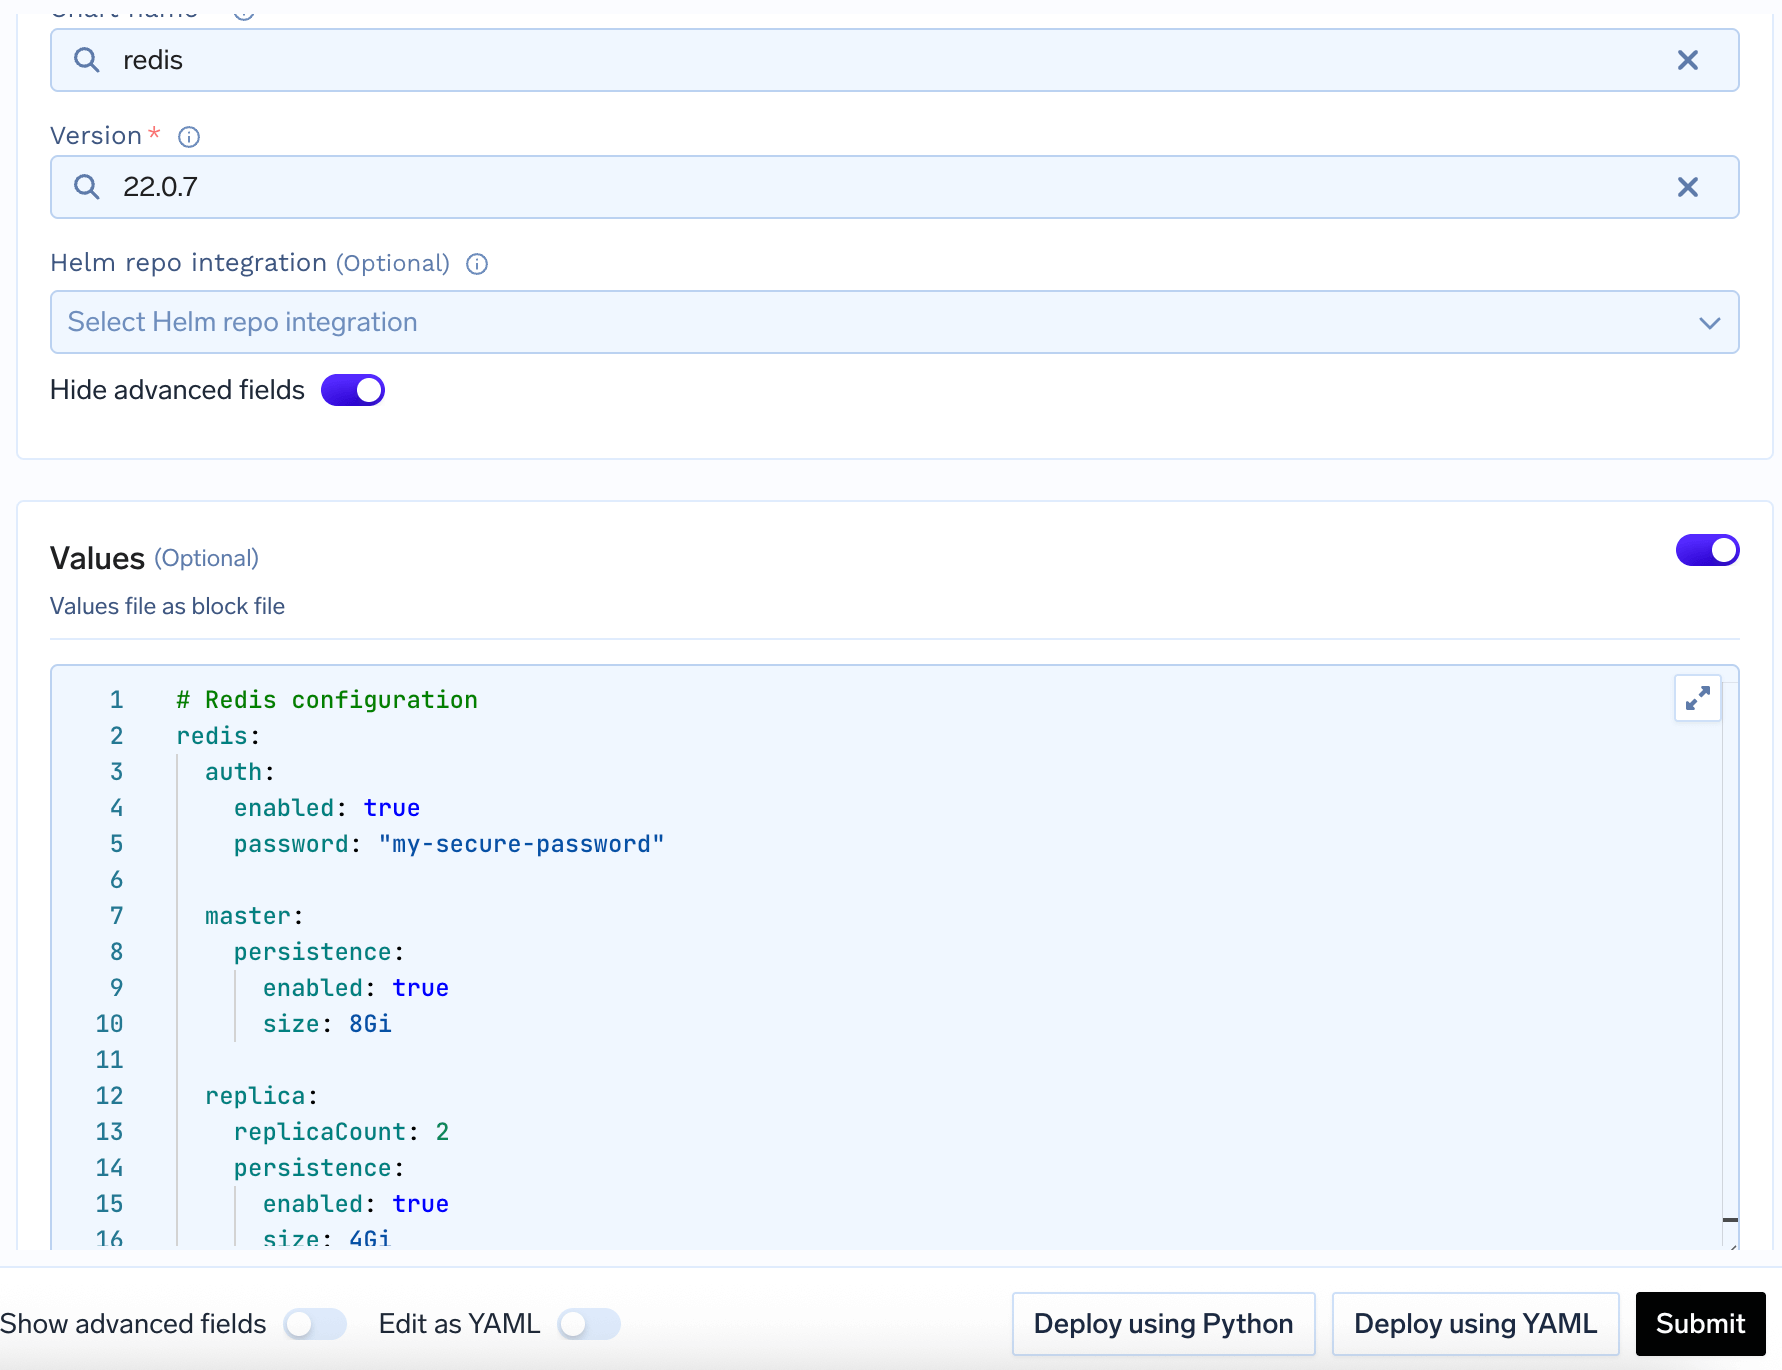 **Example:** Configure Redis with a password and persistent storage.
```yaml lines theme={"dark"}
values:
auth:
enabled: true
password: "my-secure-password"
master:
persistence:
enabled: true
size: 8Gi
service:
type: LoadBalancer
ports:
redis: 6379
```
Instead of putting passwords directly in your configuration, you can use TrueFoundry's secure secret management.
**How to use secrets:**
1. First, create a secret in TrueFoundry, you can refer to the [Secret Management](/docs/manage-secrets#creating-and-managing-secrets) page for more details on how to create a secret.
2. Copy the secret's FQN (it looks like `tfy-secret://truefoundry:secret-name:key`)
3. Use it in your secret manifest instead of plain text password.
Truefoundry secrets are supported only in manifest block that too only for kubernetes secret manifest which are using `stringData` field to store the secret.
**Example:** Configure Redis with a password and persistent storage.
```yaml lines theme={"dark"}
values:
auth:
enabled: true
password: "my-secure-password"
master:
persistence:
enabled: true
size: 8Gi
service:
type: LoadBalancer
ports:
redis: 6379
```
Instead of putting passwords directly in your configuration, you can use TrueFoundry's secure secret management.
**How to use secrets:**
1. First, create a secret in TrueFoundry, you can refer to the [Secret Management](/docs/manage-secrets#creating-and-managing-secrets) page for more details on how to create a secret.
2. Copy the secret's FQN (it looks like `tfy-secret://truefoundry:secret-name:key`)
3. Use it in your secret manifest instead of plain text password.
Truefoundry secrets are supported only in manifest block that too only for kubernetes secret manifest which are using `stringData` field to store the secret.
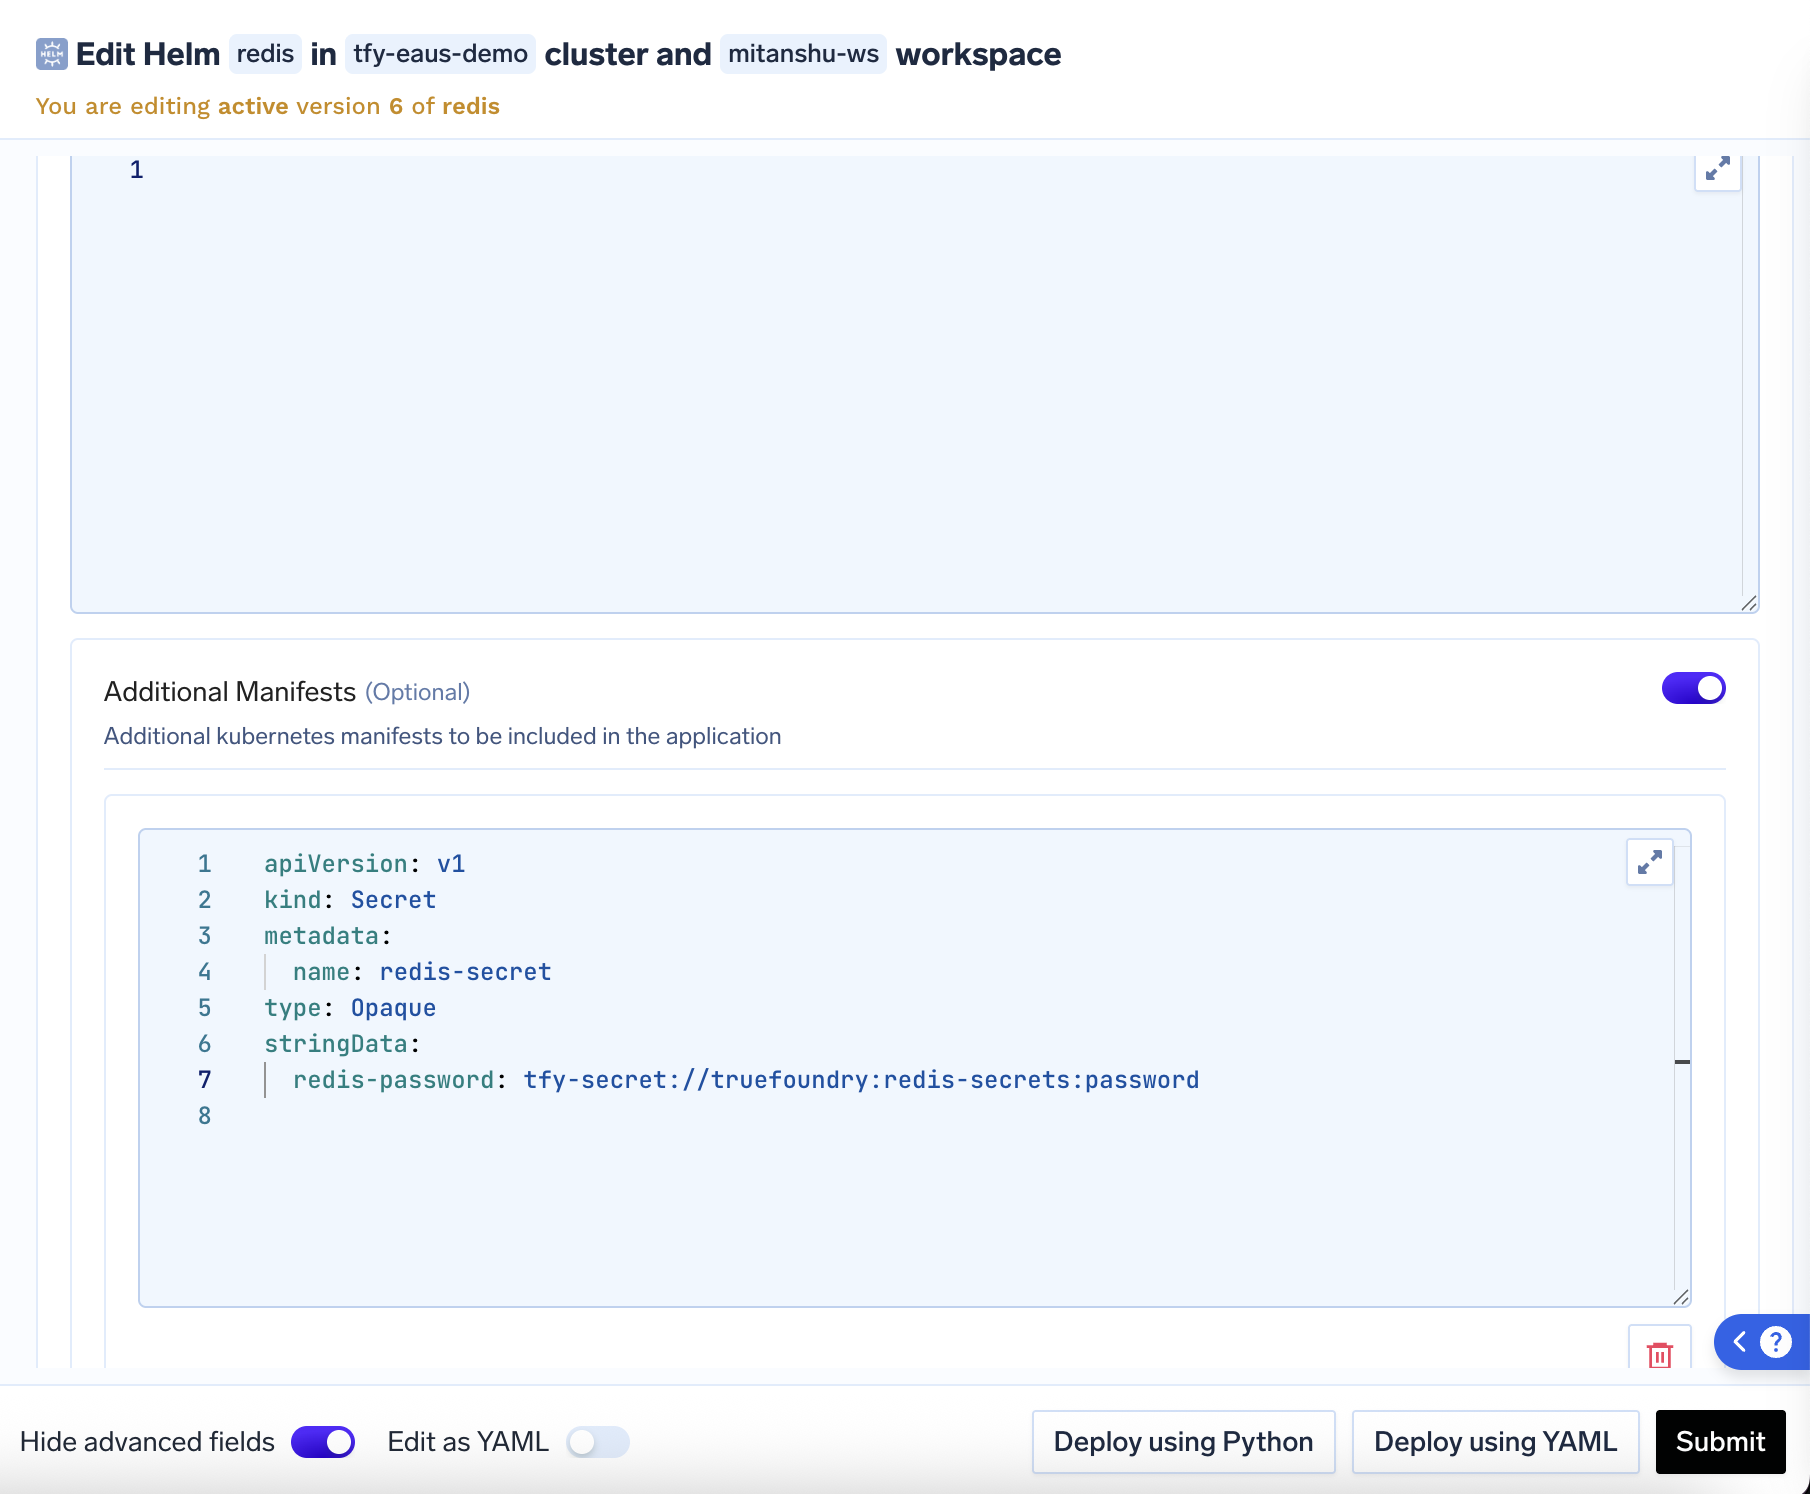 **Example:** Using a secret for Redis password, as you can see in the above image, the password is referenced using the secret FQN.
```yaml lines theme={"dark"}
# Secret to create a redis password secret
apiVersion: v1
kind: Secret
metadata:
name: redis-secret
type: Opaque
stringData:
redis-password: tfy-secret://truefoundry:redis-secrets:password
```
This is much more secure than putting passwords directly in your configuration files!
**When to use this:** If you need to modify the Kubernetes resources that Helm creates, or add additional resources.
**Two main options:**
1. **Kustomize Patches**: Modify existing resources (e.g., add annotations, change resource limits), you can refer to the [Kustomize](/docs/kustomize) page for more details on how to use kustomize patches.
**Example:** Using a secret for Redis password, as you can see in the above image, the password is referenced using the secret FQN.
```yaml lines theme={"dark"}
# Secret to create a redis password secret
apiVersion: v1
kind: Secret
metadata:
name: redis-secret
type: Opaque
stringData:
redis-password: tfy-secret://truefoundry:redis-secrets:password
```
This is much more secure than putting passwords directly in your configuration files!
**When to use this:** If you need to modify the Kubernetes resources that Helm creates, or add additional resources.
**Two main options:**
1. **Kustomize Patches**: Modify existing resources (e.g., add annotations, change resource limits), you can refer to the [Kustomize](/docs/kustomize) page for more details on how to use kustomize patches.
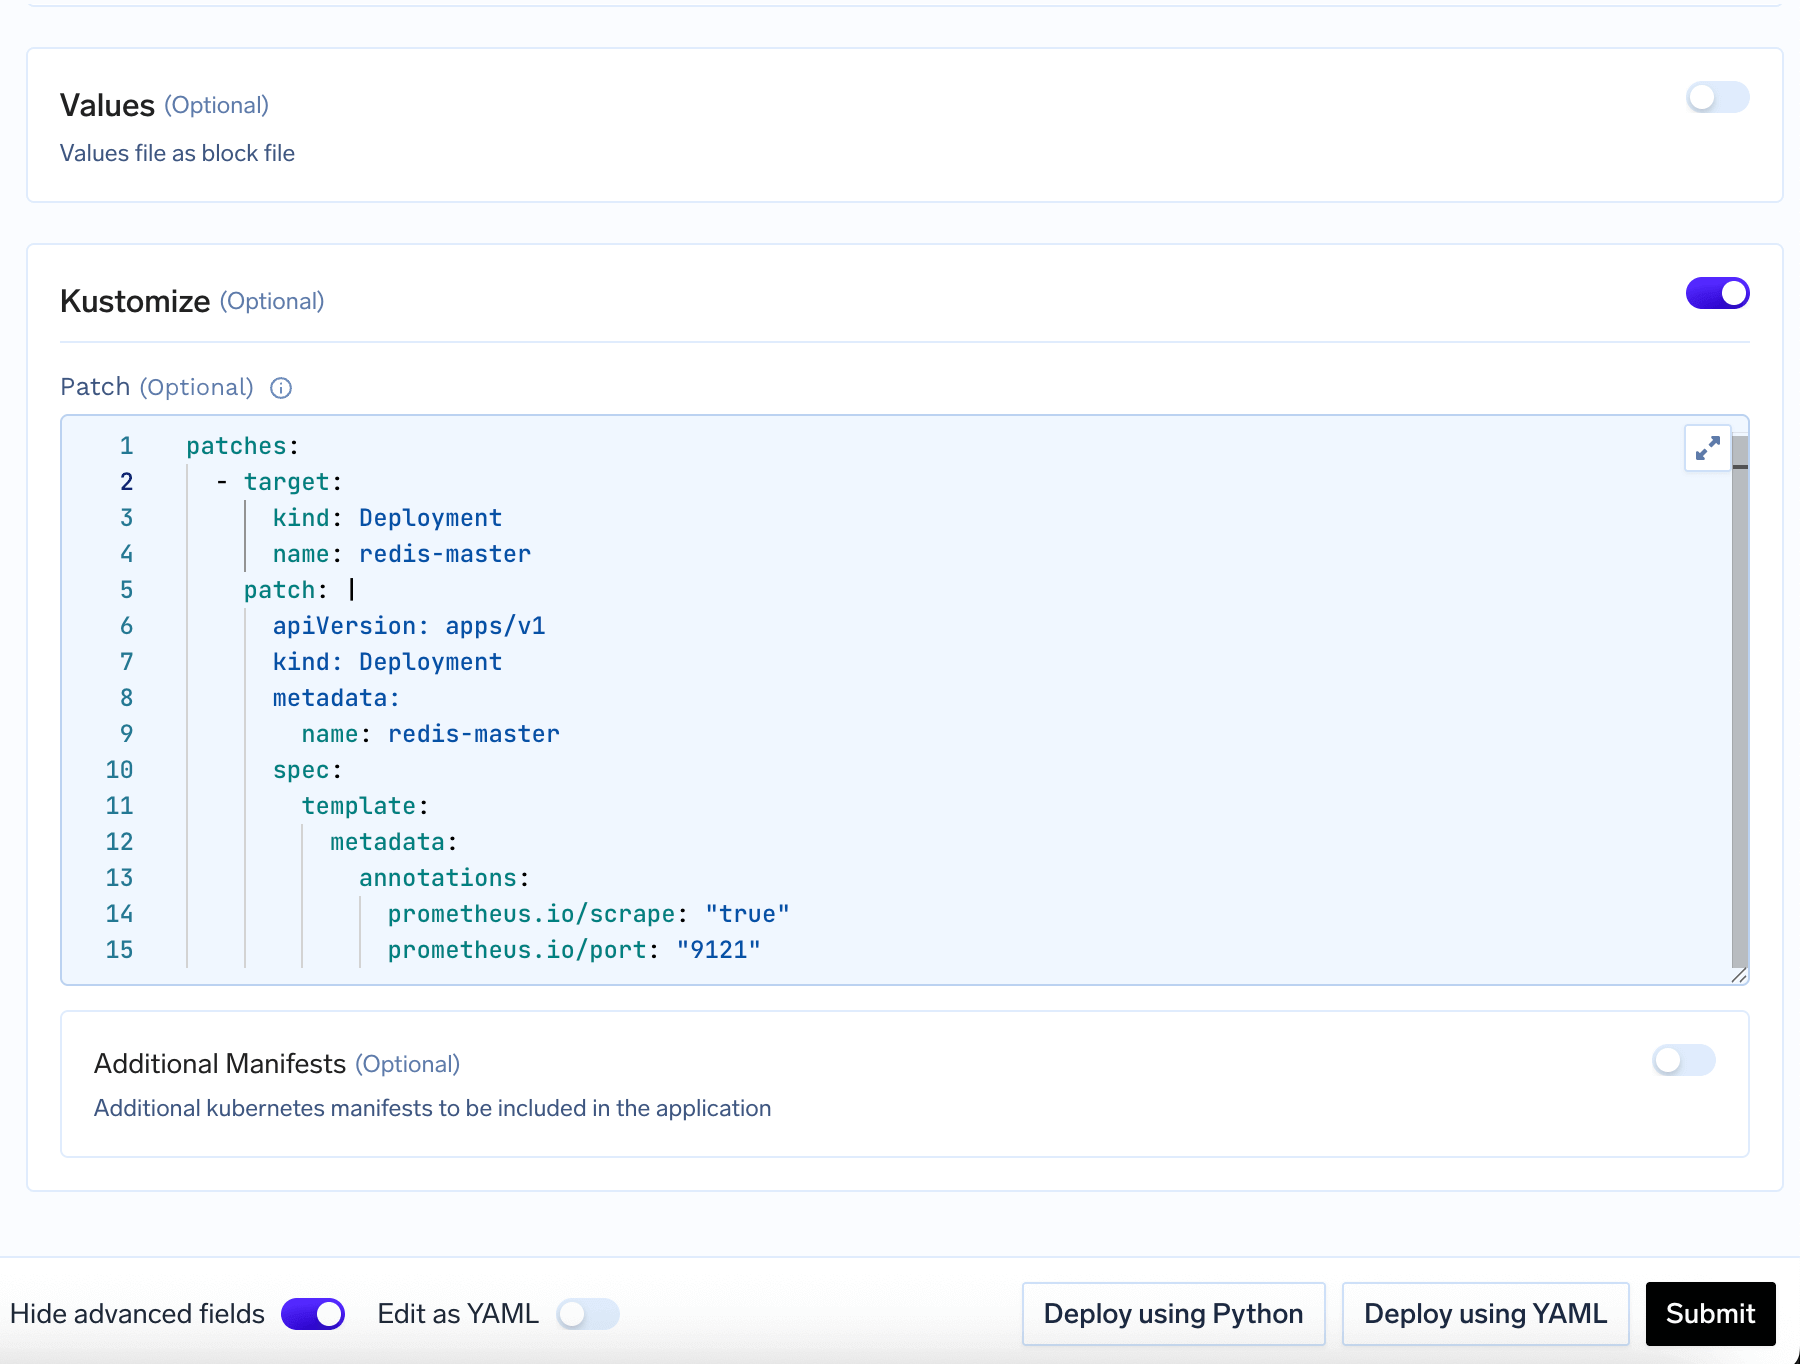 2. **Additional Manifests**: Add new Kubernetes resources (e.g., To expose your app with a VirtualService, you can add a VirtualService manifest here.)
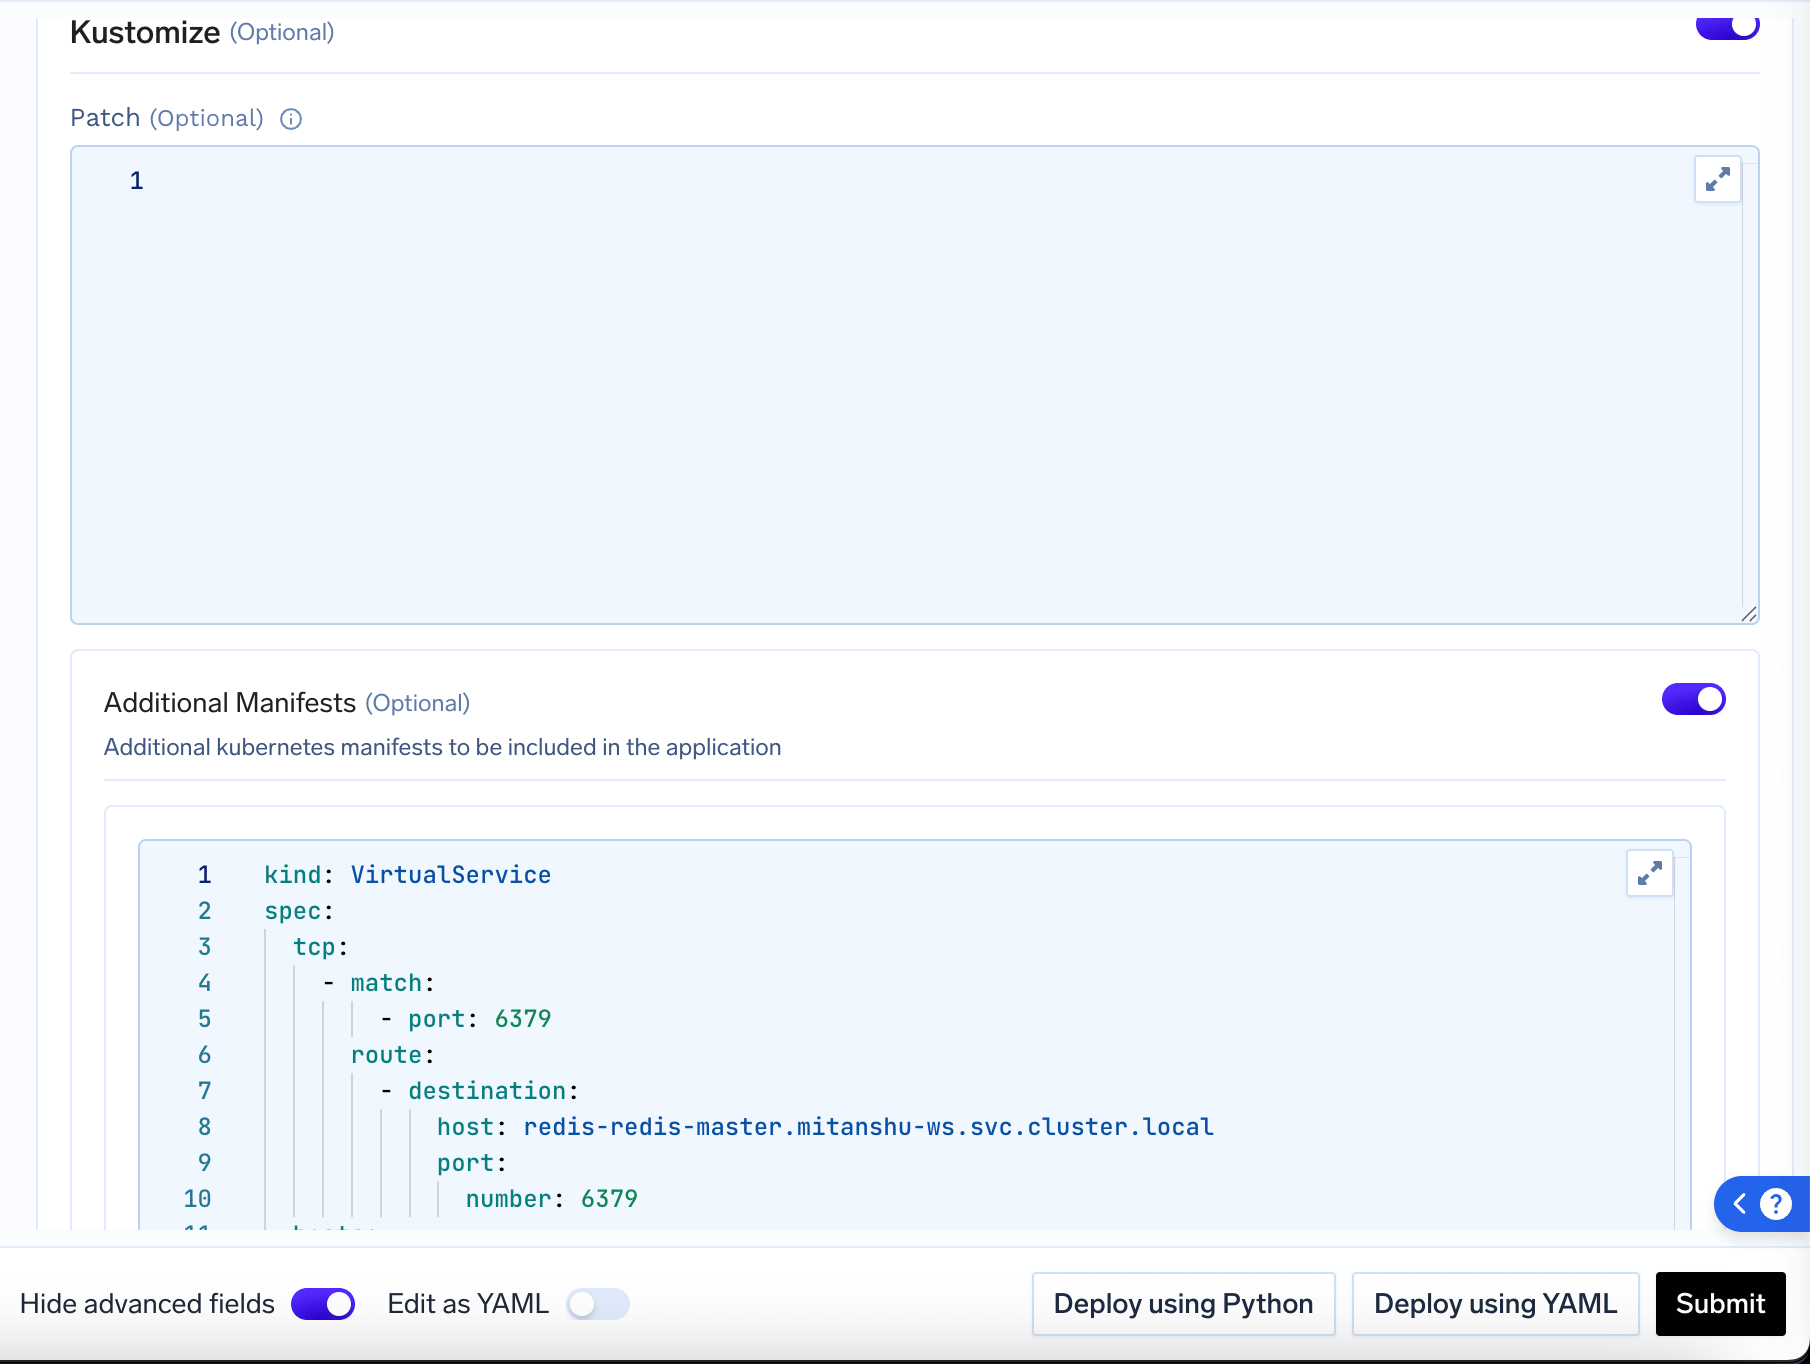 **Example:** Expose Redis with a custom endpoint
```yaml lines theme={"dark"}
# Additional manifest to expose Redis endpoint
apiVersion: networking.istio.io/v1beta1
kind: VirtualService
metadata:
name: redis-virtualservice
namespace: your-workspace
spec:
hosts:
-
gateways:
- /
tcp:
- match:
- port: 6379
route:
- destination:
host: redis-redis-master..svc.cluster.local
port:
number: 6379
```
Click **Submit** to deploy your chart. TrueFoundry will:
1. Download your chart
2. Apply your configuration
3. Create the necessary Kubernetes resources
4. Show you the deployment status
**Example:** Expose Redis with a custom endpoint
```yaml lines theme={"dark"}
# Additional manifest to expose Redis endpoint
apiVersion: networking.istio.io/v1beta1
kind: VirtualService
metadata:
name: redis-virtualservice
namespace: your-workspace
spec:
hosts:
-
gateways:
- /
tcp:
- match:
- port: 6379
route:
- destination:
host: redis-redis-master..svc.cluster.local
port:
number: 6379
```
Click **Submit** to deploy your chart. TrueFoundry will:
1. Download your chart
2. Apply your configuration
3. Create the necessary Kubernetes resources
4. Show you the deployment status
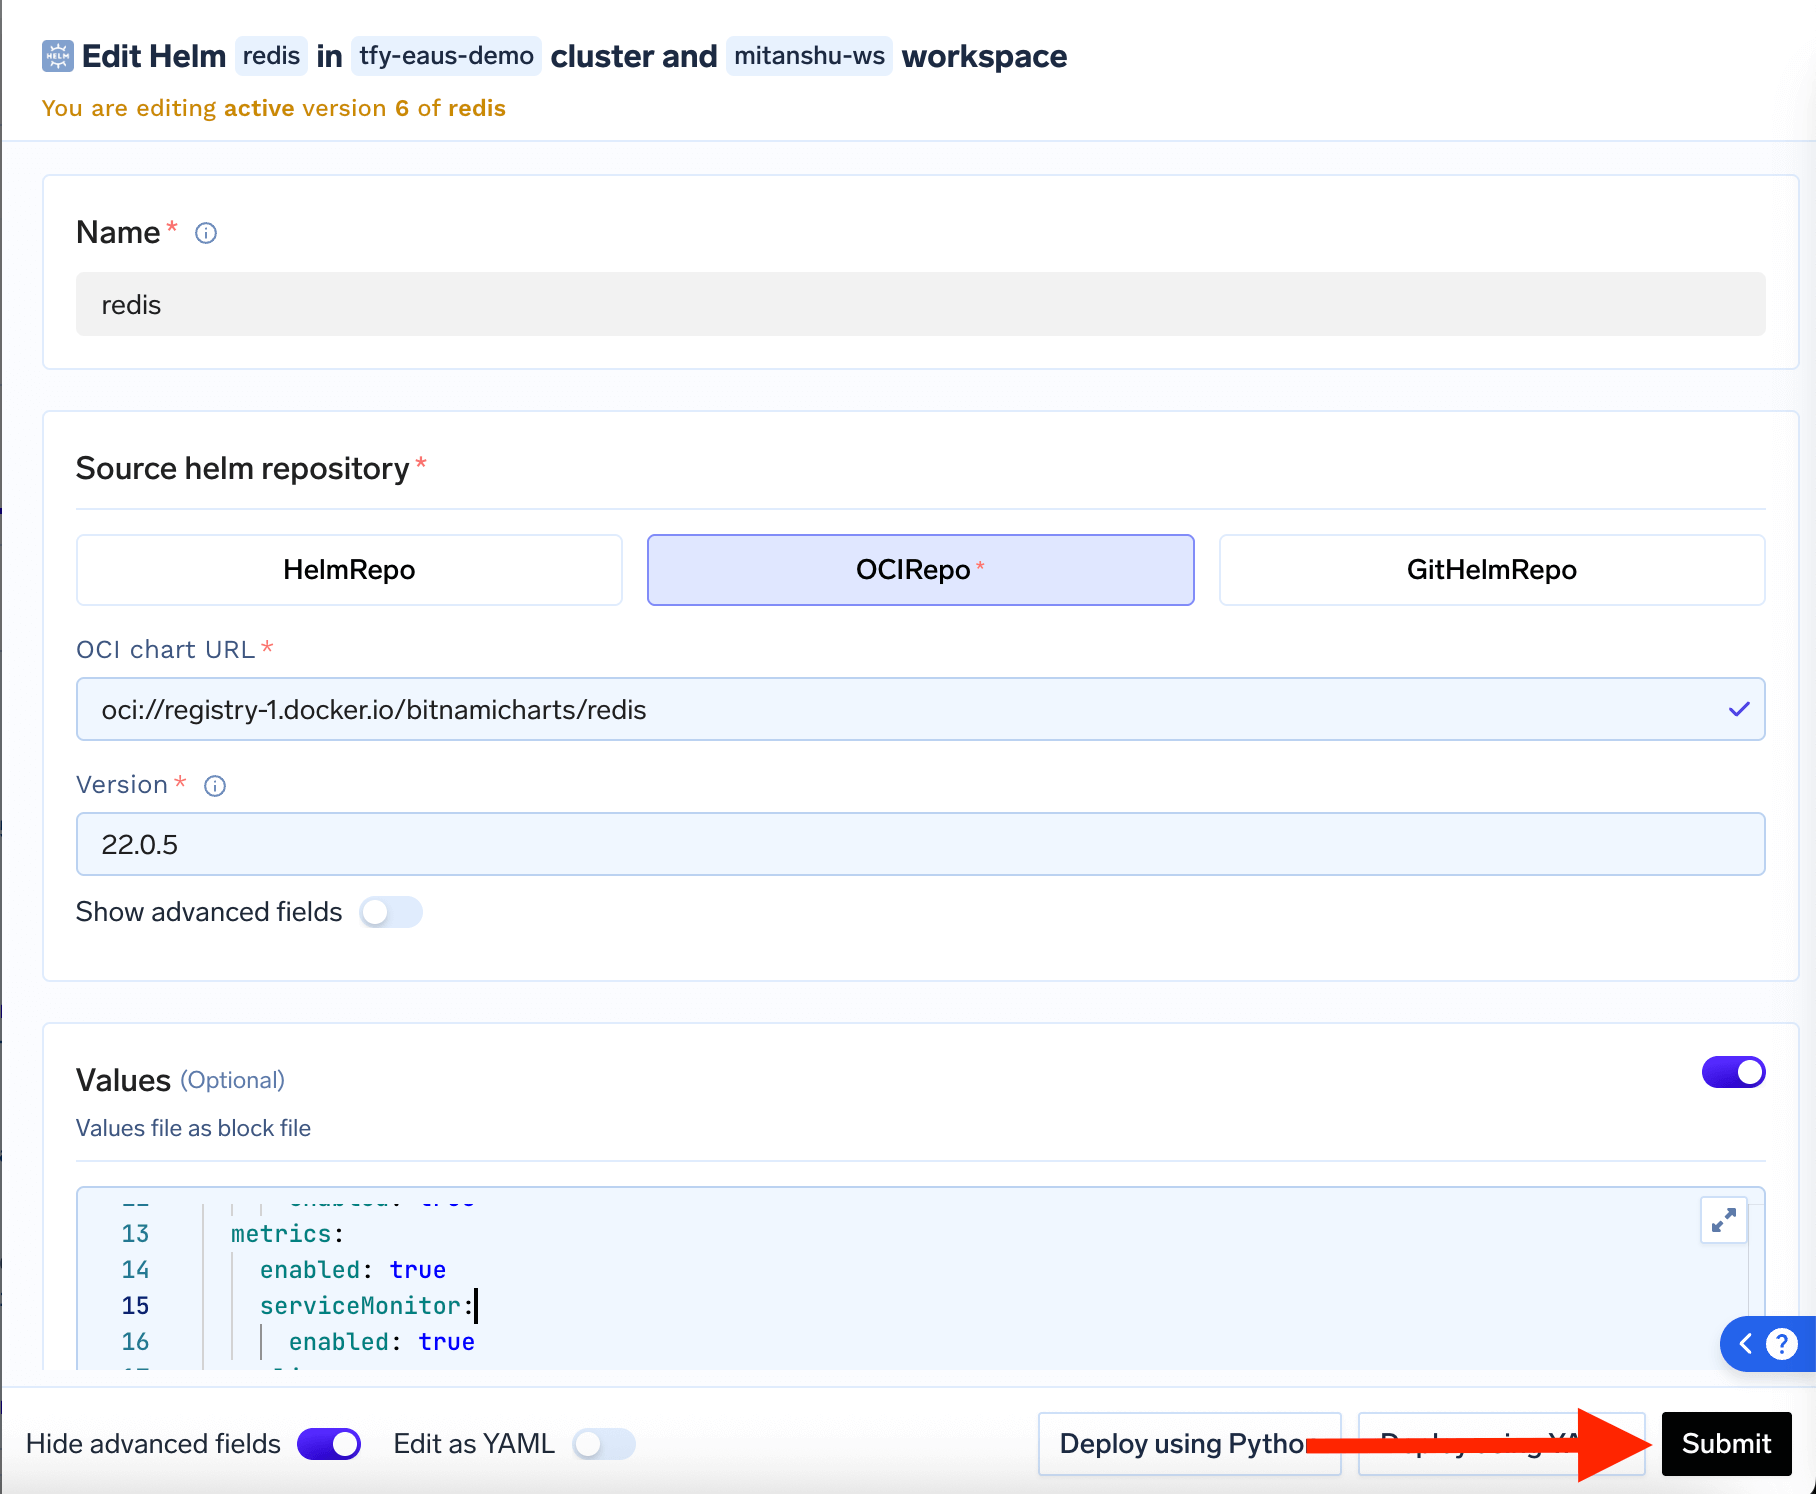 You can monitor the deployment progress and view logs by clicking on your deployment in the deployments list.
## Private Repository Configuration
TrueFoundry allows you to deploy Helm charts from private Git or OCI repositories by configuring repository credentials using the Kubernetes manifest deployment feature or by adding repository integrations.
Configure access to private GitHub repositories containing Helm charts.
First, add your private GitHub repository as an integration in TrueFoundry, you can refer to the [Github Integration](/docs/github-integration-set-up) guide for more details on how to add an github repository as an integration.
First, create a personal access token in GitHub:
1. Go to [https://github.com/settings/tokens](https://github.com/settings/tokens) (click on "Generate new token (classic)")
2. Select scopes: `repo` (for private repositories)
3. Copy the generated token
Store your token securely. You won't be able to see it again after
creation.
Use TrueFoundry's Kubernetes manifest deployment to create the repository
secret. Follow the [Deploy Kubernetes
Manifests](/docs/deploy-kubernetes-manifests) guide and deploy this manifest:
```yaml lines theme={"dark"}
apiVersion: v1
kind: Secret
type: Opaque
metadata:
name: repo-1752233801
labels:
argocd.argoproj.io/secret-type: repository
namespace: argocd
stringData:
url: https://github.com/your-org/helm-charts.git
type: git
project: tfy-apps
password: github_pat_11BAP2UBQ0tDSEVgbtphEM_18bH8fYWa6qhGCIWZsZIeIMm5NAEKYUIOfdfdfdfdfHER7RDDfbTAa
username: x-access-token
```
**Before deploying, replace:**
* `https://github.com/your-org/helm-charts.git` with your actual repository URL
* `github_pat_11BAP2UBQ0tDSEVgbtphEM_18bH8fYWa6qhGCIWZsZIeIMm5NAEKYUIOfdfdfdfdfHER7RDDfbTAa` with your actual GitHub token
* `repo-1752233801` with a unique name for your secret
You can monitor the deployment progress and view logs by clicking on your deployment in the deployments list.
## Private Repository Configuration
TrueFoundry allows you to deploy Helm charts from private Git or OCI repositories by configuring repository credentials using the Kubernetes manifest deployment feature or by adding repository integrations.
Configure access to private GitHub repositories containing Helm charts.
First, add your private GitHub repository as an integration in TrueFoundry, you can refer to the [Github Integration](/docs/github-integration-set-up) guide for more details on how to add an github repository as an integration.
First, create a personal access token in GitHub:
1. Go to [https://github.com/settings/tokens](https://github.com/settings/tokens) (click on "Generate new token (classic)")
2. Select scopes: `repo` (for private repositories)
3. Copy the generated token
Store your token securely. You won't be able to see it again after
creation.
Use TrueFoundry's Kubernetes manifest deployment to create the repository
secret. Follow the [Deploy Kubernetes
Manifests](/docs/deploy-kubernetes-manifests) guide and deploy this manifest:
```yaml lines theme={"dark"}
apiVersion: v1
kind: Secret
type: Opaque
metadata:
name: repo-1752233801
labels:
argocd.argoproj.io/secret-type: repository
namespace: argocd
stringData:
url: https://github.com/your-org/helm-charts.git
type: git
project: tfy-apps
password: github_pat_11BAP2UBQ0tDSEVgbtphEM_18bH8fYWa6qhGCIWZsZIeIMm5NAEKYUIOfdfdfdfdfHER7RDDfbTAa
username: x-access-token
```
**Before deploying, replace:**
* `https://github.com/your-org/helm-charts.git` with your actual repository URL
* `github_pat_11BAP2UBQ0tDSEVgbtphEM_18bH8fYWa6qhGCIWZsZIeIMm5NAEKYUIOfdfdfdfdfHER7RDDfbTAa` with your actual GitHub token
* `repo-1752233801` with a unique name for your secret
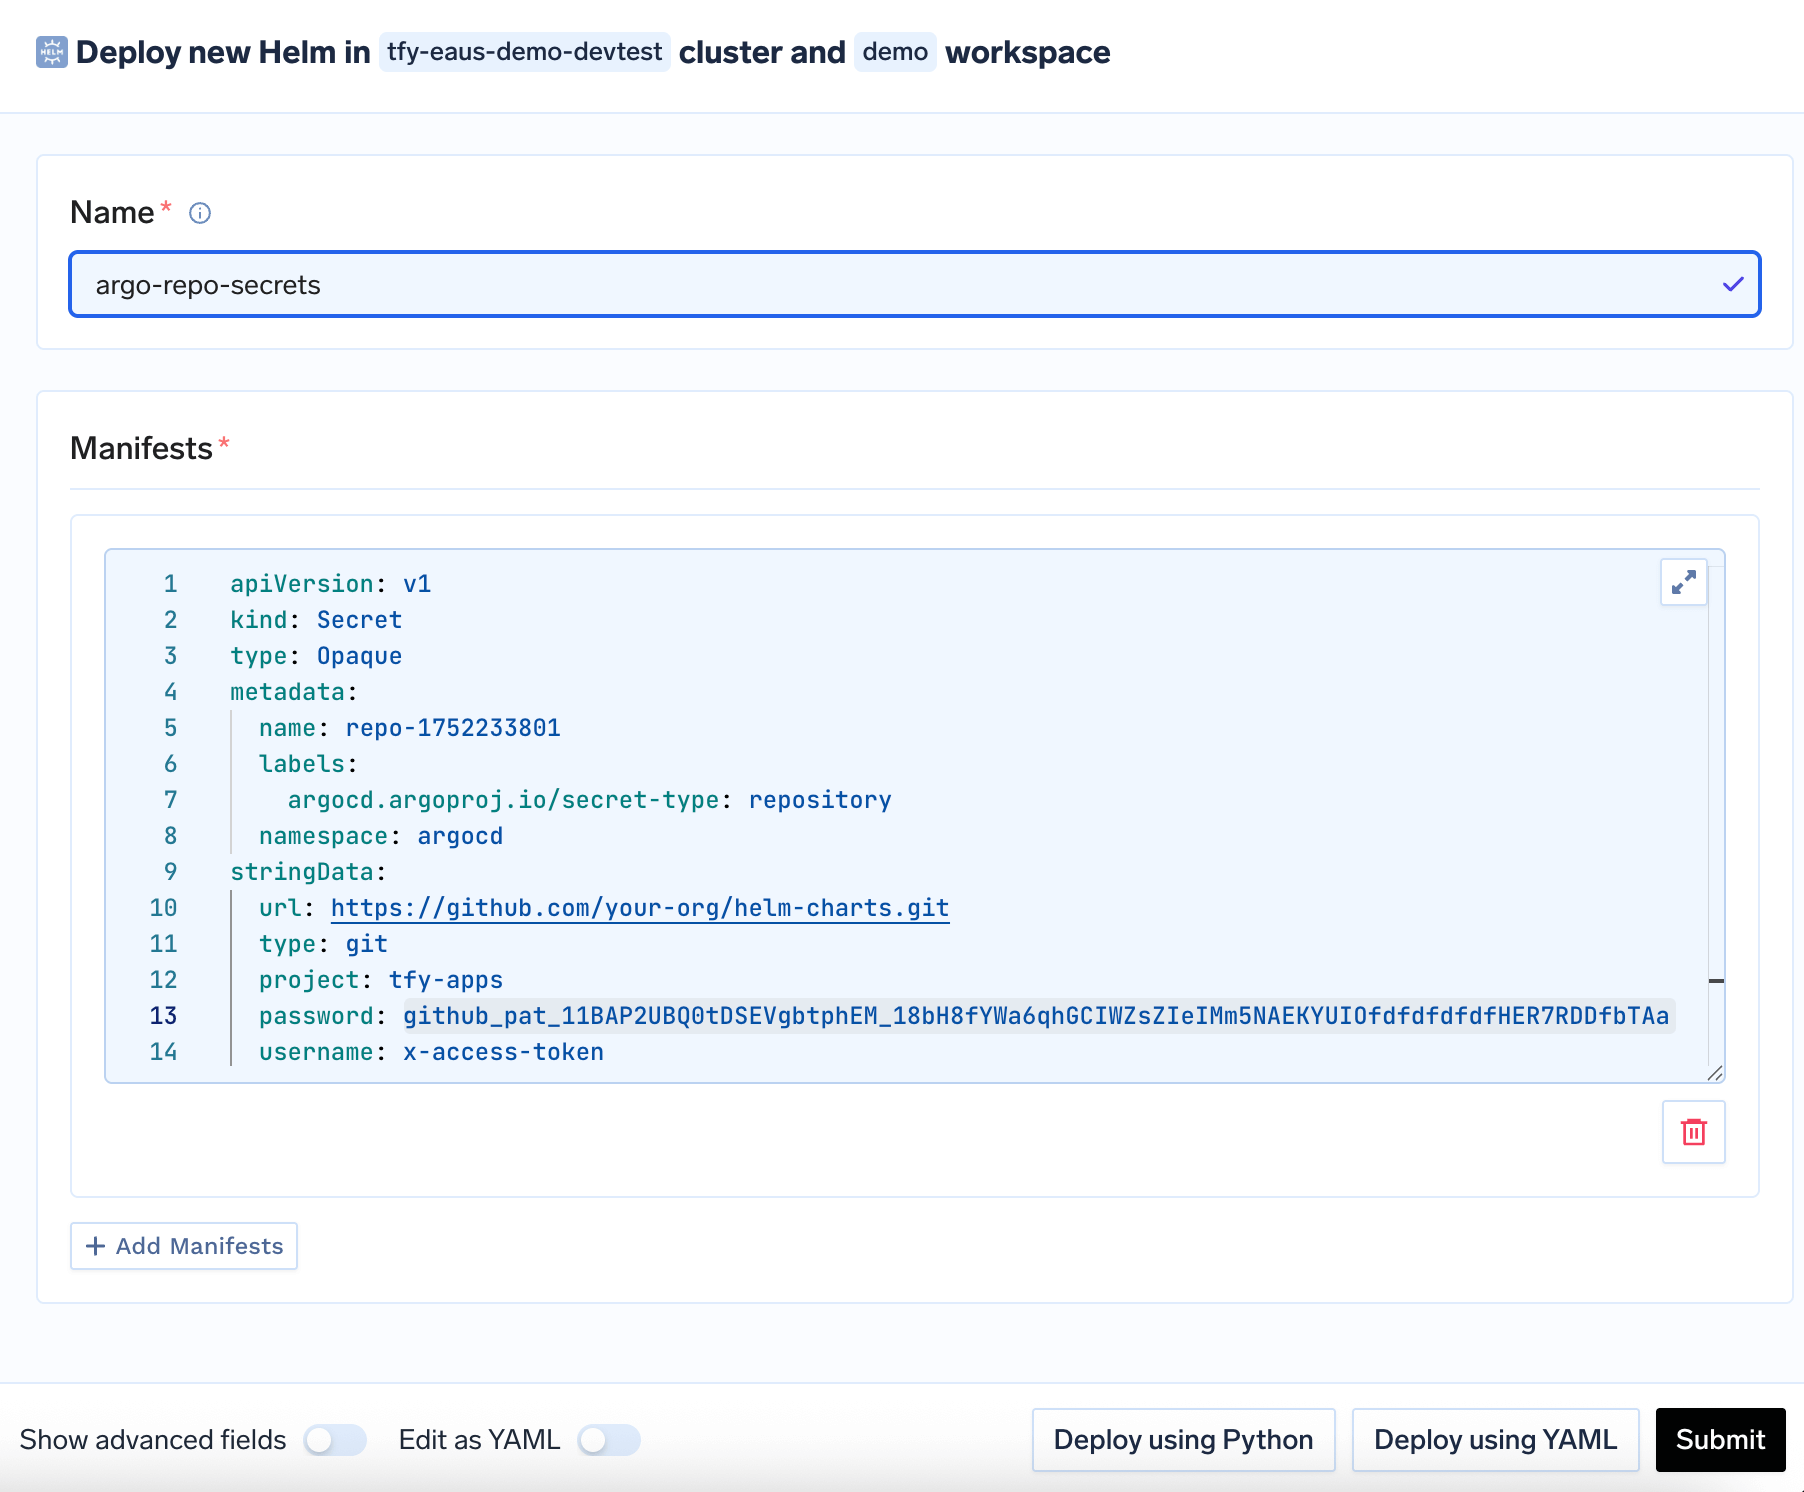 Now you can deploy Helm charts from your private repository:
1. Go to **Deployments** → **New** → **Helm**
2. Select **Git Repository** as your chart source
3. Enter your private repository URL
4. Specify the chart path and revision
5. Configure your values and deploy
Use this path when your Helm chart is published as an OCI artifact in a **private** container registry (for example AWS ECR, Azure ACR, Google Artifact Registry, Docker Hub, JFrog Artifactory, or a self-hosted registry).
In TrueFoundry, register the registry credentials your cluster will use to pull the chart. Go to **Integrations** → **Add Integration Provider**, pick your provider (or **Custom Docker Registry** for generic or self-hosted registries), and finish the setup.
See the [Integrations Overview](/docs/integrations-overview) guide for provider-specific fields such as registry URL, username, and password or token.
The integration host must match the host in your `oci://` chart URL. For example, for `oci://myregistry.example.com/helm/my-chart`, the integration must authenticate to `myregistry.example.com`.
1. Go to **Deployments** → **New** → **Helm**
2. Select **Container Registry (OCI)** as the chart source
3. Enter the **OCI chart URL** (for example `oci://myregistry.example.com/helm/my-chart`)
4. Set the chart **Version** (typically the OCI tag, often a SemVer string)
5. Open **Show Advanced Fields** and choose your **Container Registry** integration from the dropdown
6. Configure values and deploy
The URL and version should match what works with `helm pull` or `helm install` against your registry.
You will need to create an Argo CD repository `Secret` so that Argo CD can access the private OCI registry. You can deploy one with [Deploy Kubernetes Manifests](/docs/deploy-kubernetes-manifests) or you can also do kubectly apply directly:
```yaml lines theme={"dark"}
apiVersion: v1
kind: Secret
type: Opaque
metadata:
name: oci-repo-myregistry
labels:
argocd.argoproj.io/secret-type: repository
namespace: argocd
stringData:
name: my-private-helm-oci
type: helm
url: myregistry.example.com/helm
enableOCI: "true"
project: tfy-apps
username: ""
password: ""
```
**Before deploying, replace:**
* `url` with your registry location **without** the `oci://` prefix (see [Argo CD private Helm / OCI](https://argo-cd.readthedocs.io/en/stable/user-guide/private-repositories/#helm))
* `oci-repo-myregistry` with a unique secret name
* `username` and `password` with credentials your registry expects (robot account, personal access token, or provider-specific values such as `$oauthtoken` for some registries)
* Also in url make sure you give the registry url without the `oci://` prefix and along with the path
## Complete Example: Deploying Redis
Let's walk through a real example of deploying Redis (a popular caching database) with proper configuration and security:
First, we'll tell TrueFoundry to use the Redis chart from Bitnami (a popular chart repository):
Now you can deploy Helm charts from your private repository:
1. Go to **Deployments** → **New** → **Helm**
2. Select **Git Repository** as your chart source
3. Enter your private repository URL
4. Specify the chart path and revision
5. Configure your values and deploy
Use this path when your Helm chart is published as an OCI artifact in a **private** container registry (for example AWS ECR, Azure ACR, Google Artifact Registry, Docker Hub, JFrog Artifactory, or a self-hosted registry).
In TrueFoundry, register the registry credentials your cluster will use to pull the chart. Go to **Integrations** → **Add Integration Provider**, pick your provider (or **Custom Docker Registry** for generic or self-hosted registries), and finish the setup.
See the [Integrations Overview](/docs/integrations-overview) guide for provider-specific fields such as registry URL, username, and password or token.
The integration host must match the host in your `oci://` chart URL. For example, for `oci://myregistry.example.com/helm/my-chart`, the integration must authenticate to `myregistry.example.com`.
1. Go to **Deployments** → **New** → **Helm**
2. Select **Container Registry (OCI)** as the chart source
3. Enter the **OCI chart URL** (for example `oci://myregistry.example.com/helm/my-chart`)
4. Set the chart **Version** (typically the OCI tag, often a SemVer string)
5. Open **Show Advanced Fields** and choose your **Container Registry** integration from the dropdown
6. Configure values and deploy
The URL and version should match what works with `helm pull` or `helm install` against your registry.
You will need to create an Argo CD repository `Secret` so that Argo CD can access the private OCI registry. You can deploy one with [Deploy Kubernetes Manifests](/docs/deploy-kubernetes-manifests) or you can also do kubectly apply directly:
```yaml lines theme={"dark"}
apiVersion: v1
kind: Secret
type: Opaque
metadata:
name: oci-repo-myregistry
labels:
argocd.argoproj.io/secret-type: repository
namespace: argocd
stringData:
name: my-private-helm-oci
type: helm
url: myregistry.example.com/helm
enableOCI: "true"
project: tfy-apps
username: ""
password: ""
```
**Before deploying, replace:**
* `url` with your registry location **without** the `oci://` prefix (see [Argo CD private Helm / OCI](https://argo-cd.readthedocs.io/en/stable/user-guide/private-repositories/#helm))
* `oci-repo-myregistry` with a unique secret name
* `username` and `password` with credentials your registry expects (robot account, personal access token, or provider-specific values such as `$oauthtoken` for some registries)
* Also in url make sure you give the registry url without the `oci://` prefix and along with the path
## Complete Example: Deploying Redis
Let's walk through a real example of deploying Redis (a popular caching database) with proper configuration and security:
First, we'll tell TrueFoundry to use the Redis chart from Bitnami (a popular chart repository):
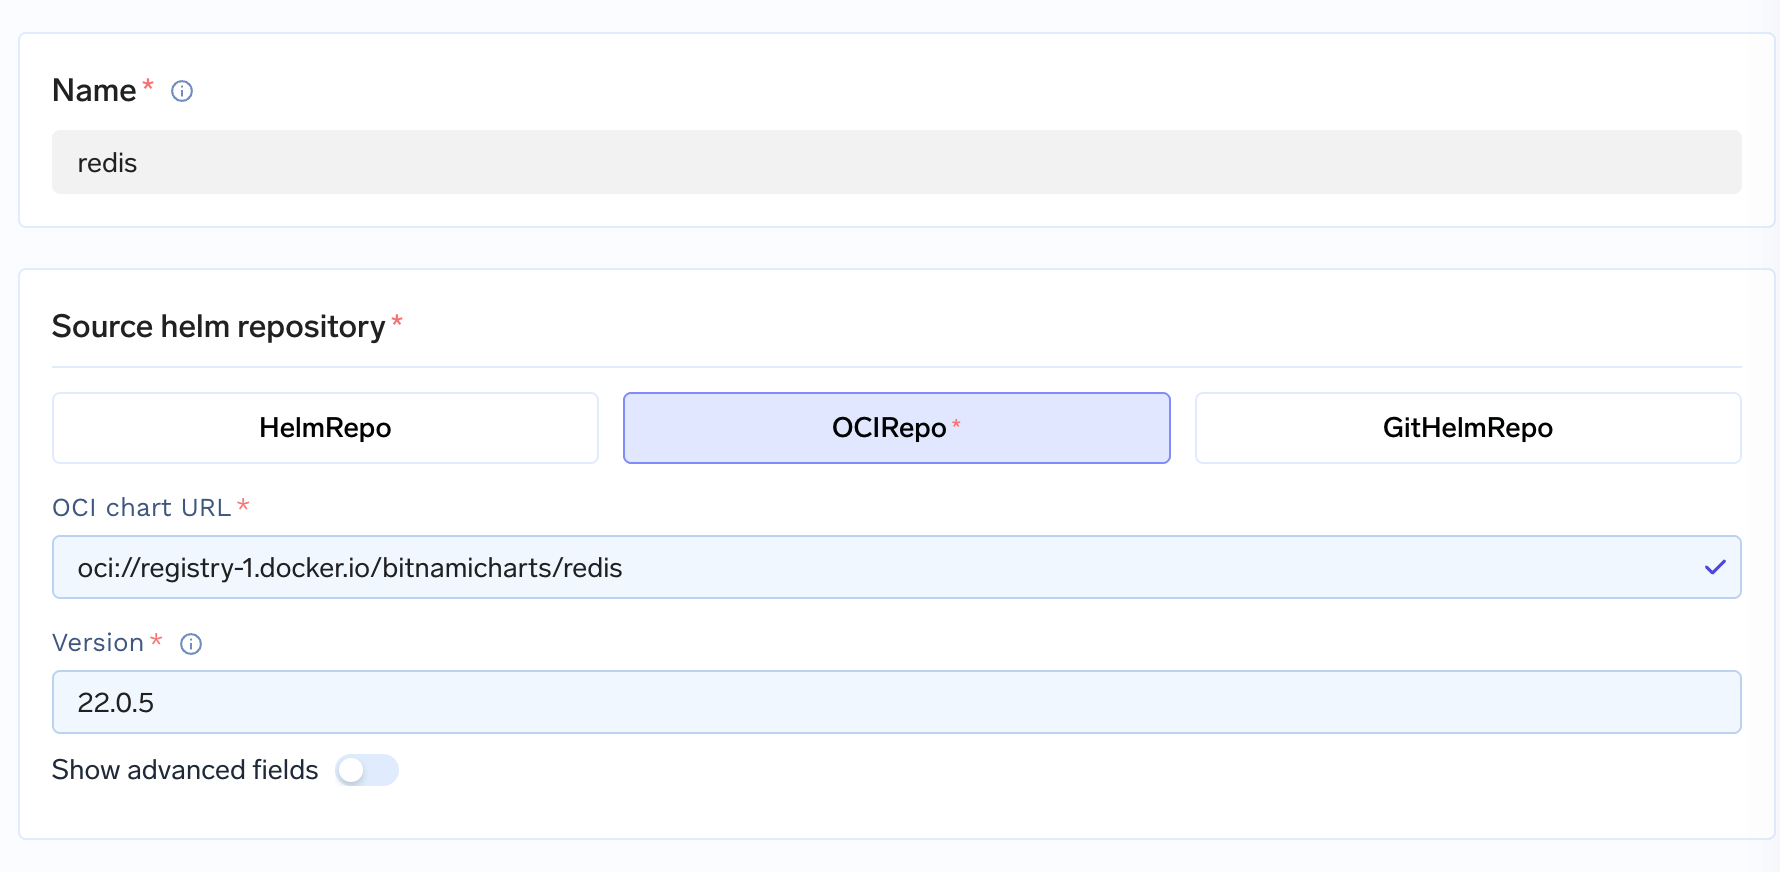 This tells TrueFoundry: "Use the Redis chart from Bitnami's repository, version 22.0.5"
Instead of putting a password directly in our configuration, we'll use TrueFoundry's secure secret management:
1. **Create a secret in TrueFoundry:**
* Go to **Secrets** in the left sidebar
* Create a new secret called `redis-secrets`
* Add a key called `password` with your desired password
2. **Copy the secret reference:** It will look like `tfy-secret://truefoundry:redis-secrets:password`
Now we'll configure how Redis should run - with a password, persistent storage, and external access:
```yaml lines theme={"dark"}
# Additional manifest to create a redis password secret
apiVersion: v1
kind: Secret
metadata:
name: redis-secret
type: Opaque
data:
redis-password:
```
**Before deploying, replace:**
* `redis-secret` with a unique name for your secret
* `redis-password` with your desired password
Now we'll configure how Redis should run - with a password, persistent storage, and external access:
```yaml lines theme={"dark"}
# Redis configuration with security and persistence
values:
auth:
enabled: true
existingSecret: redis-secret
existingSecretPasswordKey: redis-password
master:
service:
type: LoadBalancer # This makes Redis accessible from outside
ports:
redis: 6379
persistence:
enabled: true # This saves data even if Redis restarts
size: 8Gi
replica:
replicaCount: 2 # Run 2 backup Redis instances
service:
type: ClusterIP # Internal access only
persistence:
enabled: true
size: 4Gi
metrics:
enabled: true # Enable monitoring
serviceMonitor:
enabled: true
```
**What this does:**
* Sets up a secure password using our secret
* Makes Redis accessible from outside (LoadBalancer)
* Saves data permanently (persistence)
* Runs backup instances for reliability
* Enables monitoring
If you want to access Redis through a custom URL (like `redis.your-app.com`), you can add this advanced configuration:
```yaml lines theme={"dark"}
# Custom endpoint configuration
apiVersion: networking.istio.io/v1beta1
kind: VirtualService
metadata:
name: redis-virtualservice
namespace: your-workspace
spec:
hosts:
- redis.your-workspace.ml.demo.truefoundry.cloud
gateways:
- istio-system/tfy-wildcard-alb
tcp:
- match:
- port: 6379
route:
- destination:
host: redis-redis-master.your-workspace.svc.cluster.local
port:
number: 6379
```
**When to use this:** Only if you need a custom domain name for your Redis instance.
This tells TrueFoundry: "Use the Redis chart from Bitnami's repository, version 22.0.5"
Instead of putting a password directly in our configuration, we'll use TrueFoundry's secure secret management:
1. **Create a secret in TrueFoundry:**
* Go to **Secrets** in the left sidebar
* Create a new secret called `redis-secrets`
* Add a key called `password` with your desired password
2. **Copy the secret reference:** It will look like `tfy-secret://truefoundry:redis-secrets:password`
Now we'll configure how Redis should run - with a password, persistent storage, and external access:
```yaml lines theme={"dark"}
# Additional manifest to create a redis password secret
apiVersion: v1
kind: Secret
metadata:
name: redis-secret
type: Opaque
data:
redis-password:
```
**Before deploying, replace:**
* `redis-secret` with a unique name for your secret
* `redis-password` with your desired password
Now we'll configure how Redis should run - with a password, persistent storage, and external access:
```yaml lines theme={"dark"}
# Redis configuration with security and persistence
values:
auth:
enabled: true
existingSecret: redis-secret
existingSecretPasswordKey: redis-password
master:
service:
type: LoadBalancer # This makes Redis accessible from outside
ports:
redis: 6379
persistence:
enabled: true # This saves data even if Redis restarts
size: 8Gi
replica:
replicaCount: 2 # Run 2 backup Redis instances
service:
type: ClusterIP # Internal access only
persistence:
enabled: true
size: 4Gi
metrics:
enabled: true # Enable monitoring
serviceMonitor:
enabled: true
```
**What this does:**
* Sets up a secure password using our secret
* Makes Redis accessible from outside (LoadBalancer)
* Saves data permanently (persistence)
* Runs backup instances for reliability
* Enables monitoring
If you want to access Redis through a custom URL (like `redis.your-app.com`), you can add this advanced configuration:
```yaml lines theme={"dark"}
# Custom endpoint configuration
apiVersion: networking.istio.io/v1beta1
kind: VirtualService
metadata:
name: redis-virtualservice
namespace: your-workspace
spec:
hosts:
- redis.your-workspace.ml.demo.truefoundry.cloud
gateways:
- istio-system/tfy-wildcard-alb
tcp:
- match:
- port: 6379
route:
- destination:
host: redis-redis-master.your-workspace.svc.cluster.local
port:
number: 6379
```
**When to use this:** Only if you need a custom domain name for your Redis instance.