> ## Documentation Index
> Fetch the complete documentation index at: https://www.truefoundry.com/llms.txt
> Use this file to discover all available pages before exploring further.
# Getting Started
> Deploy your first service on TrueFoundry. From setup to live endpoint in minutes.
In this guide, we'll deploy a FastAPI service for solving the Iris classification problem. Iris flower has 3 species: Iris setosa, Iris versicolor, and Iris virginica. The problem involves predicting the species of an iris flower based on its sepal length, sepal width, petal length, and petal width.
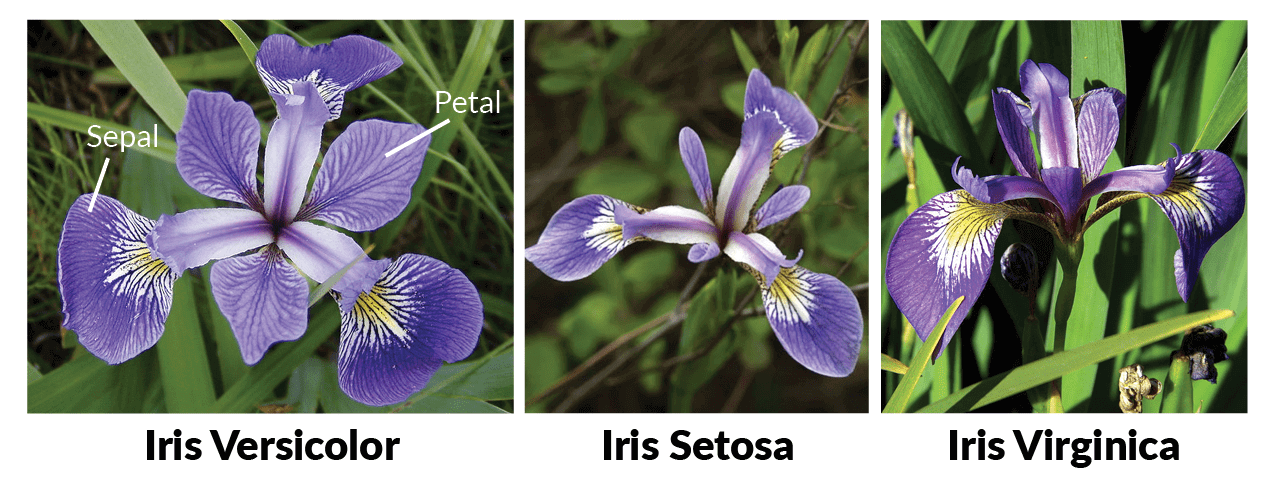 The model has 4 inputs: sepal length, sepal width, petal length, and petal width and ouputs the confidence scores for each species in the following format:
```json lines theme={"dark"}
{
"predictions": [
{
"label": "setosa",
"score": 2.1184377821359003e-16
},
{
"label": "versicolor",
"score": 3.264647319023382e-9
},
{
"label": "virginica",
"score": 0.9999999967353526
}
]
}
```
We've already created a FastAPI service for the Iris classification problem, and you can find the code in our [GitHub Repository](https://github.com/truefoundry/getting-started-examples/tree/main/deploy-model-with-fastapi).
Please visit the repository to familiarize yourself with the code you'll be deploying. The project files are organized as follows:
```csharp Directory Structure lines theme={"dark"}
.
├── server.py - Contains FastAPI code for inference.
├── iris_classifier.joblib - The model file.
└── requirements.txt - Lists dependencies.
```
## Getting Started With Deployment
To deploy a service, you'll need a workspace. If you don't have one, you can create it using this guide: [Creating a Workspace](/docs/key-concepts#creating-a-workspace) or seek assistance from your cluster administrator in case you don't have permission to create a workspace.
In TrueFoundry, you can either deploy code from your Github repository or from your local machine in case the code is not pushed to a Github repository.
In the above walkthrough, we did the following steps:
1. Select a workspace to deploy the service. This basically decides which cluster and environment the service will be deployed to.
2. Select the Service option since this is a FastAPI service and exposed a REST API.
3. We chose the Github option since the code is already pushed to a Github repository.
The key fields that we need to fill up in the deployment form are:
1. `Repo Url`: This is the URL of the Github repository that contains the code for the service. For this example, the repo url is [https://github.com/truefoundry/getting-started-examples](https://github.com/truefoundry/getting-started-examples)
2. `Path to build context`: This is the path to the directory in the Github repository that contains the code for the service. For this example, the path to the build context is `./deploy-model-with-fastapi/`
3. `Command`: This is the command to run the service. For this example, the command is `uvicorn server:app --host 0.0.0.0 --port 8000`
4. `Path to requirements`: This is the path to the requirements.txt file. This path is relative to the path to the build context. For this example, the path is `requirements.txt`
5. `Port`: This is the port on which the service will be exposed. Since we have mentioned port 8000 in the command above, so we need to specify the port here as 8000.
On filling up the form, we can press the Submit button to deploy the service.
Clone the github repository and navigate to the `deploy-model-with-fastapi` directory.
```bash lines theme={"dark"}
git clone https://github.com/truefoundry/getting-started-examples.git
cd getting-started-examples/deploy-model-with-fastapi
```
To deploy from your local machine, follow these steps on the TrueFoundry UI to generate the deployment script:
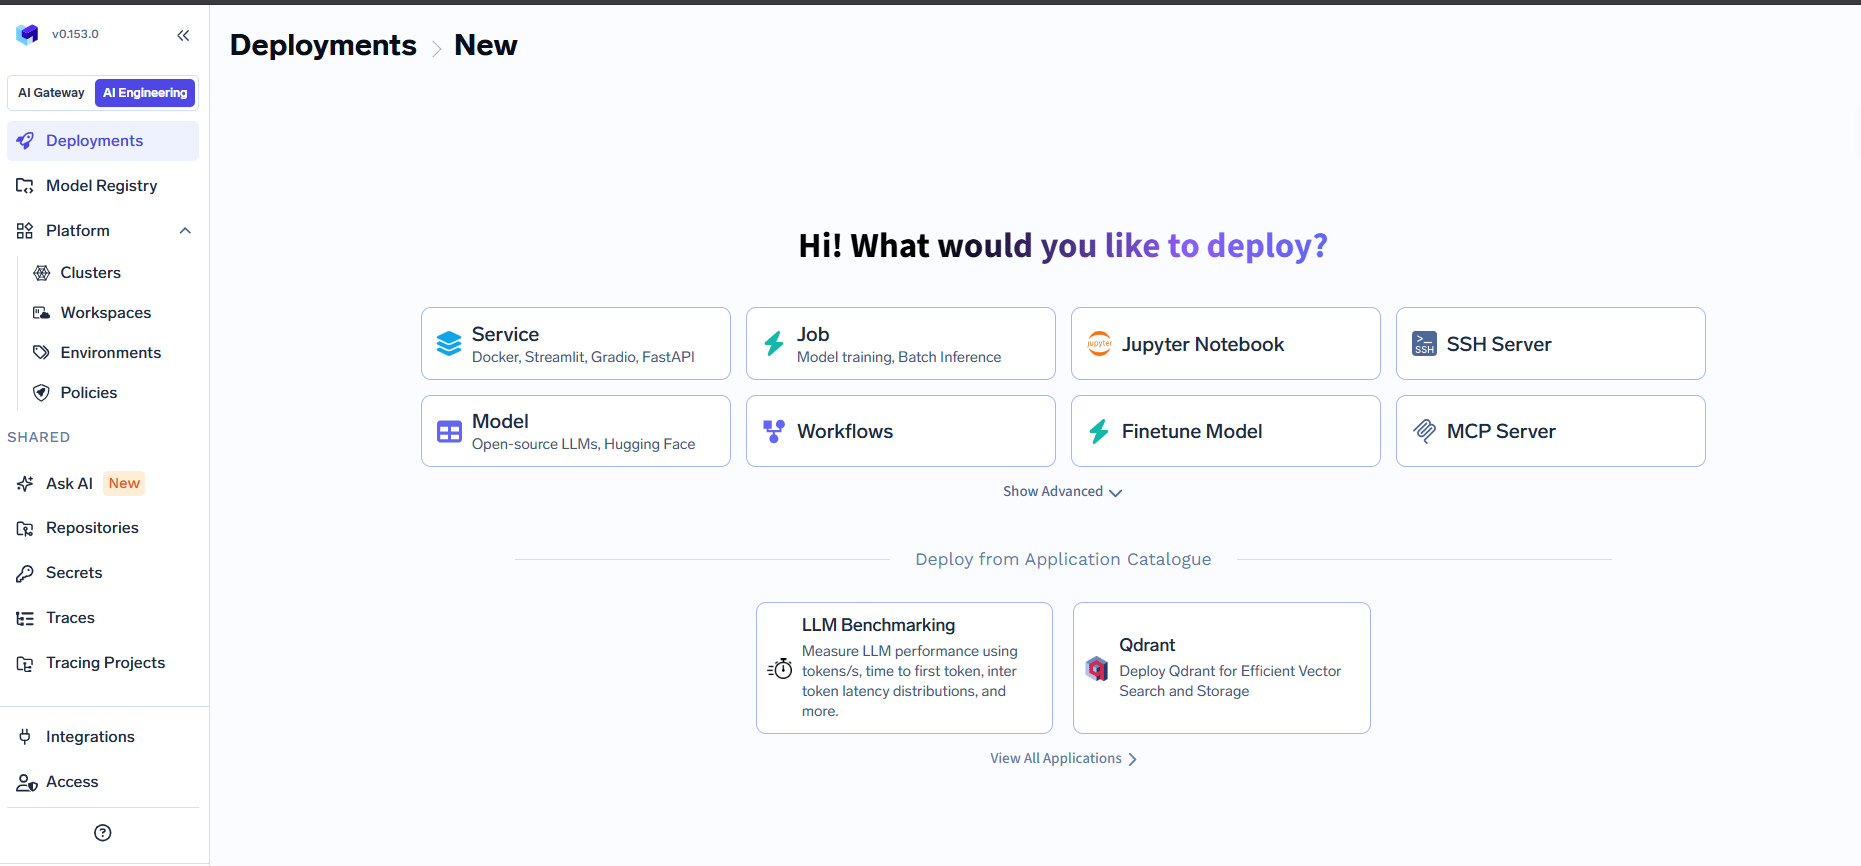
Navigate to **Deployments > New** and select **Service** (Docker, Streamlit, Gradio, FastAPI).
The model has 4 inputs: sepal length, sepal width, petal length, and petal width and ouputs the confidence scores for each species in the following format:
```json lines theme={"dark"}
{
"predictions": [
{
"label": "setosa",
"score": 2.1184377821359003e-16
},
{
"label": "versicolor",
"score": 3.264647319023382e-9
},
{
"label": "virginica",
"score": 0.9999999967353526
}
]
}
```
We've already created a FastAPI service for the Iris classification problem, and you can find the code in our [GitHub Repository](https://github.com/truefoundry/getting-started-examples/tree/main/deploy-model-with-fastapi).
Please visit the repository to familiarize yourself with the code you'll be deploying. The project files are organized as follows:
```csharp Directory Structure lines theme={"dark"}
.
├── server.py - Contains FastAPI code for inference.
├── iris_classifier.joblib - The model file.
└── requirements.txt - Lists dependencies.
```
## Getting Started With Deployment
To deploy a service, you'll need a workspace. If you don't have one, you can create it using this guide: [Creating a Workspace](/docs/key-concepts#creating-a-workspace) or seek assistance from your cluster administrator in case you don't have permission to create a workspace.
In TrueFoundry, you can either deploy code from your Github repository or from your local machine in case the code is not pushed to a Github repository.
In the above walkthrough, we did the following steps:
1. Select a workspace to deploy the service. This basically decides which cluster and environment the service will be deployed to.
2. Select the Service option since this is a FastAPI service and exposed a REST API.
3. We chose the Github option since the code is already pushed to a Github repository.
The key fields that we need to fill up in the deployment form are:
1. `Repo Url`: This is the URL of the Github repository that contains the code for the service. For this example, the repo url is [https://github.com/truefoundry/getting-started-examples](https://github.com/truefoundry/getting-started-examples)
2. `Path to build context`: This is the path to the directory in the Github repository that contains the code for the service. For this example, the path to the build context is `./deploy-model-with-fastapi/`
3. `Command`: This is the command to run the service. For this example, the command is `uvicorn server:app --host 0.0.0.0 --port 8000`
4. `Path to requirements`: This is the path to the requirements.txt file. This path is relative to the path to the build context. For this example, the path is `requirements.txt`
5. `Port`: This is the port on which the service will be exposed. Since we have mentioned port 8000 in the command above, so we need to specify the port here as 8000.
On filling up the form, we can press the Submit button to deploy the service.
Clone the github repository and navigate to the `deploy-model-with-fastapi` directory.
```bash lines theme={"dark"}
git clone https://github.com/truefoundry/getting-started-examples.git
cd getting-started-examples/deploy-model-with-fastapi
```
To deploy from your local machine, follow these steps on the TrueFoundry UI to generate the deployment script:
Navigate to **Deployments > New** and select **Service** (Docker, Streamlit, Gradio, FastAPI).
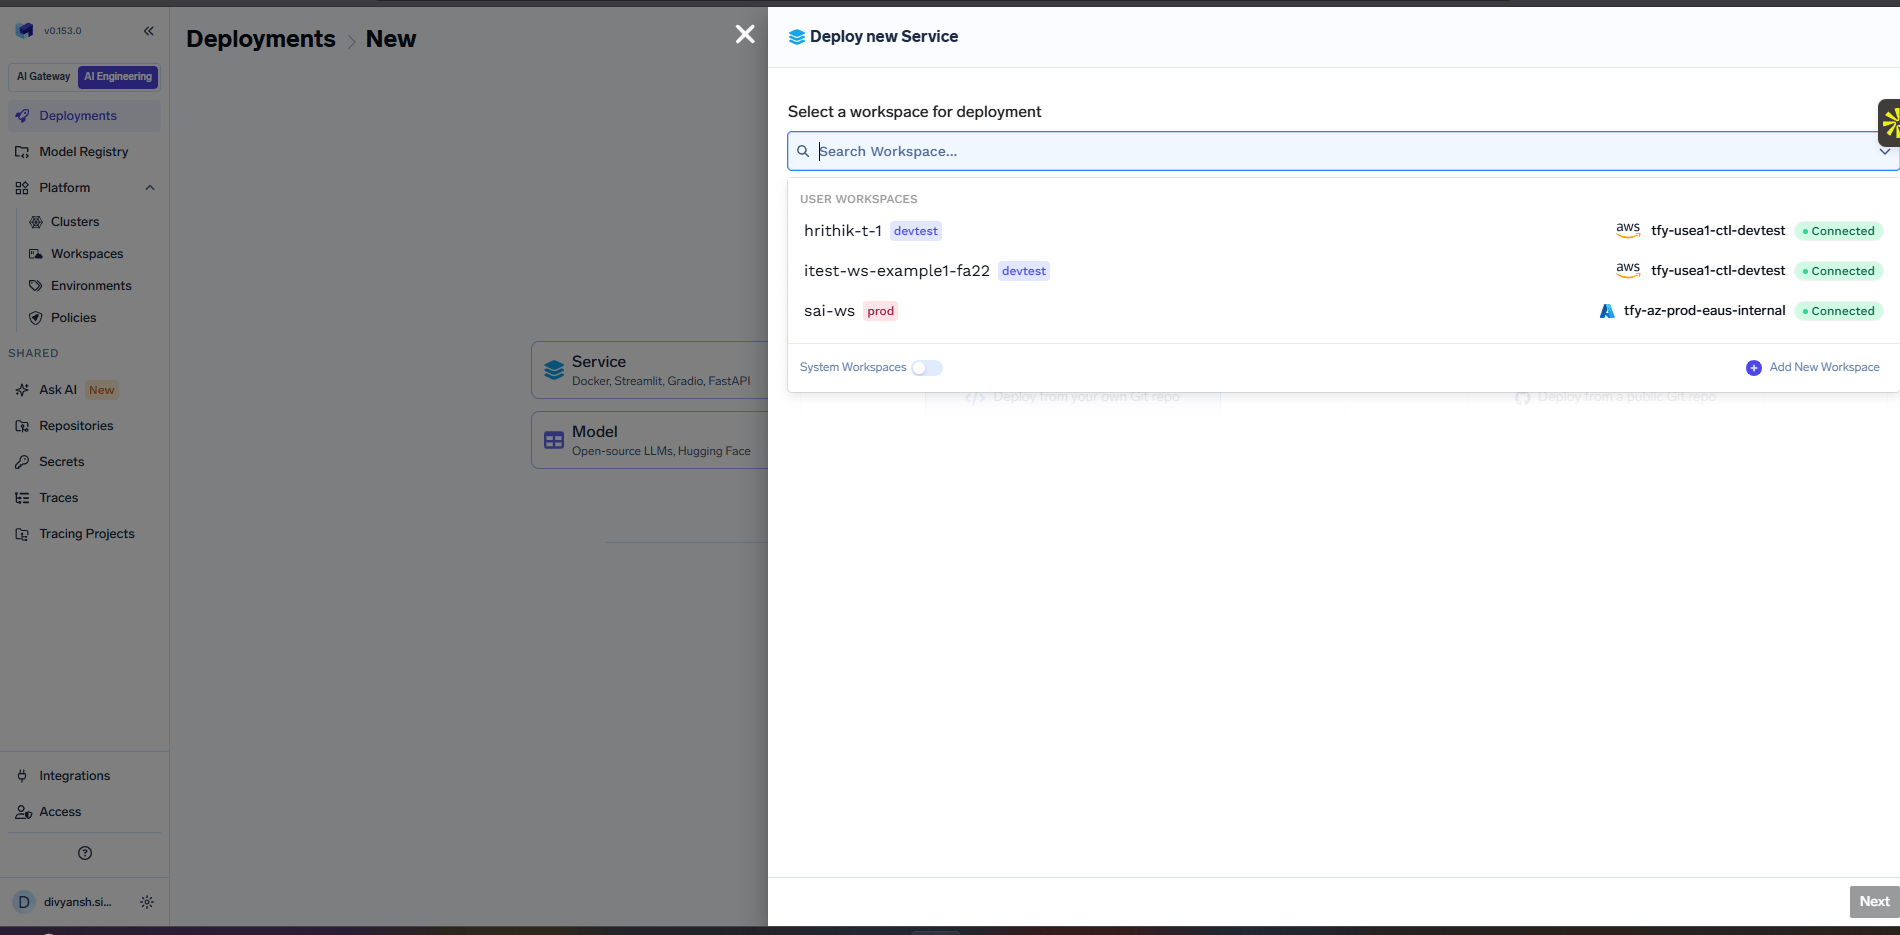
 Choose the workspace where you want to deploy the service. This determines which cluster and environment the service will be deployed to.
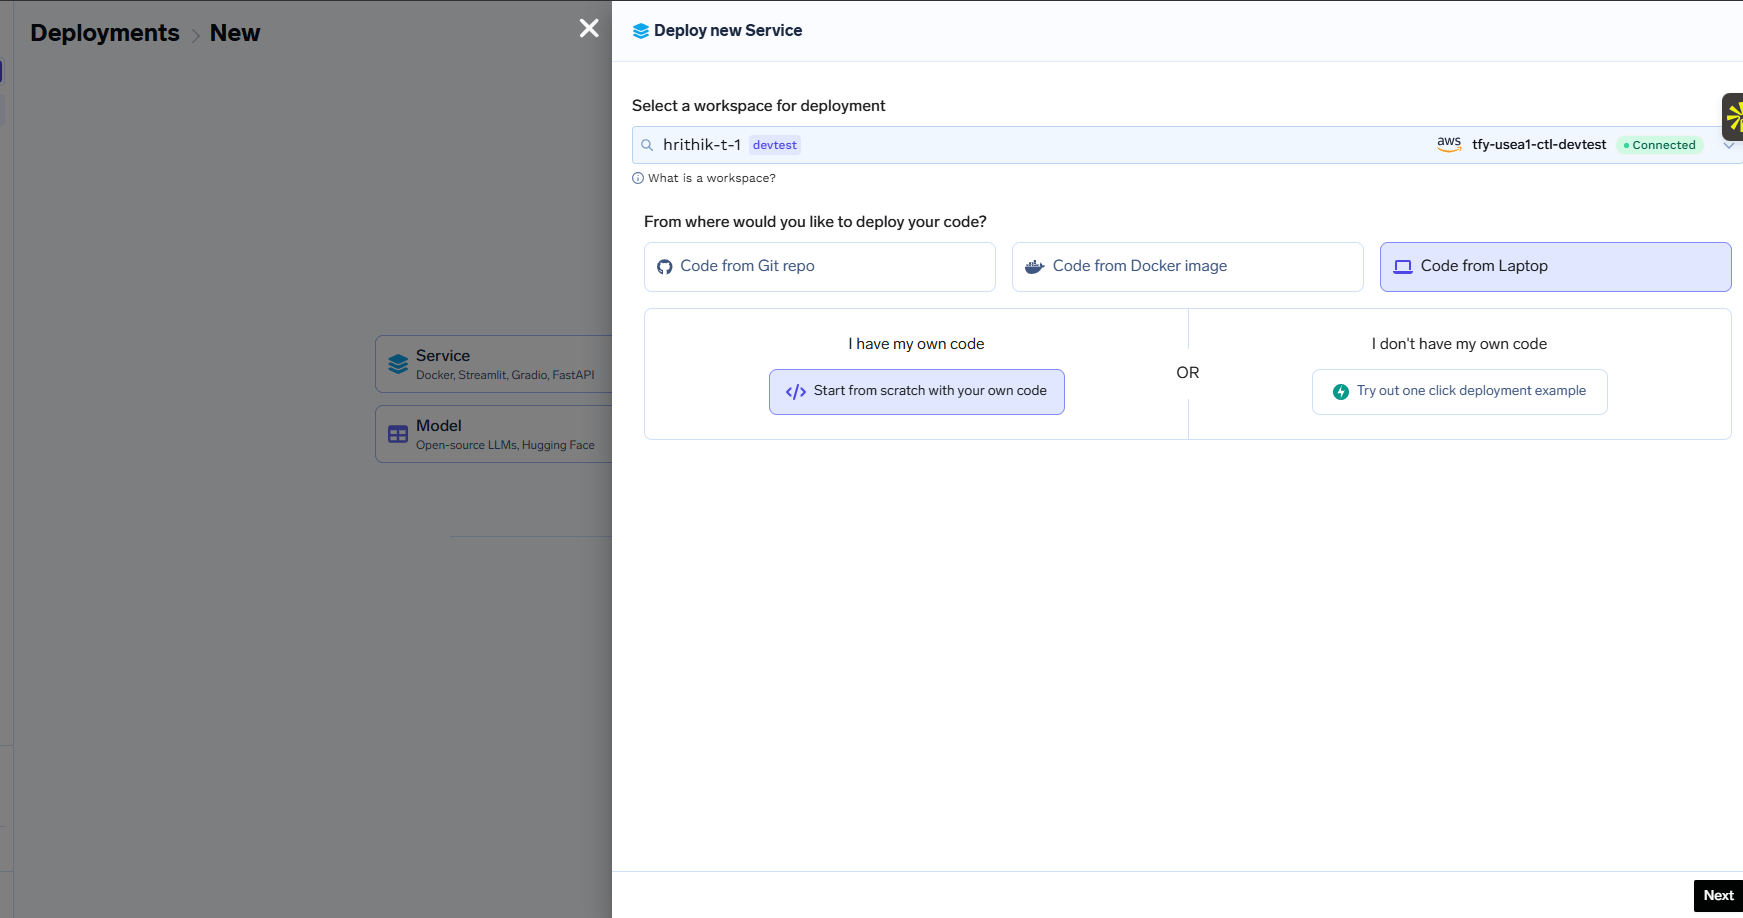
 Under "From where would you like to deploy your code?", select **Code from Laptop** and then choose **Start from scratch with your own code**.
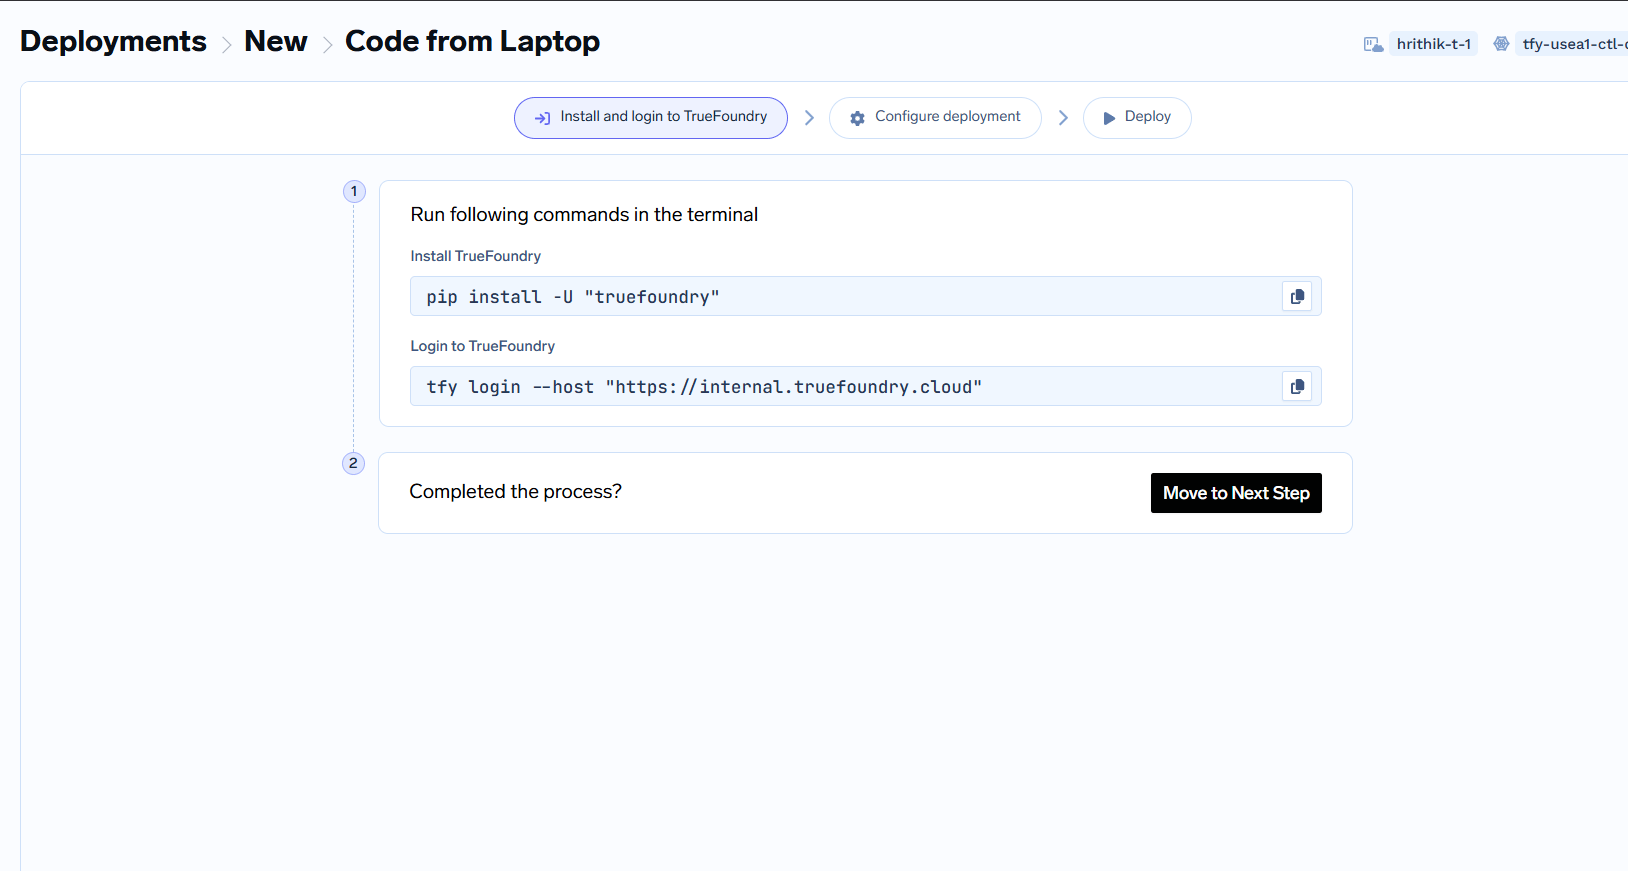
 Run the following commands in your terminal to install and authenticate the TrueFoundry CLI:
```bash theme={"dark"}
pip install -U "truefoundry"
tfy login --host "https://internal.truefoundry.cloud"
```
Once completed, click **Move to Next Step**.
Run the following commands in your terminal to install and authenticate the TrueFoundry CLI:
```bash theme={"dark"}
pip install -U "truefoundry"
tfy login --host "https://internal.truefoundry.cloud"
```
Once completed, click **Move to Next Step**.
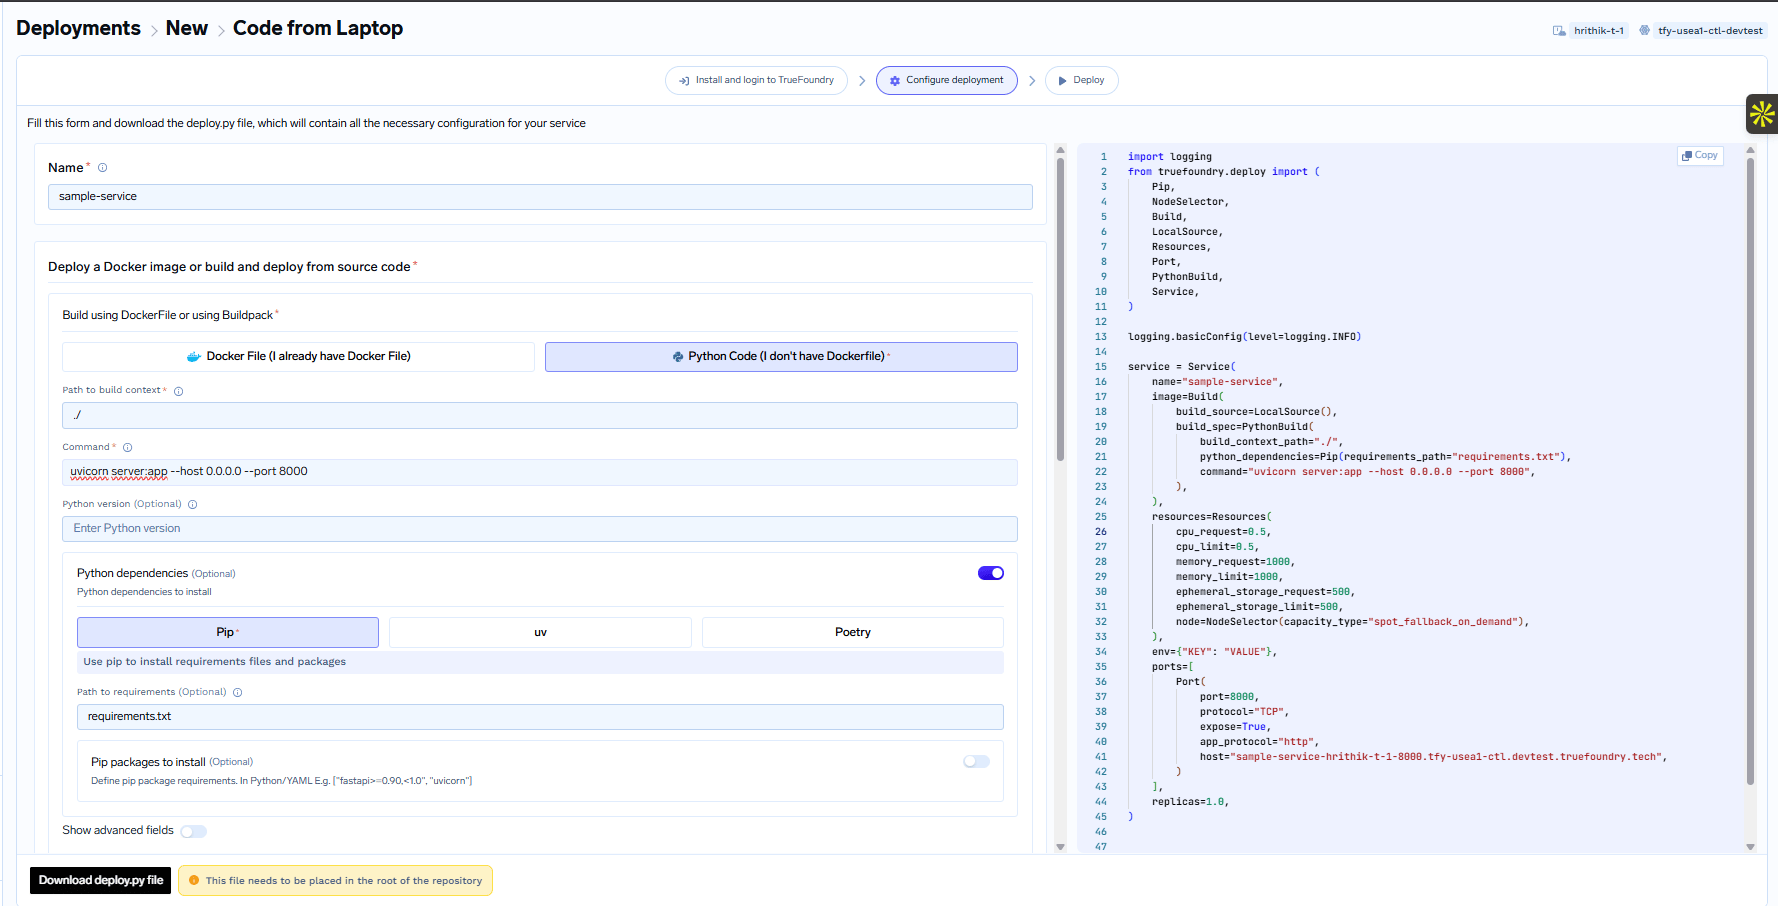
 Fill in the deployment configuration form:
1. `Name`: A name for your service (e.g. `sample-service`)
2. `Build using`: Select **Python Code (I don't have Dockerfile)**
3. `Path to build context`: `.`
4. `Command`: `uvicorn server:app --host 0.0.0.0 --port 8000`
5. `Path to requirements`: `requirements.txt`
6. `Port`: `8000`
The generated `deploy.py` script will appear on the right side. Click **Download deploy.py file** at the bottom to save it.
Fill in the deployment configuration form:
1. `Name`: A name for your service (e.g. `sample-service`)
2. `Build using`: Select **Python Code (I don't have Dockerfile)**
3. `Path to build context`: `.`
4. `Command`: `uvicorn server:app --host 0.0.0.0 --port 8000`
5. `Path to requirements`: `requirements.txt`
6. `Port`: `8000`
The generated `deploy.py` script will appear on the right side. Click **Download deploy.py file** at the bottom to save it.
 Place the downloaded `deploy.py` in the root of your project.
The deploy.py should be placed in the root of your project.
The deploy.py has a field called `project_root_path` in the build\_source section.
The project\_root\_path is considered relative to where the command `python deploy.py` is executed from.
The build\_context\_path is relative to the project\_root\_path.
All the code in the `build_context_path` will be packaged into a docker image and deployed.
**It's usually recommended to use "./" as the project\_root\_path, put the `deploy.py` in that path and execute the command `python deploy.py` from the project\_root\_path directory.**
The directory structure will then appear as follows:
```plain Directory Structure theme={"dark"}
.
├── iris_classifier.joblib
├── server.py
├── deploy.py
└── requirements.txt
```
To deploy, execute the command:
```
python deploy.py
```
You can find more details about the deploy.py file in the [Deploy Service Programatically](/docs/deploy-service-programatically) section. Here's a brief explanation of the file:
```python deploy.py wrap lines theme={"dark"}
import logging
from truefoundry.deploy import (
Resources,
Build,
LocalSource,
DockerFileBuild,
Port,
Service,
NodeSelector,
)
# Set up logging to display informational messages
logging.basicConfig(level=logging.INFO)
# Create a TrueFoundry Service object to configure your service. This comprises of
# of all the configuration and is a one-on-one mapping of the UI fields in the
#Service Deployment form.
service = Service(
name="sample-service",
# Define how to build your code into a Docker image
image=Build(
# The project_root_path is the path to the directory containing the code to be deployed. This should
# mostly be "./" since you are placing the deploy.py in the root of your project.
build_source=LocalSource(project_root_path="./", local_build=True),
# This defines how to build your code - it will either be DockerFileBuild or PythonBuild depending on if you
# have a docker file or not. Here's what the fields in there mean:
# build_context_path: This is the directory to build the docker image from - relative to project_root_path. project_root_path is the top level directory of the project.
# dockerfile_path: This is the path to Dockerfile relative to project_root_path.
# command: This is the command to run the service assuming the current working directory is the build_context_path.
# python_version: This is the python version to use for the service.
# build_spec=DockerFileBuild(
# dockerfile_path="./Dockerfile",
# build_context_path="./",
# ),
build_spec=PythonBuild(
build_context_path="./",
command="uvicorn server:app --host 0.0.0.0 --port 8000",
requirements_path="requirements.txt",
),
),
# Define the resource constraints.
#
# Requests are guaranteed resources to be provided to the container.
# Limits are the maximum resources that the container can use. This is opportunistic and only
# available if there is idle cpu / free memory on the node running the container.
# As a general rule, try to set requests to what your service needs to run reliably.
# If a container tries to use more resources than its limits, it will be throttled or killed.
resources=Resources(
# CPU is specified as a number. 1 CPU unit is equivalent to 1 physical CPU core, or 1 virtual core.
cpu_request=0.5,
cpu_limit=0.5,
# Memory is defined as an integer and the unit is Megabytes.
memory_request=1000,
memory_limit=1000,
# Ephemeral storage is defined as an integer and the unit is Megabytes.
ephemeral_storage_request=500,
ephemeral_storage_limit=500,
# node: This is used to specify whether its on-demand or spot or fallback from spot to on-demand.
node=NodeSelector(capacity_type="spot_fallback_on_demand"),
),
# Define the environment variables
env={"KEY": "VALUE"},
# Define the ports and domain. Here's what the fields in there mean:
# port: The port on which the service will be exposed.
# protocol: Will be TCP in all cases.
# expose: Whether to expose the service outside the cluster. If yes, you can choose a domain name as configured
# by the infrateam.
# app_protocol: "http "in most cases. Use "grpc" for gRPC services.
# host: Endpoint URL to access the service.
ports=[
Port(
port=8000,
protocol="TCP",
expose=True,
app_protocol="http",
host="sample-service-8000.example.com",
)
],
# replicas: The number of replicas of the service to deploy.
replicas=1.0,
)
service.deploy(workspace_fqn="your-workspace-fqn", wait=False)
```
After running the command mentioned above, wait for the deployment process to complete. Monitor the status until it shows **`DEPLOY_SUCCESS:`**, indicating a successful deployment.
Place the downloaded `deploy.py` in the root of your project.
The deploy.py should be placed in the root of your project.
The deploy.py has a field called `project_root_path` in the build\_source section.
The project\_root\_path is considered relative to where the command `python deploy.py` is executed from.
The build\_context\_path is relative to the project\_root\_path.
All the code in the `build_context_path` will be packaged into a docker image and deployed.
**It's usually recommended to use "./" as the project\_root\_path, put the `deploy.py` in that path and execute the command `python deploy.py` from the project\_root\_path directory.**
The directory structure will then appear as follows:
```plain Directory Structure theme={"dark"}
.
├── iris_classifier.joblib
├── server.py
├── deploy.py
└── requirements.txt
```
To deploy, execute the command:
```
python deploy.py
```
You can find more details about the deploy.py file in the [Deploy Service Programatically](/docs/deploy-service-programatically) section. Here's a brief explanation of the file:
```python deploy.py wrap lines theme={"dark"}
import logging
from truefoundry.deploy import (
Resources,
Build,
LocalSource,
DockerFileBuild,
Port,
Service,
NodeSelector,
)
# Set up logging to display informational messages
logging.basicConfig(level=logging.INFO)
# Create a TrueFoundry Service object to configure your service. This comprises of
# of all the configuration and is a one-on-one mapping of the UI fields in the
#Service Deployment form.
service = Service(
name="sample-service",
# Define how to build your code into a Docker image
image=Build(
# The project_root_path is the path to the directory containing the code to be deployed. This should
# mostly be "./" since you are placing the deploy.py in the root of your project.
build_source=LocalSource(project_root_path="./", local_build=True),
# This defines how to build your code - it will either be DockerFileBuild or PythonBuild depending on if you
# have a docker file or not. Here's what the fields in there mean:
# build_context_path: This is the directory to build the docker image from - relative to project_root_path. project_root_path is the top level directory of the project.
# dockerfile_path: This is the path to Dockerfile relative to project_root_path.
# command: This is the command to run the service assuming the current working directory is the build_context_path.
# python_version: This is the python version to use for the service.
# build_spec=DockerFileBuild(
# dockerfile_path="./Dockerfile",
# build_context_path="./",
# ),
build_spec=PythonBuild(
build_context_path="./",
command="uvicorn server:app --host 0.0.0.0 --port 8000",
requirements_path="requirements.txt",
),
),
# Define the resource constraints.
#
# Requests are guaranteed resources to be provided to the container.
# Limits are the maximum resources that the container can use. This is opportunistic and only
# available if there is idle cpu / free memory on the node running the container.
# As a general rule, try to set requests to what your service needs to run reliably.
# If a container tries to use more resources than its limits, it will be throttled or killed.
resources=Resources(
# CPU is specified as a number. 1 CPU unit is equivalent to 1 physical CPU core, or 1 virtual core.
cpu_request=0.5,
cpu_limit=0.5,
# Memory is defined as an integer and the unit is Megabytes.
memory_request=1000,
memory_limit=1000,
# Ephemeral storage is defined as an integer and the unit is Megabytes.
ephemeral_storage_request=500,
ephemeral_storage_limit=500,
# node: This is used to specify whether its on-demand or spot or fallback from spot to on-demand.
node=NodeSelector(capacity_type="spot_fallback_on_demand"),
),
# Define the environment variables
env={"KEY": "VALUE"},
# Define the ports and domain. Here's what the fields in there mean:
# port: The port on which the service will be exposed.
# protocol: Will be TCP in all cases.
# expose: Whether to expose the service outside the cluster. If yes, you can choose a domain name as configured
# by the infrateam.
# app_protocol: "http "in most cases. Use "grpc" for gRPC services.
# host: Endpoint URL to access the service.
ports=[
Port(
port=8000,
protocol="TCP",
expose=True,
app_protocol="http",
host="sample-service-8000.example.com",
)
],
# replicas: The number of replicas of the service to deploy.
replicas=1.0,
)
service.deploy(workspace_fqn="your-workspace-fqn", wait=False)
```
After running the command mentioned above, wait for the deployment process to complete. Monitor the status until it shows **`DEPLOY_SUCCESS:`**, indicating a successful deployment.
 Once deployed, you'll receive a dashboard access link in the output, typically mentioned as **`You can find the application on the dashboard:`**. Click this link to access the deployment dashboard.
## View your deployed service
Congratulations! You've successfully deployed your FastAPI service.
Once you click **`Submit`**, your deployment will be successful in a few seconds, and your service will be displayed as active (green), indicating that it's up and running.
You can view all the information about your service following the steps below:
To make a request to the Service, you can copy the endpoint URL as shown on the UI or from what you provided in the Ports section.
The endpoint will be an internal cluster URL or an external URL based on whether you chose **Expose** in the Ports configuration. You can read about it more in the [Ports](/docs/define-ports-and-domains) section.
You can call the service using curl or Postman or using the Python code as shown below:
```python lines theme={"dark"}
import json
from urllib.parse import urljoin
import requests
ENDPOINT_URL = "\" # e.g., https://your-service-endpoint.com
response = requests.post(
urljoin(ENDPOINT_URL, 'predict'),
params={
"sepal_length": 7.0,
"sepal_width": 3.2,
"petal_length": 4.7,
"petal_width": 1.4,
}
)
result = response.json()
print("Predicted Classes:", result["predictions"])
```
## FAQ
It's possible there are certain files in your repository that you don't want to package in the docker image like like test files, etc.
To exclude specific files from being built and deployed, create a .tfyignore file in the root directory of your project. The `.tfyignore` file follows the same rules as the `.gitignore` file.
If your repository already has a `.gitignore` file, you don't need to create a `.tfyignore` file. Truefoundry will automatically detect the files to ignore.
If you are deploying from a Github repository, the docker image is built in Truefoundry control-plane and pushed to your configured container registry.
If you are deploying code from your local machine, the Truefoundry SDK first checks is docker is installed on your local environment.
It tries to build using the locally installed Docker, failing which it uses the remote builder on the Truefoundry control-plane. If docker is not installed, the SDK will use the remote builder on the Truefoundry control-plane.
You just need to change the command and the port - the rest pretty much remains the same.
```bash Streamlit (default port 8501) lines theme={"dark"}
streamlit run app.py --server.address 0.0.0.0
```
```bash Gradio (default port 7860) lines theme={"dark"}
gradio app.py --server_name 0.0.0.0
```
Whichever framework you are using the host the API, please make sure you bind the port to `0.0.0.0` and not `localhost / 127.0.0.1.`.
This is commonly manifested via command line arguments like `gunicorn --bind 0.0.0.0:8000` or `uvicorn --host 0.0.0.0 --port 8000`.
Once deployed, you'll receive a dashboard access link in the output, typically mentioned as **`You can find the application on the dashboard:`**. Click this link to access the deployment dashboard.
## View your deployed service
Congratulations! You've successfully deployed your FastAPI service.
Once you click **`Submit`**, your deployment will be successful in a few seconds, and your service will be displayed as active (green), indicating that it's up and running.
You can view all the information about your service following the steps below:
To make a request to the Service, you can copy the endpoint URL as shown on the UI or from what you provided in the Ports section.
The endpoint will be an internal cluster URL or an external URL based on whether you chose **Expose** in the Ports configuration. You can read about it more in the [Ports](/docs/define-ports-and-domains) section.
You can call the service using curl or Postman or using the Python code as shown below:
```python lines theme={"dark"}
import json
from urllib.parse import urljoin
import requests
ENDPOINT_URL = "\" # e.g., https://your-service-endpoint.com
response = requests.post(
urljoin(ENDPOINT_URL, 'predict'),
params={
"sepal_length": 7.0,
"sepal_width": 3.2,
"petal_length": 4.7,
"petal_width": 1.4,
}
)
result = response.json()
print("Predicted Classes:", result["predictions"])
```
## FAQ
It's possible there are certain files in your repository that you don't want to package in the docker image like like test files, etc.
To exclude specific files from being built and deployed, create a .tfyignore file in the root directory of your project. The `.tfyignore` file follows the same rules as the `.gitignore` file.
If your repository already has a `.gitignore` file, you don't need to create a `.tfyignore` file. Truefoundry will automatically detect the files to ignore.
If you are deploying from a Github repository, the docker image is built in Truefoundry control-plane and pushed to your configured container registry.
If you are deploying code from your local machine, the Truefoundry SDK first checks is docker is installed on your local environment.
It tries to build using the locally installed Docker, failing which it uses the remote builder on the Truefoundry control-plane. If docker is not installed, the SDK will use the remote builder on the Truefoundry control-plane.
You just need to change the command and the port - the rest pretty much remains the same.
```bash Streamlit (default port 8501) lines theme={"dark"}
streamlit run app.py --server.address 0.0.0.0
```
```bash Gradio (default port 7860) lines theme={"dark"}
gradio app.py --server_name 0.0.0.0
```
Whichever framework you are using the host the API, please make sure you bind the port to `0.0.0.0` and not `localhost / 127.0.0.1.`.
This is commonly manifested via command line arguments like `gunicorn --bind 0.0.0.0:8000` or `uvicorn --host 0.0.0.0 --port 8000`.