> ## Documentation Index
> Fetch the complete documentation index at: https://www.truefoundry.com/llms.txt
> Use this file to discover all available pages before exploring further.
# Creating And Using Volumes
> Step-by-step guide for creating a volume, explaining configuration, best practices, and real-world usage on TrueFoundry.
To create a volume, click on `New Deployment` and select `Volume`.
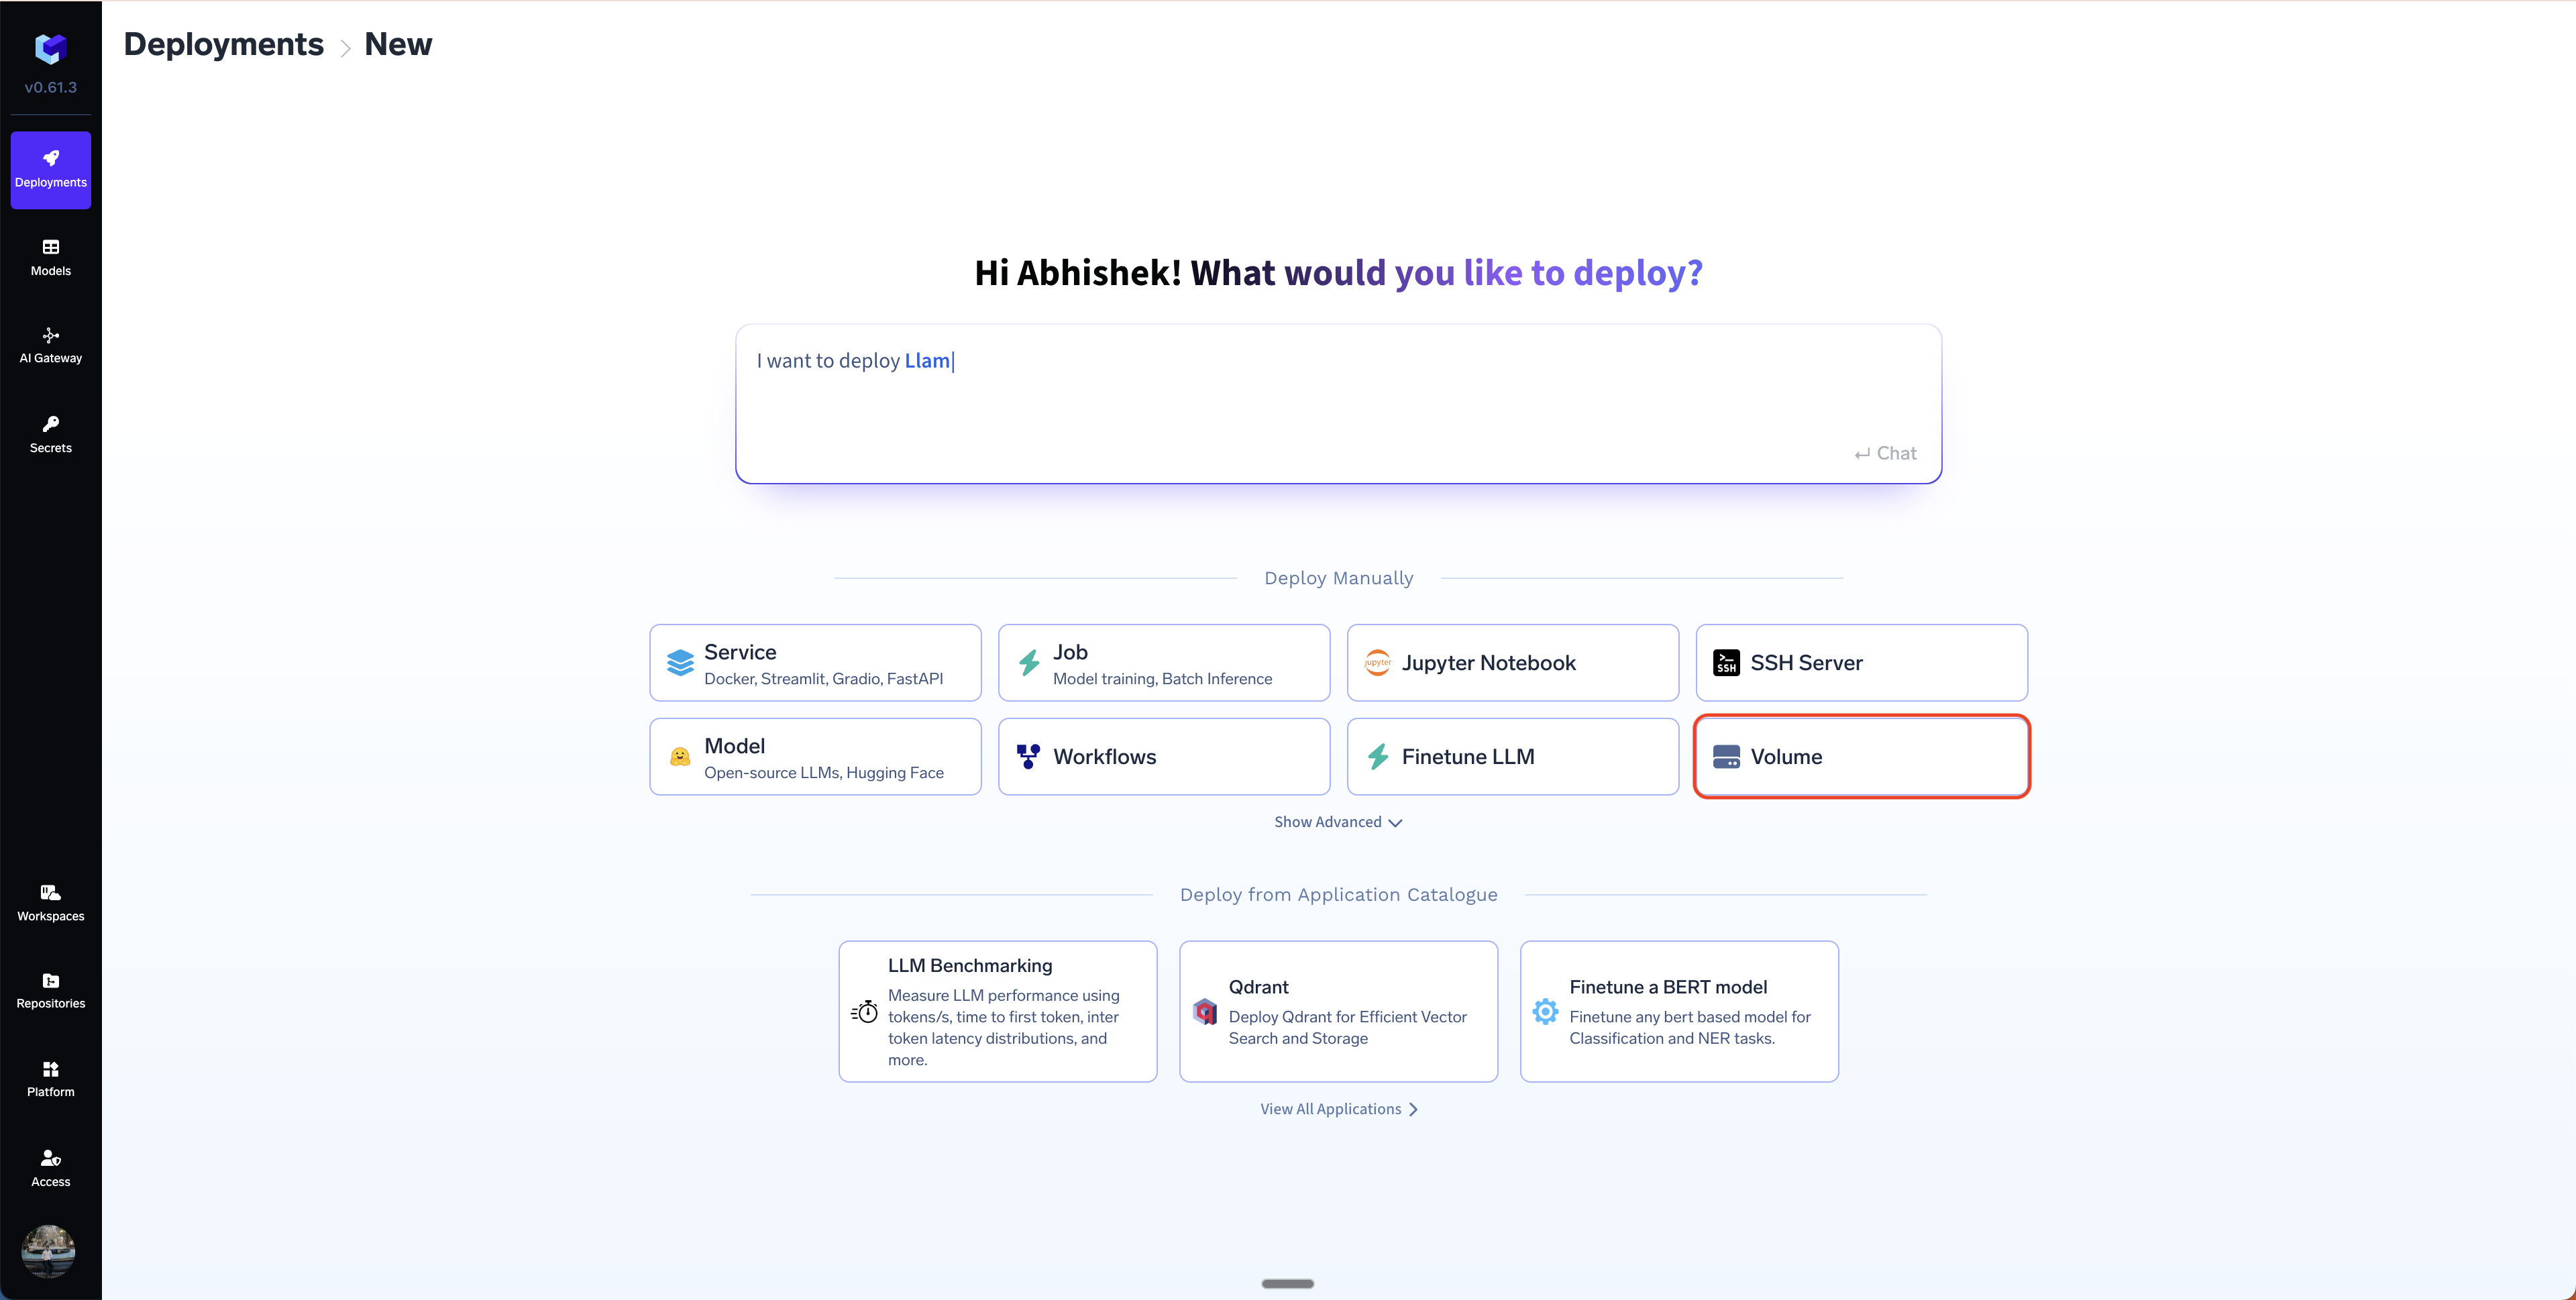 To create a volume, you will need to select a workspace.
**Volumes created within a specific workspace in TrueFoundry can only be used by applications deployed within the same workspace.**
This ensures that the volume's data is accessible only to the applications that are part of the same environment, enhancing security and organization.
The volume form will look something like this:
To create a volume, you will need to select a workspace.
**Volumes created within a specific workspace in TrueFoundry can only be used by applications deployed within the same workspace.**
This ensures that the volume's data is accessible only to the applications that are part of the same environment, enhancing security and organization.
The volume form will look something like this:
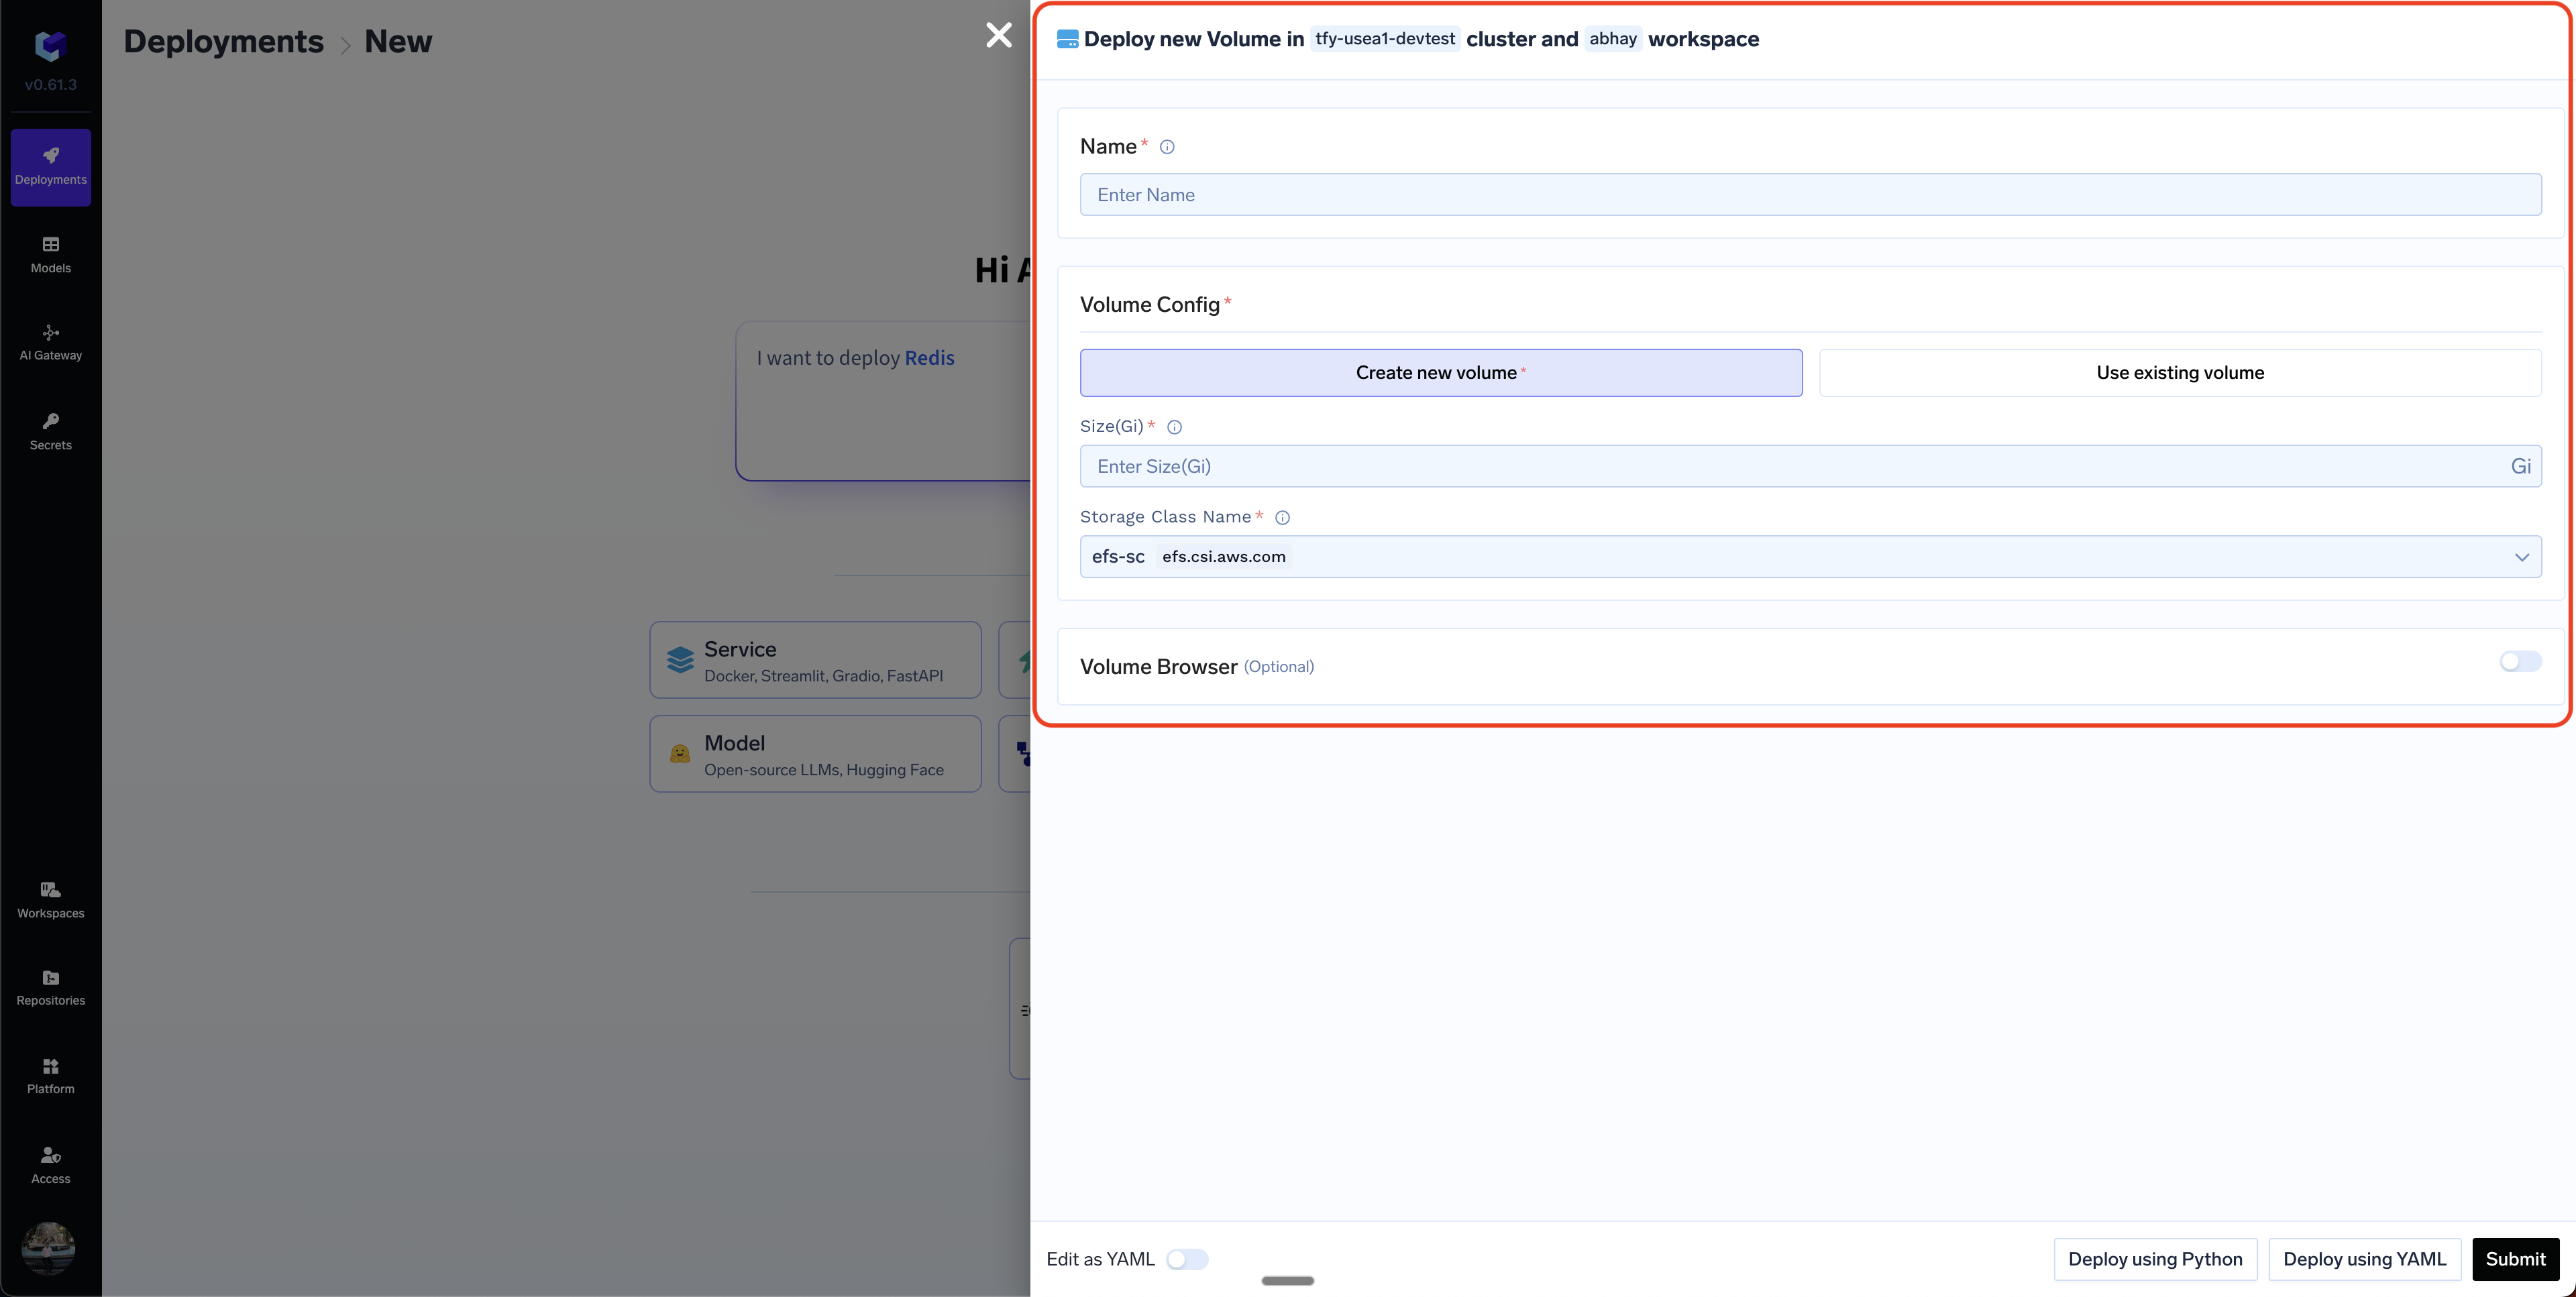 The key fields to fill up in the form are:
1. **Name**: The name of the volume.
2. **Volume Config**: You can select either of `Create New Volume` or
`Use Existing Volume`.
In most cases, you will want to create a new volume. The Use Existing Volume
option is useful when you want to mount a pre-existing volume or bucket like
S3, GCS, etc.
You will need to fill up two fields here:
1. **Size**: The size of the volume in Gi.
In most cases, you can increase the size of the volume after it is created.
But you cannot decrease the size of the volume once created. So if you are not
sure about the final size, you can start with a smaller size and increase it
later.
2. **Storage Class**: The Kubernetes storage class to use for the volume. Storage classes provide a way to specify the type of storage that should be provisioned for a Volume. These storage classes differ in their characteristics, such as performance, durability, and cost. The specific storage classes available will depend on the cloud provider you are using and what is preconfigured by the Infra team.
In case you want to whitelist only certain storage classes in the cluster to
be used for provisioning volumes, you can add the **`truefoundry.com/enabled:
'true'`** label to the StorageClass resources. The dropdown will then show
only the storage classes with this label.
The most common storage classes available in different cloud providers are:
| Storage Class | Cloud Provider Storage Name | Storage Class | Description |
| ------------- | --------------------------- | --------------- | --------------------------------------------------------------------------------------------------------------------------------------------------------------------------------------------------------------------- |
| efs-sc | Elastic File System (EFS) | efs.csi.aws.com | A fully managed, scalable, and highly durable elastic file system that offers high availability, automatic scaling, and cost-effective general file sharing. It's suitable for workloads with varying capacity needs. |
| TrueFoundry Storage Name | Cloud Provider Storage Name | Storage Class | Description |
| ------------------------ | --------------------------- | ---------------------------- | -------------------------------------------------------------------------------------------------------------------------------------------------------------------------------------------------------------------------------------------------- |
| standard-rwx | Google Basic HDD Filestore | filestore.csi.storage.gke.io | A cost-effective and scalable file storage solution ideal for general-purpose file storage and cost-sensitive workloads. It offers lower cost but also lower performance due to its HDD-based nature. |
| premium-rwx | Google Premium Filestore | filestore.csi.storage.gke.io | Provides higher performance and throughput compared to Basic HDD, making it suitable for I/O-intensive file operations and demanding workloads. It's SSD-based, offering higher performance at a higher cost. |
| enterprise-rwx | Google Enterprise Filestore | filestore.csi.storage.gke.io | Delivers the highest performance, throughput, advanced features, multi-zone support, and high availability, making it ideal for mission-critical workloads and applications with strict availability requirements. It comes with the highest cost. |
| TrueFoundry Storage Name | Cloud Provider Storage Name | Storage Class | Description |
| ------------------------ | --------------------------------- | ------------------ | --------------------------------------------------------------------------------------------------------------------------------------------------------------------- |
| azurefile | Azure File Storage (Standard) | file.csi.azure.com | Uses Azure Standard storage to create file shares for general file sharing across VMs or containers, including Windows apps. It offers cost-effective performance. |
| azurefile-premium | Azure File Storage (Premium) | file.csi.azure.com | Uses Azure Premium storage for higher performance, making it suitable for I/O-intensive file operations. |
| azurefile-csi | Azure File Storage (StandardCSI) | file.csi.azure.com | Leverages Azure Standard storage with CSI for dynamic provisioning, potentially offering better performance and CSI features. |
| azurefile-csi-premium | Azure File Storage (PremiumCSI) | file.csi.azure.com | Combines Azure Premium storage with CSI for dynamic provisioning and high-performance file operations. |
| azureblob-nfs-premium | Azure Blob Storage (NFS Premium) | blob.csi.azure.com | Uses Azure Premium storage with NFS v3 protocol for accessing large amounts of unstructured data and object storage, catering to demanding workloads with NFS access. |
| azureblob-fuse-premium | Azure Blob Storage (Fuse Premium) | blob.csi.azure.com | Uses Azure Premium storage with BlobFuse for accessing large amounts of unstructured data and object storage, suitable for workloads that require BlobFuse access. |
In this case, you will first create a PersistentVolume object in the Kubernetes cluster and then provide the name of the object in the `PersistentVolume` field. This option is useful if you want to mount the data that is present in an existing S3, EFS or GCS bucket.
Azure has default support for mounting Azure container buckets as volumes. So,
you can just follow the route of creating a volume in truefoundry.
To mount an S3 bucket as a volume on TrueFoundry, you need to follow the following steps:
### Setting up IAM Policies and Relevant Roles
Please follow this [document](https://docs.aws.amazon.com/eks/latest/userguide/s3-csi.html) of AWS to set up mount point of S3 in an EKS cluster.
This will guide you to do the following things:
* Create an IAM policy to give permissions for mount point to access the s3 bucket
* Create an IAM role.
* Install the mountpoint for Amazon S3 CSI driver and attach the role that was created above.
### Creating a Persistent Volume on the Kubernetes Cluster
Create a PV with the following spec (by doing a `kubectl apply`):
```yaml YAML lines theme={"dark"}
apiVersion: v1
kind: PersistentVolume
metadata:
name:
spec:
capacity:
storage: 100Gi
csi:
driver: s3.csi.aws.com
volumeHandle: s3-csi-driver-volume # must be unique
volumeAttributes:
bucketName:
accessModes:
- ReadWriteMany
persistentVolumeReclaimPolicy: Retain
storageClassName: s3-test # put any value here
mountOptions:
- allow-delete
- region
- allow-other
- uid=1000
volumeMode: Filesystem
```
### Create a Volume on TrueFoundry:
Please follow this [section](/docs/creating-a-volume#statically-provisioned-volumes) to create volume on TrueFoundry
To mount a EFS as a volume on truefoundry, you need to follow the following steps:
### Install EFS CSI driver on your cluster
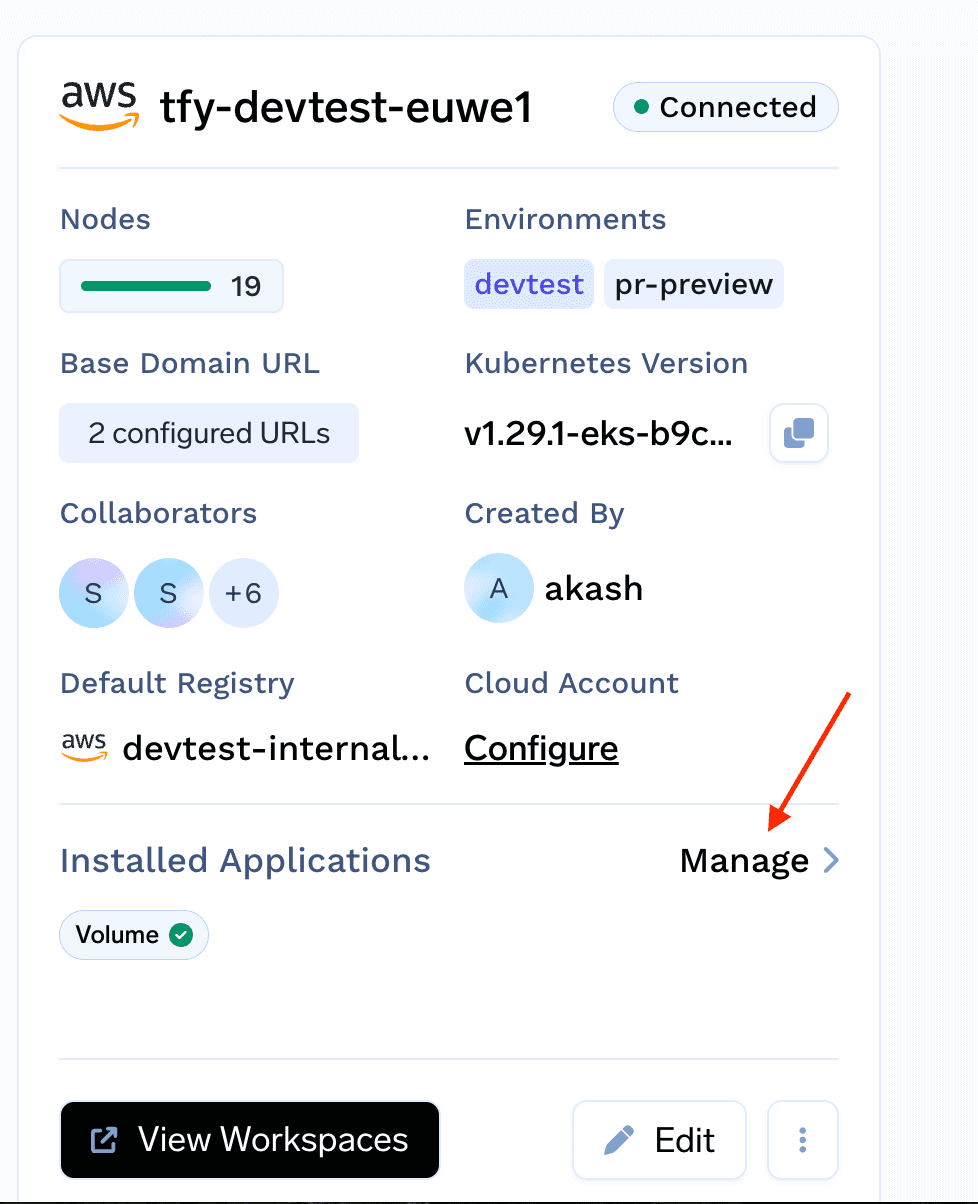
* To install EFS CSI driver on your cluster, go to TrueFoundry UI -> `Clusters`-> `Installed Applications`-> `Manage`
The key fields to fill up in the form are:
1. **Name**: The name of the volume.
2. **Volume Config**: You can select either of `Create New Volume` or
`Use Existing Volume`.
In most cases, you will want to create a new volume. The Use Existing Volume
option is useful when you want to mount a pre-existing volume or bucket like
S3, GCS, etc.
You will need to fill up two fields here:
1. **Size**: The size of the volume in Gi.
In most cases, you can increase the size of the volume after it is created.
But you cannot decrease the size of the volume once created. So if you are not
sure about the final size, you can start with a smaller size and increase it
later.
2. **Storage Class**: The Kubernetes storage class to use for the volume. Storage classes provide a way to specify the type of storage that should be provisioned for a Volume. These storage classes differ in their characteristics, such as performance, durability, and cost. The specific storage classes available will depend on the cloud provider you are using and what is preconfigured by the Infra team.
In case you want to whitelist only certain storage classes in the cluster to
be used for provisioning volumes, you can add the **`truefoundry.com/enabled:
'true'`** label to the StorageClass resources. The dropdown will then show
only the storage classes with this label.
The most common storage classes available in different cloud providers are:
| Storage Class | Cloud Provider Storage Name | Storage Class | Description |
| ------------- | --------------------------- | --------------- | --------------------------------------------------------------------------------------------------------------------------------------------------------------------------------------------------------------------- |
| efs-sc | Elastic File System (EFS) | efs.csi.aws.com | A fully managed, scalable, and highly durable elastic file system that offers high availability, automatic scaling, and cost-effective general file sharing. It's suitable for workloads with varying capacity needs. |
| TrueFoundry Storage Name | Cloud Provider Storage Name | Storage Class | Description |
| ------------------------ | --------------------------- | ---------------------------- | -------------------------------------------------------------------------------------------------------------------------------------------------------------------------------------------------------------------------------------------------- |
| standard-rwx | Google Basic HDD Filestore | filestore.csi.storage.gke.io | A cost-effective and scalable file storage solution ideal for general-purpose file storage and cost-sensitive workloads. It offers lower cost but also lower performance due to its HDD-based nature. |
| premium-rwx | Google Premium Filestore | filestore.csi.storage.gke.io | Provides higher performance and throughput compared to Basic HDD, making it suitable for I/O-intensive file operations and demanding workloads. It's SSD-based, offering higher performance at a higher cost. |
| enterprise-rwx | Google Enterprise Filestore | filestore.csi.storage.gke.io | Delivers the highest performance, throughput, advanced features, multi-zone support, and high availability, making it ideal for mission-critical workloads and applications with strict availability requirements. It comes with the highest cost. |
| TrueFoundry Storage Name | Cloud Provider Storage Name | Storage Class | Description |
| ------------------------ | --------------------------------- | ------------------ | --------------------------------------------------------------------------------------------------------------------------------------------------------------------- |
| azurefile | Azure File Storage (Standard) | file.csi.azure.com | Uses Azure Standard storage to create file shares for general file sharing across VMs or containers, including Windows apps. It offers cost-effective performance. |
| azurefile-premium | Azure File Storage (Premium) | file.csi.azure.com | Uses Azure Premium storage for higher performance, making it suitable for I/O-intensive file operations. |
| azurefile-csi | Azure File Storage (StandardCSI) | file.csi.azure.com | Leverages Azure Standard storage with CSI for dynamic provisioning, potentially offering better performance and CSI features. |
| azurefile-csi-premium | Azure File Storage (PremiumCSI) | file.csi.azure.com | Combines Azure Premium storage with CSI for dynamic provisioning and high-performance file operations. |
| azureblob-nfs-premium | Azure Blob Storage (NFS Premium) | blob.csi.azure.com | Uses Azure Premium storage with NFS v3 protocol for accessing large amounts of unstructured data and object storage, catering to demanding workloads with NFS access. |
| azureblob-fuse-premium | Azure Blob Storage (Fuse Premium) | blob.csi.azure.com | Uses Azure Premium storage with BlobFuse for accessing large amounts of unstructured data and object storage, suitable for workloads that require BlobFuse access. |
In this case, you will first create a PersistentVolume object in the Kubernetes cluster and then provide the name of the object in the `PersistentVolume` field. This option is useful if you want to mount the data that is present in an existing S3, EFS or GCS bucket.
Azure has default support for mounting Azure container buckets as volumes. So,
you can just follow the route of creating a volume in truefoundry.
To mount an S3 bucket as a volume on TrueFoundry, you need to follow the following steps:
### Setting up IAM Policies and Relevant Roles
Please follow this [document](https://docs.aws.amazon.com/eks/latest/userguide/s3-csi.html) of AWS to set up mount point of S3 in an EKS cluster.
This will guide you to do the following things:
* Create an IAM policy to give permissions for mount point to access the s3 bucket
* Create an IAM role.
* Install the mountpoint for Amazon S3 CSI driver and attach the role that was created above.
### Creating a Persistent Volume on the Kubernetes Cluster
Create a PV with the following spec (by doing a `kubectl apply`):
```yaml YAML lines theme={"dark"}
apiVersion: v1
kind: PersistentVolume
metadata:
name:
spec:
capacity:
storage: 100Gi
csi:
driver: s3.csi.aws.com
volumeHandle: s3-csi-driver-volume # must be unique
volumeAttributes:
bucketName:
accessModes:
- ReadWriteMany
persistentVolumeReclaimPolicy: Retain
storageClassName: s3-test # put any value here
mountOptions:
- allow-delete
- region
- allow-other
- uid=1000
volumeMode: Filesystem
```
### Create a Volume on TrueFoundry:
Please follow this [section](/docs/creating-a-volume#statically-provisioned-volumes) to create volume on TrueFoundry
To mount a EFS as a volume on truefoundry, you need to follow the following steps:
### Install EFS CSI driver on your cluster
* To install EFS CSI driver on your cluster, go to TrueFoundry UI -> `Clusters`-> `Installed Applications`-> `Manage`
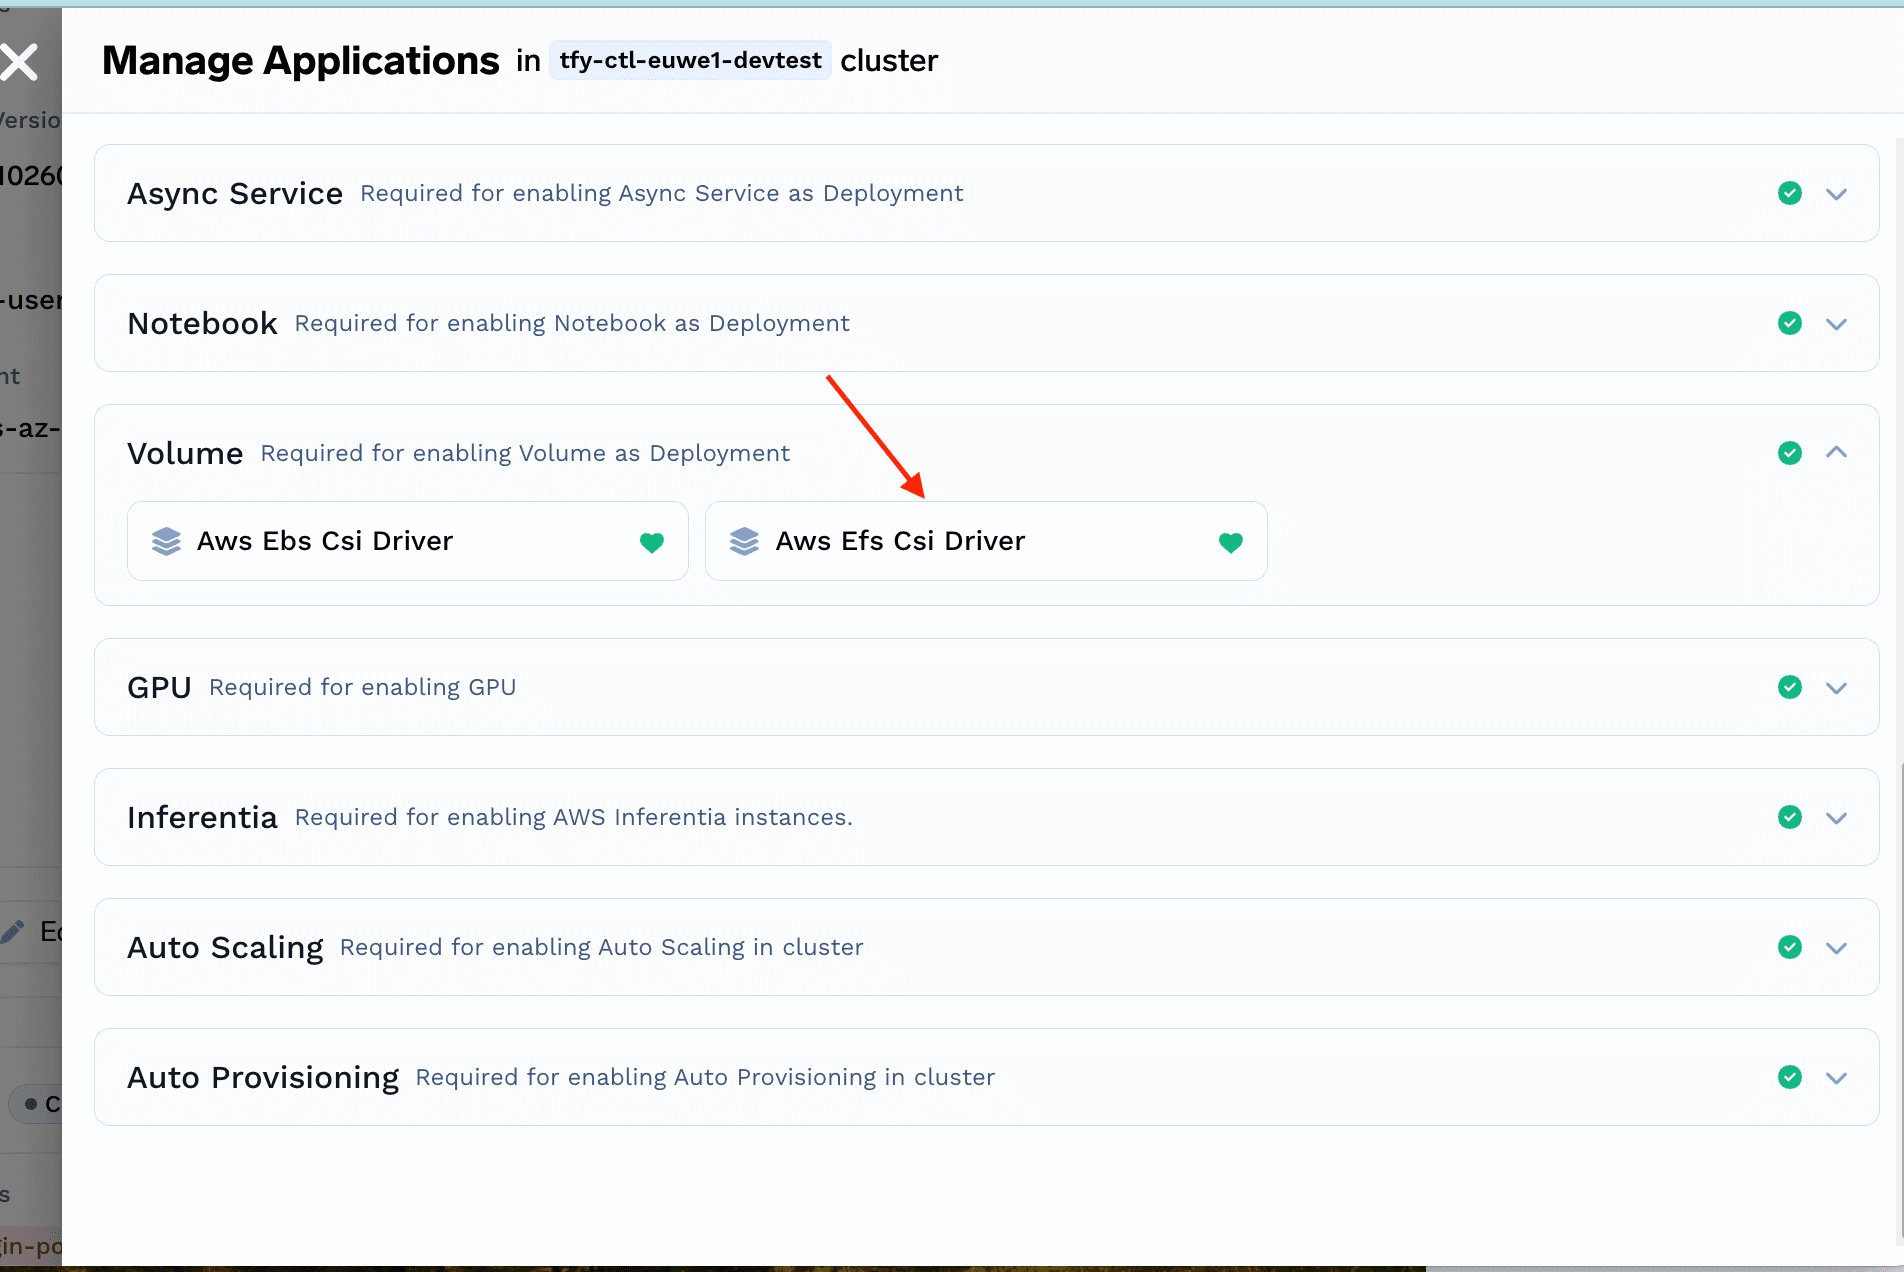
 * From the `Volumes`section click on install AWS EFS CSI driver and click on Install.
 ### Create an Access Point for your EFS
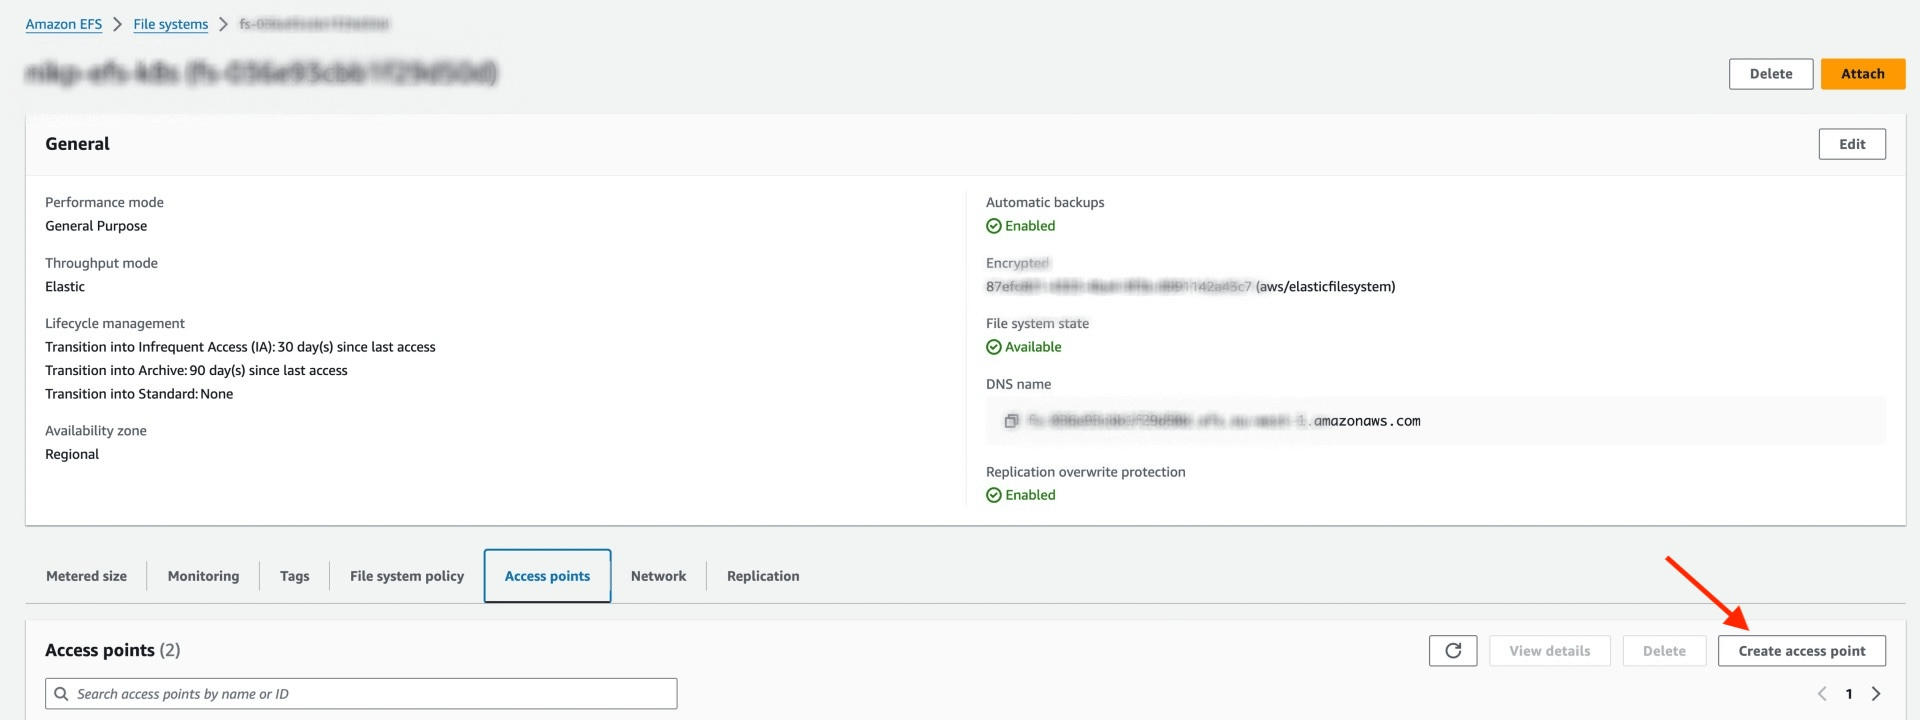
* Locate your EFS in the AWS console and open it. Ensure that the EFS and the K8S cluster are in the same VPC. Click on "Create access point"
### Create an Access Point for your EFS
* Locate your EFS in the AWS console and open it. Ensure that the EFS and the K8S cluster are in the same VPC. Click on "Create access point"
 * Enter details like name, `Root directory path`(please make sure you fill the `Root directory creation permissions`section, can fill in with UID:1000, GID:1000 if you want to attach it to notebook)
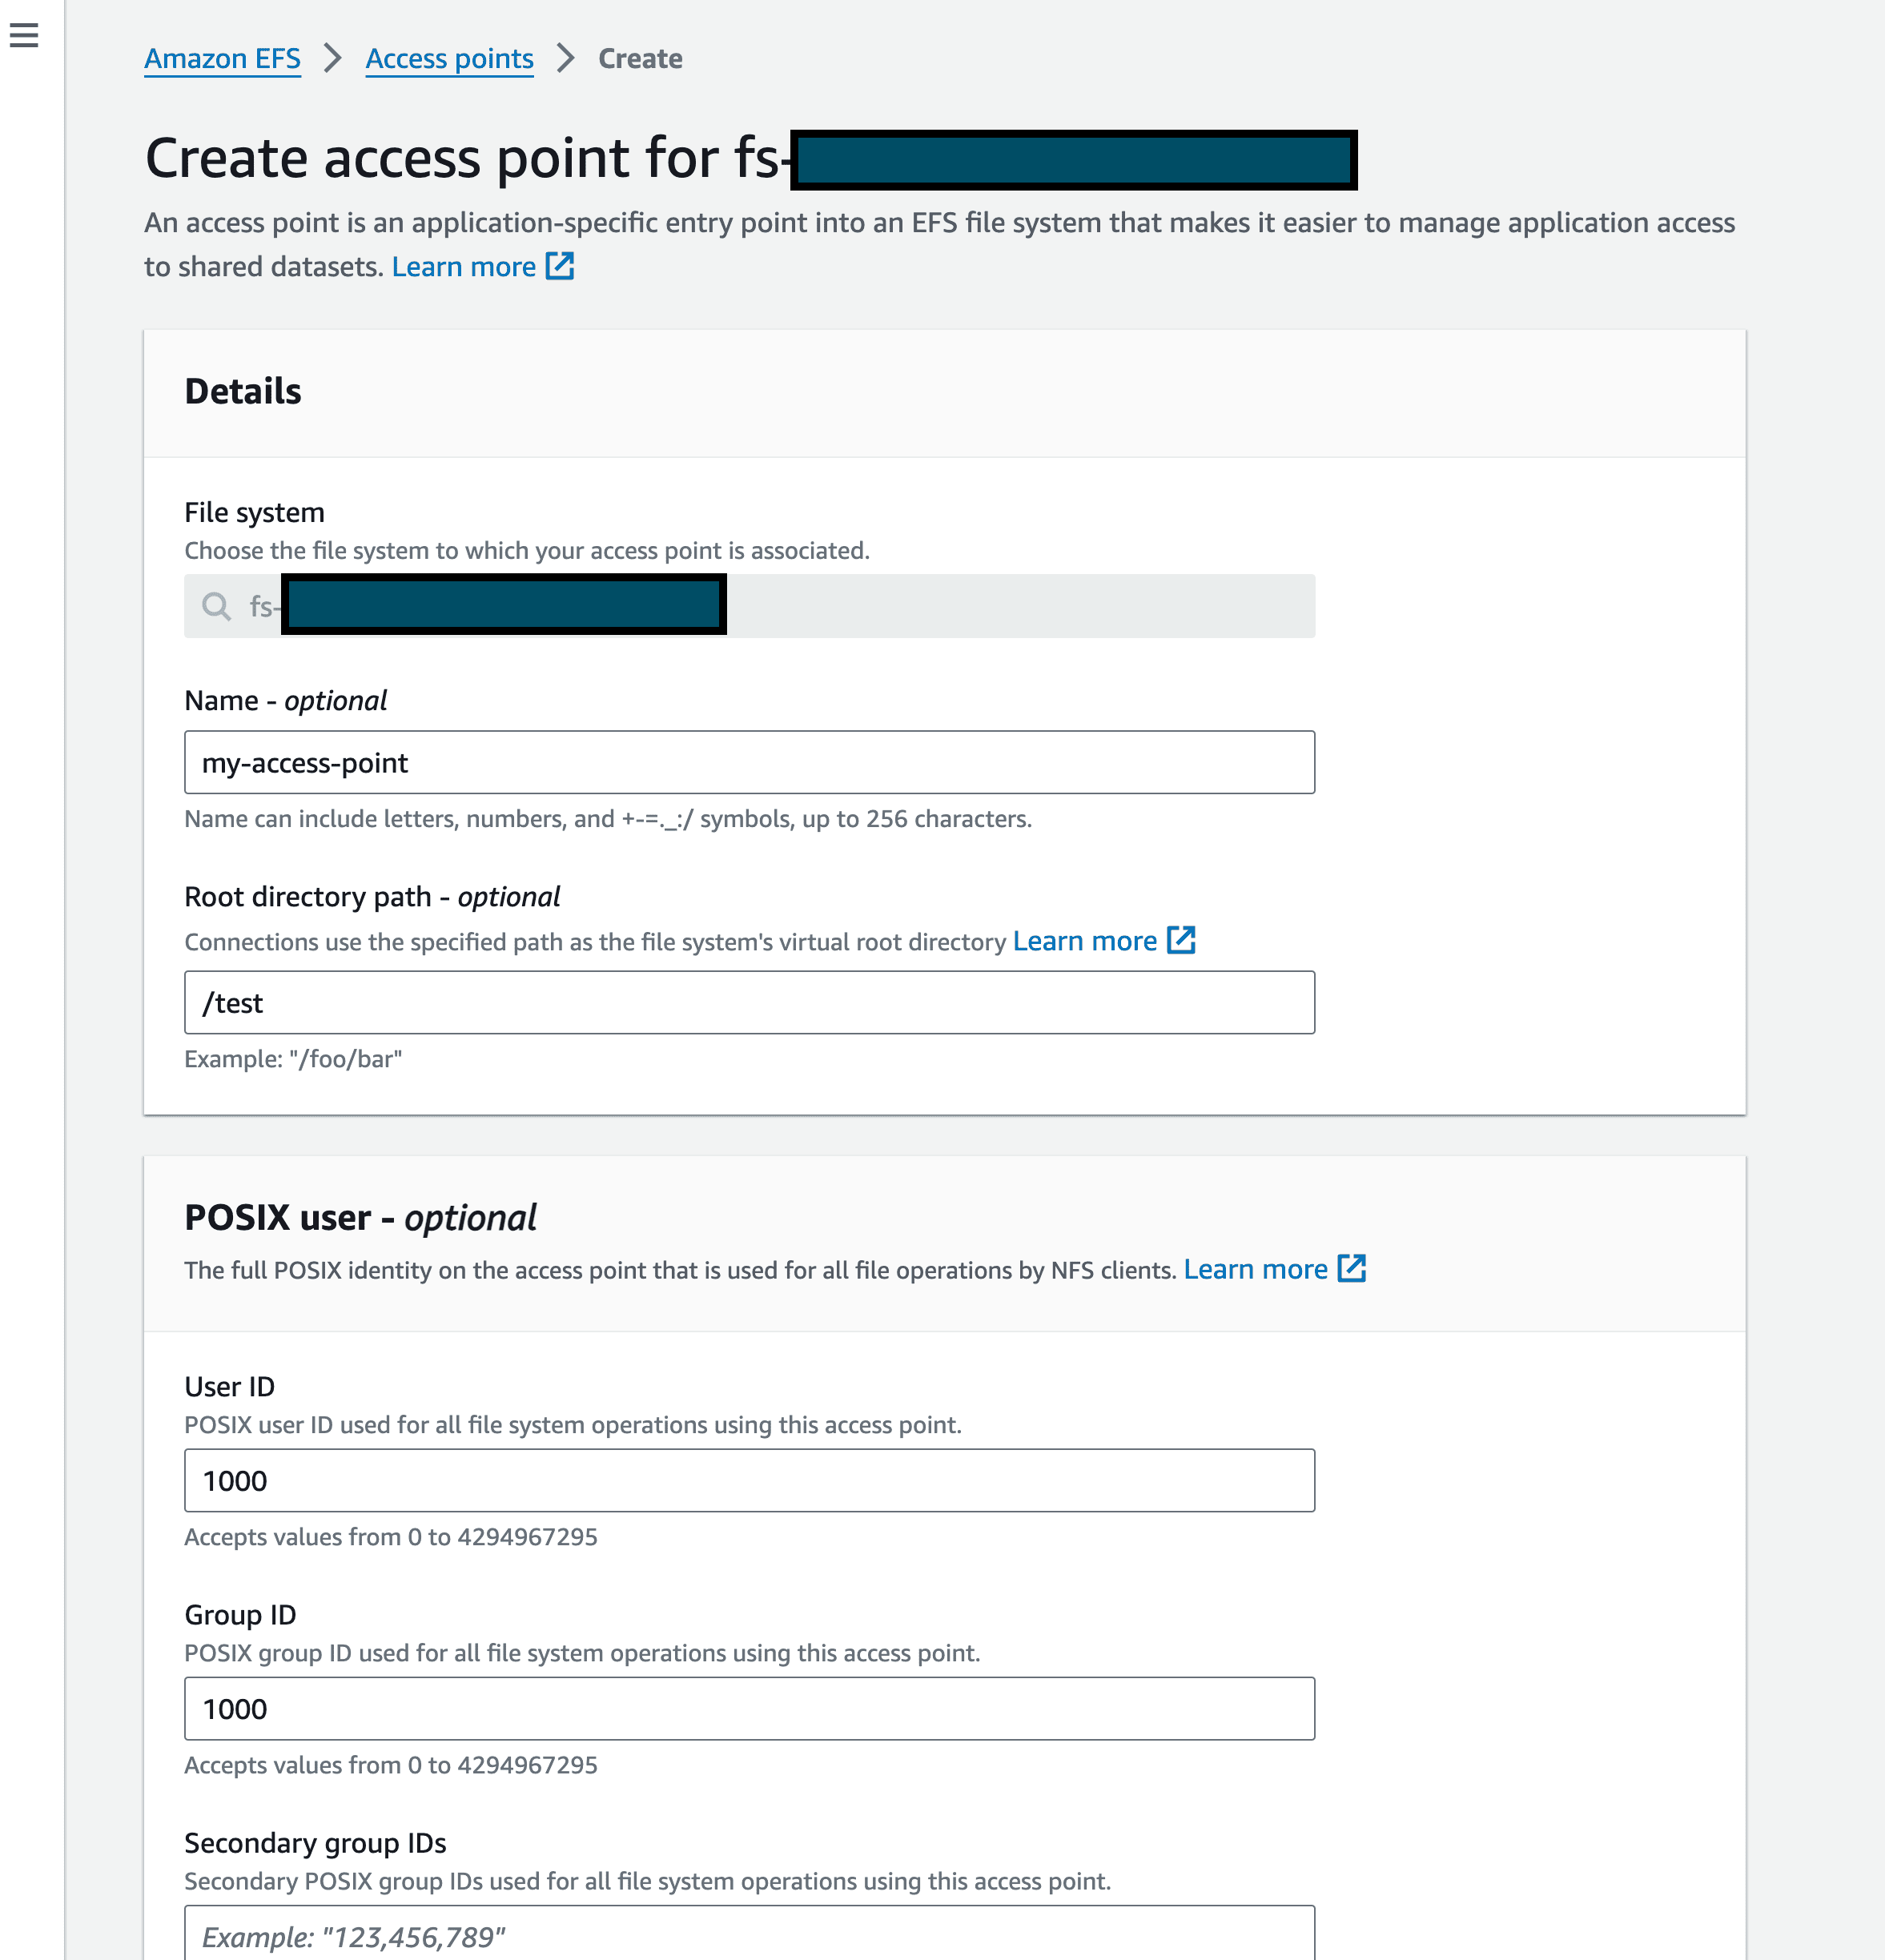 * Click on create.
### Create a PersistentVolume on the cluster
Create a PV with the following spec (by doing a `kubectl apply`):
```yaml YAML lines theme={"dark"}
apiVersion: v1
kind: PersistentVolume
metadata:
name:
spec:
capacity:
storage: 5Gi # this number doesn't matter for EFS, any number will work
csi:
driver: efs.csi.aws.com
volumeHandle: :: # e.g. fs-036e93cbb1fabcdef::fsap-0923ac354cqwerty
accessModes:
- ReadWriteMany
persistentVolumeReclaimPolicy: Retain
storageClassName: efs-sc
volumeMode: Filesystem
```
### Create a Volume on TrueFoundry:
Please follow this [section](/docs/creating-a-volume#statically-provisioned-volumes) to create volume on TrueFoundry
To mount a GCS bucket as a volume on truefoundry, you need to follow the following steps. You can refer to this [document](https://cloud.google.com/kubernetes-engine/docs/how-to/persistent-volumes/cloud-storage-fuse-csi-driver) for more details:
### Create a GCS bucket
Create a GCS bucket and ensure the following:
* Should be single region ( multi-region will work but speed will be slower and costs will be higher )
* Region should be the same as that of your Kubernetes Cluster
### Create Serviceaccount and Grant relevant permissions
You need to run the following script. This does the following:
* Enables GCS Fuse Driver on the cluster
* Create IAM Policy to access your bucket
* Create K8s service-account and add policy to this service-account
* Enables role-binding of service account to the desired K8s namespace.
```bash Shell lines theme={"dark"}
#!/bin/bash
PROJECT=
CLUSTER_NAME=
REGION=
BUCKET_NAME=
TARGET_NAMESPACE=
# Clip bucket name to 20 characters
CLIPPED_BUCKET_NAME="${BUCKET_NAME:0:20}"
K8S_SA_NAME="$CLIPPED_BUCKET_NAME-bucket-sa"
GCP_SA_NAME="$CLIPPED_BUCKET_NAME-gcp-sa"
GCP_SA_ID="$GCP_SA_NAME@$PROJECT.iam.gserviceaccount.com"
gcloud container clusters update $CLUSTER_NAME \
--update-addons GcsFuseCsiDriver=ENABLED \
--region=$REGION \
--project=$PROJECT
gcloud iam service-accounts create $GCP_SA_NAME --project=$PROJECT
gcloud storage buckets add-iam-policy-binding gs://$BUCKET_NAME \
--member "serviceAccount:$GCP_SA_ID" \
--role "roles/storage.objectAdmin" \
--project $PROJECT
gcloud iam service-accounts add-iam-policy-binding $GCP_SA_ID \
--role roles/iam.workloadIdentityUser \
--member "serviceAccount:$PROJECT.svc.id.goog[$TARGET_NAMESPACE/$K8S_SA_NAME]" \
--project $PROJECT
```
### Create Service-Account in the Namespace
We now need to create a serviceaccount on truefoundry in the same namespace with name: `TARGET_NAMESPACE`and the serviceaccount must have the name `K8S_SA_NAME`.
```yaml lines theme={"dark"}
apiVersion: v1
kind: ServiceAccount
metadata:
name:
namespace:
annotations:
iam.gke.io/gcp-service-account:
```
### Important
The service account name and workspace should be exactly same as the previous step.
### Create a PersistentVolume object as shown below:
Create a persistent volume object with the following step. (by doing a `kubectl apply`)
```yaml YAML lines theme={"dark"}
apiVersion: v1
kind: PersistentVolume
metadata:
name:
spec:
capacity:
storage: 30Gi
csi:
driver: gcsfuse.csi.storage.gke.io
volumeHandle:
accessModes:
- ReadWriteMany
persistentVolumeReclaimPolicy: Retain
storageClassName: np-fuse-test
mountOptions:
- implicit-dirs
volumeMode: Filesystem
```
### Create a Volume on TrueFoundry:
Please follow this [section](/docs/creating-a-volume#statically-provisioned-volumes) to create volume on TrueFoundry
3. **Volume Browser**: Enabling the volume browser will provide you a
user-friendly interface that allows you to effortlessly upload, download, and
view files stored within the Volumes. The interface will need to be
configured with a password so that only authorized users can view the data in
the volume. The password will need to be first created as a Secret and then
entered in the form below.
You can enable the volume browser by following the demo below:
## Using the Volume
Once you press the submit button in the deployment form, the volume will be created within a few seconds. The Volume Dashboard will transform to appear as follows:
* Click on create.
### Create a PersistentVolume on the cluster
Create a PV with the following spec (by doing a `kubectl apply`):
```yaml YAML lines theme={"dark"}
apiVersion: v1
kind: PersistentVolume
metadata:
name:
spec:
capacity:
storage: 5Gi # this number doesn't matter for EFS, any number will work
csi:
driver: efs.csi.aws.com
volumeHandle: :: # e.g. fs-036e93cbb1fabcdef::fsap-0923ac354cqwerty
accessModes:
- ReadWriteMany
persistentVolumeReclaimPolicy: Retain
storageClassName: efs-sc
volumeMode: Filesystem
```
### Create a Volume on TrueFoundry:
Please follow this [section](/docs/creating-a-volume#statically-provisioned-volumes) to create volume on TrueFoundry
To mount a GCS bucket as a volume on truefoundry, you need to follow the following steps. You can refer to this [document](https://cloud.google.com/kubernetes-engine/docs/how-to/persistent-volumes/cloud-storage-fuse-csi-driver) for more details:
### Create a GCS bucket
Create a GCS bucket and ensure the following:
* Should be single region ( multi-region will work but speed will be slower and costs will be higher )
* Region should be the same as that of your Kubernetes Cluster
### Create Serviceaccount and Grant relevant permissions
You need to run the following script. This does the following:
* Enables GCS Fuse Driver on the cluster
* Create IAM Policy to access your bucket
* Create K8s service-account and add policy to this service-account
* Enables role-binding of service account to the desired K8s namespace.
```bash Shell lines theme={"dark"}
#!/bin/bash
PROJECT=
CLUSTER_NAME=
REGION=
BUCKET_NAME=
TARGET_NAMESPACE=
# Clip bucket name to 20 characters
CLIPPED_BUCKET_NAME="${BUCKET_NAME:0:20}"
K8S_SA_NAME="$CLIPPED_BUCKET_NAME-bucket-sa"
GCP_SA_NAME="$CLIPPED_BUCKET_NAME-gcp-sa"
GCP_SA_ID="$GCP_SA_NAME@$PROJECT.iam.gserviceaccount.com"
gcloud container clusters update $CLUSTER_NAME \
--update-addons GcsFuseCsiDriver=ENABLED \
--region=$REGION \
--project=$PROJECT
gcloud iam service-accounts create $GCP_SA_NAME --project=$PROJECT
gcloud storage buckets add-iam-policy-binding gs://$BUCKET_NAME \
--member "serviceAccount:$GCP_SA_ID" \
--role "roles/storage.objectAdmin" \
--project $PROJECT
gcloud iam service-accounts add-iam-policy-binding $GCP_SA_ID \
--role roles/iam.workloadIdentityUser \
--member "serviceAccount:$PROJECT.svc.id.goog[$TARGET_NAMESPACE/$K8S_SA_NAME]" \
--project $PROJECT
```
### Create Service-Account in the Namespace
We now need to create a serviceaccount on truefoundry in the same namespace with name: `TARGET_NAMESPACE`and the serviceaccount must have the name `K8S_SA_NAME`.
```yaml lines theme={"dark"}
apiVersion: v1
kind: ServiceAccount
metadata:
name:
namespace:
annotations:
iam.gke.io/gcp-service-account:
```
### Important
The service account name and workspace should be exactly same as the previous step.
### Create a PersistentVolume object as shown below:
Create a persistent volume object with the following step. (by doing a `kubectl apply`)
```yaml YAML lines theme={"dark"}
apiVersion: v1
kind: PersistentVolume
metadata:
name:
spec:
capacity:
storage: 30Gi
csi:
driver: gcsfuse.csi.storage.gke.io
volumeHandle:
accessModes:
- ReadWriteMany
persistentVolumeReclaimPolicy: Retain
storageClassName: np-fuse-test
mountOptions:
- implicit-dirs
volumeMode: Filesystem
```
### Create a Volume on TrueFoundry:
Please follow this [section](/docs/creating-a-volume#statically-provisioned-volumes) to create volume on TrueFoundry
3. **Volume Browser**: Enabling the volume browser will provide you a
user-friendly interface that allows you to effortlessly upload, download, and
view files stored within the Volumes. The interface will need to be
configured with a password so that only authorized users can view the data in
the volume. The password will need to be first created as a Secret and then
entered in the form below.
You can enable the volume browser by following the demo below:
## Using the Volume
Once you press the submit button in the deployment form, the volume will be created within a few seconds. The Volume Dashboard will transform to appear as follows:
 You can use the volume in the following ways:
Once set-up, you can use Volume Browser to effortlessly upload, download, and view files stored within the Volumes.
You can attach Volumes to various types of deployments, including Services and Jobs. You can then read and write data to the volume like you would normally read and write data to a file system.
You can read this [guide](/docs/mounting-volumes-service) to learn more about how to use volumes in deployments. This guide is for Service, but the same can be applied to Jobs as well.
You can use the volume in the following ways:
Once set-up, you can use Volume Browser to effortlessly upload, download, and view files stored within the Volumes.
You can attach Volumes to various types of deployments, including Services and Jobs. You can then read and write data to the volume like you would normally read and write data to a file system.
You can read this [guide](/docs/mounting-volumes-service) to learn more about how to use volumes in deployments. This guide is for Service, but the same can be applied to Jobs as well.