> ## Documentation Index
> Fetch the complete documentation index at: https://www.truefoundry.com/llms.txt
> Use this file to discover all available pages before exploring further.
# OpenAI Codex CLI
> Use OpenAI Codex CLI with TrueFoundry LLM Gateway to interact with AI models from your terminal
This guide provides instructions for using the [Codex CLI](https://github.com/openai/codex) through the Truefoundry LLM Gateway.
**GPT-5.3-Codex is now available!** You can access GPT-5.3-Codex through TrueFoundry AI Gateway. Follow the setup steps below to get started.
## What is Codex?
Codex is the official command-line interface (CLI) tool for OpenAI, providing a streamlined way to interact with OpenAI's language models directly from your terminal. With Truefoundry LLM Gateway integration, you can route your Codex requests via Gateway.
### Key Features of OpenAI Codex CLI
1. **Terminal-Native AI Interactions**: Chat with AI models directly from your terminal without switching contexts
2. **Intelligent Code Generation**: Generate code snippets, functions, and programs across multiple programming languages using natural language prompts
3. **Streaming and Interactive Sessions**: Real-time streaming responses enable dynamic, conversation-like interactions for code development
## Prerequisites
Before integrating Codex with TrueFoundry, ensure you have:
1. **TrueFoundry Account**: Create a [Truefoundry account](https://www.truefoundry.com/register) with at least one model provider and generate a Personal Access Token by following the instructions in [Generating Tokens](/docs/ai-gateway/authentication). For a quick setup guide, see our [Gateway Quick Start](https://docs.truefoundry.com/gateway/quick-start)
2. **Codex Installation**: Install the [Codex CLI](https://github.com/openai/codex) on your system
3. **Virtual Model**: Create a Virtual Model for each Codex model you want to use (see [Create a Virtual Model](#2-create-a-virtual-model) below)
## Why You Need a Virtual Model
Codex has internal logic that sends **thinking tokens** to certain models during processing. This works correctly with standard OpenAI-style model names (like `gpt-5`), but causes compatibility issues with TrueFoundry’s **fully qualified** model names (like `openai-main/gpt-5` or `azure-openai/gpt-5`). When Codex sees a fully qualified name directly, it can send thinking tokens incorrectly, which leads to unexpected behavior.
**Virtual Models fix this** by letting you:
1. Use a **slug** as the model name in Codex (e.g. `gpt-5` or `gpt-5.2-codex`) so thinking tokens work as intended.
2. Have the TrueFoundry Gateway map that slug to the fully qualified target (e.g. `openai-main/gpt-5`) and route requests there.
You get correct thinking-token behavior and can still use any model through the Gateway.
## Setup Process
### 1. Configure Codex
TrueFoundry supports both ways of authenticating Codex to OpenAI: a usage-based **API key** and **sign in with your ChatGPT account** (Personal, Business, or Enterprise subscription).
Codex reads configuration from `~/.codex/config.toml`. Create this file (and the `~/.codex` directory if needed) if it does not exist. Choose the tab that matches how you authenticate to OpenAI:
* **API key** — Authenticate to the gateway with a TrueFoundry API key (usage-based OpenAI access).
* **ChatGPT Business/Enterprise** — Sign in with your ChatGPT subscription. Codex sends its ChatGPT credentials, which the gateway forwards to OpenAI, while TrueFoundry authenticates you separately with `x-tfy-api-key`.
Configure Codex with the following `~/.codex/config.toml`:
```toml lines theme={"dark"}
model = "gpt-5.2-codex"
model_provider = "truefoundry"
[model_providers.truefoundry]
name = "TrueFoundry Gateway"
base_url = "{GATEWAY_BASE_URL}"
wire_api = "responses"
[model_providers.truefoundry.http_headers]
Authorization = "Bearer TFY_API_KEY"
```
Replace `{GATEWAY_BASE_URL}` with your TrueFoundry AI Gateway Base URL ([how to find it](/docs/ai-gateway/quick-start#gateway-base-url)) and `TFY_API_KEY` with your TrueFoundry API key from [Generating Tokens](/docs/ai-gateway/authentication).
* **`model`** — The [Virtual Model slug](#2-create-a-virtual-model) you create in step 2 (for example `gpt-5.2-codex`). It must match that slug.
* **`model_provider`** — Must match the `[model_providers.]` section name (`truefoundry` in this example).
* **`wire_api = "responses"`** — Use this for `gpt-5.x-codex` models so Codex uses the Responses API and thinking tokens behave correctly. For other models, use `wire_api = "chat"` (Chat Completions).
* **`[model_providers.truefoundry.http_headers]`** — Sends `Authorization: Bearer ...` on every request using your TrueFoundry API key.
Use this if you have a ChatGPT Business or Personal subscription that includes Codex access and want to use that subscription instead of a usage-based OpenAI API key. Codex signs in with your ChatGPT account and sends its ChatGPT OAuth token to the gateway, while TrueFoundry authenticates you separately using `x-tfy-api-key`.
**First, configure the OpenAI integration in TrueFoundry.** When you add the OpenAI provider integration (and models) that Codex will use:
* **Base URL**: Set the base URL to `https://chatgpt.com/backend-api/codex` instead of the default OpenAI API endpoint. This is the endpoint Codex uses for ChatGPT subscription traffic.
* **API key**: Leave the API key field **empty**. The actual ChatGPT credentials are sent by Codex (as a Bearer OAuth token plus the `ChatGPT-Account-Id` header) from your subscription session and forwarded by the gateway at request time.
Leaving the API key empty is what tells the gateway to forward the `Authorization` header that Codex sends. If you set an API key on this integration, the gateway will use that key instead of the ChatGPT OAuth token.
**Then, configure Codex** with the following `~/.codex/config.toml`:
```toml lines theme={"dark"}
model = "gpt-5.2-codex"
model_provider = "truefoundry"
[model_providers.truefoundry]
name = "TrueFoundry Gateway"
base_url = "{GATEWAY_BASE_URL}"
wire_api = "responses"
requires_openai_auth = true
[model_providers.truefoundry.http_headers]
x-tfy-api-key = "TFY_API_KEY"
```
Replace `{GATEWAY_BASE_URL}` with your TrueFoundry AI Gateway Base URL ([how to find it](/docs/ai-gateway/quick-start#gateway-base-url)) and `TFY_API_KEY` with your TrueFoundry API key from [Generating Tokens](/docs/ai-gateway/authentication).
* **`model`** — The [Virtual Model slug](#2-create-a-virtual-model) you create in step 2 (for example `gpt-5.2-codex`). It must match that slug.
* **`model_provider`** — Must match the `[model_providers.]` section name (`truefoundry` in this example).
* **`wire_api = "responses"`** — Use the Responses API so `gpt-5.x-codex` models handle thinking tokens correctly.
* **`requires_openai_auth = true`** — Tells Codex to send its ChatGPT OAuth token as a Bearer `Authorization` header along with the `ChatGPT-Account-Id` header. The gateway forwards these to OpenAI because the OpenAI integration has no API key.
* **`[model_providers.truefoundry.http_headers]`** — Sends `x-tfy-api-key` on every request so the gateway can authenticate you independently of the ChatGPT subscription credentials.
After saving the file, start Codex by running `codex` in your terminal and **sign in with your ChatGPT Business/Enterprise account** when prompted.
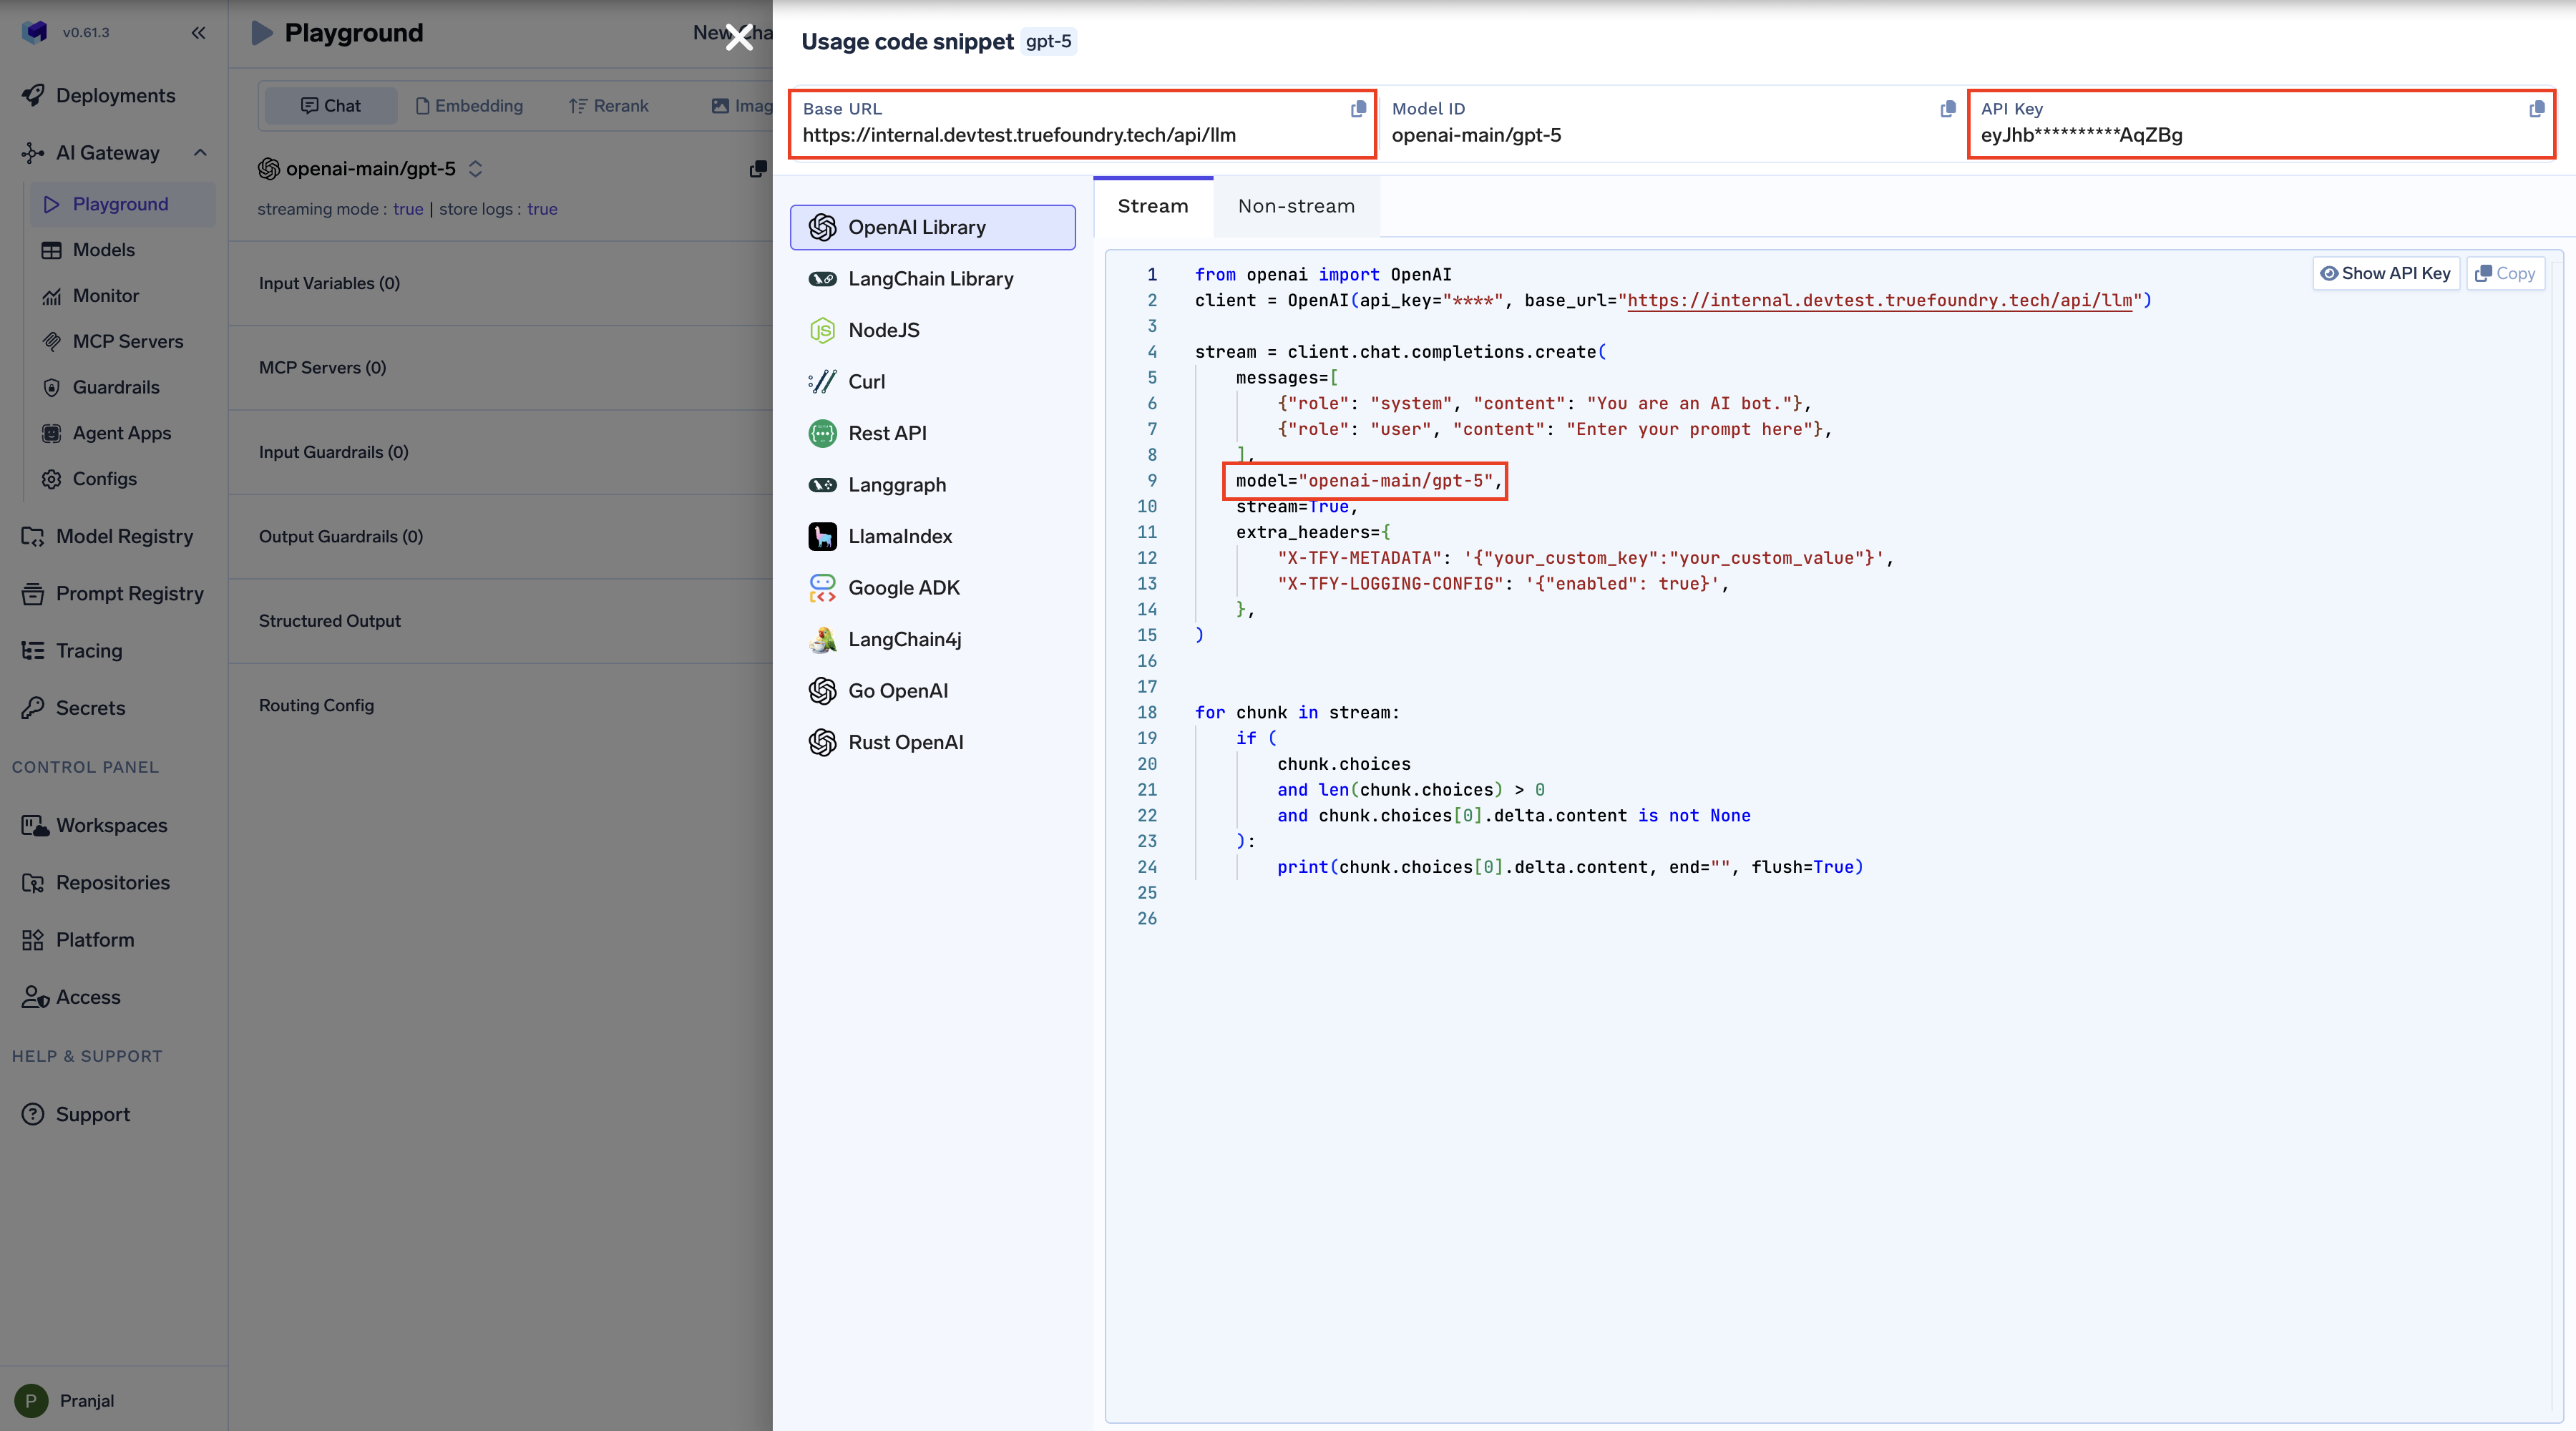 ### 2. Create a Virtual Model
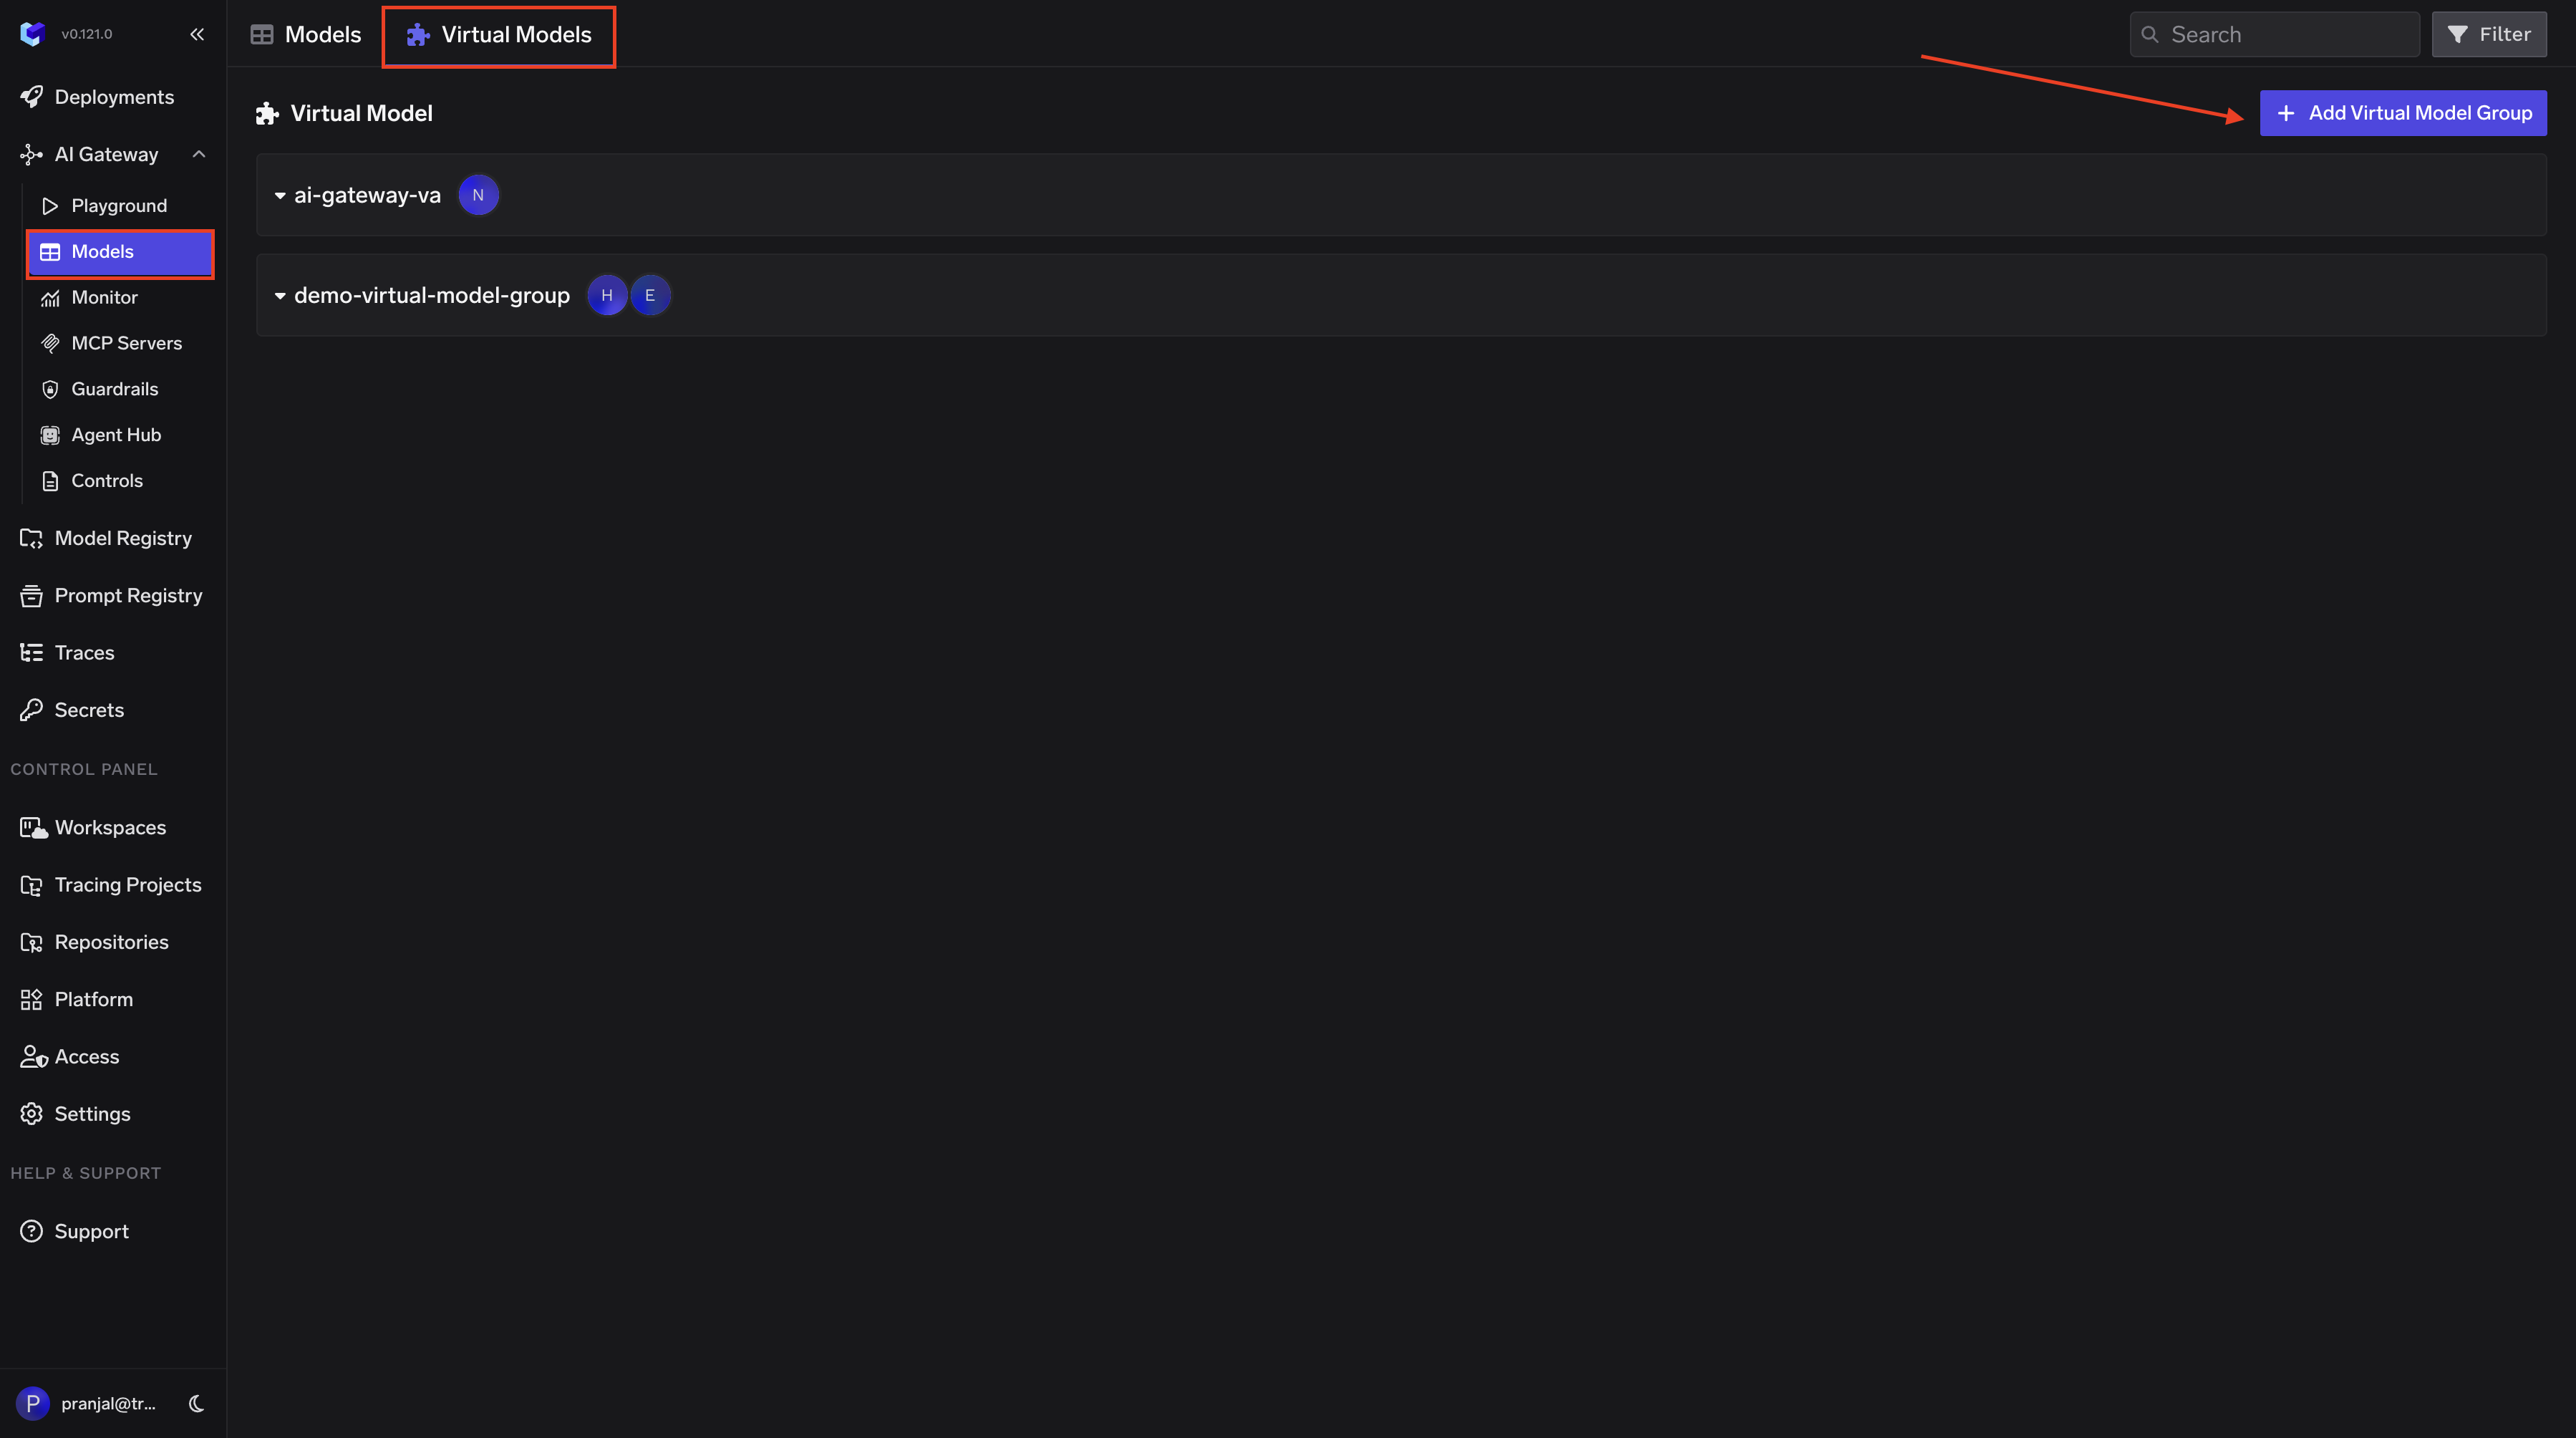
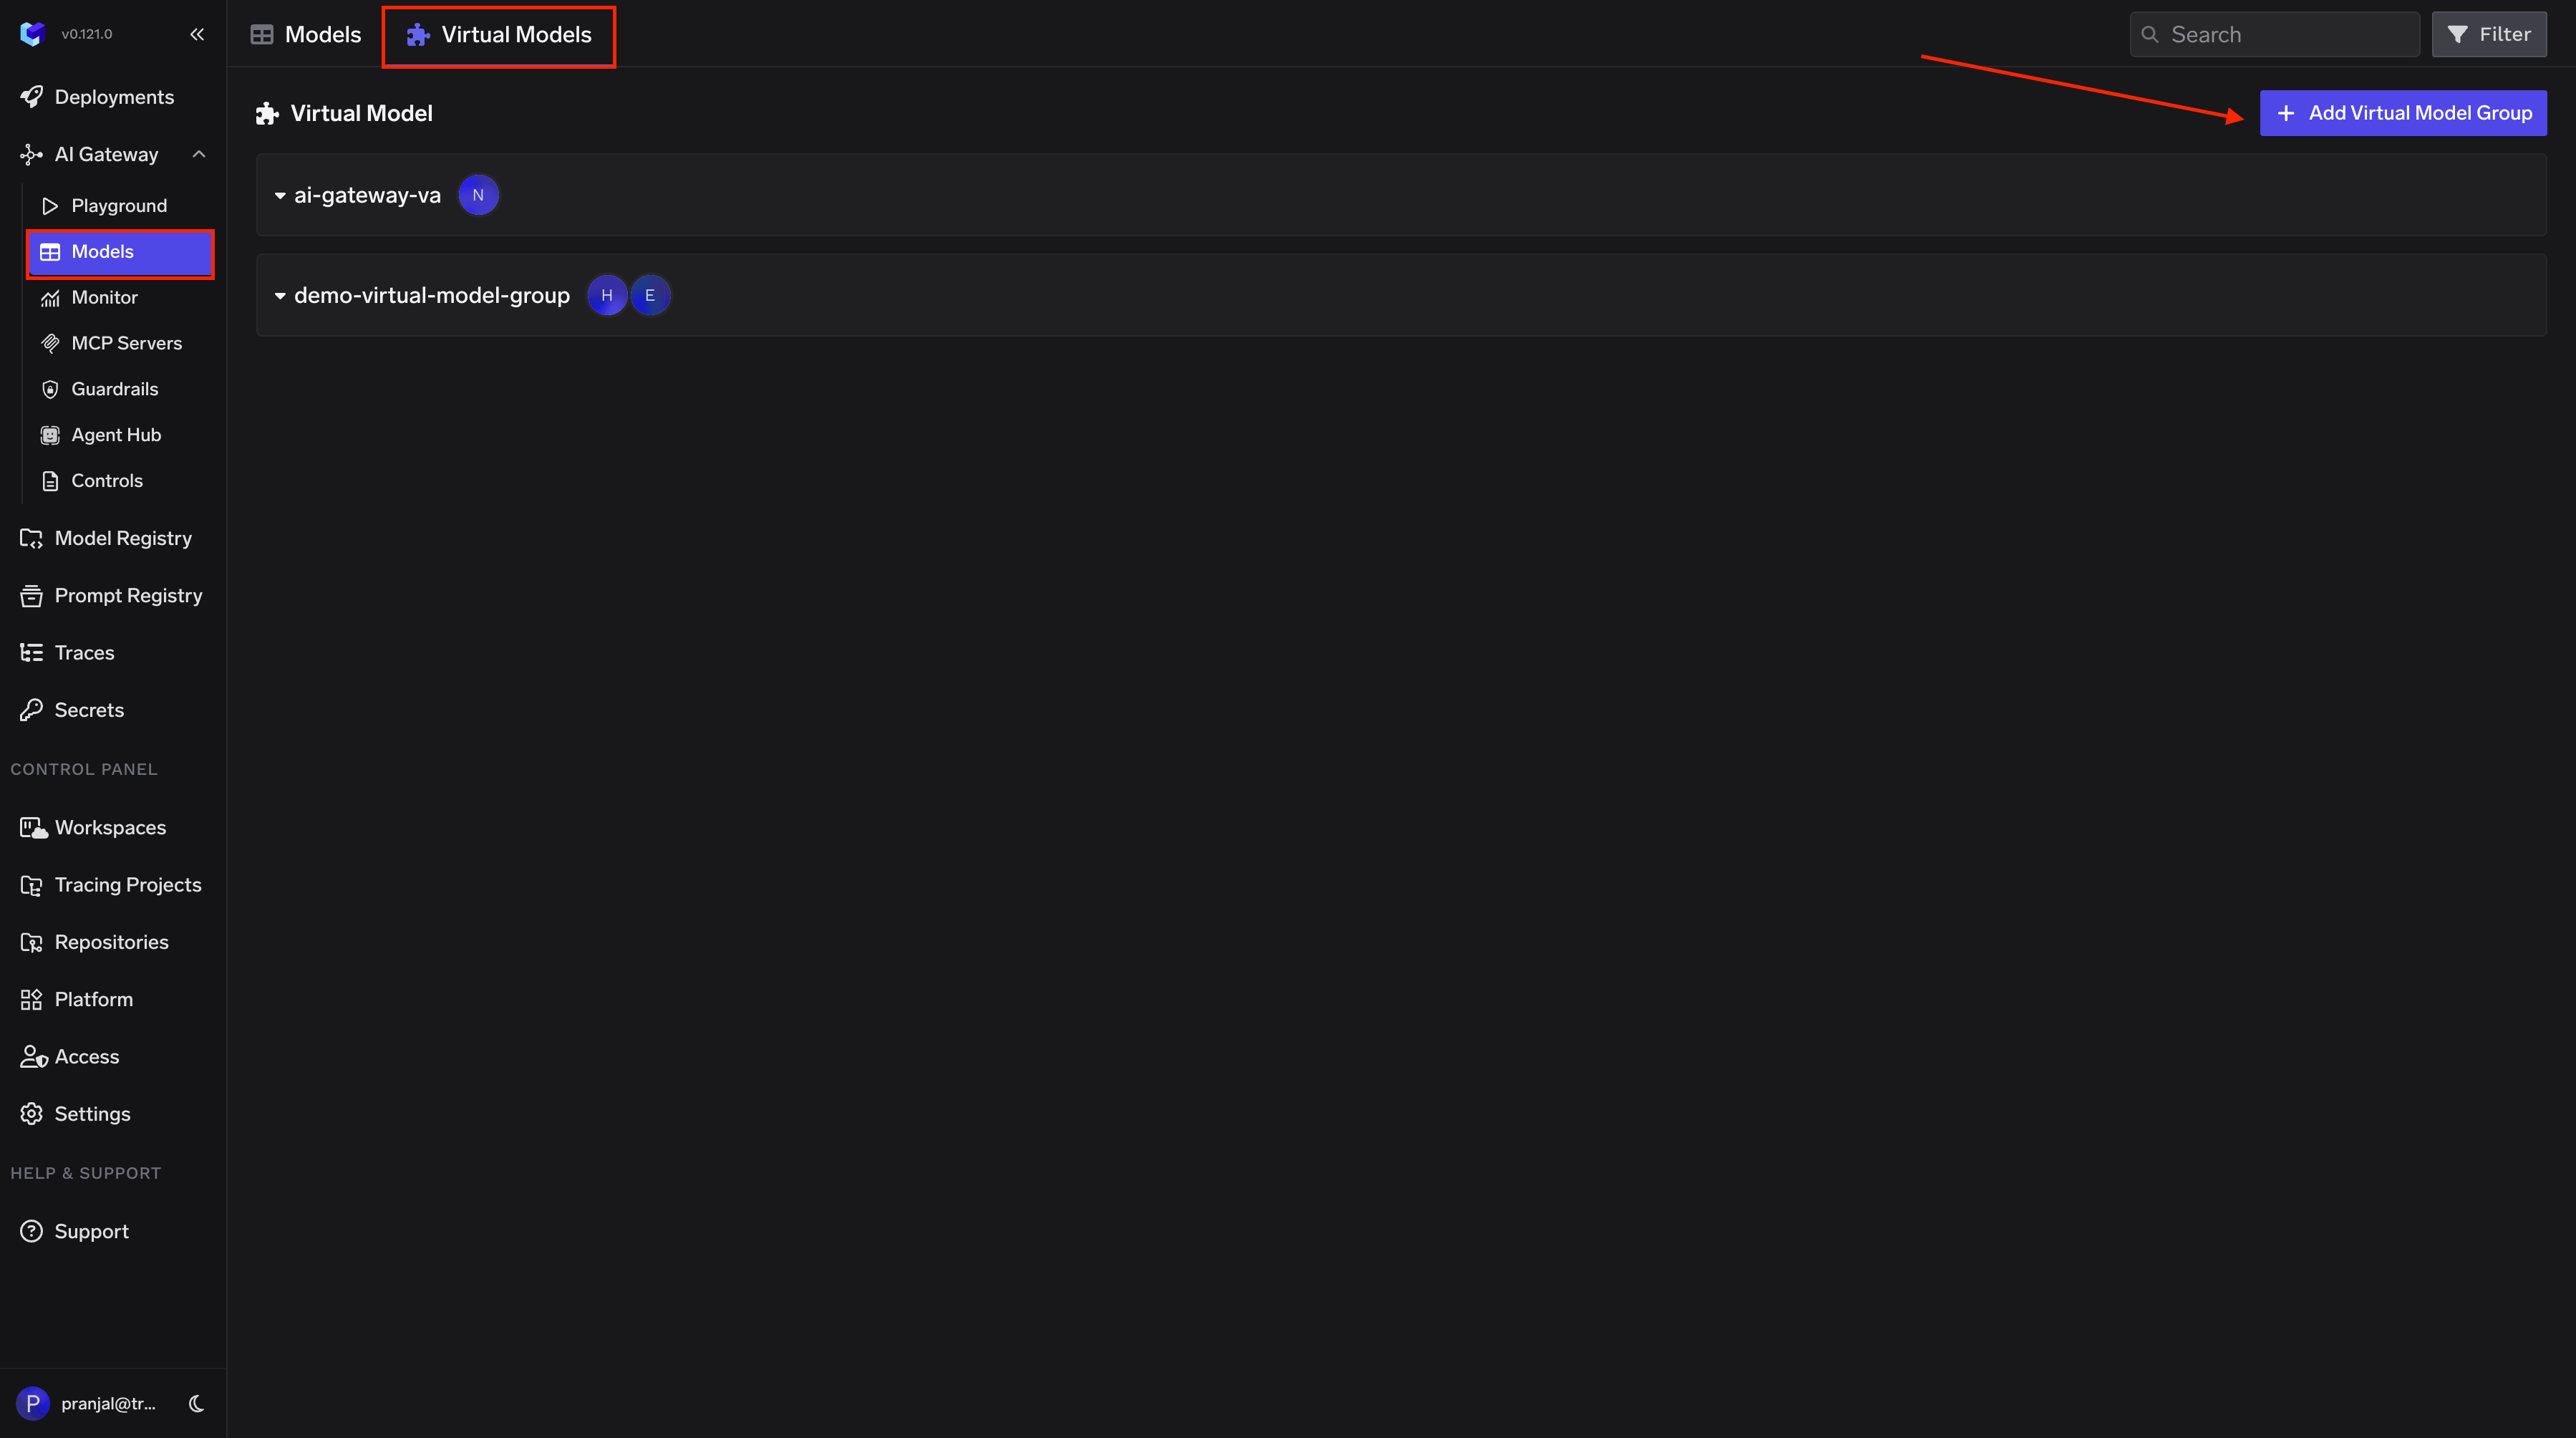
Create a Virtual Model so Codex can use a simple model name that the Gateway maps to your provider. Follow these steps:
1. **Open the Virtual Model / Routing page** in the TrueFoundry AI Gateway dashboard
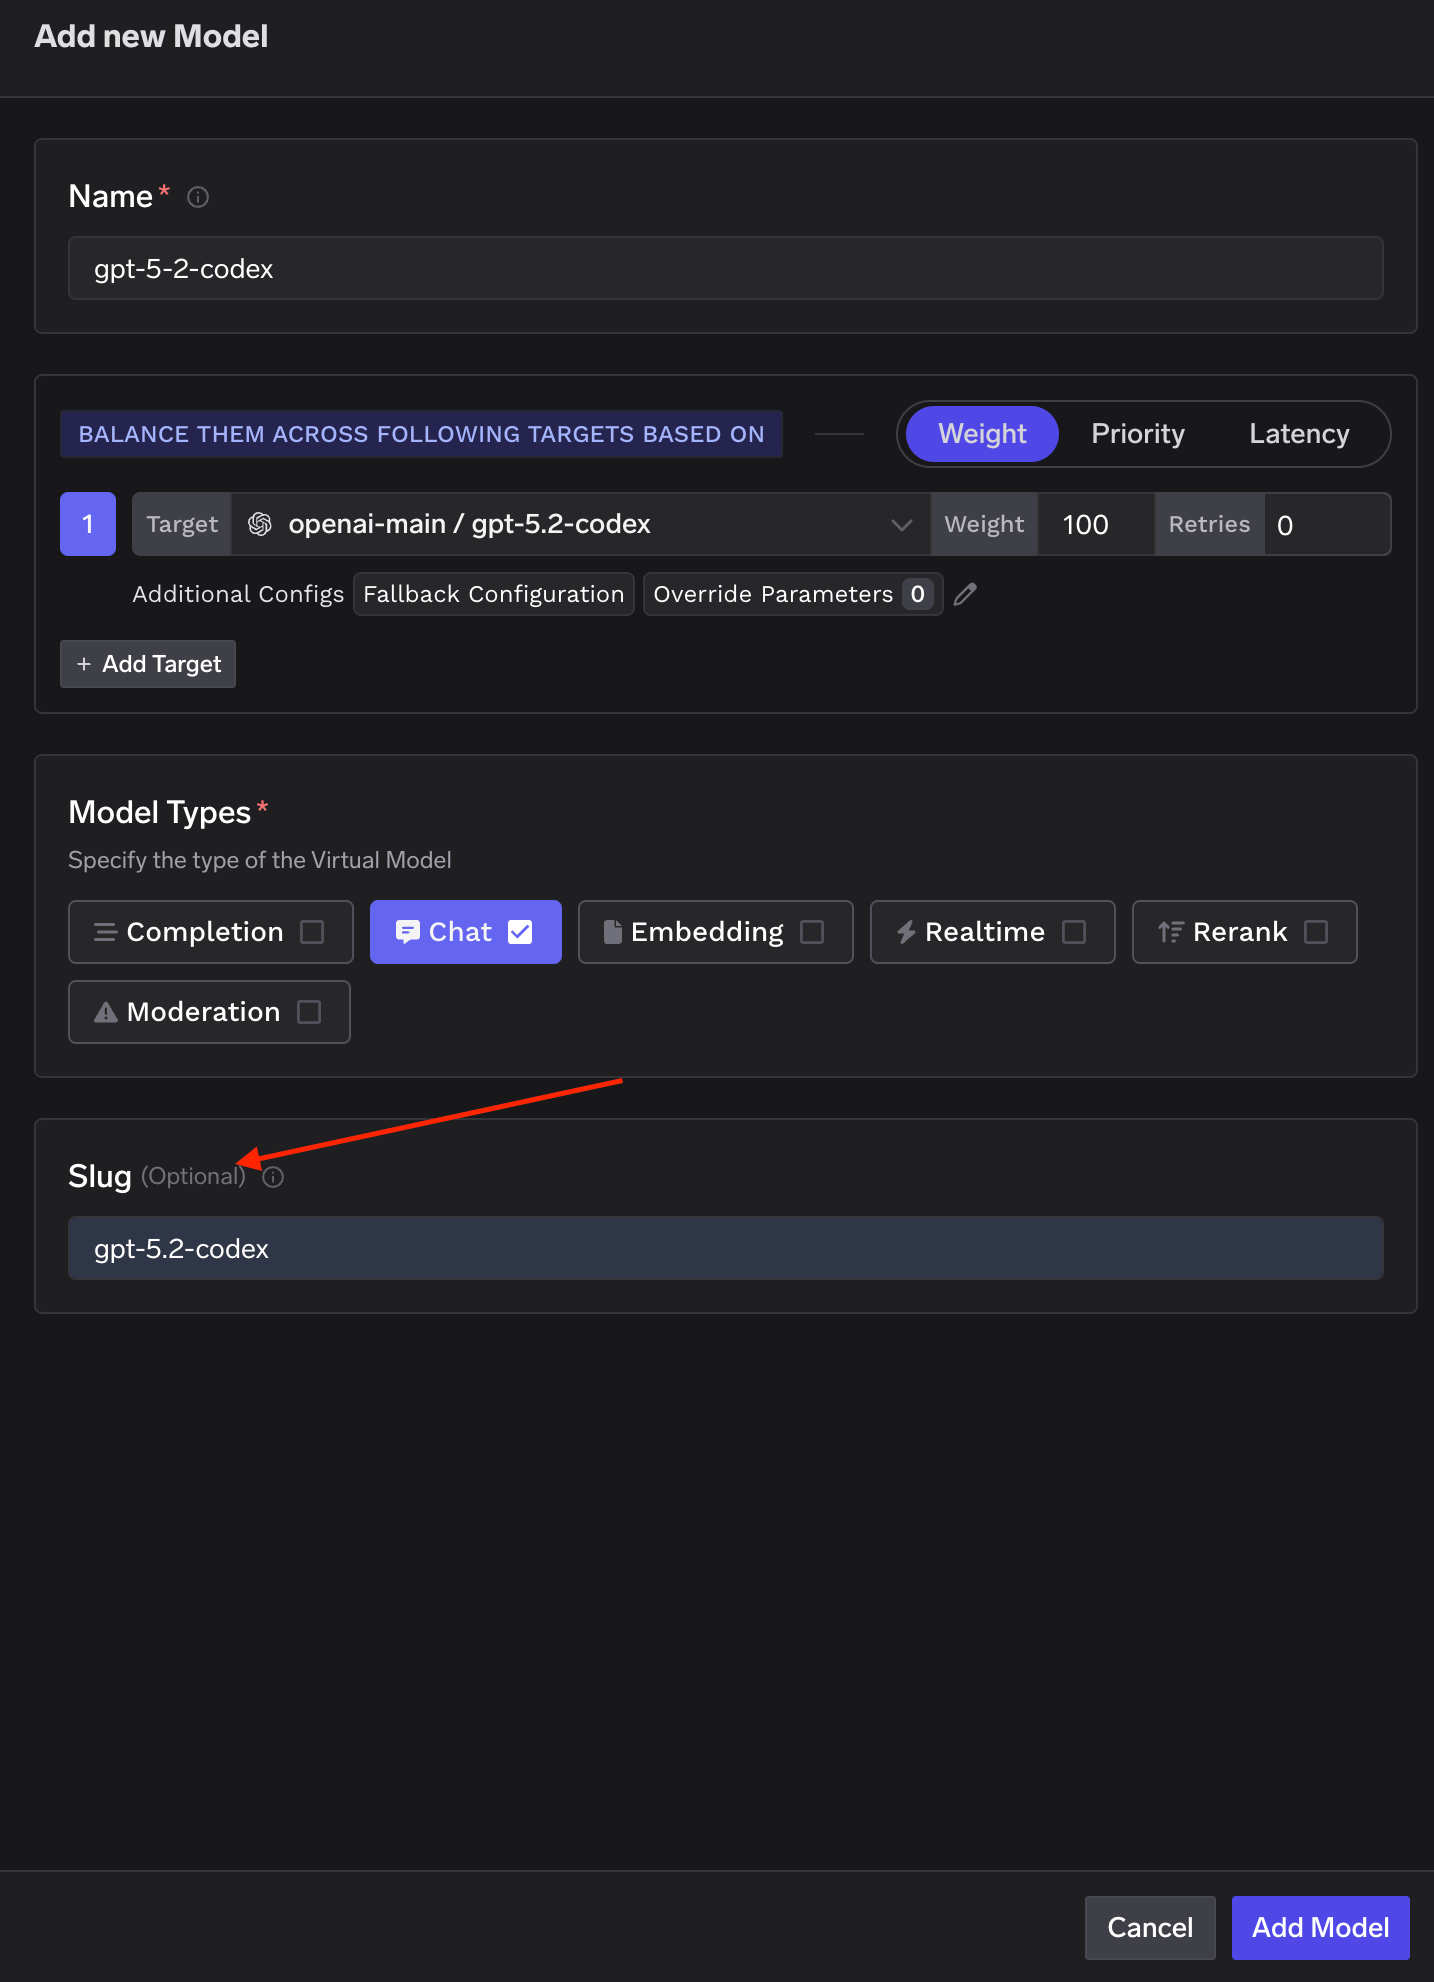
2. **Create a new Virtual Model** and add a **Slug**. This slug is the name you will use in Codex (e.g. `gpt-5.2-codex` or `gpt-5`).
Use a slug that matches the **actual model ID** (e.g. `gpt-5.2-codex` for GPT-5.2-Codex). Codex recognizes these IDs and enables the right features (e.g. thinking tokens)
3. **Set the target** to the fully qualified model name (e.g. `openai-main/gpt-5.2-codex`). You can use one target at 100% weight or add multiple targets with weights for load balancing.
### 2. Create a Virtual Model
Create a Virtual Model so Codex can use a simple model name that the Gateway maps to your provider. Follow these steps:
1. **Open the Virtual Model / Routing page** in the TrueFoundry AI Gateway dashboard
2. **Create a new Virtual Model** and add a **Slug**. This slug is the name you will use in Codex (e.g. `gpt-5.2-codex` or `gpt-5`).
Use a slug that matches the **actual model ID** (e.g. `gpt-5.2-codex` for GPT-5.2-Codex). Codex recognizes these IDs and enables the right features (e.g. thinking tokens)
3. **Set the target** to the fully qualified model name (e.g. `openai-main/gpt-5.2-codex`). You can use one target at 100% weight or add multiple targets with weights for load balancing.
 **Example:** If your slug is `gpt-5.2-codex` and the target is `openai-main/gpt-5.2-codex` at 100% weight, then when you run `codex chat --model gpt-5.2-codex`, the Gateway routes that request to `openai-main/gpt-5.2-codex`.
Use the slug as the model name in Codex (e.g. `--model gpt-5.2-codex`). Do not use the fully qualified name (e.g. `openai-main/gpt-5.2-codex`) in Codex; that can break thinking tokens and other behavior.
## Usage Examples
Use the **virtual model slug** you created (e.g. `gpt-5.2-codex` or `gpt-5`) with the `--model` flag so requests go through the TrueFoundry Gateway.
### Basic usage
```bash lines theme={"dark"}
# Chat using your virtual model slug
codex chat --model gpt-5.2-codex "Generate a Python function to calculate the Fibonacci sequence"
codex chat --model gpt-5.2-codex "Explain quantum computing in simple terms"
# With streaming
codex chat --model gpt-5.2-codex --stream "Write a short story about AI"
```
### With options
```bash lines theme={"dark"}
codex chat --model gpt-5.2-codex --temperature 0.7 "Generate creative marketing slogans"
codex chat --model gpt-5.2-codex --max-tokens 500 "Write a detailed explanation of relativity"
# Piping through Codex
cat input.txt | codex chat --model gpt-5.2-codex "Translate to French" | codex chat --model gpt-5.2-codex "Make this more formal"
```
Replace `gpt-5.2-codex` with whatever slug you set in your Virtual Model.
## Understanding Virtual Model Routing
When you use `--model `, the Gateway routes the request according to that Virtual Model’s targets. With a single target at 100% weight, all traffic goes to that model.
You can also add **multiple targets with weights** in the Virtual Model (e.g. 70% to one provider, 30% to another). Example:
```yaml lines theme={"dark"}
load_balance_targets:
- target: openai-main/gpt-5
weight: 70
- target: azure-openai/gpt-5
weight: 30
```
Then about 70% of requests go to the first provider and 30% to the second.
**Example:** If your slug is `gpt-5.2-codex` and the target is `openai-main/gpt-5.2-codex` at 100% weight, then when you run `codex chat --model gpt-5.2-codex`, the Gateway routes that request to `openai-main/gpt-5.2-codex`.
Use the slug as the model name in Codex (e.g. `--model gpt-5.2-codex`). Do not use the fully qualified name (e.g. `openai-main/gpt-5.2-codex`) in Codex; that can break thinking tokens and other behavior.
## Usage Examples
Use the **virtual model slug** you created (e.g. `gpt-5.2-codex` or `gpt-5`) with the `--model` flag so requests go through the TrueFoundry Gateway.
### Basic usage
```bash lines theme={"dark"}
# Chat using your virtual model slug
codex chat --model gpt-5.2-codex "Generate a Python function to calculate the Fibonacci sequence"
codex chat --model gpt-5.2-codex "Explain quantum computing in simple terms"
# With streaming
codex chat --model gpt-5.2-codex --stream "Write a short story about AI"
```
### With options
```bash lines theme={"dark"}
codex chat --model gpt-5.2-codex --temperature 0.7 "Generate creative marketing slogans"
codex chat --model gpt-5.2-codex --max-tokens 500 "Write a detailed explanation of relativity"
# Piping through Codex
cat input.txt | codex chat --model gpt-5.2-codex "Translate to French" | codex chat --model gpt-5.2-codex "Make this more formal"
```
Replace `gpt-5.2-codex` with whatever slug you set in your Virtual Model.
## Understanding Virtual Model Routing
When you use `--model `, the Gateway routes the request according to that Virtual Model’s targets. With a single target at 100% weight, all traffic goes to that model.
You can also add **multiple targets with weights** in the Virtual Model (e.g. 70% to one provider, 30% to another). Example:
```yaml lines theme={"dark"}
load_balance_targets:
- target: openai-main/gpt-5
weight: 70
- target: azure-openai/gpt-5
weight: 30
```
Then about 70% of requests go to the first provider and 30% to the second.