> ## Documentation Index
> Fetch the complete documentation index at: https://www.truefoundry.com/llms.txt
> Use this file to discover all available pages before exploring further.
# Create an OAuth MCP Server with Azure Entra ID
> Learn how to create and deploy an OAuth2-authenticated MCP server using Azure Entra ID and fastMCP, then integrate it with TrueFoundry AI Gateway.
This guide demonstrates how to write a MCP server, add OAuth based authentication to it using Azure Entra ID (formerly Azure AD) as the identity provider and then integrate it with the Truefoundry gateway. The setup below explains both the user authentication and machine-to-machine authentication scenarios:
* **User Authentication**: Authenticate specific users through the AI Gateway using the Authorization Code flow with refresh tokens
* **Machine-to-Machine Authentication**: Enable programmatic access without user interaction using the Client Credentials grant flow
The entire code for the steps described below can be found in this Github link: [https://github.com/truefoundry/getting-started-examples/tree/main/calculator-oauth-mcp-server](https://github.com/truefoundry/getting-started-examples/tree/main/calculator-oauth-mcp-server)
## Guide to creating the MCP server and adding OAuth
Let's start by writing a basic MCP server that provides a `get_me` tool.
```python server.py expandable lines theme={"dark"}
from fastmcp import FastMCP
mcp = FastMCP("Demo 🚀")
@mcp.tool
def add(a: int, b: int) -> int:
"""Add two numbers"""
return a + b
@mcp.tool
def subtract(a: int, b: int) -> int:
"""Subtract two numbers"""
return a - b
if __name__ == "__main__":
mcp.run(transport="streamable-http", stateless_http=True)
```
Run the server locally:
```bash theme={"dark"}
python server.py
```
Your MCP server will be available at `http://localhost:8000/mcp`. Test the server using this Python script:
```python test.py theme={"dark"}
import asyncio
from fastmcp import Client
async def main():
async with Client("http://127.0.0.1:8000/mcp") as client:
tools = await client.list_tools()
print(tools)
result = await client.call_tool(
name="add",
arguments={"a": 1, "b": 2}
)
print(result)
asyncio.run(main())
```
This MCP server is running without any authentication. We want to enable OAuth authentication on the MCP server. To enable OAuth, we will be creating an Azure App Registration in the next step which will be used to authenticate users and applications.
This app registration represents your MCP server as a protected resource. It will define what permissions (scopes) are available for your API.
1. Navigate to **Azure Portal** > **Microsoft Entra ID** > **App registrations**
2. Click **New registration**
3. Configure:
* **Name**: `CalculatorMCPServer`
* **Supported account types**: Choose based on your needs (typically "Accounts in this organizational directory only")
* **Redirect URI**: Leave empty for now (this is the API, not the client)
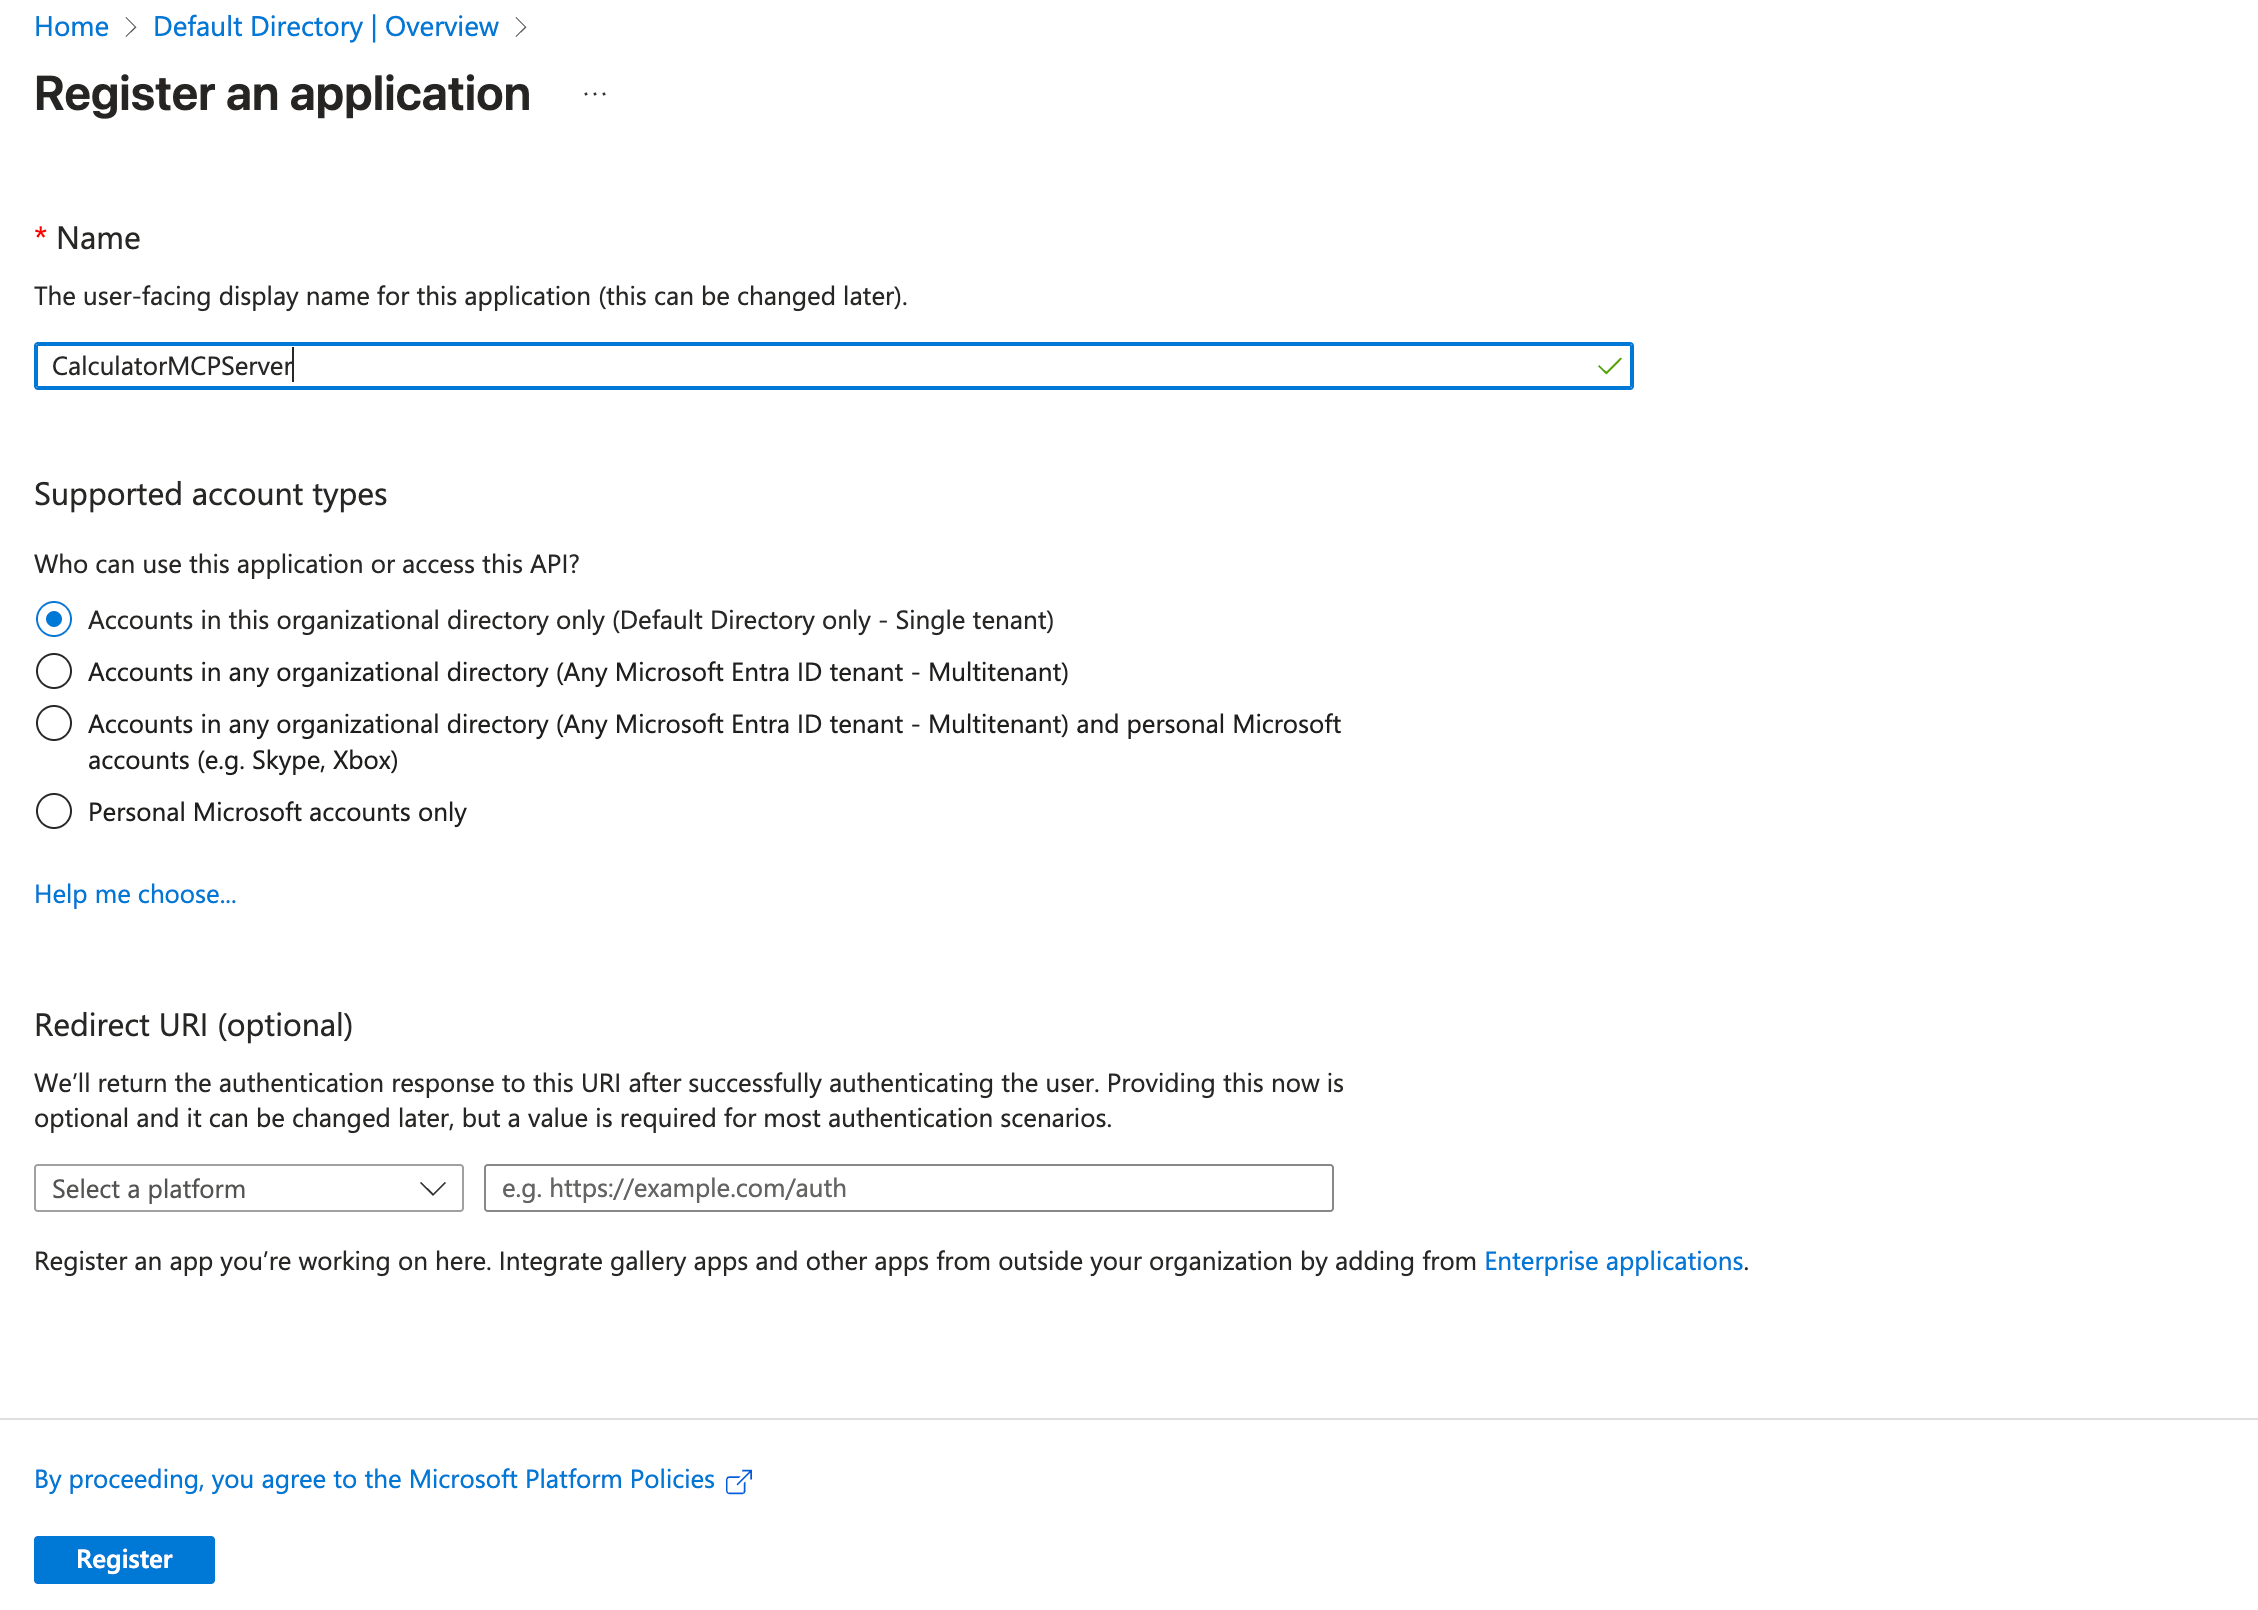 4. Click **Register**
5. Note down the following from the **Overview** page:
* **Application (client) ID** - This will be used as part of your audience
* **Directory (tenant) ID** - Your Azure AD tenant ID
Now we'll configure the app registration to expose an API with custom scopes that clients can request.
1. In your **CalculatorMCPServer** app registration, go to **Expose an API**
2. Click **Add** next to **Application ID URI**
* Azure will suggest `api://{client-id}` - accept this or customize it
* This URI becomes your **audience** value
4. Click **Register**
5. Note down the following from the **Overview** page:
* **Application (client) ID** - This will be used as part of your audience
* **Directory (tenant) ID** - Your Azure AD tenant ID
Now we'll configure the app registration to expose an API with custom scopes that clients can request.
1. In your **CalculatorMCPServer** app registration, go to **Expose an API**
2. Click **Add** next to **Application ID URI**
* Azure will suggest `api://{client-id}` - accept this or customize it
* This URI becomes your **audience** value
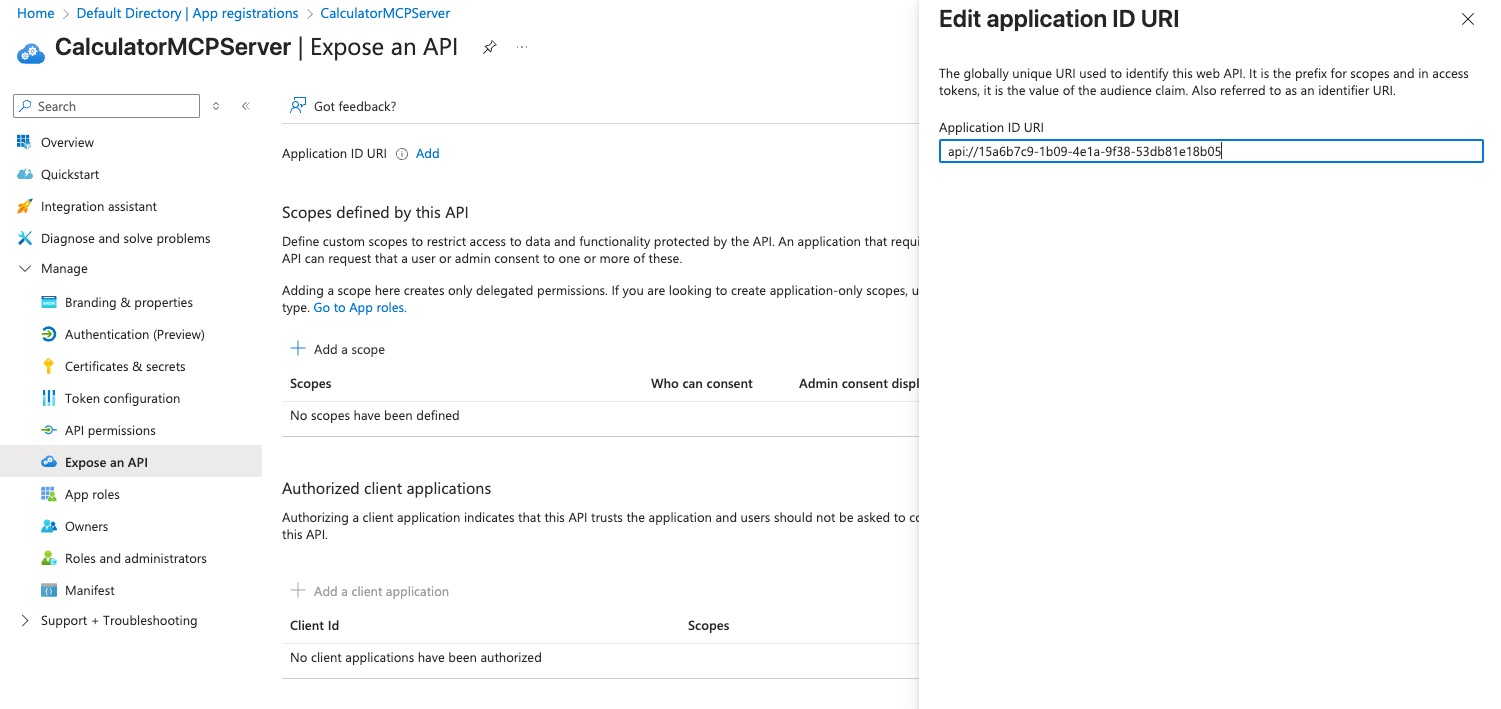 3. Click **Add a scope** to create custom scopes:
* **Scope name**: `calculator.add`
* **Who can consent**: Admins and users
* **Admin consent display name**: Add numbers
* **Admin consent description**: Allows the application to add numbers
* **User consent display name**: Add numbers
* **User consent description**: Allows the application to add numbers on your behalf
* **State**: Enabled
3. Click **Add a scope** to create custom scopes:
* **Scope name**: `calculator.add`
* **Who can consent**: Admins and users
* **Admin consent display name**: Add numbers
* **Admin consent description**: Allows the application to add numbers
* **User consent display name**: Add numbers
* **User consent description**: Allows the application to add numbers on your behalf
* **State**: Enabled
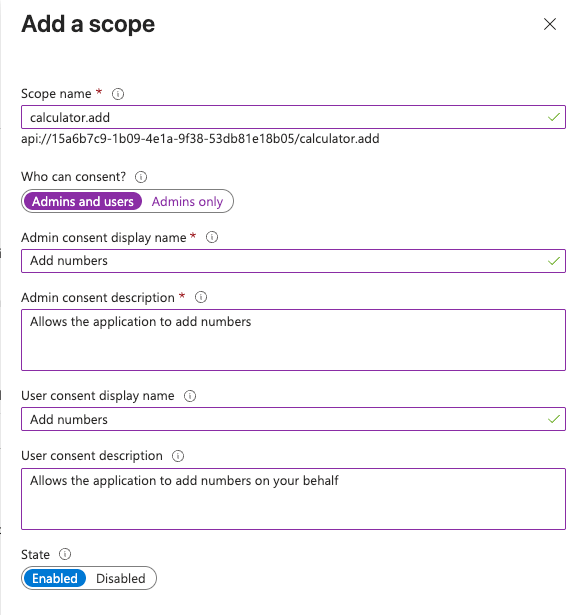 4. Click **Add scope**
5. Repeat to add another scope:
* **Scope name**: `calculator.subtract`
* Configure similar display names and descriptions
4. Click **Add scope**
5. Repeat to add another scope:
* **Scope name**: `calculator.subtract`
* Configure similar display names and descriptions
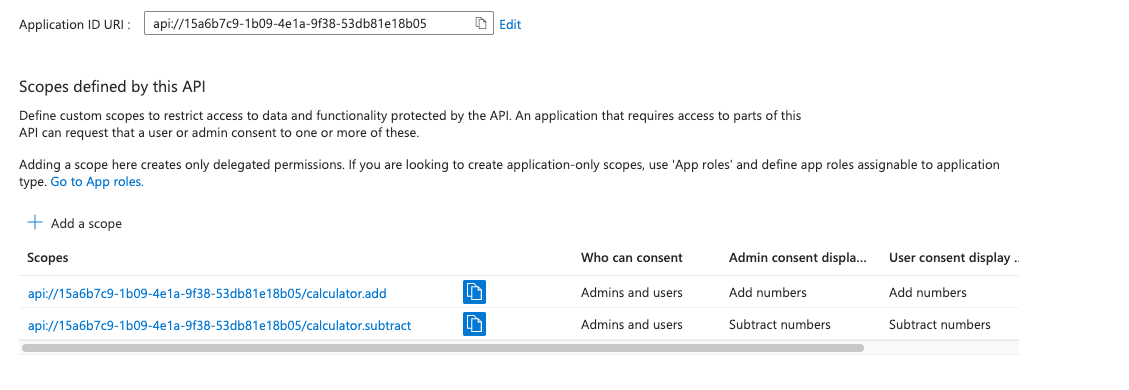 Your full scope names will be in the format: `api://{client-id}/calculator.add` and `api://{client-id}/calculator.subtract`
This app registration represents the client application (user-facing or machine-to-machine) that will access your MCP server.
1. Navigate to **App registrations** > **New registration**
2. Configure:
* **Name**: `CalculatorMCPClient`
* **Supported account types**: Same as your API app
* **Redirect URI**:
* Platform: **Web**
* URI: `https:///api/svc/v1/llm-gateway/mcp-servers/oauth2/callback`
3. Click **Register**
4. Note the **Application (client) ID** - this is your OAuth **Client ID**
5. Go to **Certificates & secrets**
6. Click **New client secret**
* **Description**: `MCP Client Secret`
* **Expires**: Choose based on your security requirements
Your full scope names will be in the format: `api://{client-id}/calculator.add` and `api://{client-id}/calculator.subtract`
This app registration represents the client application (user-facing or machine-to-machine) that will access your MCP server.
1. Navigate to **App registrations** > **New registration**
2. Configure:
* **Name**: `CalculatorMCPClient`
* **Supported account types**: Same as your API app
* **Redirect URI**:
* Platform: **Web**
* URI: `https:///api/svc/v1/llm-gateway/mcp-servers/oauth2/callback`
3. Click **Register**
4. Note the **Application (client) ID** - this is your OAuth **Client ID**
5. Go to **Certificates & secrets**
6. Click **New client secret**
* **Description**: `MCP Client Secret`
* **Expires**: Choose based on your security requirements
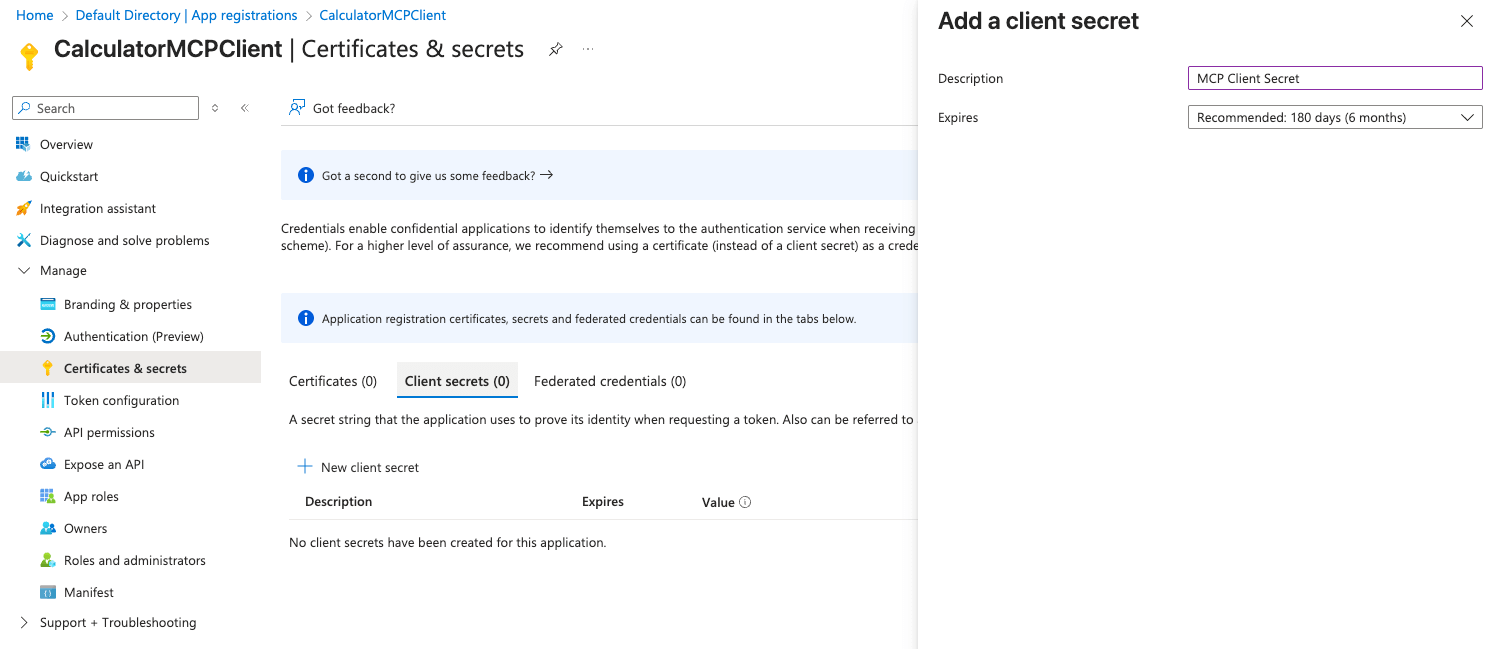 7. Click **Add**
8. **Important**: Copy the **Value** immediately - this is your **Client Secret** (it won't be shown again)
Store the client secret securely. It cannot be retrieved after you leave this page.
9. Go to **Authentication**
10. Under **Implicit grant and hybrid flows**, ensure:
* **Access tokens** is checked (for user auth)
* **ID tokens** is checked (for user auth)
11. Under **Advanced settings** > **Allow public client flows**: Set to **No**
The client app needs permission to access the MCP server API. We'll grant the scopes we defined earlier.
1. In your **CalculatorMCPClient** app registration, go to **API permissions**
2. Click **Add a permission**
3. Go to **My APIs** tab
4. Select **CalculatorMCPServer**
7. Click **Add**
8. **Important**: Copy the **Value** immediately - this is your **Client Secret** (it won't be shown again)
Store the client secret securely. It cannot be retrieved after you leave this page.
9. Go to **Authentication**
10. Under **Implicit grant and hybrid flows**, ensure:
* **Access tokens** is checked (for user auth)
* **ID tokens** is checked (for user auth)
11. Under **Advanced settings** > **Allow public client flows**: Set to **No**
The client app needs permission to access the MCP server API. We'll grant the scopes we defined earlier.
1. In your **CalculatorMCPClient** app registration, go to **API permissions**
2. Click **Add a permission**
3. Go to **My APIs** tab
4. Select **CalculatorMCPServer**
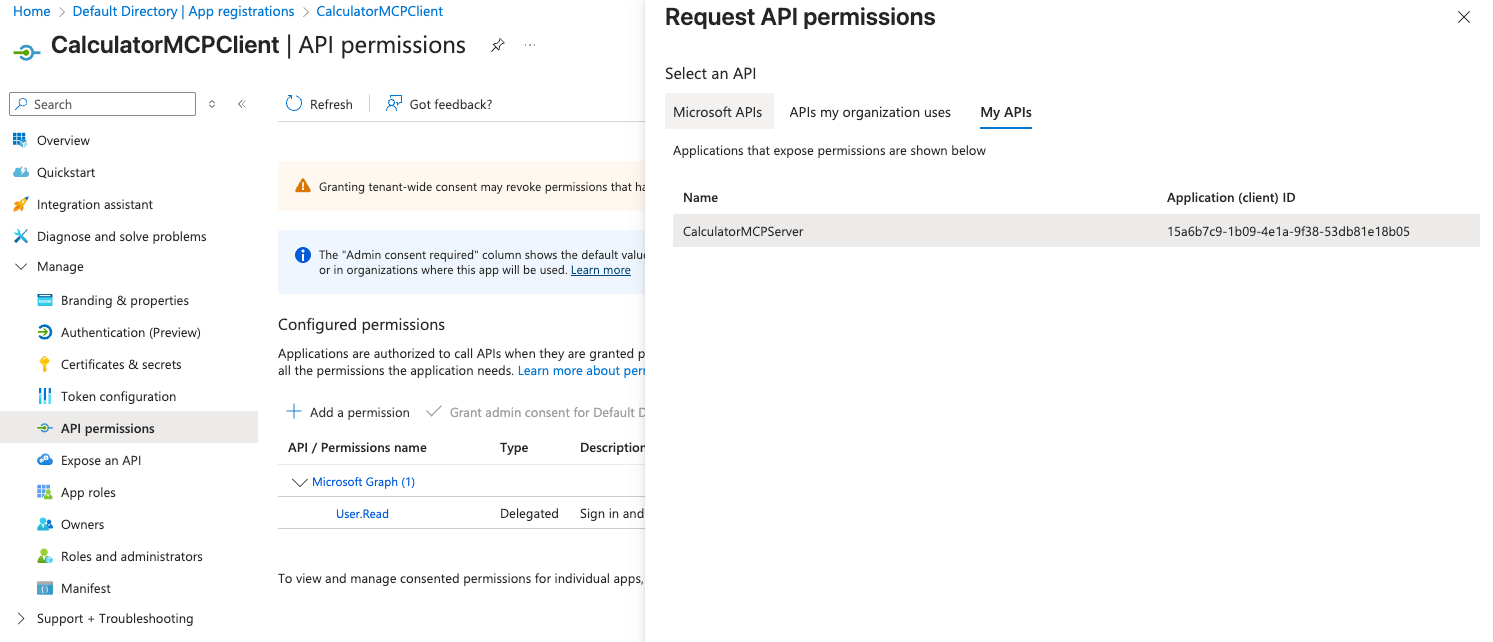 5. Select **Delegated permissions** (for user authentication)
6. Check:
* `calculator.add`
* `calculator.subtract`
**Screenshot placeholder: Select permissions dialog**
7. Click **Add permissions**
8. For machine-to-machine authentication, click **Add a permission** again
9. Select **CalculatorMCPServer** from **My APIs**
10. Select **Application permissions**
11. Check the same scopes:
* `calculator.add`
* `calculator.subtract`
12. Click **Add permissions**
13. Confirm by clicking **Yes**
5. Select **Delegated permissions** (for user authentication)
6. Check:
* `calculator.add`
* `calculator.subtract`
**Screenshot placeholder: Select permissions dialog**
7. Click **Add permissions**
8. For machine-to-machine authentication, click **Add a permission** again
9. Select **CalculatorMCPServer** from **My APIs**
10. Select **Application permissions**
11. Check the same scopes:
* `calculator.add`
* `calculator.subtract`
12. Click **Add permissions**
13. Confirm by clicking **Yes**
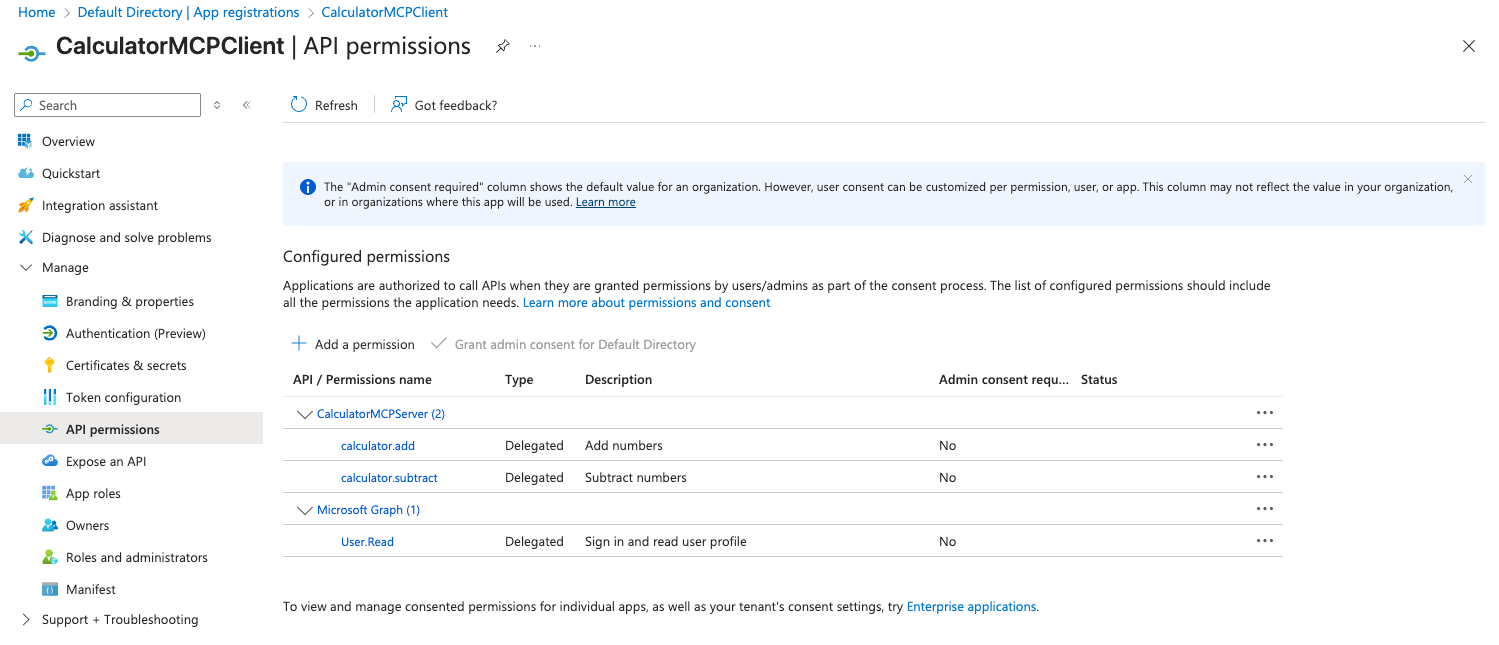 "Grant admin consent" is required for the application permissions to work. Delegated permissions can work with or without admin consent depending on your tenant settings.
Gather all the configuration values needed for your MCP server and client applications.
From your Azure tenant and app registrations, collect:
| Variable | Example Value | Where to Find |
| ------------------- | -------------------------------------- | -------------------------------------------------------- |
| **TENANT\_ID** | `12345678-1234-1234-1234-123456789abc` | App Registration > Overview |
| **OAUTH\_AUDIENCE** | `9876543-5678-5678-5678-987654321def` | CalculatorMCPServer > Overview > Application (client) ID |
| **CLIENT\_ID** | `abcdef12-3456-7890-abcd-ef1234567890` | CalculatorMCPClient > Overview > Application (client) ID |
| **CLIENT\_SECRET** | `secret_value_here` | CalculatorMCPClient > Certificates & secrets |
**Important**: The `OAUTH_AUDIENCE` should be just the Application (client) ID of your **CalculatorMCPServer** (the API), NOT the full `api://` URI. Azure tokens contain only the client ID in the `aud` claim.
Example: Use `15a6b7c9-1b09-4e1a-9f38-53db81e18b05` instead of `api://15a6b7c9-1b09-4e1a-9f38-53db81e18b05`
From these values, construct:
**OAUTH\_ISSUER**: `https://login.microsoftonline.com/{TENANT_ID}/v2.0`
**OAUTH\_WELL\_KNOWN\_URL**: `https://login.microsoftonline.com/{TENANT_ID}/v2.0/.well-known/openid-configuration`
**OAUTH\_JWKS\_URI**: Access the well-known URL and find the `jwks_uri` value (typically: `https://login.microsoftonline.com/{TENANT_ID}/discovery/v2.0/keys`)
**TOKEN\_ENDPOINT**: `https://login.microsoftonline.com/{TENANT_ID}/oauth2/v2.0/token`
**CUSTOM\_SCOPES** (for Gateway configuration):
* `api://{API_CLIENT_ID}/calculator.add`
* `api://{API_CLIENT_ID}/calculator.subtract`
* `offline_access`
These custom scopes won't appear in Azure's well-known endpoint. You'll need to manually enter them when configuring the MCP server in the TrueFoundry Gateway.
Store these securely - you'll use them in subsequent steps.
Create a .env file to add the environment variables and modify the server.py file to add the JWT verification.
```python server.py highlight={6-22} theme={"dark"}
from fastmcp import FastMCP
import os
from fastmcp.server.auth.providers.jwt import JWTVerifier
from dotenv import load_dotenv
from starlette.requests import Request
from starlette.responses import RedirectResponse
load_dotenv()
# Configure JWT verification using JWKS
token_verifier = JWTVerifier(
jwks_uri=os.getenv("OAUTH_JWKS_URI"),
issuer=os.getenv("OAUTH_ISSUER"),
audience=os.getenv("OAUTH_AUDIENCE"),
)
# Bearer token authentication
mcp = FastMCP("Demo 🚀", auth=token_verifier)
# Forward .well-known/oauth-authorization-server to Azure's OpenID configuration
@mcp.custom_route("/.well-known/oauth-authorization-server", methods=["GET", "HEAD", "OPTIONS"], include_in_schema=False)
async def oauth_well_known(request: Request):
"""Redirect to Azure's OpenID configuration endpoint."""
return RedirectResponse(os.environ.get("OAUTH_ISSUER") + "/.well-known/openid-configuration", status_code=307)
@mcp.tool
def add(a: int, b: int) -> int:
"""Add two numbers"""
return a + b
@mcp.tool
def subtract(a: int, b: int) -> int:
"""Subtract two numbers"""
return a - b
if __name__ == "__main__":
mcp.run(transport="streamable-http", host="0.0.0.0", port=8000, stateless_http=True)
```
```yaml .env theme={"dark"}
OAUTH_JWKS_URI=https://login.microsoftonline.com/{TENANT_ID}/discovery/v2.0/keys
OAUTH_ISSUER=https://login.microsoftonline.com/{TENANT_ID}/v2.0
OAUTH_AUDIENCE={API_CLIENT_ID}
```
Replace `{TENANT_ID}` with your Azure tenant ID and `{API_CLIENT_ID}` with the Application ID of your CalculatorMCPServer app registration.
**Important**: The audience should be just the client ID (e.g., `15a6b7c9-1b09-4e1a-9f38-53db81e18b05`), not the full `api://` URI. Azure tokens contain only the client ID in the `aud` claim.
In Step 1, we had a script to test the MCP server locally. After adding the OAuth token verification to the MCP server in the previous step, we need to modify the script to get the token and then call the MCP server. If you call the MCP server without a token, it will return a 401 Unauthorized error.
```python test.py theme={"dark"}
import asyncio
from fastmcp import Client
import requests
# Configuration
TENANT_ID = "12345678-1234-1234-1234-123456789abc"
TOKEN_ENDPOINT = f"https://login.microsoftonline.com/{TENANT_ID}/oauth2/v2.0/token"
CLIENT_ID = "abcdef12-3456-7890-abcd-ef1234567890"
CLIENT_SECRET = "your-client-secret"
SCOPE = "api://9876543-5678-5678-5678-987654321def/.default" # Note: .default for client credentials
# Request token
response = requests.post(
TOKEN_ENDPOINT,
data={
"grant_type": "client_credentials",
"client_id": CLIENT_ID,
"client_secret": CLIENT_SECRET,
"scope": SCOPE
}
)
print(response.json())
response.raise_for_status()
token_data = response.json()
access_token = token_data["access_token"]
print(f"Access Token: {access_token}")
print(f"Expires in: {token_data['expires_in']} seconds")
# Call the MCP server
async def main():
async with Client("http://localhost:8000/mcp", auth=access_token) as client:
tools = await client.list_tools()
print(tools)
result = await client.call_tool(
name="add",
arguments={"a": 1, "b": 2}
)
print(result)
asyncio.run(main())
```
For client credentials flow with Azure Entra ID, use the scope format `api://{client-id}/.default` to request all application permissions. The token will contain the short scope names (e.g., `calculator.add calculator.subtract`) in the `scp` claim, but you request them using the `.default` suffix.
This is exactly how you will be doing Machine-to-Machine authentication to the MCP server. Code snippets to get the token in different ways are outlined below:
```bash theme={"dark"}
# Set your values
TENANT_ID="12345678-1234-1234-1234-123456789abc"
TOKEN_ENDPOINT="https://login.microsoftonline.com/${TENANT_ID}/oauth2/v2.0/token"
CLIENT_ID="abcdef12-3456-7890-abcd-ef1234567890"
CLIENT_SECRET="your-client-secret"
SCOPE="api://9876543-5678-5678-5678-987654321def/.default"
# Request access token
curl -X POST "${TOKEN_ENDPOINT}" \
-H "Content-Type: application/x-www-form-urlencoded" \
-d "grant_type=client_credentials" \
-d "client_id=${CLIENT_ID}" \
-d "client_secret=${CLIENT_SECRET}" \
-d "scope=${SCOPE}"
```
Response:
```json theme={"dark"}
{
"token_type": "Bearer",
"expires_in": 3599,
"ext_expires_in": 3599,
"access_token": "eyJ0eXAiOiJKV1QiLCJhbGc..."
}
```
Azure Entra ID uses `scope` parameter (not `audience`) and requires the `.default` suffix for client credentials flow.
```python theme={"dark"}
import requests
# Configuration
TENANT_ID = "12345678-1234-1234-1234-123456789abc"
TOKEN_ENDPOINT = f"https://login.microsoftonline.com/{TENANT_ID}/oauth2/v2.0/token"
CLIENT_ID = "abcdef12-3456-7890-abcd-ef1234567890"
CLIENT_SECRET = "your-client-secret"
SCOPE = "api://9876543-5678-5678-5678-987654321def/.default"
# Request token
response = requests.post(
TOKEN_ENDPOINT,
data={
"grant_type": "client_credentials",
"client_id": CLIENT_ID,
"client_secret": CLIENT_SECRET,
"scope": SCOPE
}
)
response.raise_for_status()
token_data = response.json()
access_token = token_data["access_token"]
print(f"Access Token: {access_token}")
print(f"Expires in: {token_data['expires_in']} seconds")
```
```python theme={"dark"}
from msal import ConfidentialClientApplication
# Configuration
TENANT_ID = "12345678-1234-1234-1234-123456789abc"
CLIENT_ID = "abcdef12-3456-7890-abcd-ef1234567890"
CLIENT_SECRET = "your-client-secret"
AUTHORITY = f"https://login.microsoftonline.com/{TENANT_ID}"
SCOPE = ["api://9876543-5678-5678-5678-987654321def/.default"]
# Create MSAL app
app = ConfidentialClientApplication(
CLIENT_ID,
authority=AUTHORITY,
client_credential=CLIENT_SECRET
)
# Acquire token
result = app.acquire_token_for_client(scopes=SCOPE)
if "access_token" in result:
access_token = result["access_token"]
print(f"Access Token: {access_token}")
print(f"Expires in: {result['expires_in']} seconds")
else:
print(f"Error: {result.get('error')}")
print(f"Description: {result.get('error_description')}")
```
Now that we have tested the MCP server locally, we will add it to the Gateway to enable user authentication and allow the MCP server to be accessed via the Gateway.
To add the MCP server to the Gateway, we need to get the endpoint URL of the MCP server. Hence, we need to host the MCP server on a public URL.
If you are using the Truefoundry AI Deployment product, this can be done by creating a service deployment, choosing your Github repository containing the MCP server code above. Otherwise, you can host it on a VM or a Kubernetes cluster or any hosting provider of your choice.
Remember to add the environment variables for the MCP server:
| Variable | Value | Description |
| ---------------- | ------------------------------------------------------------------- | --------------------------------------------------------- |
| `OAUTH_JWKS_URI` | `https://login.microsoftonline.com/{TENANT_ID}/discovery/v2.0/keys` | JSON Web Key Set URI for token verification |
| `OAUTH_ISSUER` | `https://login.microsoftonline.com/{TENANT_ID}/v2.0` | Azure Entra ID issuer URI |
| `OAUTH_AUDIENCE` | `{API_CLIENT_ID}` | Application (client) ID of your CalculatorMCPServer (API) |
The MCP server only needs these environment variables to validate OAuth tokens. It doesn't need the Client ID or Client Secret since it's only validating tokens, not generating them.
After deployment, you will have the endpoint URL of the MCP server. Let's consider it `https://calculator-oauth-mcp-server.example.com` for the rest of the steps.
After deploying, check once using the test.py script above by changing the MCP server URL to the deployed URL. You should be able to fetch the tools from the MCP server.
You will need to have a MCP server group to be able to add the MCP server to the Truefoundry AI Gateway. Please refer to the [Getting Started](/docs/ai-gateway/mcp/mcp-server-getting-started) guide to create a MCP server group.
1. In your MCP Server Group, click **Add MCP Server**
2. Select **Remote MCP**
3. Configure the server:
* **Name**: `calculator-mcp-azure-oauth`
* **Description**: OAuth-authenticated MCP server with Azure Entra ID
* **URL**: Your deployed service endpoint (e.g., `https://calculator-oauth-mcp-server.example.com/mcp`)
* **Transport**: `streamable-http`
* **Authentication Type**: Select **OAuth2**
4. In the OAuth2 configuration section, provide the Azure credentials:
* **OAuth2 Client ID**: Your CalculatorMCPClient application client ID
* **OAuth2 Client Secret**: Your CalculatorMCPClient client secret
The AI Gateway will automatically discover the OAuth2 Authorization URL, Token URL, and other configuration details from your MCP server's `/.well-known/oauth-authorization-server` endpoint once you provide the MCP server URL.
**Important - Azure Custom Scopes**:
Azure's well-known endpoint only includes generic OpenID scopes (`openid`, `profile`, `email`, `offline_access`). You **must manually add your custom API scopes** in the OAuth2 configuration:
* **OAuth2 Scopes**: Manually enter your scopes in the format:
* `api://{API_CLIENT_ID}/calculator.add`
* `api://{API_CLIENT_ID}/calculator.subtract`
* `offline_access` (to enable automatic token refresh)
Replace `{API_CLIENT_ID}` with your **CalculatorMCPServer** Application (client) ID (e.g., `api://15a6b7c9-1b09-4e1a-9f38-53db81e18b05/calculator.add`).
You can also store the client id and secrets in truefoundry secrets and reference them by FQN in the configuration.
5. Set **access control**: Select teams or users who should have access to this MCP server
Managers of the MCP Server Group automatically have access to all servers in the group.
"Grant admin consent" is required for the application permissions to work. Delegated permissions can work with or without admin consent depending on your tenant settings.
Gather all the configuration values needed for your MCP server and client applications.
From your Azure tenant and app registrations, collect:
| Variable | Example Value | Where to Find |
| ------------------- | -------------------------------------- | -------------------------------------------------------- |
| **TENANT\_ID** | `12345678-1234-1234-1234-123456789abc` | App Registration > Overview |
| **OAUTH\_AUDIENCE** | `9876543-5678-5678-5678-987654321def` | CalculatorMCPServer > Overview > Application (client) ID |
| **CLIENT\_ID** | `abcdef12-3456-7890-abcd-ef1234567890` | CalculatorMCPClient > Overview > Application (client) ID |
| **CLIENT\_SECRET** | `secret_value_here` | CalculatorMCPClient > Certificates & secrets |
**Important**: The `OAUTH_AUDIENCE` should be just the Application (client) ID of your **CalculatorMCPServer** (the API), NOT the full `api://` URI. Azure tokens contain only the client ID in the `aud` claim.
Example: Use `15a6b7c9-1b09-4e1a-9f38-53db81e18b05` instead of `api://15a6b7c9-1b09-4e1a-9f38-53db81e18b05`
From these values, construct:
**OAUTH\_ISSUER**: `https://login.microsoftonline.com/{TENANT_ID}/v2.0`
**OAUTH\_WELL\_KNOWN\_URL**: `https://login.microsoftonline.com/{TENANT_ID}/v2.0/.well-known/openid-configuration`
**OAUTH\_JWKS\_URI**: Access the well-known URL and find the `jwks_uri` value (typically: `https://login.microsoftonline.com/{TENANT_ID}/discovery/v2.0/keys`)
**TOKEN\_ENDPOINT**: `https://login.microsoftonline.com/{TENANT_ID}/oauth2/v2.0/token`
**CUSTOM\_SCOPES** (for Gateway configuration):
* `api://{API_CLIENT_ID}/calculator.add`
* `api://{API_CLIENT_ID}/calculator.subtract`
* `offline_access`
These custom scopes won't appear in Azure's well-known endpoint. You'll need to manually enter them when configuring the MCP server in the TrueFoundry Gateway.
Store these securely - you'll use them in subsequent steps.
Create a .env file to add the environment variables and modify the server.py file to add the JWT verification.
```python server.py highlight={6-22} theme={"dark"}
from fastmcp import FastMCP
import os
from fastmcp.server.auth.providers.jwt import JWTVerifier
from dotenv import load_dotenv
from starlette.requests import Request
from starlette.responses import RedirectResponse
load_dotenv()
# Configure JWT verification using JWKS
token_verifier = JWTVerifier(
jwks_uri=os.getenv("OAUTH_JWKS_URI"),
issuer=os.getenv("OAUTH_ISSUER"),
audience=os.getenv("OAUTH_AUDIENCE"),
)
# Bearer token authentication
mcp = FastMCP("Demo 🚀", auth=token_verifier)
# Forward .well-known/oauth-authorization-server to Azure's OpenID configuration
@mcp.custom_route("/.well-known/oauth-authorization-server", methods=["GET", "HEAD", "OPTIONS"], include_in_schema=False)
async def oauth_well_known(request: Request):
"""Redirect to Azure's OpenID configuration endpoint."""
return RedirectResponse(os.environ.get("OAUTH_ISSUER") + "/.well-known/openid-configuration", status_code=307)
@mcp.tool
def add(a: int, b: int) -> int:
"""Add two numbers"""
return a + b
@mcp.tool
def subtract(a: int, b: int) -> int:
"""Subtract two numbers"""
return a - b
if __name__ == "__main__":
mcp.run(transport="streamable-http", host="0.0.0.0", port=8000, stateless_http=True)
```
```yaml .env theme={"dark"}
OAUTH_JWKS_URI=https://login.microsoftonline.com/{TENANT_ID}/discovery/v2.0/keys
OAUTH_ISSUER=https://login.microsoftonline.com/{TENANT_ID}/v2.0
OAUTH_AUDIENCE={API_CLIENT_ID}
```
Replace `{TENANT_ID}` with your Azure tenant ID and `{API_CLIENT_ID}` with the Application ID of your CalculatorMCPServer app registration.
**Important**: The audience should be just the client ID (e.g., `15a6b7c9-1b09-4e1a-9f38-53db81e18b05`), not the full `api://` URI. Azure tokens contain only the client ID in the `aud` claim.
In Step 1, we had a script to test the MCP server locally. After adding the OAuth token verification to the MCP server in the previous step, we need to modify the script to get the token and then call the MCP server. If you call the MCP server without a token, it will return a 401 Unauthorized error.
```python test.py theme={"dark"}
import asyncio
from fastmcp import Client
import requests
# Configuration
TENANT_ID = "12345678-1234-1234-1234-123456789abc"
TOKEN_ENDPOINT = f"https://login.microsoftonline.com/{TENANT_ID}/oauth2/v2.0/token"
CLIENT_ID = "abcdef12-3456-7890-abcd-ef1234567890"
CLIENT_SECRET = "your-client-secret"
SCOPE = "api://9876543-5678-5678-5678-987654321def/.default" # Note: .default for client credentials
# Request token
response = requests.post(
TOKEN_ENDPOINT,
data={
"grant_type": "client_credentials",
"client_id": CLIENT_ID,
"client_secret": CLIENT_SECRET,
"scope": SCOPE
}
)
print(response.json())
response.raise_for_status()
token_data = response.json()
access_token = token_data["access_token"]
print(f"Access Token: {access_token}")
print(f"Expires in: {token_data['expires_in']} seconds")
# Call the MCP server
async def main():
async with Client("http://localhost:8000/mcp", auth=access_token) as client:
tools = await client.list_tools()
print(tools)
result = await client.call_tool(
name="add",
arguments={"a": 1, "b": 2}
)
print(result)
asyncio.run(main())
```
For client credentials flow with Azure Entra ID, use the scope format `api://{client-id}/.default` to request all application permissions. The token will contain the short scope names (e.g., `calculator.add calculator.subtract`) in the `scp` claim, but you request them using the `.default` suffix.
This is exactly how you will be doing Machine-to-Machine authentication to the MCP server. Code snippets to get the token in different ways are outlined below:
```bash theme={"dark"}
# Set your values
TENANT_ID="12345678-1234-1234-1234-123456789abc"
TOKEN_ENDPOINT="https://login.microsoftonline.com/${TENANT_ID}/oauth2/v2.0/token"
CLIENT_ID="abcdef12-3456-7890-abcd-ef1234567890"
CLIENT_SECRET="your-client-secret"
SCOPE="api://9876543-5678-5678-5678-987654321def/.default"
# Request access token
curl -X POST "${TOKEN_ENDPOINT}" \
-H "Content-Type: application/x-www-form-urlencoded" \
-d "grant_type=client_credentials" \
-d "client_id=${CLIENT_ID}" \
-d "client_secret=${CLIENT_SECRET}" \
-d "scope=${SCOPE}"
```
Response:
```json theme={"dark"}
{
"token_type": "Bearer",
"expires_in": 3599,
"ext_expires_in": 3599,
"access_token": "eyJ0eXAiOiJKV1QiLCJhbGc..."
}
```
Azure Entra ID uses `scope` parameter (not `audience`) and requires the `.default` suffix for client credentials flow.
```python theme={"dark"}
import requests
# Configuration
TENANT_ID = "12345678-1234-1234-1234-123456789abc"
TOKEN_ENDPOINT = f"https://login.microsoftonline.com/{TENANT_ID}/oauth2/v2.0/token"
CLIENT_ID = "abcdef12-3456-7890-abcd-ef1234567890"
CLIENT_SECRET = "your-client-secret"
SCOPE = "api://9876543-5678-5678-5678-987654321def/.default"
# Request token
response = requests.post(
TOKEN_ENDPOINT,
data={
"grant_type": "client_credentials",
"client_id": CLIENT_ID,
"client_secret": CLIENT_SECRET,
"scope": SCOPE
}
)
response.raise_for_status()
token_data = response.json()
access_token = token_data["access_token"]
print(f"Access Token: {access_token}")
print(f"Expires in: {token_data['expires_in']} seconds")
```
```python theme={"dark"}
from msal import ConfidentialClientApplication
# Configuration
TENANT_ID = "12345678-1234-1234-1234-123456789abc"
CLIENT_ID = "abcdef12-3456-7890-abcd-ef1234567890"
CLIENT_SECRET = "your-client-secret"
AUTHORITY = f"https://login.microsoftonline.com/{TENANT_ID}"
SCOPE = ["api://9876543-5678-5678-5678-987654321def/.default"]
# Create MSAL app
app = ConfidentialClientApplication(
CLIENT_ID,
authority=AUTHORITY,
client_credential=CLIENT_SECRET
)
# Acquire token
result = app.acquire_token_for_client(scopes=SCOPE)
if "access_token" in result:
access_token = result["access_token"]
print(f"Access Token: {access_token}")
print(f"Expires in: {result['expires_in']} seconds")
else:
print(f"Error: {result.get('error')}")
print(f"Description: {result.get('error_description')}")
```
Now that we have tested the MCP server locally, we will add it to the Gateway to enable user authentication and allow the MCP server to be accessed via the Gateway.
To add the MCP server to the Gateway, we need to get the endpoint URL of the MCP server. Hence, we need to host the MCP server on a public URL.
If you are using the Truefoundry AI Deployment product, this can be done by creating a service deployment, choosing your Github repository containing the MCP server code above. Otherwise, you can host it on a VM or a Kubernetes cluster or any hosting provider of your choice.
Remember to add the environment variables for the MCP server:
| Variable | Value | Description |
| ---------------- | ------------------------------------------------------------------- | --------------------------------------------------------- |
| `OAUTH_JWKS_URI` | `https://login.microsoftonline.com/{TENANT_ID}/discovery/v2.0/keys` | JSON Web Key Set URI for token verification |
| `OAUTH_ISSUER` | `https://login.microsoftonline.com/{TENANT_ID}/v2.0` | Azure Entra ID issuer URI |
| `OAUTH_AUDIENCE` | `{API_CLIENT_ID}` | Application (client) ID of your CalculatorMCPServer (API) |
The MCP server only needs these environment variables to validate OAuth tokens. It doesn't need the Client ID or Client Secret since it's only validating tokens, not generating them.
After deployment, you will have the endpoint URL of the MCP server. Let's consider it `https://calculator-oauth-mcp-server.example.com` for the rest of the steps.
After deploying, check once using the test.py script above by changing the MCP server URL to the deployed URL. You should be able to fetch the tools from the MCP server.
You will need to have a MCP server group to be able to add the MCP server to the Truefoundry AI Gateway. Please refer to the [Getting Started](/docs/ai-gateway/mcp/mcp-server-getting-started) guide to create a MCP server group.
1. In your MCP Server Group, click **Add MCP Server**
2. Select **Remote MCP**
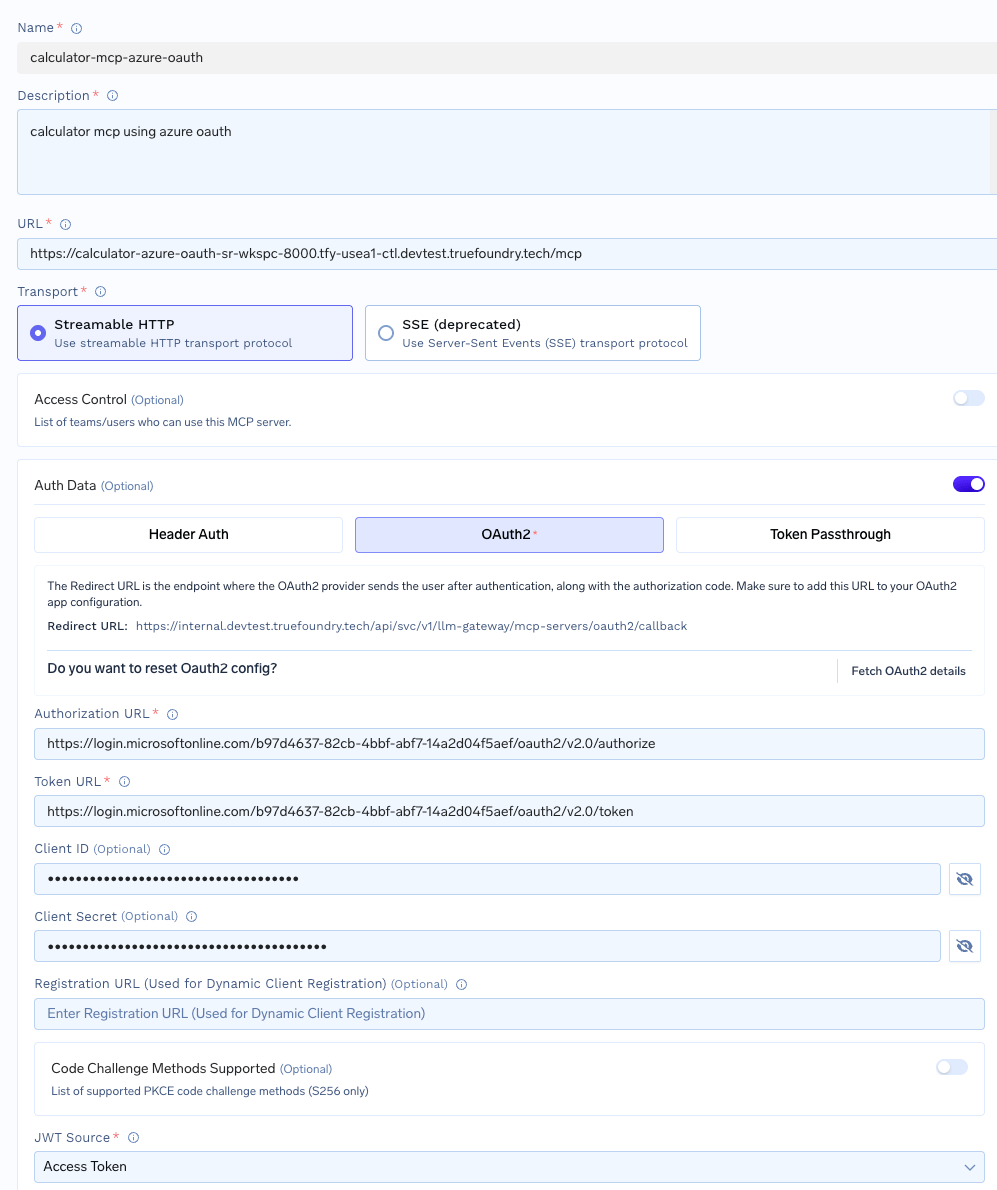
3. Configure the server:
* **Name**: `calculator-mcp-azure-oauth`
* **Description**: OAuth-authenticated MCP server with Azure Entra ID
* **URL**: Your deployed service endpoint (e.g., `https://calculator-oauth-mcp-server.example.com/mcp`)
* **Transport**: `streamable-http`
* **Authentication Type**: Select **OAuth2**
4. In the OAuth2 configuration section, provide the Azure credentials:
* **OAuth2 Client ID**: Your CalculatorMCPClient application client ID
* **OAuth2 Client Secret**: Your CalculatorMCPClient client secret
The AI Gateway will automatically discover the OAuth2 Authorization URL, Token URL, and other configuration details from your MCP server's `/.well-known/oauth-authorization-server` endpoint once you provide the MCP server URL.
**Important - Azure Custom Scopes**:
Azure's well-known endpoint only includes generic OpenID scopes (`openid`, `profile`, `email`, `offline_access`). You **must manually add your custom API scopes** in the OAuth2 configuration:
* **OAuth2 Scopes**: Manually enter your scopes in the format:
* `api://{API_CLIENT_ID}/calculator.add`
* `api://{API_CLIENT_ID}/calculator.subtract`
* `offline_access` (to enable automatic token refresh)
Replace `{API_CLIENT_ID}` with your **CalculatorMCPServer** Application (client) ID (e.g., `api://15a6b7c9-1b09-4e1a-9f38-53db81e18b05/calculator.add`).
You can also store the client id and secrets in truefoundry secrets and reference them by FQN in the configuration.
5. Set **access control**: Select teams or users who should have access to this MCP server
Managers of the MCP Server Group automatically have access to all servers in the group.
 6. Click **Save** to add the MCP server
* The server will appear in your MCP Server Group
* Users can now connect and use the server through the AI Gateway
1. Navigate to the **Playground** in the AI Gateway
2. Click **Add Tool/MCP Servers**
3. Find your `calculator-mcp-azure-oauth` in the list
4. Click **Connect Now** to initiate OAuth authorization
6. Click **Save** to add the MCP server
* The server will appear in your MCP Server Group
* Users can now connect and use the server through the AI Gateway
1. Navigate to the **Playground** in the AI Gateway
2. Click **Add Tool/MCP Servers**
3. Find your `calculator-mcp-azure-oauth` in the list
4. Click **Connect Now** to initiate OAuth authorization
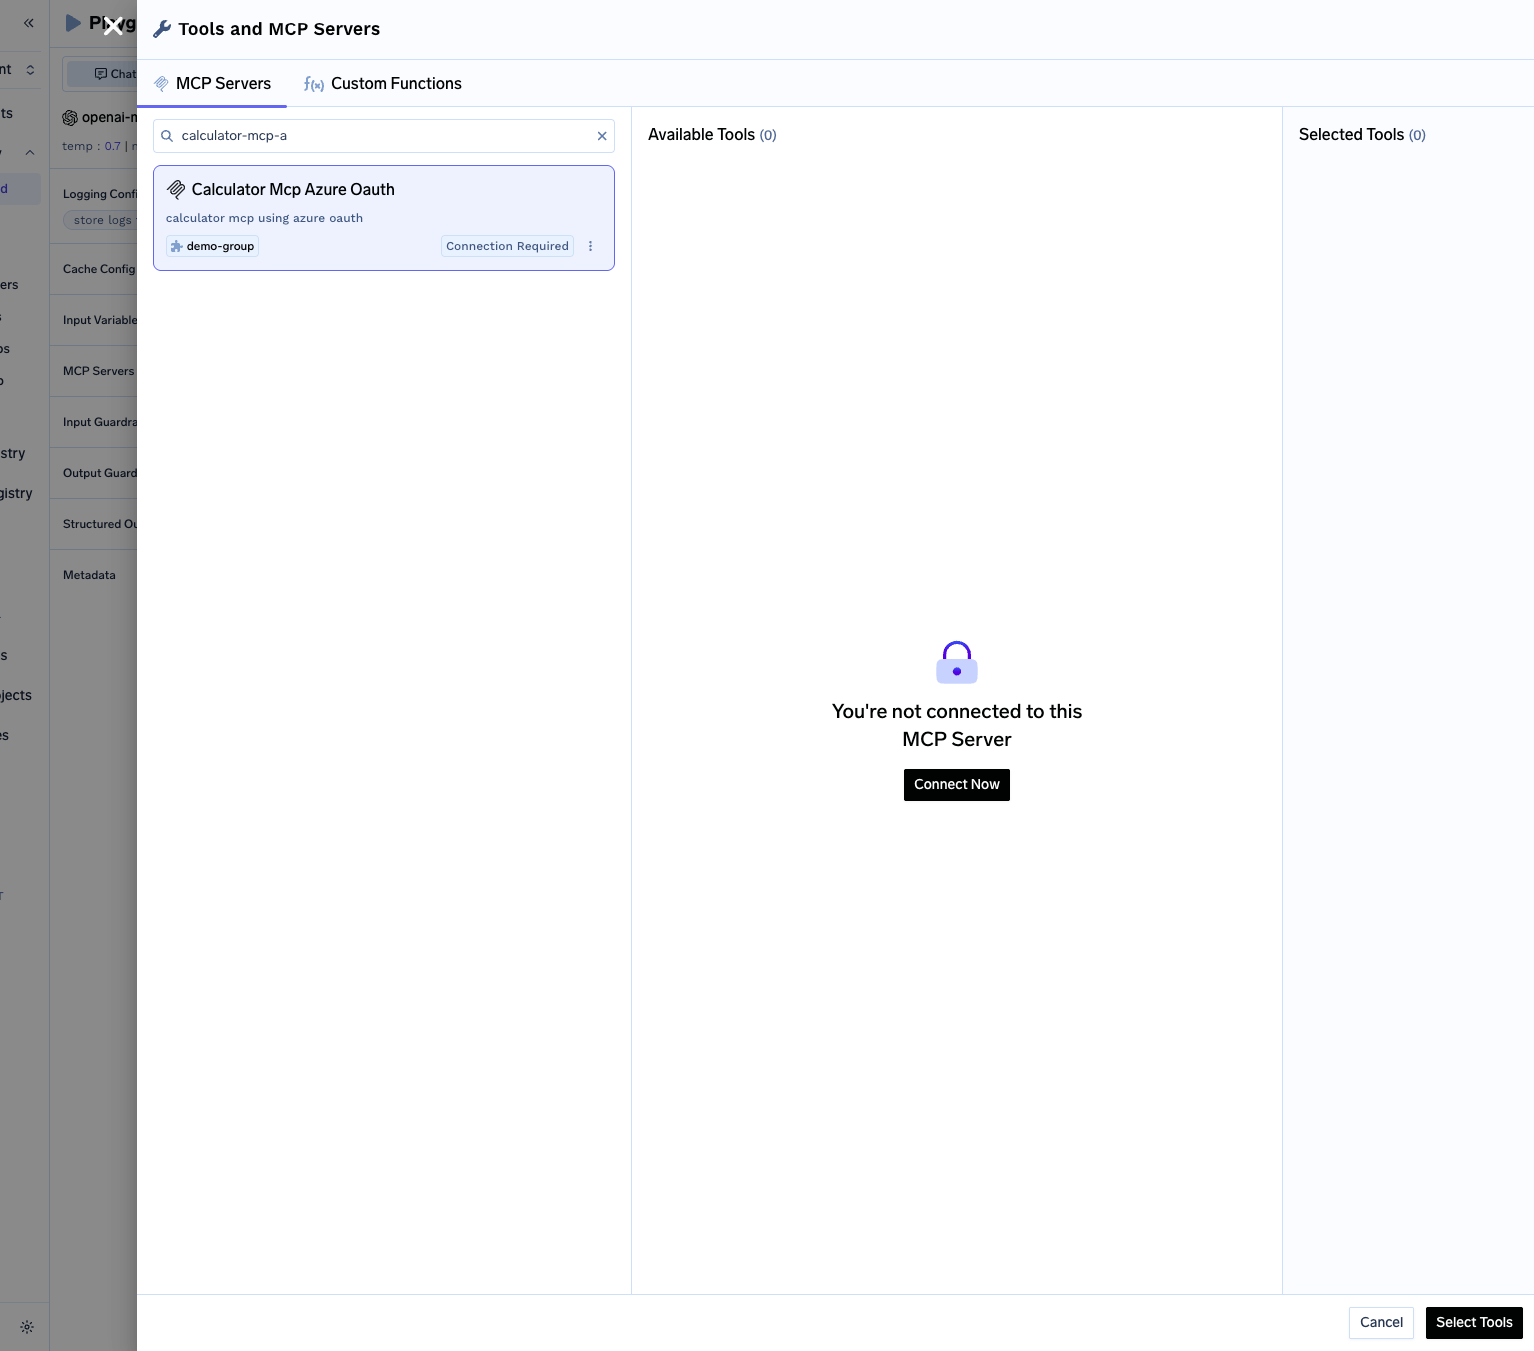 5. You'll be redirected to Azure to authorize access
6. Sign in with your Azure account and consent to the requested permissions
7. You'll be redirected back to the Gateway
8. The AI Gateway will store your OAuth tokens securely and refresh them automatically when they expire
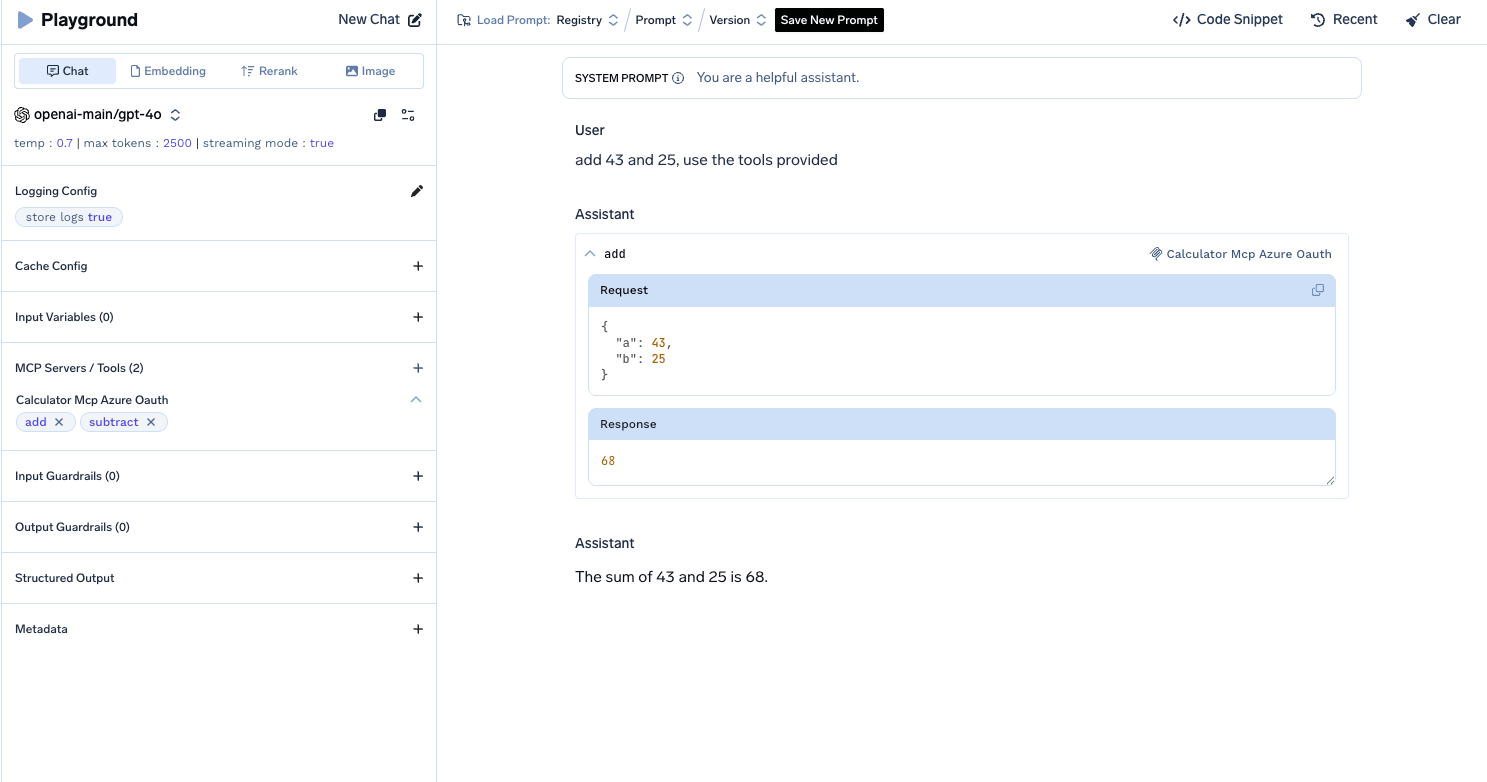
9. You'll see the `add` and `subtract` tools from your MCP server
10. Select the tools and click **Done**
11. Try sending a prompt like `Add 1 and 2. Use the tools provided`
12. The tool will return the result from your MCP server
5. You'll be redirected to Azure to authorize access
6. Sign in with your Azure account and consent to the requested permissions
7. You'll be redirected back to the Gateway
8. The AI Gateway will store your OAuth tokens securely and refresh them automatically when they expire
9. You'll see the `add` and `subtract` tools from your MCP server
10. Select the tools and click **Done**
11. Try sending a prompt like `Add 1 and 2. Use the tools provided`
12. The tool will return the result from your MCP server
 ## FAQ
Machine to Machine Authentication is a type of authentication that allows a machine to authenticate to the MCP server without user interaction. For M2M authentication, you can use the OAuth2 Client Credentials grant type to obtain access tokens directly.
* **Delegated permissions**: Used when a user is present. The app acts on behalf of the signed-in user. These require user consent (or admin consent).
* **Application permissions**: Used for machine-to-machine scenarios without a signed-in user. These always require admin consent.
For the AI Gateway (user authentication), use delegated permissions. For direct API access (M2M), use application permissions.
When using client credentials flow, Azure Entra ID requires the `.default` scope format (`api://{client-id}/.default`). This requests all application permissions that have been pre-consented for your application. You cannot request individual scopes in client credentials flow.
Azure's `/.well-known/openid-configuration` endpoint only returns generic OpenID Connect scopes:
* `openid`
* `profile`
* `email`
* `offline_access`
Custom API scopes (like `api://{client-id}/calculator.add`) are:
1. **Defined per app registration** in the "Expose an API" section
2. **Granted per client** in the "API permissions" section
3. **Not discoverable** via the well-known endpoint
This means you must **manually configure** custom scopes in the TrueFoundry Gateway when adding the MCP server. The Gateway cannot auto-discover them like it can with Okta's custom authorization servers.
Key differences:
| Aspect | Azure Entra ID | Okta |
| --------------------------- | ----------------------------------- | ----------------------------------------- |
| **Scopes format** | `api://{client-id}/scope-name` | Custom scopes |
| **Audience in token** | Just the client ID | Full audience URI |
| **Custom scopes discovery** | Manual configuration required | Auto-discoverable |
| **Well-known URL** | `/.well-known/openid-configuration` | `/.well-known/oauth-authorization-server` |
Both work with TrueFoundry AI Gateway, but Azure requires manually entering custom scopes in the Gateway configuration.
## FAQ
Machine to Machine Authentication is a type of authentication that allows a machine to authenticate to the MCP server without user interaction. For M2M authentication, you can use the OAuth2 Client Credentials grant type to obtain access tokens directly.
* **Delegated permissions**: Used when a user is present. The app acts on behalf of the signed-in user. These require user consent (or admin consent).
* **Application permissions**: Used for machine-to-machine scenarios without a signed-in user. These always require admin consent.
For the AI Gateway (user authentication), use delegated permissions. For direct API access (M2M), use application permissions.
When using client credentials flow, Azure Entra ID requires the `.default` scope format (`api://{client-id}/.default`). This requests all application permissions that have been pre-consented for your application. You cannot request individual scopes in client credentials flow.
Azure's `/.well-known/openid-configuration` endpoint only returns generic OpenID Connect scopes:
* `openid`
* `profile`
* `email`
* `offline_access`
Custom API scopes (like `api://{client-id}/calculator.add`) are:
1. **Defined per app registration** in the "Expose an API" section
2. **Granted per client** in the "API permissions" section
3. **Not discoverable** via the well-known endpoint
This means you must **manually configure** custom scopes in the TrueFoundry Gateway when adding the MCP server. The Gateway cannot auto-discover them like it can with Okta's custom authorization servers.
Key differences:
| Aspect | Azure Entra ID | Okta |
| --------------------------- | ----------------------------------- | ----------------------------------------- |
| **Scopes format** | `api://{client-id}/scope-name` | Custom scopes |
| **Audience in token** | Just the client ID | Full audience URI |
| **Custom scopes discovery** | Manual configuration required | Auto-discoverable |
| **Well-known URL** | `/.well-known/openid-configuration` | `/.well-known/oauth-authorization-server` |
Both work with TrueFoundry AI Gateway, but Azure requires manually entering custom scopes in the Gateway configuration.