> ## Documentation Index
> Fetch the complete documentation index at: https://www.truefoundry.com/llms.txt
> Use this file to discover all available pages before exploring further.
# Getting Started
> Learn how to create MCP Server Groups, add MCP servers, and use them in the TrueFoundry AI Gateway playground.
This guide will walk you through the steps to add a MCP server to the TrueFoundry AI Gateway and then use it in the playground or through
Cursor/VSCode/Claude or in your code agents.
Navigate to **MCP Gateway** in the left sidebar and click the **Add MCP Server** button. You will see the following options:
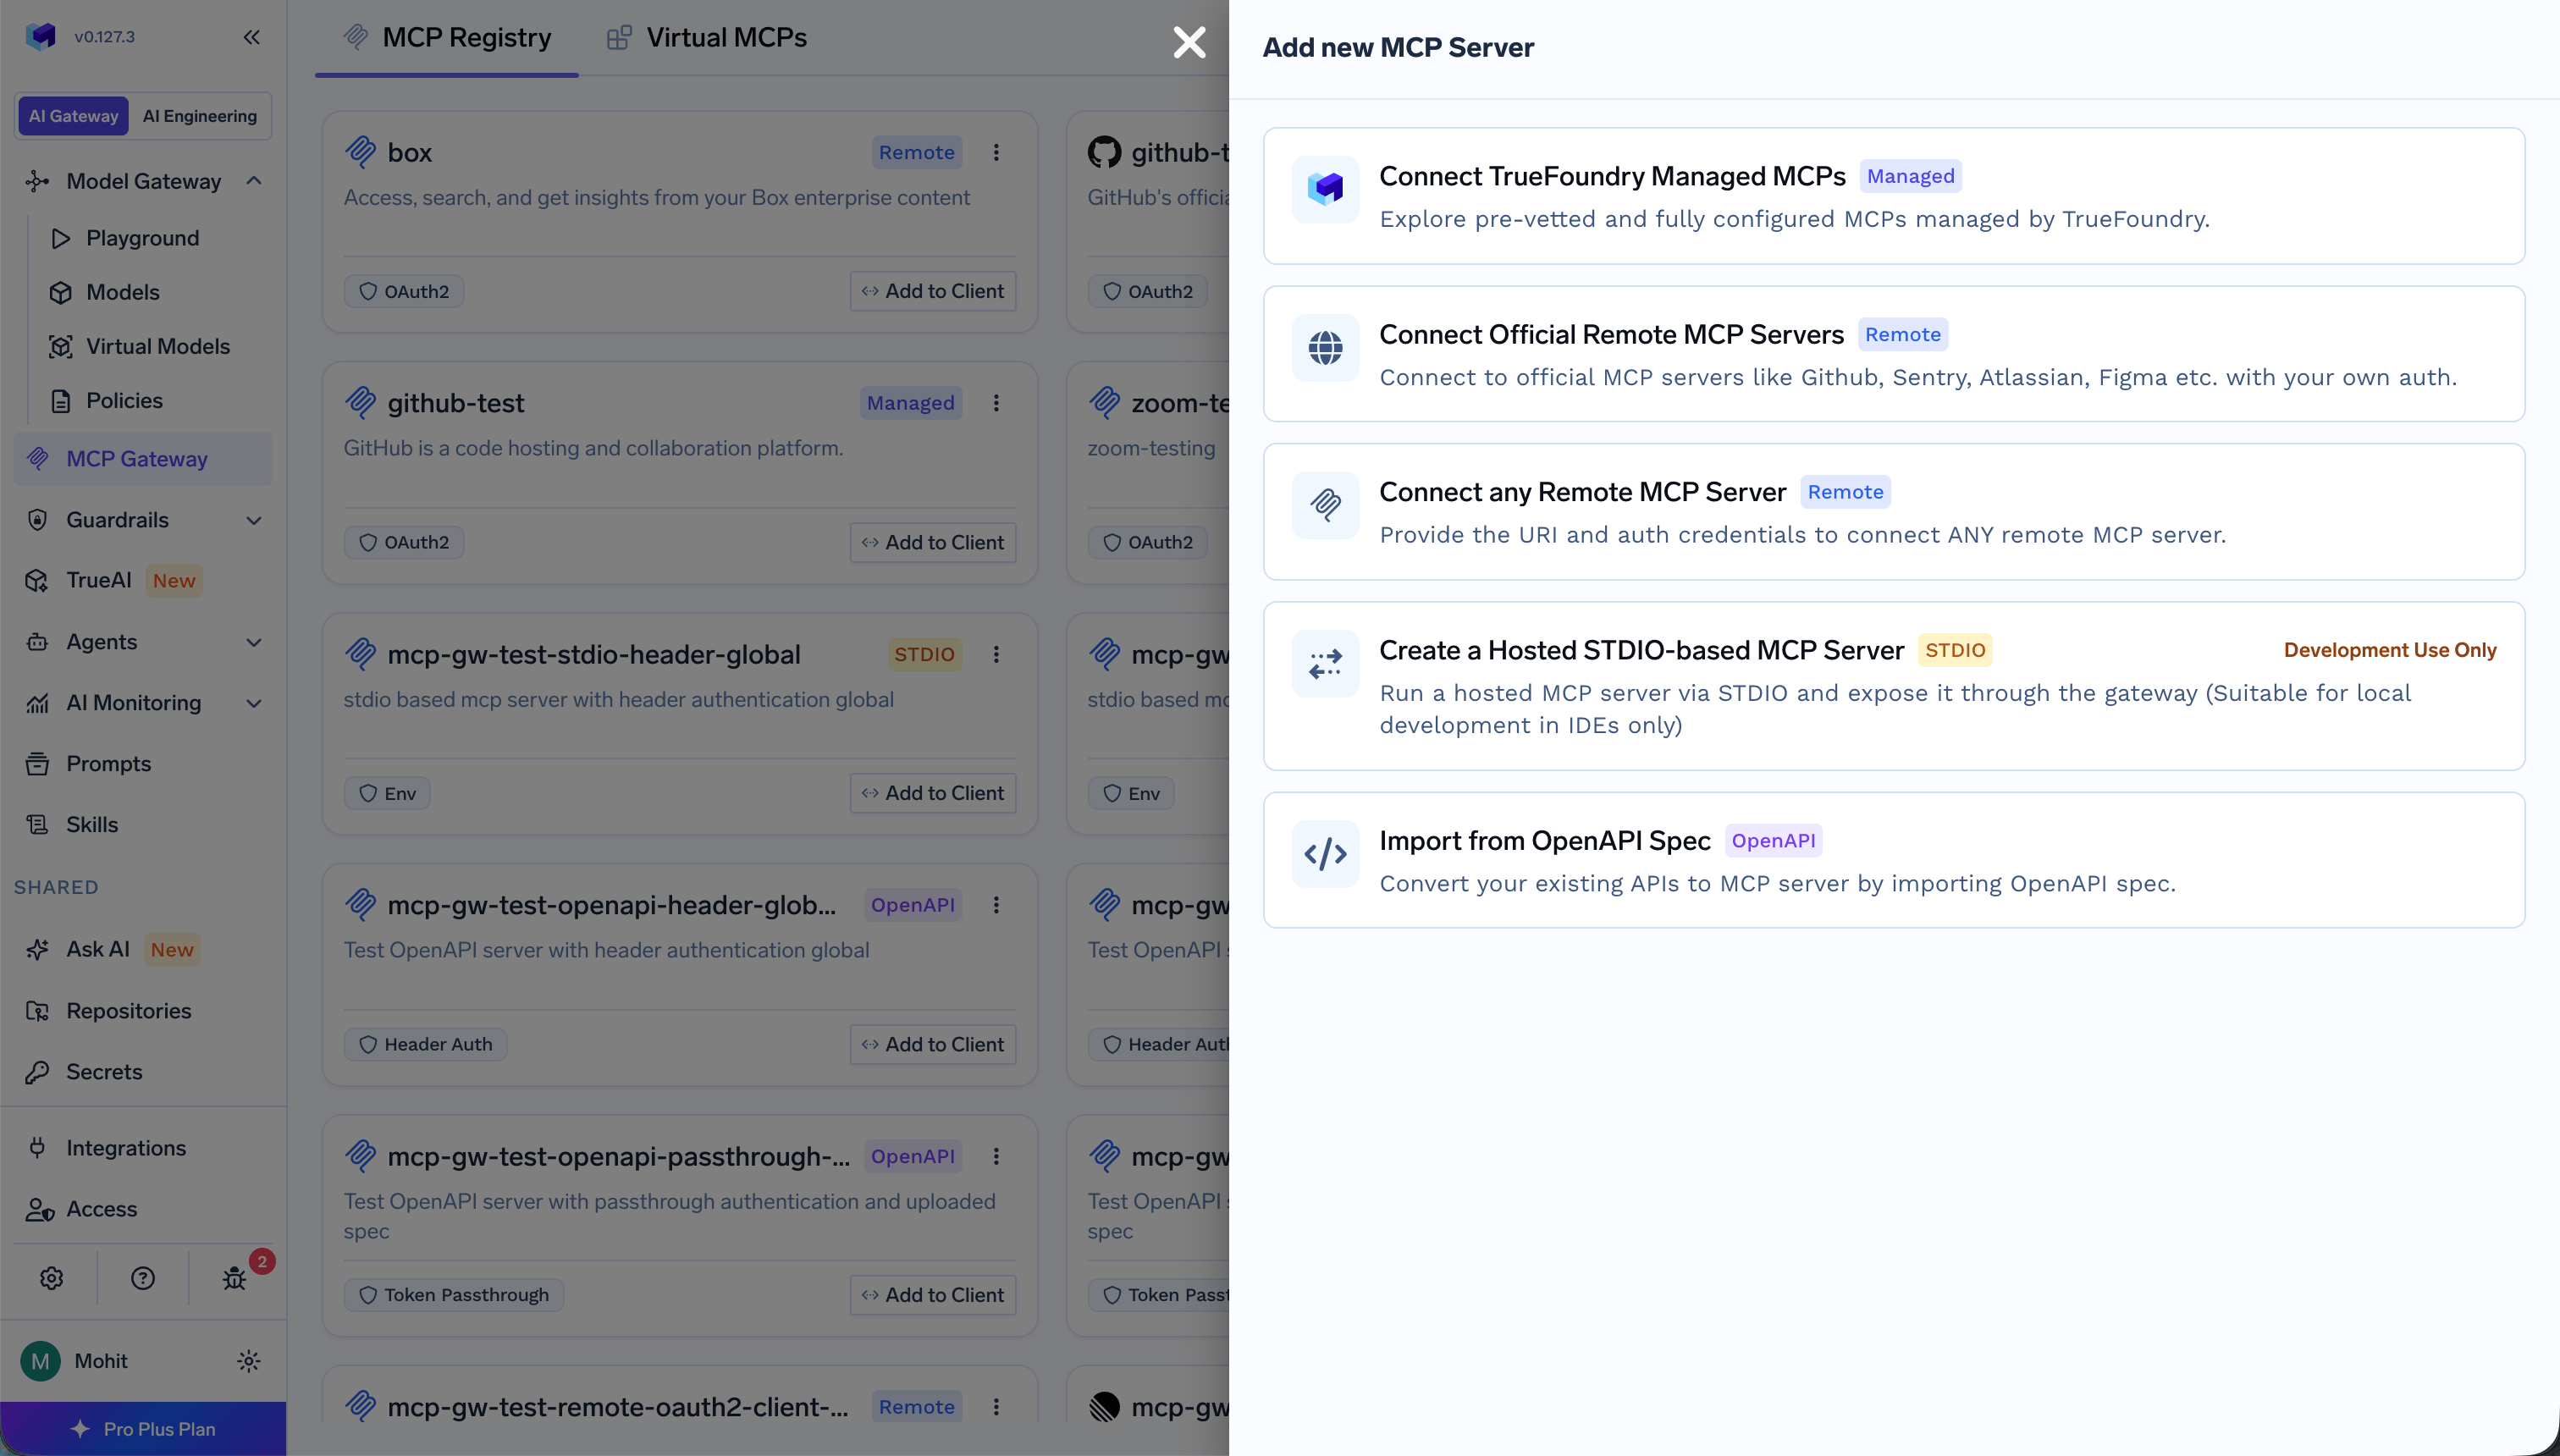 | Option | Description |
| --------------------------------------- | ------------------------------------------------------------------------------------------------------------------------------------------------------------------------------------------------------------------------ |
| **Connect TrueFoundry Managed MCPs** | Provision a pre-vetted MCP server from the TrueFoundry catalogue with just a name; URLs, auth, and credentials are managed by the platform. See [TrueFoundry Managed MCPs](/docs/ai-gateway/mcp/tfy-managed-mcp-server). |
| **Connect Official Remote MCP Servers** | Connect to official MCP servers like GitHub, Sentry, Atlassian, Figma, etc. with your own auth |
| **Connect any Remote MCP Server** | Provide the URI and auth credentials to connect any remote MCP server |
| **Create a Virtual MCP Server** | Combine multiple MCPs into a bundle so each user or team gets access to exactly the tools they need |
| **Import from OpenAPI Spec** | Convert your existing APIs to MCP server by importing OpenAPI spec |
| **Hosted Stdio-based MCP Server** | Register a CLI-style MCP server by command and arguments; see [Hosted Stdio-based MCP Server](/docs/ai-gateway/mcp/stdio-mcp-server) |
If you want to build an MCP server from scratch, you can follow the [Create Calculator MCP Server](/docs/ai-gateway/mcp/create-calculator-mcp-server) tutorial.
To add a custom Remote MCP server, click **Connect any Remote MCP Server** and provide the following details:
| Field | Description |
| ----------------- | --------------------------------------------------- |
| **URL** | The URL of the MCP server |
| **Collaborators** | Users and teams that have access to this MCP server |
#### Collaborators
The Collaborators section allows you to control who can access and manage this MCP server. You can add individual users or entire teams and assign them specific roles:
| Option | Description |
| --------------------------------------- | ------------------------------------------------------------------------------------------------------------------------------------------------------------------------------------------------------------------------ |
| **Connect TrueFoundry Managed MCPs** | Provision a pre-vetted MCP server from the TrueFoundry catalogue with just a name; URLs, auth, and credentials are managed by the platform. See [TrueFoundry Managed MCPs](/docs/ai-gateway/mcp/tfy-managed-mcp-server). |
| **Connect Official Remote MCP Servers** | Connect to official MCP servers like GitHub, Sentry, Atlassian, Figma, etc. with your own auth |
| **Connect any Remote MCP Server** | Provide the URI and auth credentials to connect any remote MCP server |
| **Create a Virtual MCP Server** | Combine multiple MCPs into a bundle so each user or team gets access to exactly the tools they need |
| **Import from OpenAPI Spec** | Convert your existing APIs to MCP server by importing OpenAPI spec |
| **Hosted Stdio-based MCP Server** | Register a CLI-style MCP server by command and arguments; see [Hosted Stdio-based MCP Server](/docs/ai-gateway/mcp/stdio-mcp-server) |
If you want to build an MCP server from scratch, you can follow the [Create Calculator MCP Server](/docs/ai-gateway/mcp/create-calculator-mcp-server) tutorial.
To add a custom Remote MCP server, click **Connect any Remote MCP Server** and provide the following details:
| Field | Description |
| ----------------- | --------------------------------------------------- |
| **URL** | The URL of the MCP server |
| **Collaborators** | Users and teams that have access to this MCP server |
#### Collaborators
The Collaborators section allows you to control who can access and manage this MCP server. You can add individual users or entire teams and assign them specific roles:
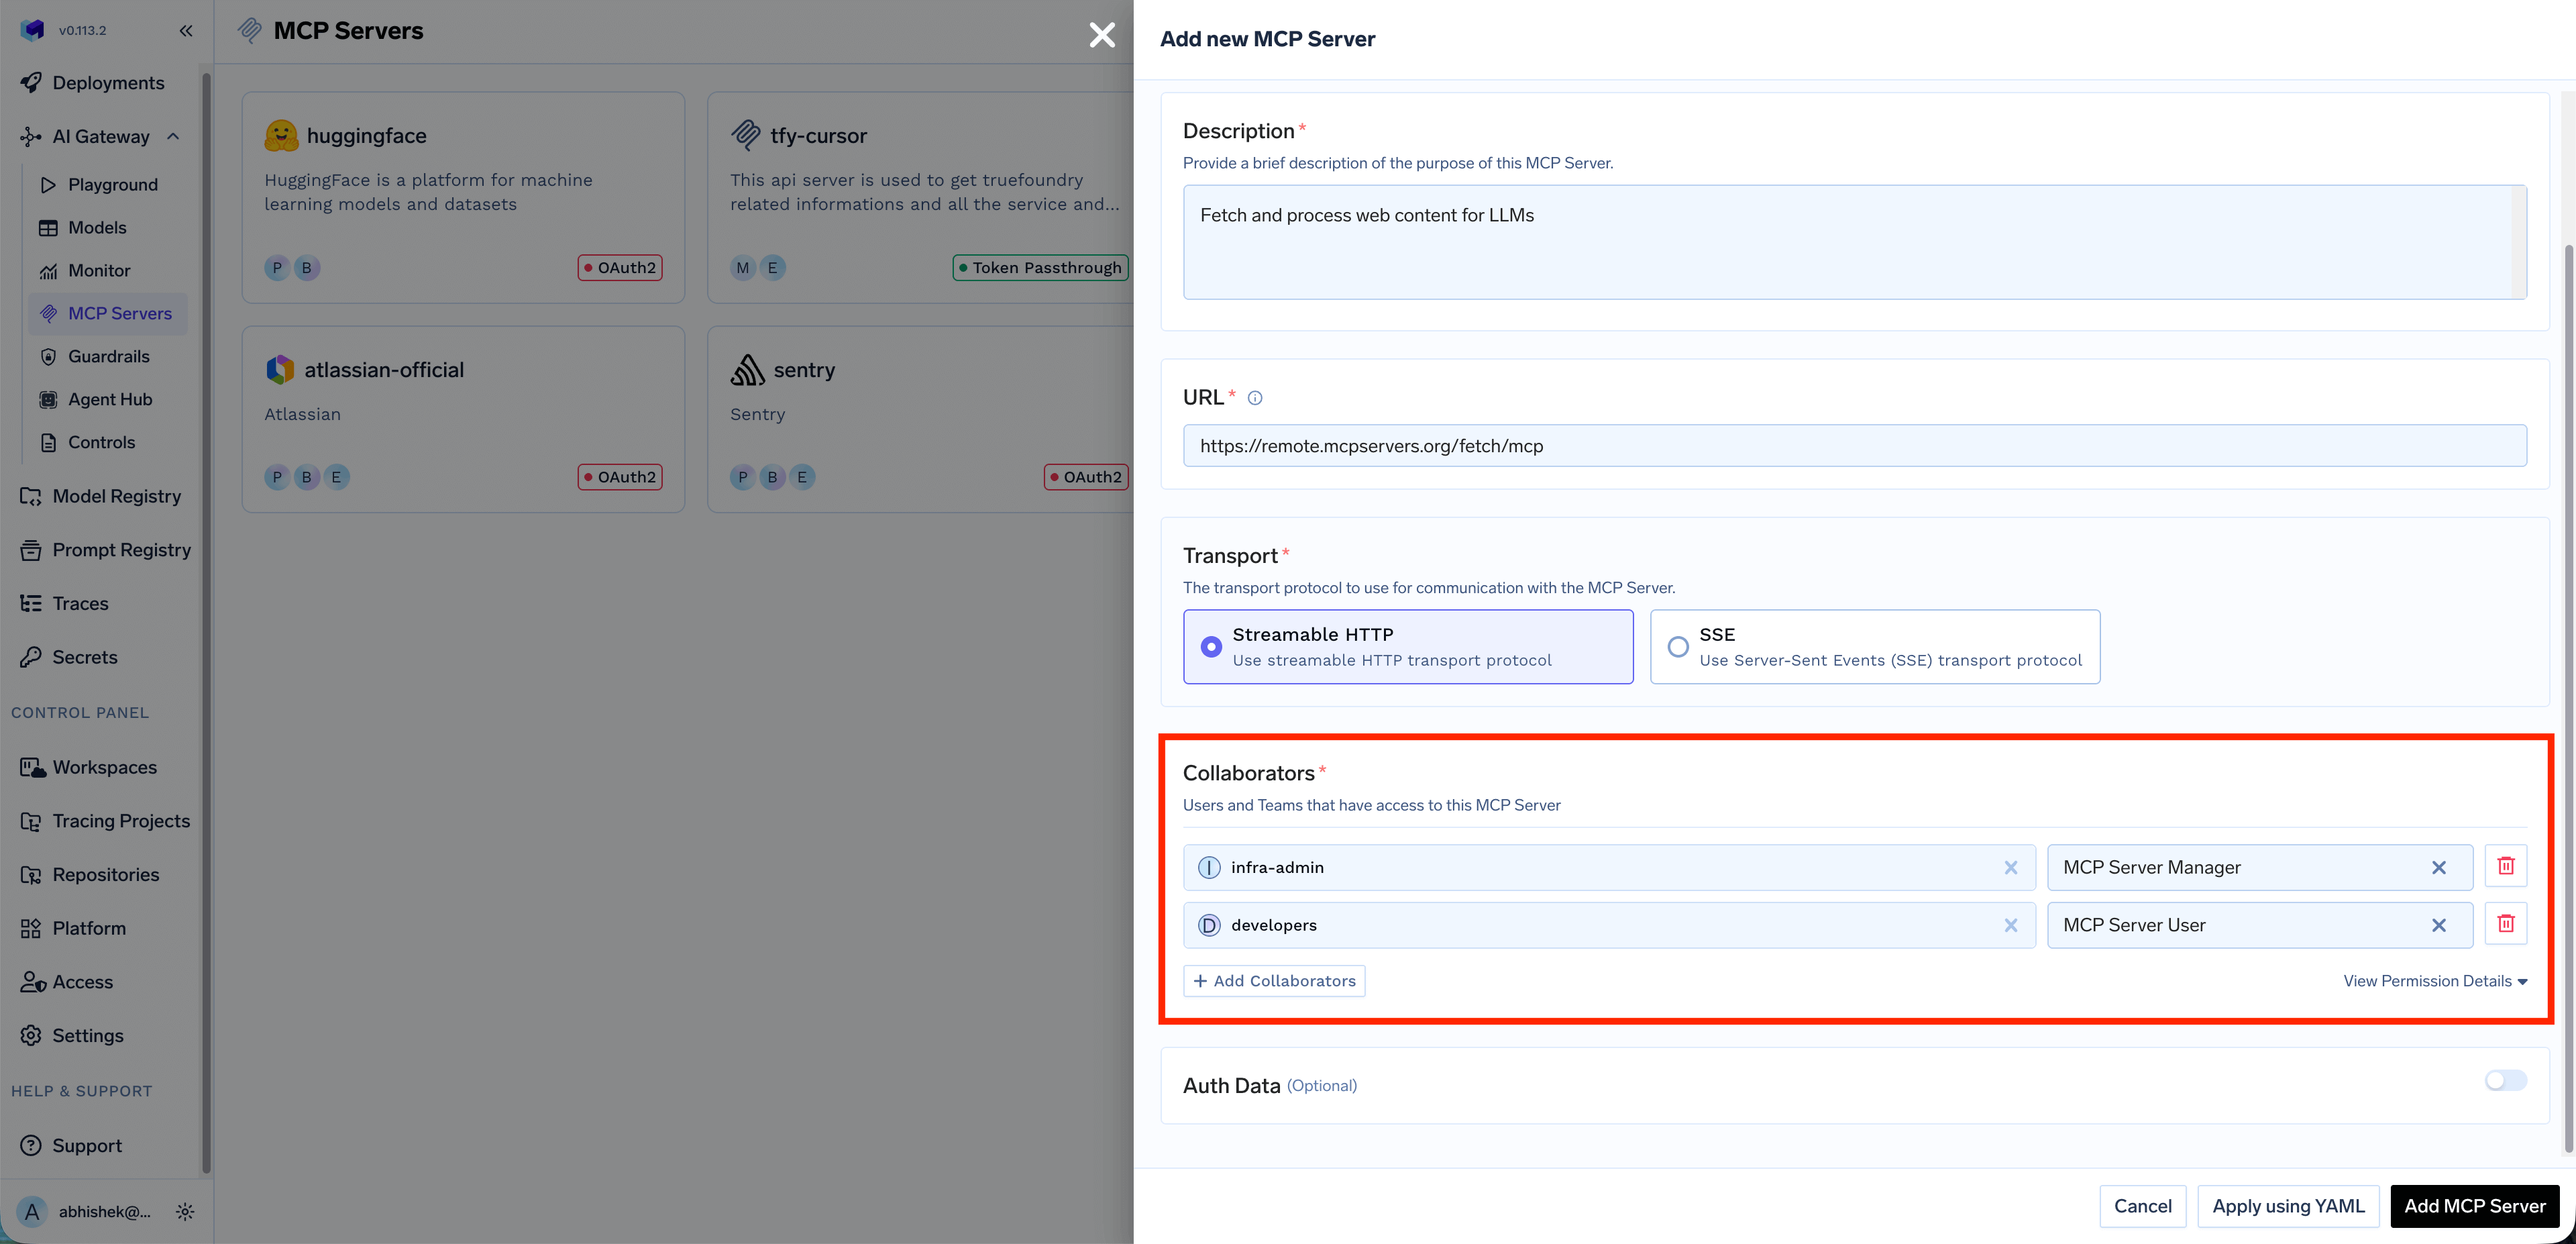 | Role | Description |
| ---------------------- | ---------------------------------------------------------------------------------------------------------------------- |
| **MCP Server Manager** | Full access to manage the MCP server, including editing configuration, managing collaborators, and deleting the server |
| **MCP Server User** | Can use the MCP server's tools in the playground and IDEs, but cannot modify server settings |
Click **+ Add Collaborators** to add more users or teams. You can also click **View Permission Details** to see the complete list of permissions for each role.
#### Auth Data
When registering an MCP server, choose the authentication type that determines how requests are authenticated with the upstream MCP server. You can select from: `API Key`, `OAuth2`, or `Token Passthrough`.
Authenticate using a static API key or token sent as a request header. When you select **API Key**, you need to choose between two credential modes:
##### Shared Credentials
One key is used by everyone. All users share the same downstream API key. Configure the header name (e.g., `Authorization`) and the corresponding value.
| Role | Description |
| ---------------------- | ---------------------------------------------------------------------------------------------------------------------- |
| **MCP Server Manager** | Full access to manage the MCP server, including editing configuration, managing collaborators, and deleting the server |
| **MCP Server User** | Can use the MCP server's tools in the playground and IDEs, but cannot modify server settings |
Click **+ Add Collaborators** to add more users or teams. You can also click **View Permission Details** to see the complete list of permissions for each role.
#### Auth Data
When registering an MCP server, choose the authentication type that determines how requests are authenticated with the upstream MCP server. You can select from: `API Key`, `OAuth2`, or `Token Passthrough`.
Authenticate using a static API key or token sent as a request header. When you select **API Key**, you need to choose between two credential modes:
##### Shared Credentials
One key is used by everyone. All users share the same downstream API key. Configure the header name (e.g., `Authorization`) and the corresponding value.
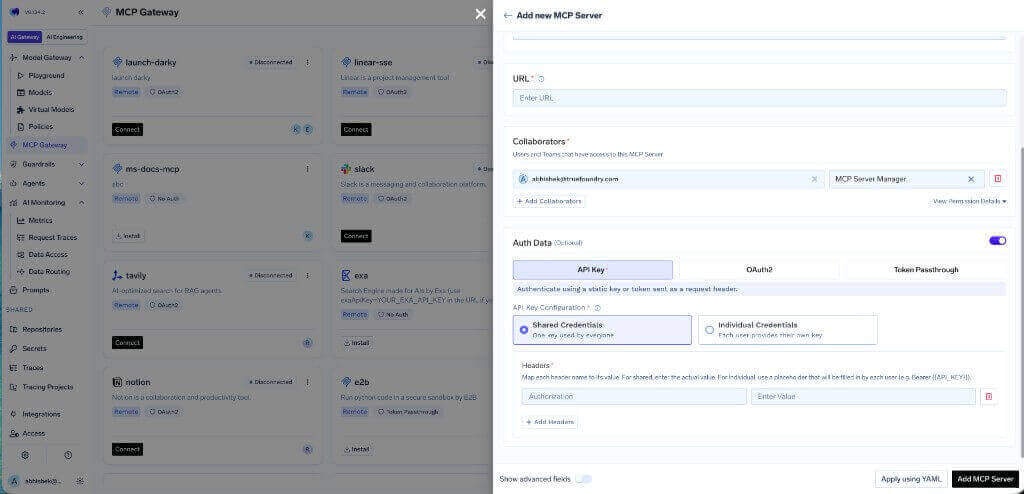 Use shared credentials for MCP servers where all users should have the same level of access, such as shared knowledge bases or read-only APIs.
##### Individual Credentials
Each user provides their own key. When **Individual Credentials** is selected, configure the header name and use a placeholder like `Bearer {{API_KEY}}` in the value field. Each user will need to provide their own API key before they can use the MCP server.
Use shared credentials for MCP servers where all users should have the same level of access, such as shared knowledge bases or read-only APIs.
##### Individual Credentials
Each user provides their own key. When **Individual Credentials** is selected, configure the header name and use a placeholder like `Bearer {{API_KEY}}` in the value field. Each user will need to provide their own API key before they can use the MCP server.
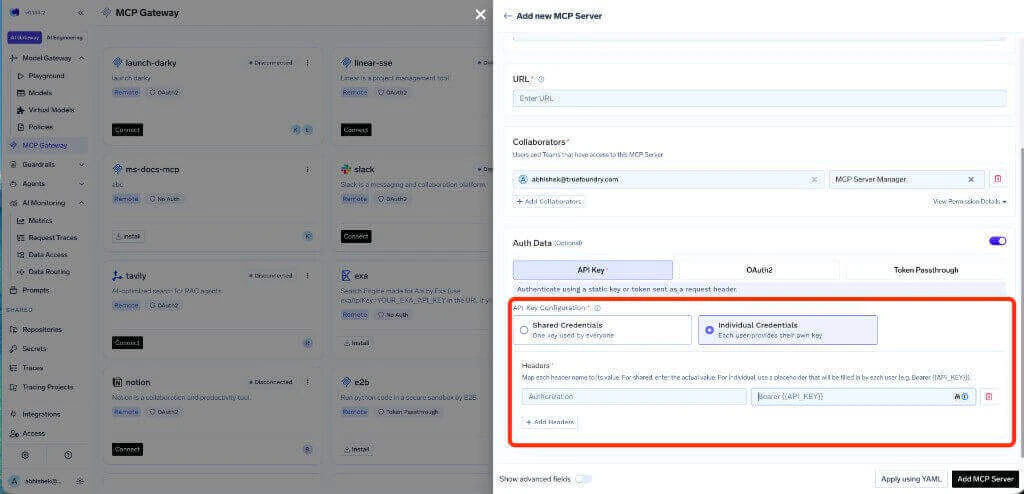 When individual credentials are configured, users can supply their API key through the **Auth Overrides** tab on the MCP server detail page. See [Auth Overrides](/docs/ai-gateway/mcp/mcp-server-auth-overrides) for details.
Use individual credentials when the upstream MCP server requires user-specific API keys, for example, when each user has their own API key for a third-party service.
Users sign in through a third-party login flow to get temporary access tokens. OAuth2 is supported by popular services like Slack, GitHub, Atlassian, Google, and more.
**Recommended for production.** OAuth2 allows you to configure scopes (e.g., read-only), users can revoke their own authorization, and access is limited to resources each user is permitted to use.
When you select **OAuth2**, you need to choose a **Grant Type**:
When individual credentials are configured, users can supply their API key through the **Auth Overrides** tab on the MCP server detail page. See [Auth Overrides](/docs/ai-gateway/mcp/mcp-server-auth-overrides) for details.
Use individual credentials when the upstream MCP server requires user-specific API keys, for example, when each user has their own API key for a third-party service.
Users sign in through a third-party login flow to get temporary access tokens. OAuth2 is supported by popular services like Slack, GitHub, Atlassian, Google, and more.
**Recommended for production.** OAuth2 allows you to configure scopes (e.g., read-only), users can revoke their own authorization, and access is limited to resources each user is permitted to use.
When you select **OAuth2**, you need to choose a **Grant Type**:
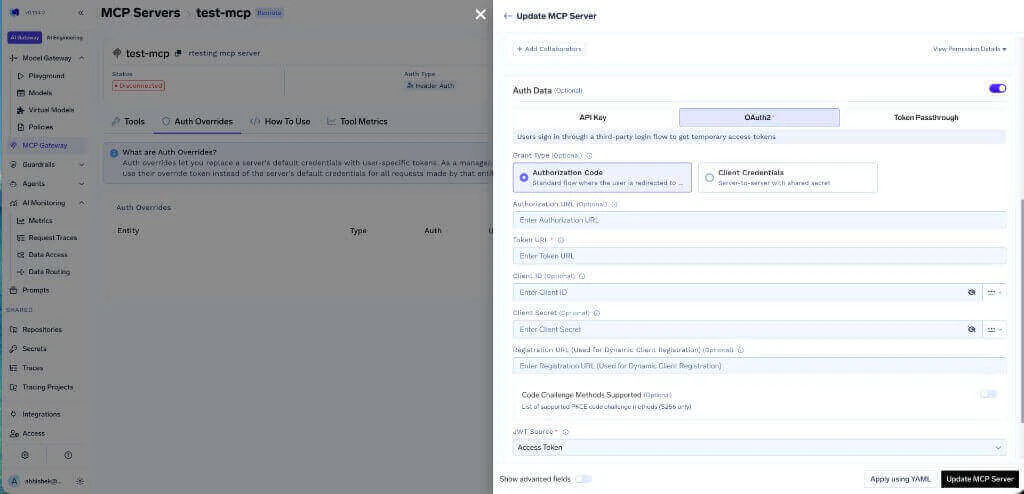 ##### Authorization Code
Standard flow where the user is redirected to the provider to authorize. This is the most common OAuth2 flow for user-facing applications.
| Field | Description |
| ------------------------------------ | ------------------------------------------------------------------- |
| **Authorization URL** | The URL where users are redirected to authorize (optional) |
| **Token URL** | The URL used to exchange the authorization code for an access token |
| **Client ID** | The client ID from your OAuth2 app (optional) |
| **Client Secret** | The client secret from your OAuth2 app (optional) |
| **Registration URL** | Used for Dynamic Client Registration (optional) |
| **Code Challenge Methods Supported** | List of supported PKCE code challenge methods, S256 only (optional) |
| **JWT Source** | Where to extract the JWT from — Access Token or ID Token |
##### Client Credentials
Server-to-server flow with shared secret. No user interaction is required. This is suitable for backend services that need to authenticate without user involvement.
| Field | Description |
| ----------------- | --------------------------------------- |
| **Token URL** | The URL used to obtain the access token |
| **Client ID** | The client ID for the service |
| **Client Secret** | The client secret for the service |
Set the redirect URI to:
```bash theme={"dark"}
https:///api/svc/v1/llm-gateway/mcp-servers/oauth2/callback
```
Replace `` with your TrueFoundry control plane URL. Note your OAuth2 App ID, Secret, and required scopes.
1. Navigate to **MCP Gateway** in the left sidebar and click **Add MCP Server**
2. Select **Connect any Remote MCP Server**
3. Provide the MCP server URL and select **OAuth2** as the authentication type
4. Choose the appropriate grant type (**Authorization Code** or **Client Credentials**)
5. Fill in the required OAuth2 fields
Store OAuth2 credentials in the TrueFoundry secrets store and reference their FQN for enhanced security.
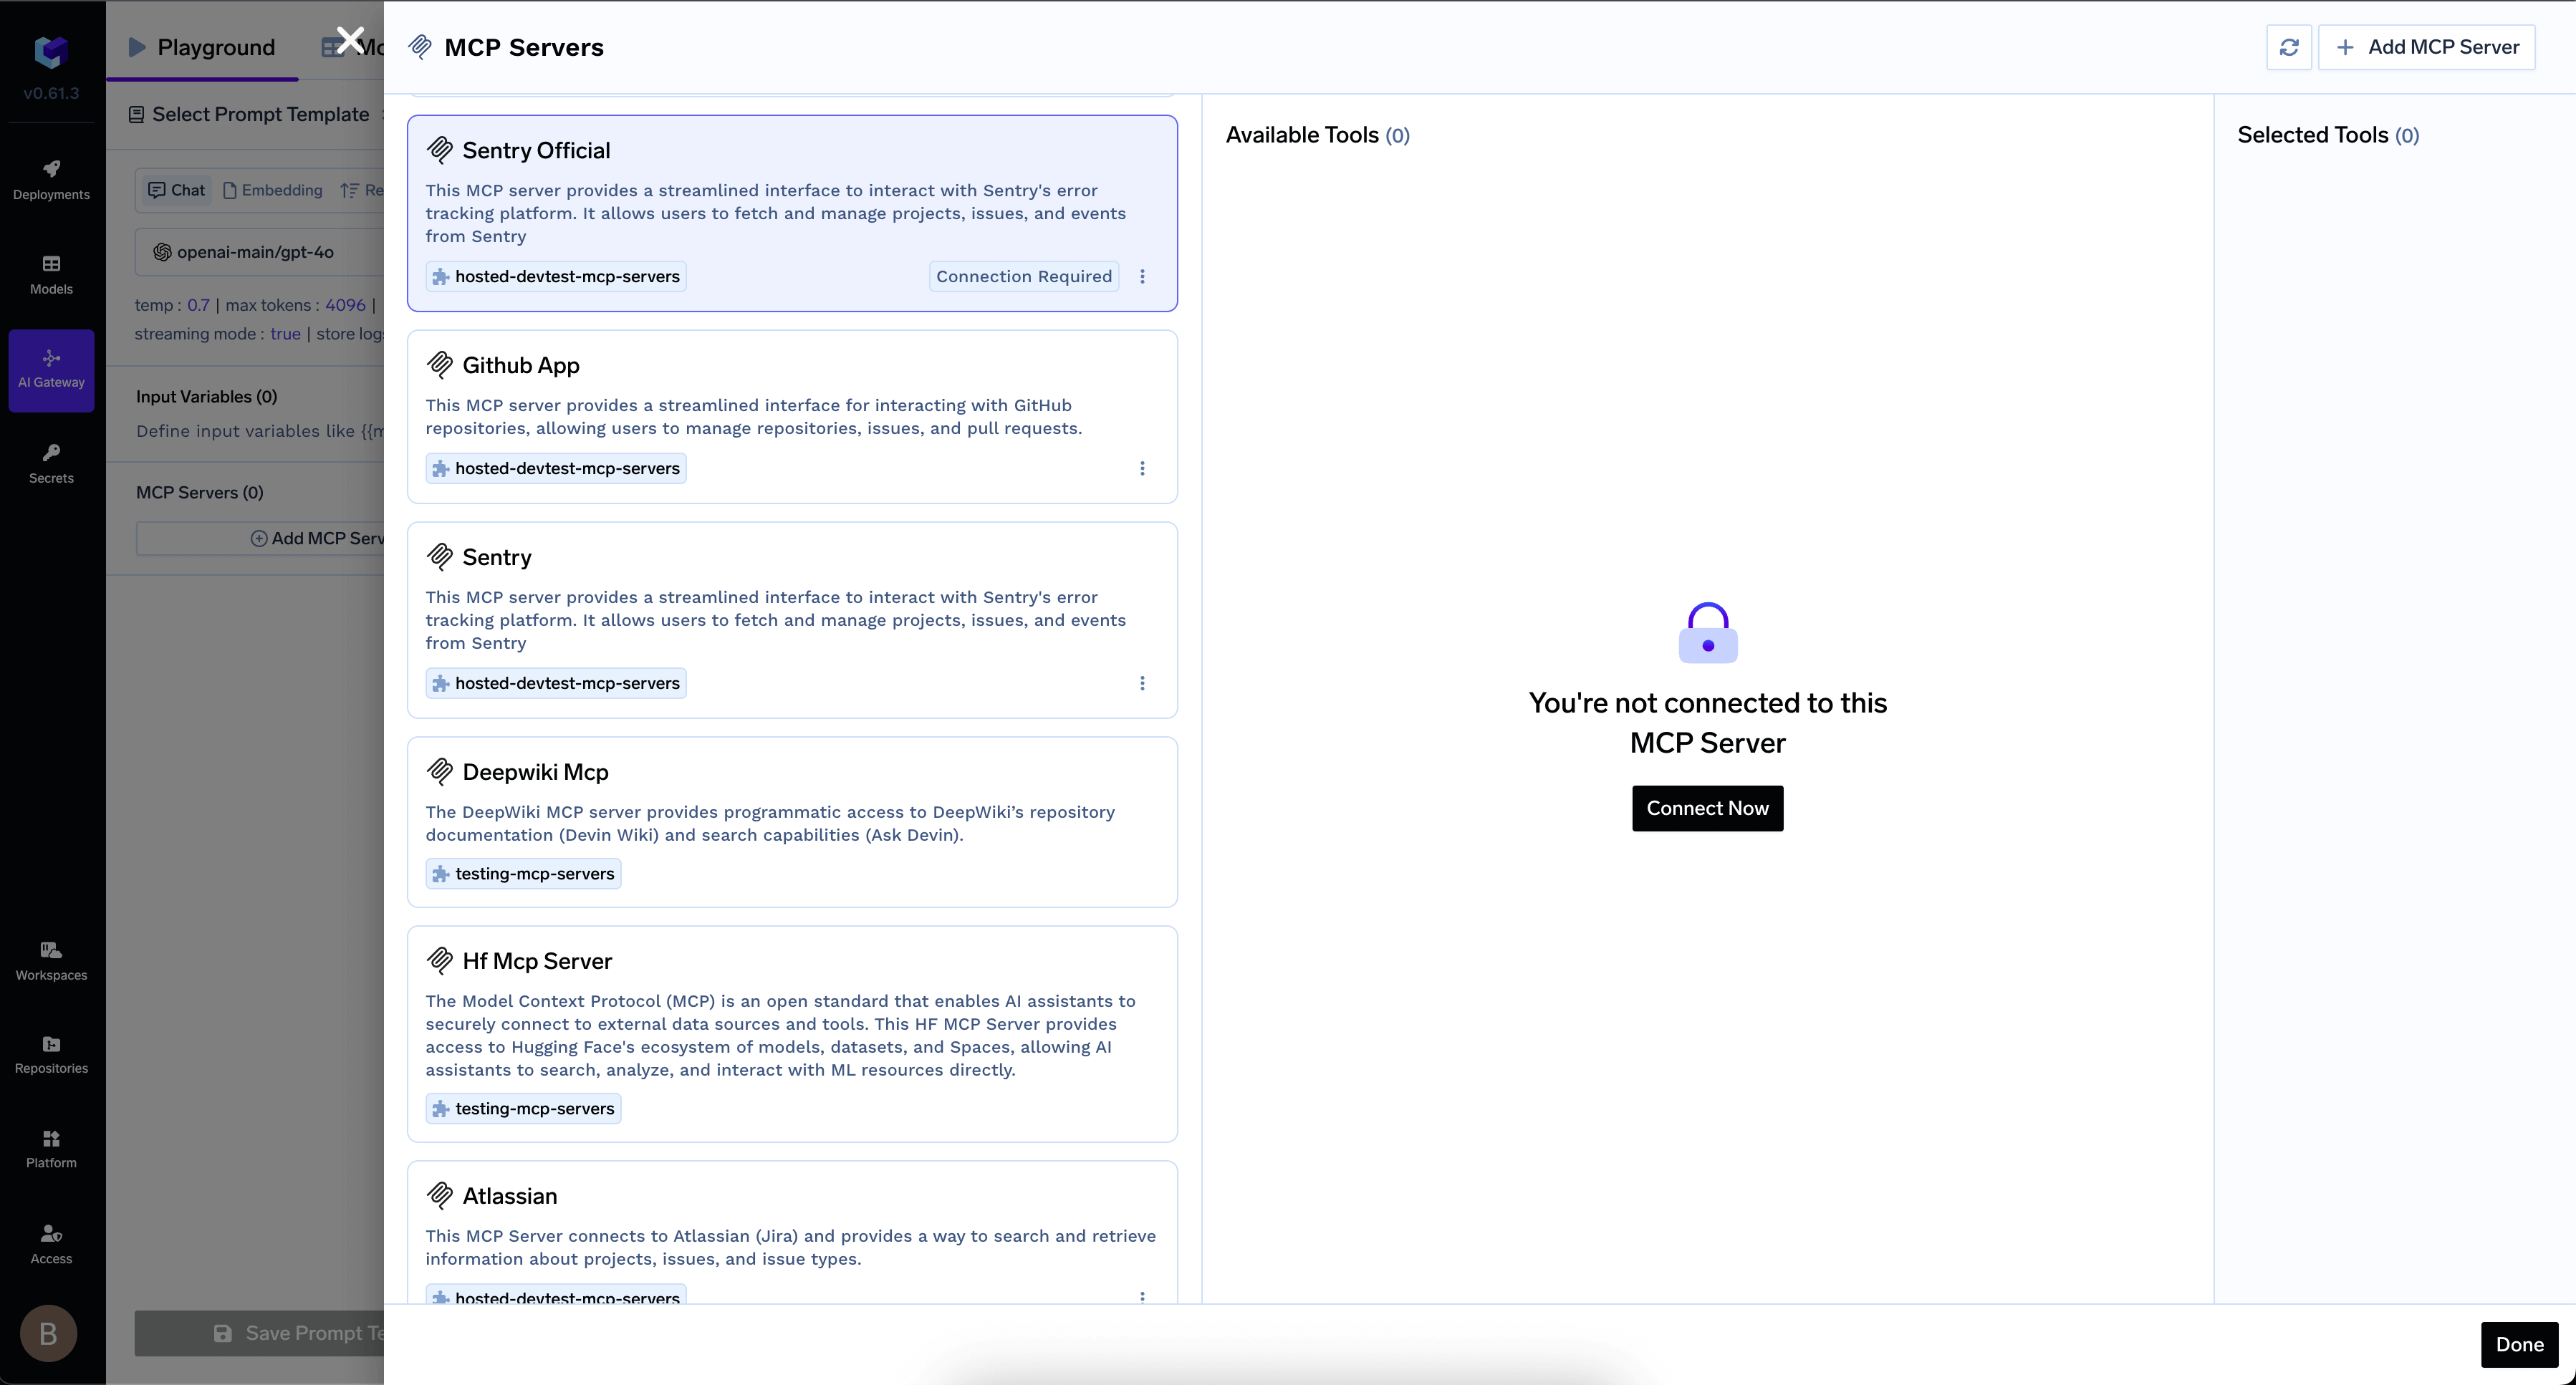
1. Click **Add Tool/MCP Servers** in the AI Gateway UI
2. For OAuth2 MCP Servers using Authorization Code flow, click **Connect Now** to authorize
##### Authorization Code
Standard flow where the user is redirected to the provider to authorize. This is the most common OAuth2 flow for user-facing applications.
| Field | Description |
| ------------------------------------ | ------------------------------------------------------------------- |
| **Authorization URL** | The URL where users are redirected to authorize (optional) |
| **Token URL** | The URL used to exchange the authorization code for an access token |
| **Client ID** | The client ID from your OAuth2 app (optional) |
| **Client Secret** | The client secret from your OAuth2 app (optional) |
| **Registration URL** | Used for Dynamic Client Registration (optional) |
| **Code Challenge Methods Supported** | List of supported PKCE code challenge methods, S256 only (optional) |
| **JWT Source** | Where to extract the JWT from — Access Token or ID Token |
##### Client Credentials
Server-to-server flow with shared secret. No user interaction is required. This is suitable for backend services that need to authenticate without user involvement.
| Field | Description |
| ----------------- | --------------------------------------- |
| **Token URL** | The URL used to obtain the access token |
| **Client ID** | The client ID for the service |
| **Client Secret** | The client secret for the service |
Set the redirect URI to:
```bash theme={"dark"}
https:///api/svc/v1/llm-gateway/mcp-servers/oauth2/callback
```
Replace `` with your TrueFoundry control plane URL. Note your OAuth2 App ID, Secret, and required scopes.
1. Navigate to **MCP Gateway** in the left sidebar and click **Add MCP Server**
2. Select **Connect any Remote MCP Server**
3. Provide the MCP server URL and select **OAuth2** as the authentication type
4. Choose the appropriate grant type (**Authorization Code** or **Client Credentials**)
5. Fill in the required OAuth2 fields
Store OAuth2 credentials in the TrueFoundry secrets store and reference their FQN for enhanced security.
1. Click **Add Tool/MCP Servers** in the AI Gateway UI
2. For OAuth2 MCP Servers using Authorization Code flow, click **Connect Now** to authorize
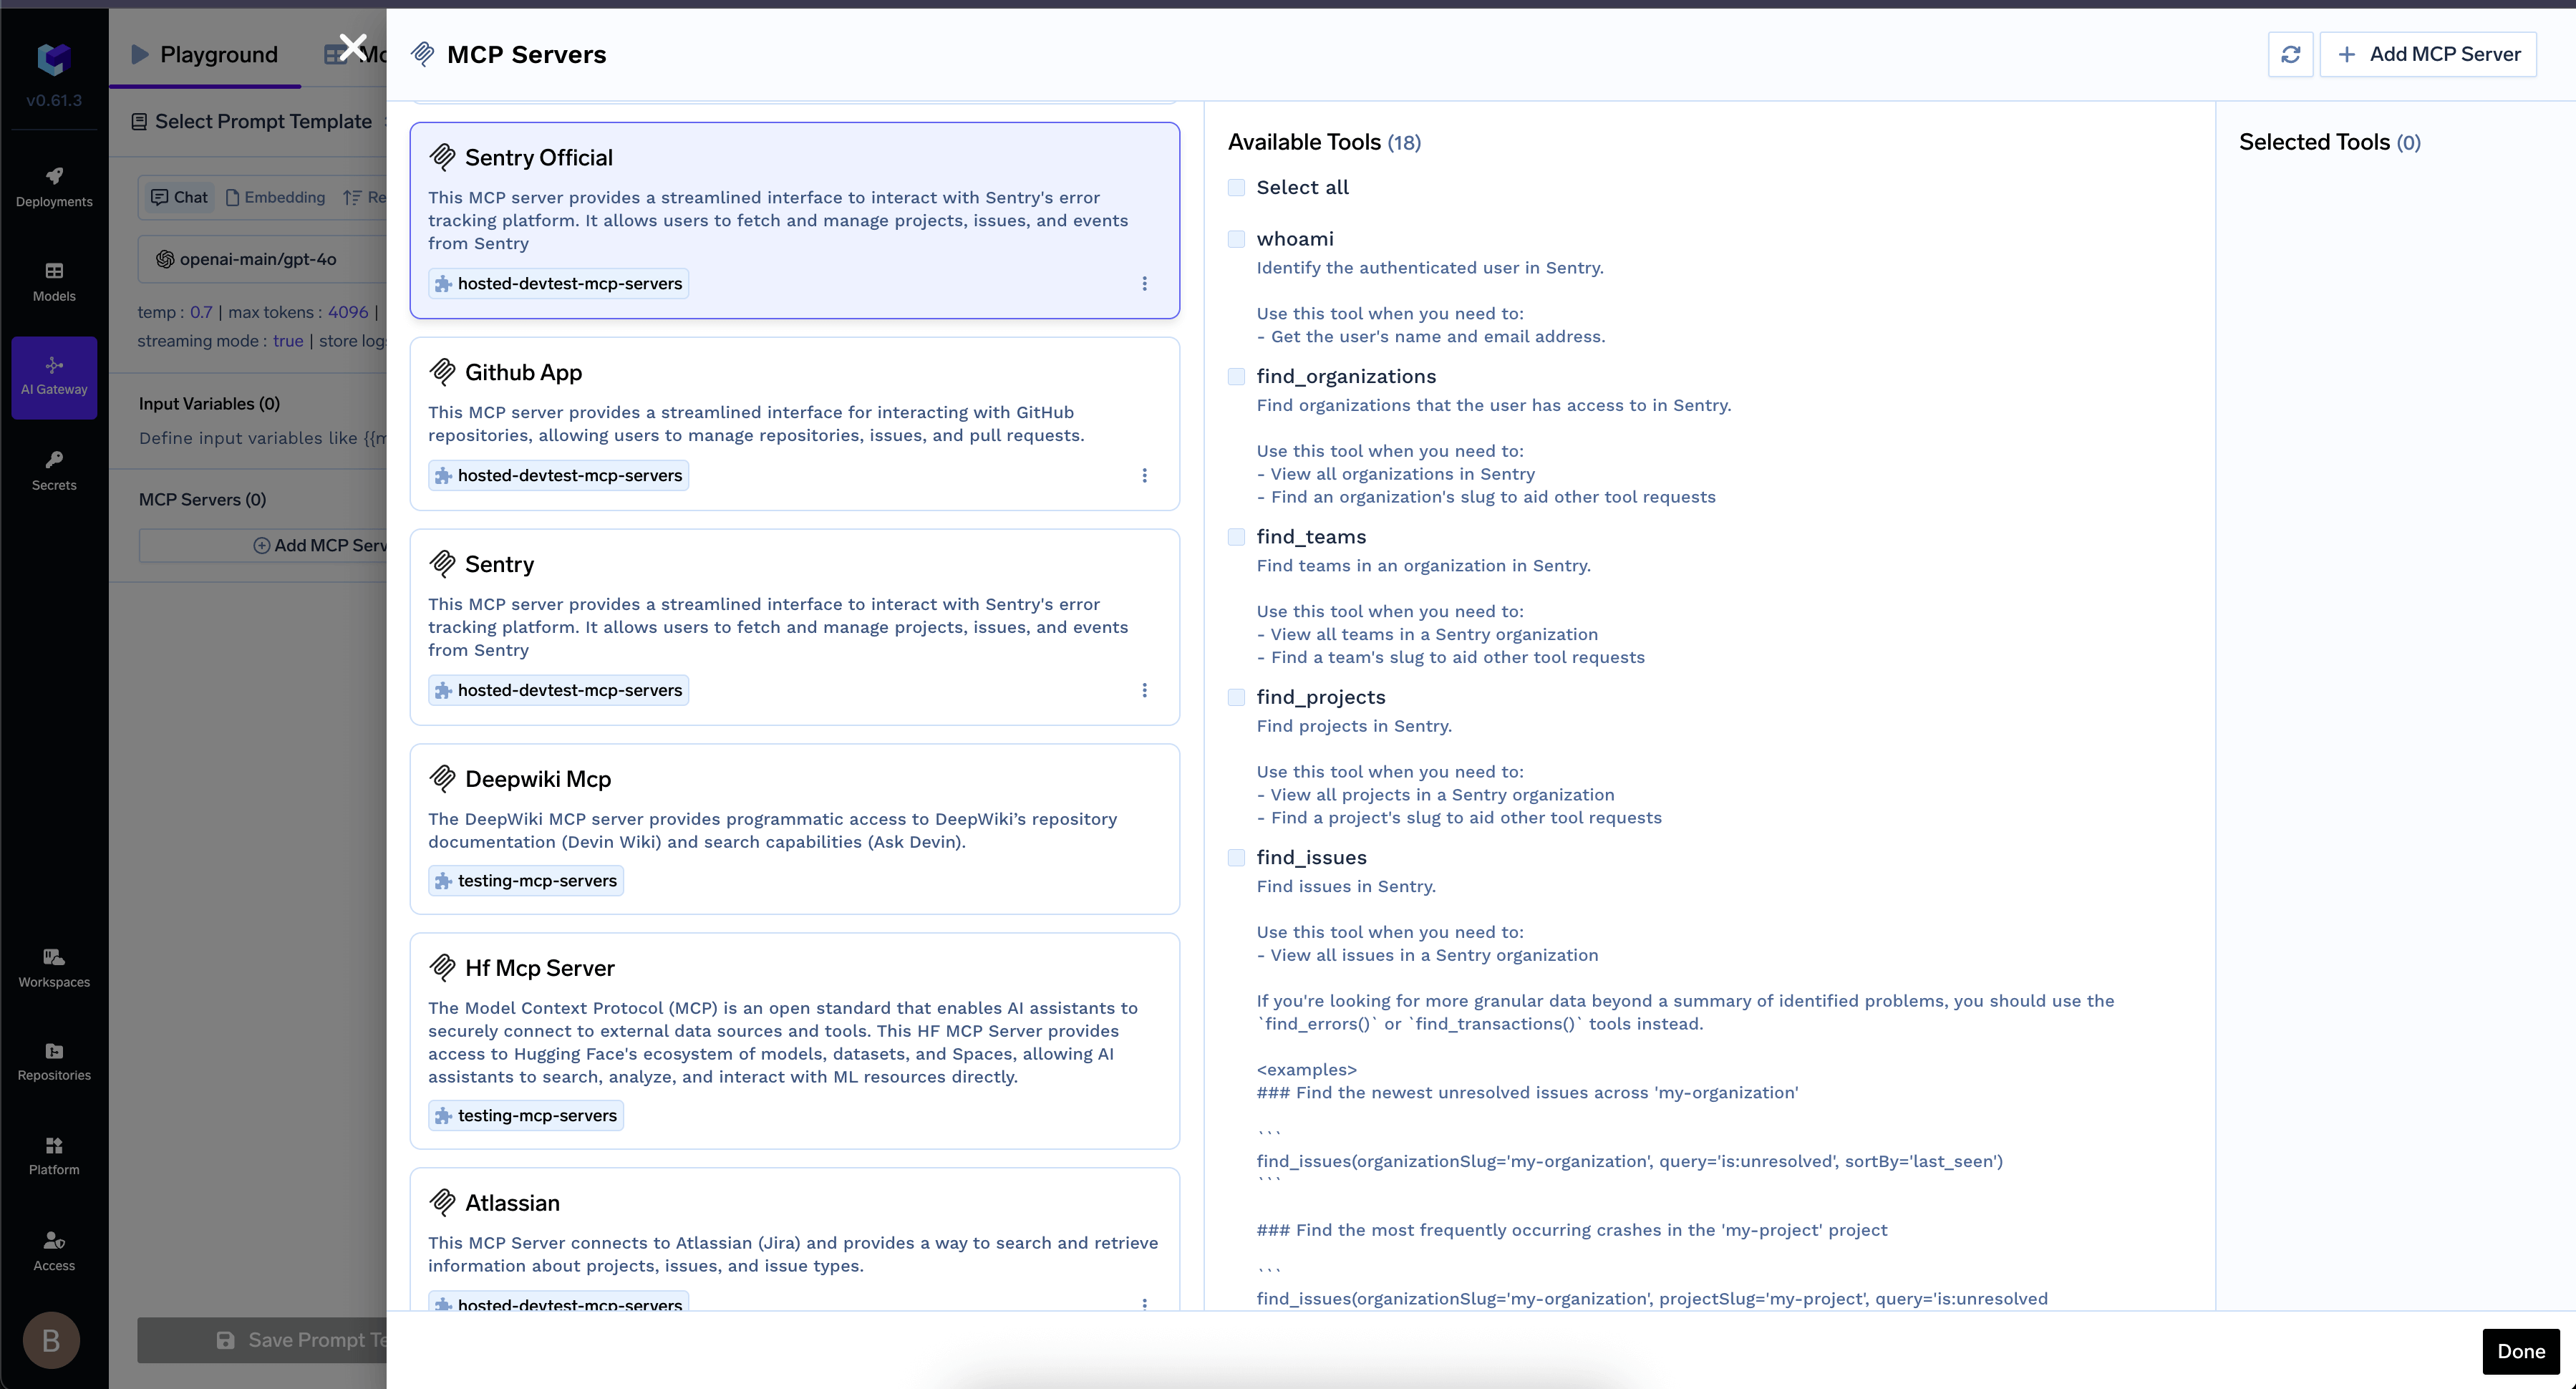
 3. Once authorized, the MCP Server's tools appear in the list
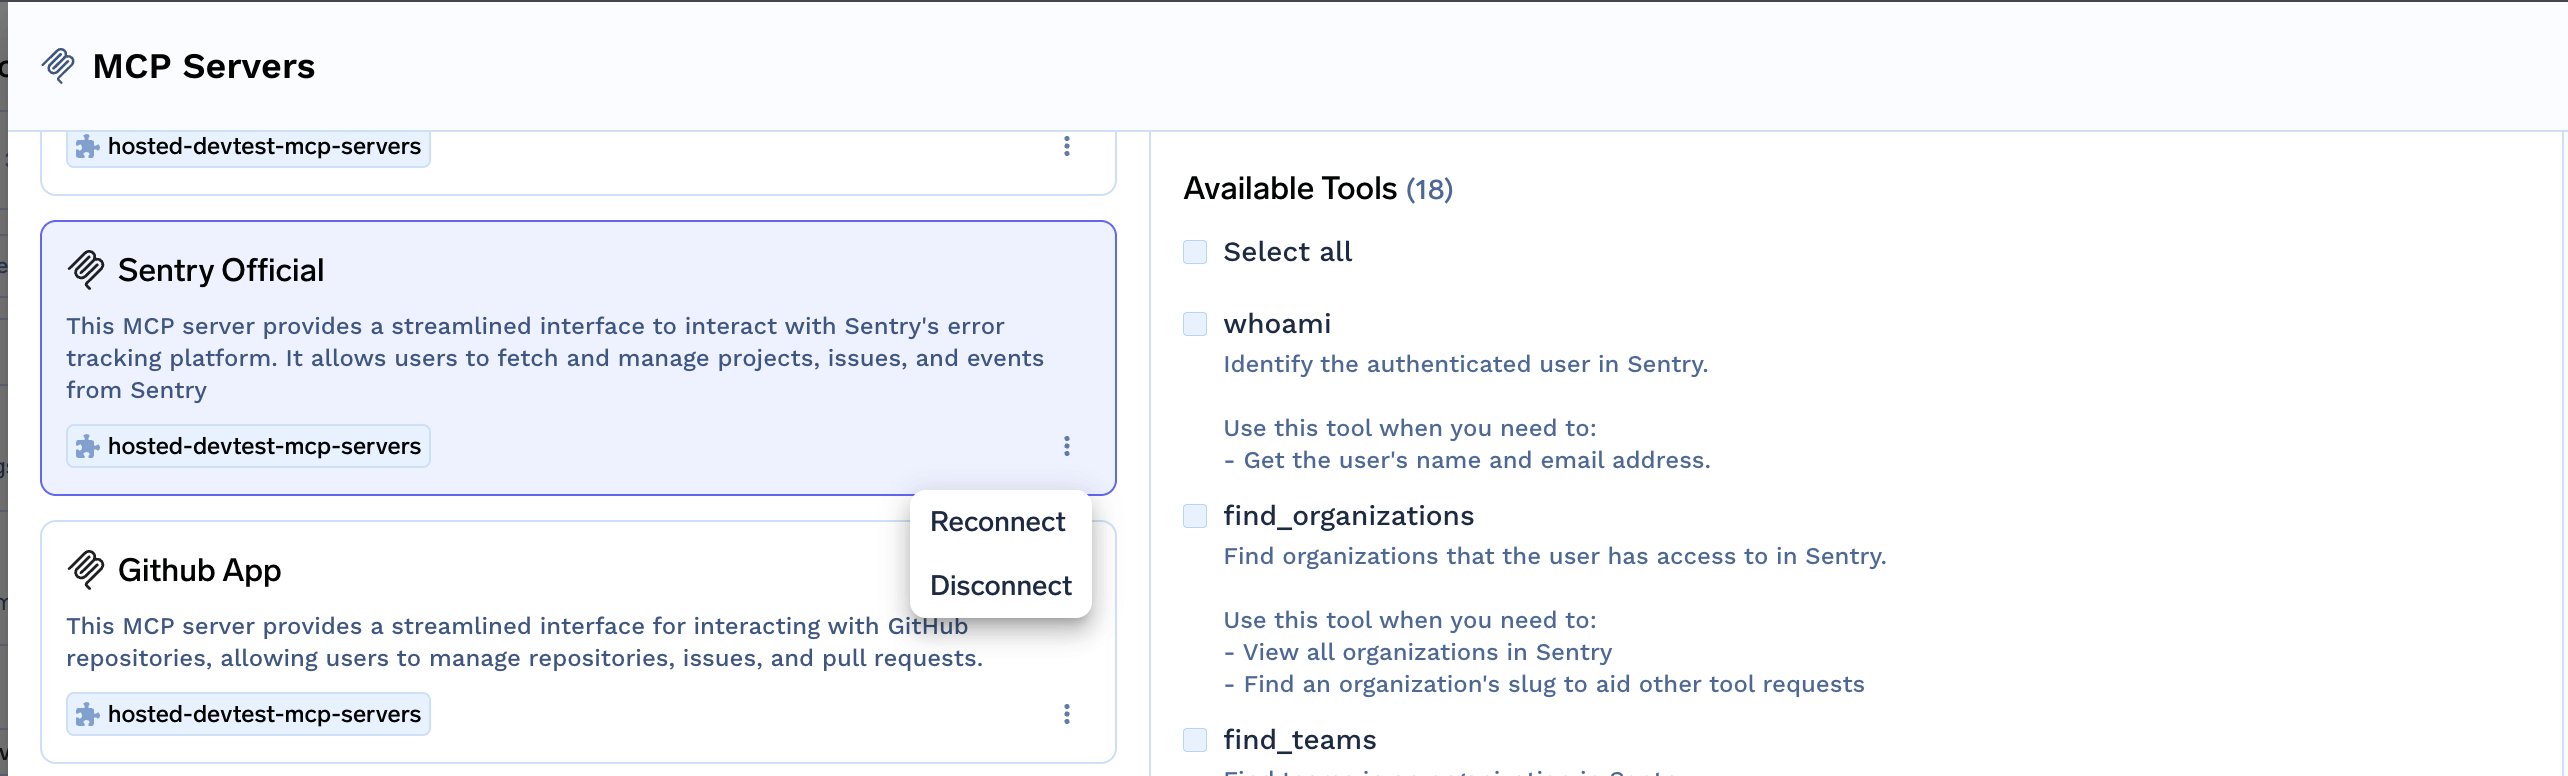
 4. You can revoke authorization at any time:
 The Gateway passes the user's JWT directly to the MCP server without transformation. The MCP server validates the token itself.
**Configuration:**
1. Register the MCP server with **Token Passthrough** authentication type
2. Configure an Identity Provider to allow your IdP tokens
3. The user's JWT is automatically forwarded to the MCP server
With Token Passthrough, the MCP server is responsible for validating the token. Make sure the MCP server is configured to trust your IdP.
Once you've added an MCP server, you can easily integrate it with your favorite IDE or AI coding assistant. Navigate to the MCP server details page and click on the **How To Use** tab.
The Gateway passes the user's JWT directly to the MCP server without transformation. The MCP server validates the token itself.
**Configuration:**
1. Register the MCP server with **Token Passthrough** authentication type
2. Configure an Identity Provider to allow your IdP tokens
3. The user's JWT is automatically forwarded to the MCP server
With Token Passthrough, the MCP server is responsible for validating the token. Make sure the MCP server is configured to trust your IdP.
Once you've added an MCP server, you can easily integrate it with your favorite IDE or AI coding assistant. Navigate to the MCP server details page and click on the **How To Use** tab.
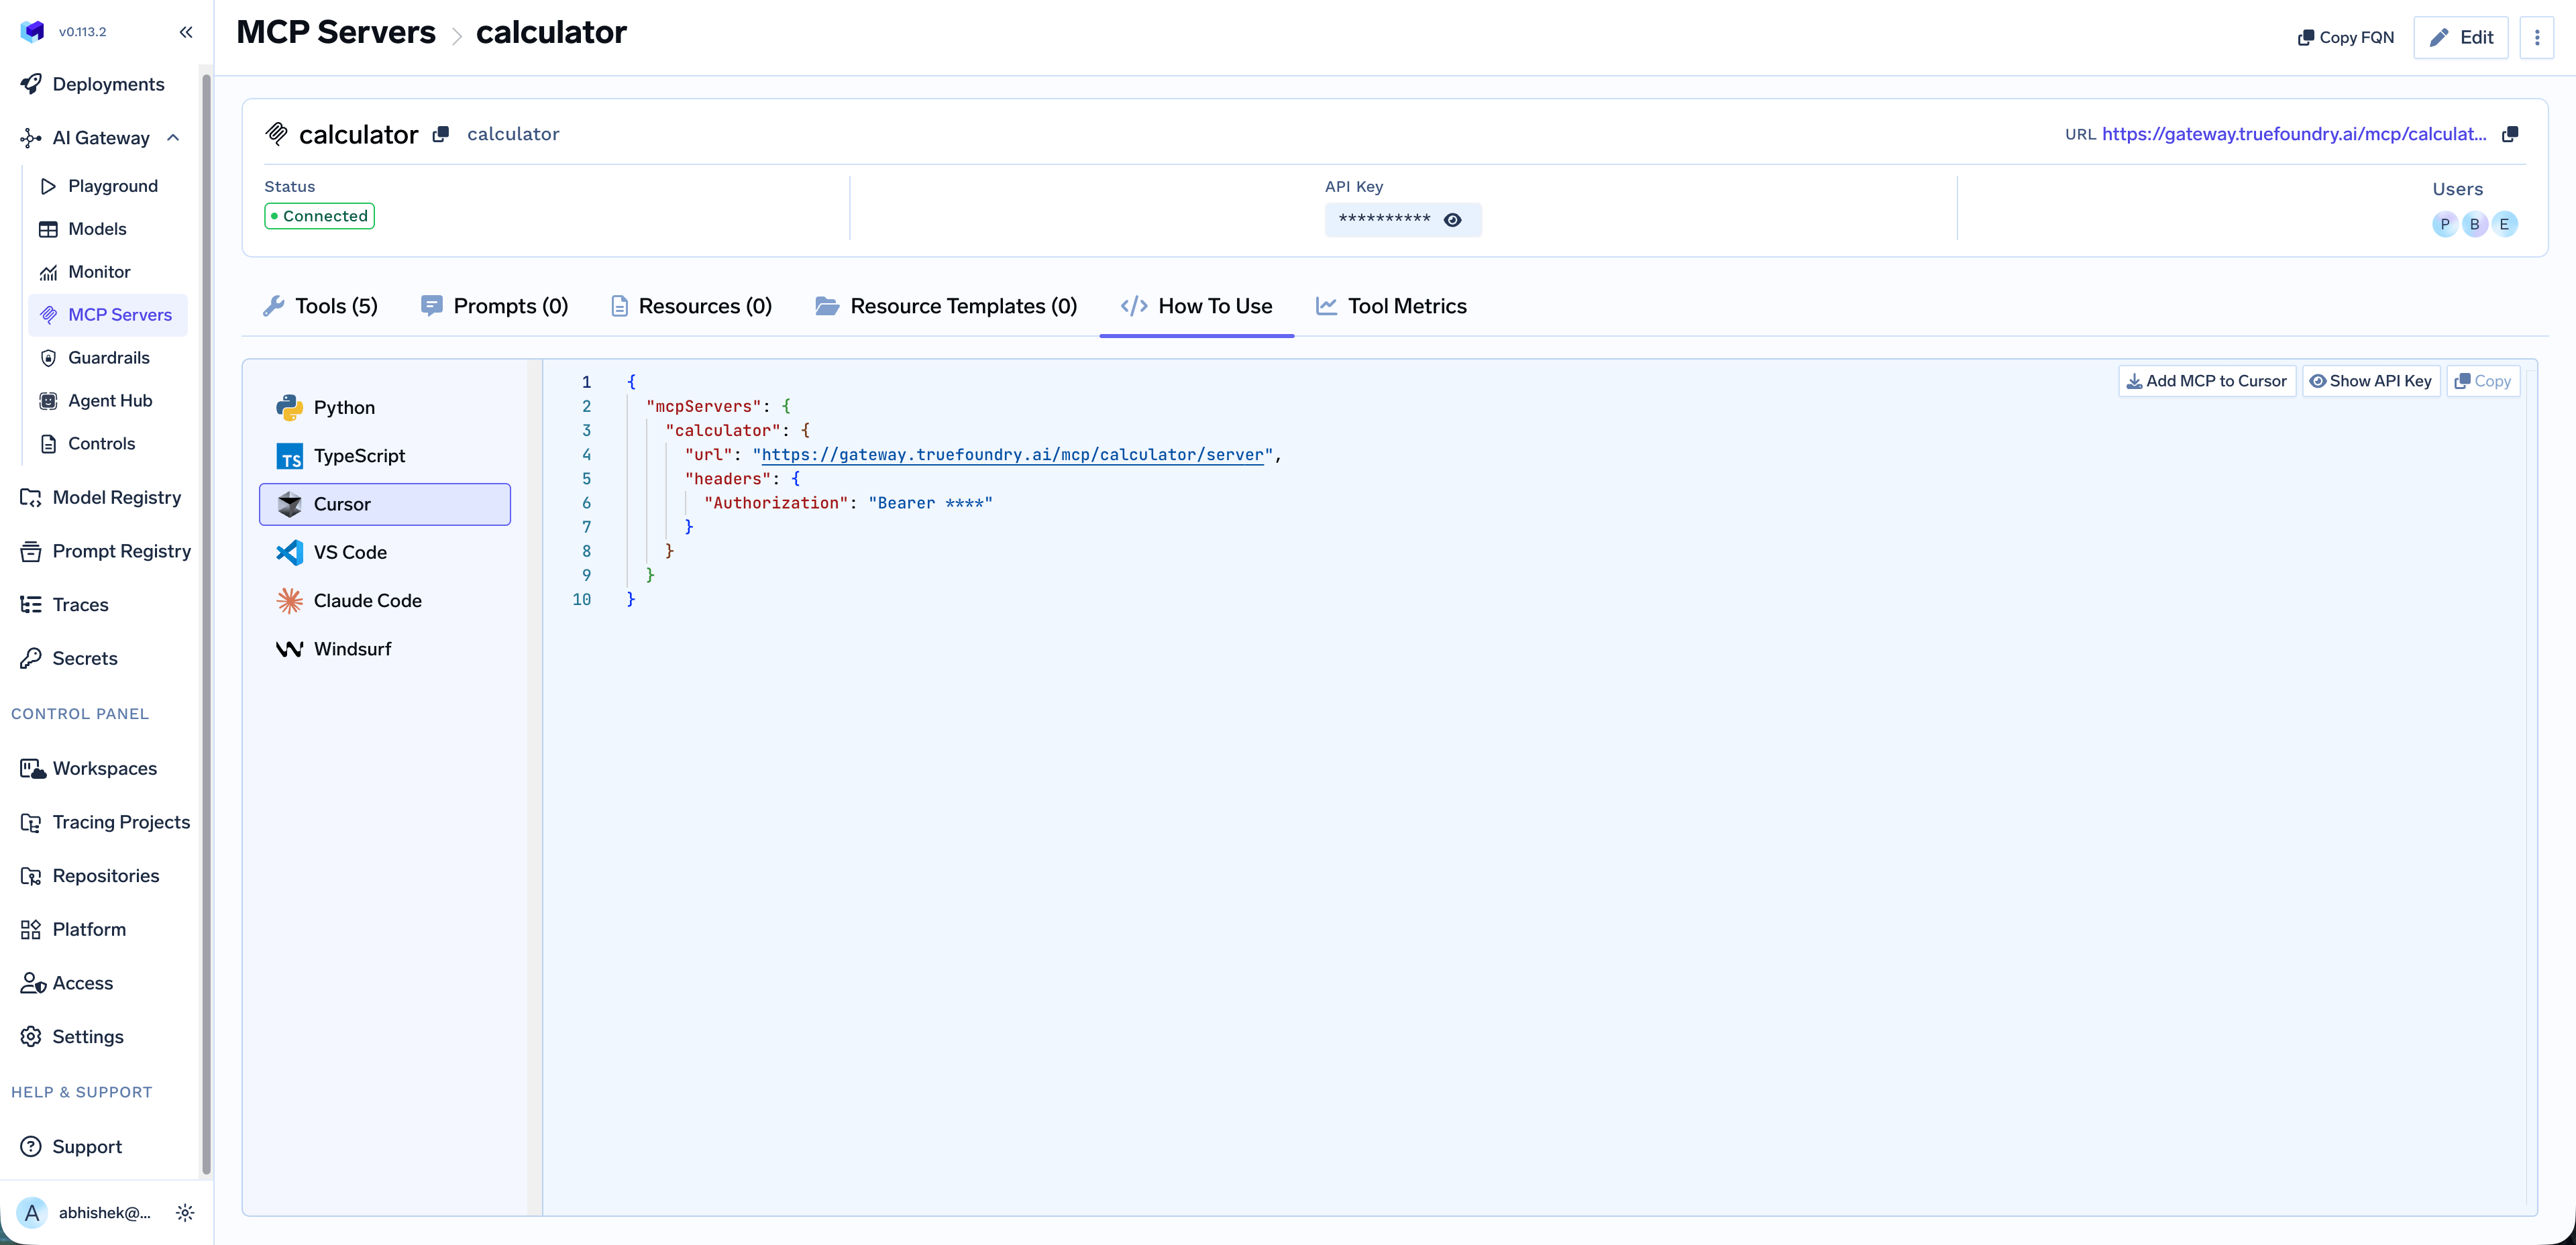 Use the **Add MCP to Cursor** button to automatically add the MCP server configuration to your Cursor IDE. You can also click **Show API Key** to reveal the full authorization token, or **Copy** to copy the configuration to your clipboard.
If no API key is shown in your code snippet, your version of the platform supports OAuth flow for obtaining the key. Cursor will automatically handle the OAuth flow when you use the MCP server.
You can select the MCP servers from the playground, select the tools and send your prompt to see which tools are being called.
***
## Debug MCP servers with MCP Inspector
MCP Inspector is an interactive tool for testing and debugging MCP servers over different transports. For a full feature overview, see the [MCP Inspector documentation](https://modelcontextprotocol.io/docs/tools/inspector).
### Install and run
Run the Inspector with `npx` (nothing to install globally):
```bash theme={"dark"}
npx @modelcontextprotocol/inspector
```
### Debug MCP OAuth issues
When an MCP server uses **OAuth2**, use the Inspector to verify that OAuth-based connectivity works before you troubleshoot clients or the playground.
After you start the Inspector with `npx @modelcontextprotocol/inspector`, click the **link** printed in the terminal (usually a local URL) to open the Inspector UI in your browser.
In the connection UI, choose the **transport** type and enter the MCP server **URL**.
Open **Auth Settings** in the Inspector so you can configure how this client authenticates to the MCP server.
Use **Quick OAuth Flow**. Press **Continue** and complete the OAuth prompts step by step. If this flow completes and you can list tools or call resources, OAuth-based MCP connectivity is working for that URL and configuration.
If OAuth works in the Inspector but fails in an IDE or agent, compare redirect URIs and allowed origins in your OAuth provider with the values documented for your MCP server. For gateway-side behavior, see [Authentication and Security](/docs/ai-gateway/mcp/mcp-gateway-auth-security).
Use the **Add MCP to Cursor** button to automatically add the MCP server configuration to your Cursor IDE. You can also click **Show API Key** to reveal the full authorization token, or **Copy** to copy the configuration to your clipboard.
If no API key is shown in your code snippet, your version of the platform supports OAuth flow for obtaining the key. Cursor will automatically handle the OAuth flow when you use the MCP server.
You can select the MCP servers from the playground, select the tools and send your prompt to see which tools are being called.
***
## Debug MCP servers with MCP Inspector
MCP Inspector is an interactive tool for testing and debugging MCP servers over different transports. For a full feature overview, see the [MCP Inspector documentation](https://modelcontextprotocol.io/docs/tools/inspector).
### Install and run
Run the Inspector with `npx` (nothing to install globally):
```bash theme={"dark"}
npx @modelcontextprotocol/inspector
```
### Debug MCP OAuth issues
When an MCP server uses **OAuth2**, use the Inspector to verify that OAuth-based connectivity works before you troubleshoot clients or the playground.
After you start the Inspector with `npx @modelcontextprotocol/inspector`, click the **link** printed in the terminal (usually a local URL) to open the Inspector UI in your browser.
In the connection UI, choose the **transport** type and enter the MCP server **URL**.
Open **Auth Settings** in the Inspector so you can configure how this client authenticates to the MCP server.
Use **Quick OAuth Flow**. Press **Continue** and complete the OAuth prompts step by step. If this flow completes and you can list tools or call resources, OAuth-based MCP connectivity is working for that URL and configuration.
If OAuth works in the Inspector but fails in an IDE or agent, compare redirect URIs and allowed origins in your OAuth provider with the values documented for your MCP server. For gateway-side behavior, see [Authentication and Security](/docs/ai-gateway/mcp/mcp-gateway-auth-security).